ESPHome has support for PMSx003 Air quality sensor (Particulate Measurements). The sensor only lasts for around 1 year of usage, but can be extended through the use of a sleep function. The only issue is that after the sleep it needs 30 seconds before the data is considered stable. Ideally I would like to be able to sleep the sensor for say 540 Seconds, Turn it on for 30 Seconds (while ignoring the data), then average for 30 Seconds sending data after this period. Variations of this could certainly still be usable, but the main point is getting it to sleep, wake up, ignore the data for the first 30 seconds then return data from the next thirty seconds.
To support the need for the usecase the pmsx003 data sheet has stated:
Stable data should be got at least 30 seconds after the sensor wakeup
from the sleep mode because of the fan’s performance.
I am now using the esphome sensor debounce functionality. It only gets me the last reading of the set (where i would rather average over some time) but should be workable for now.
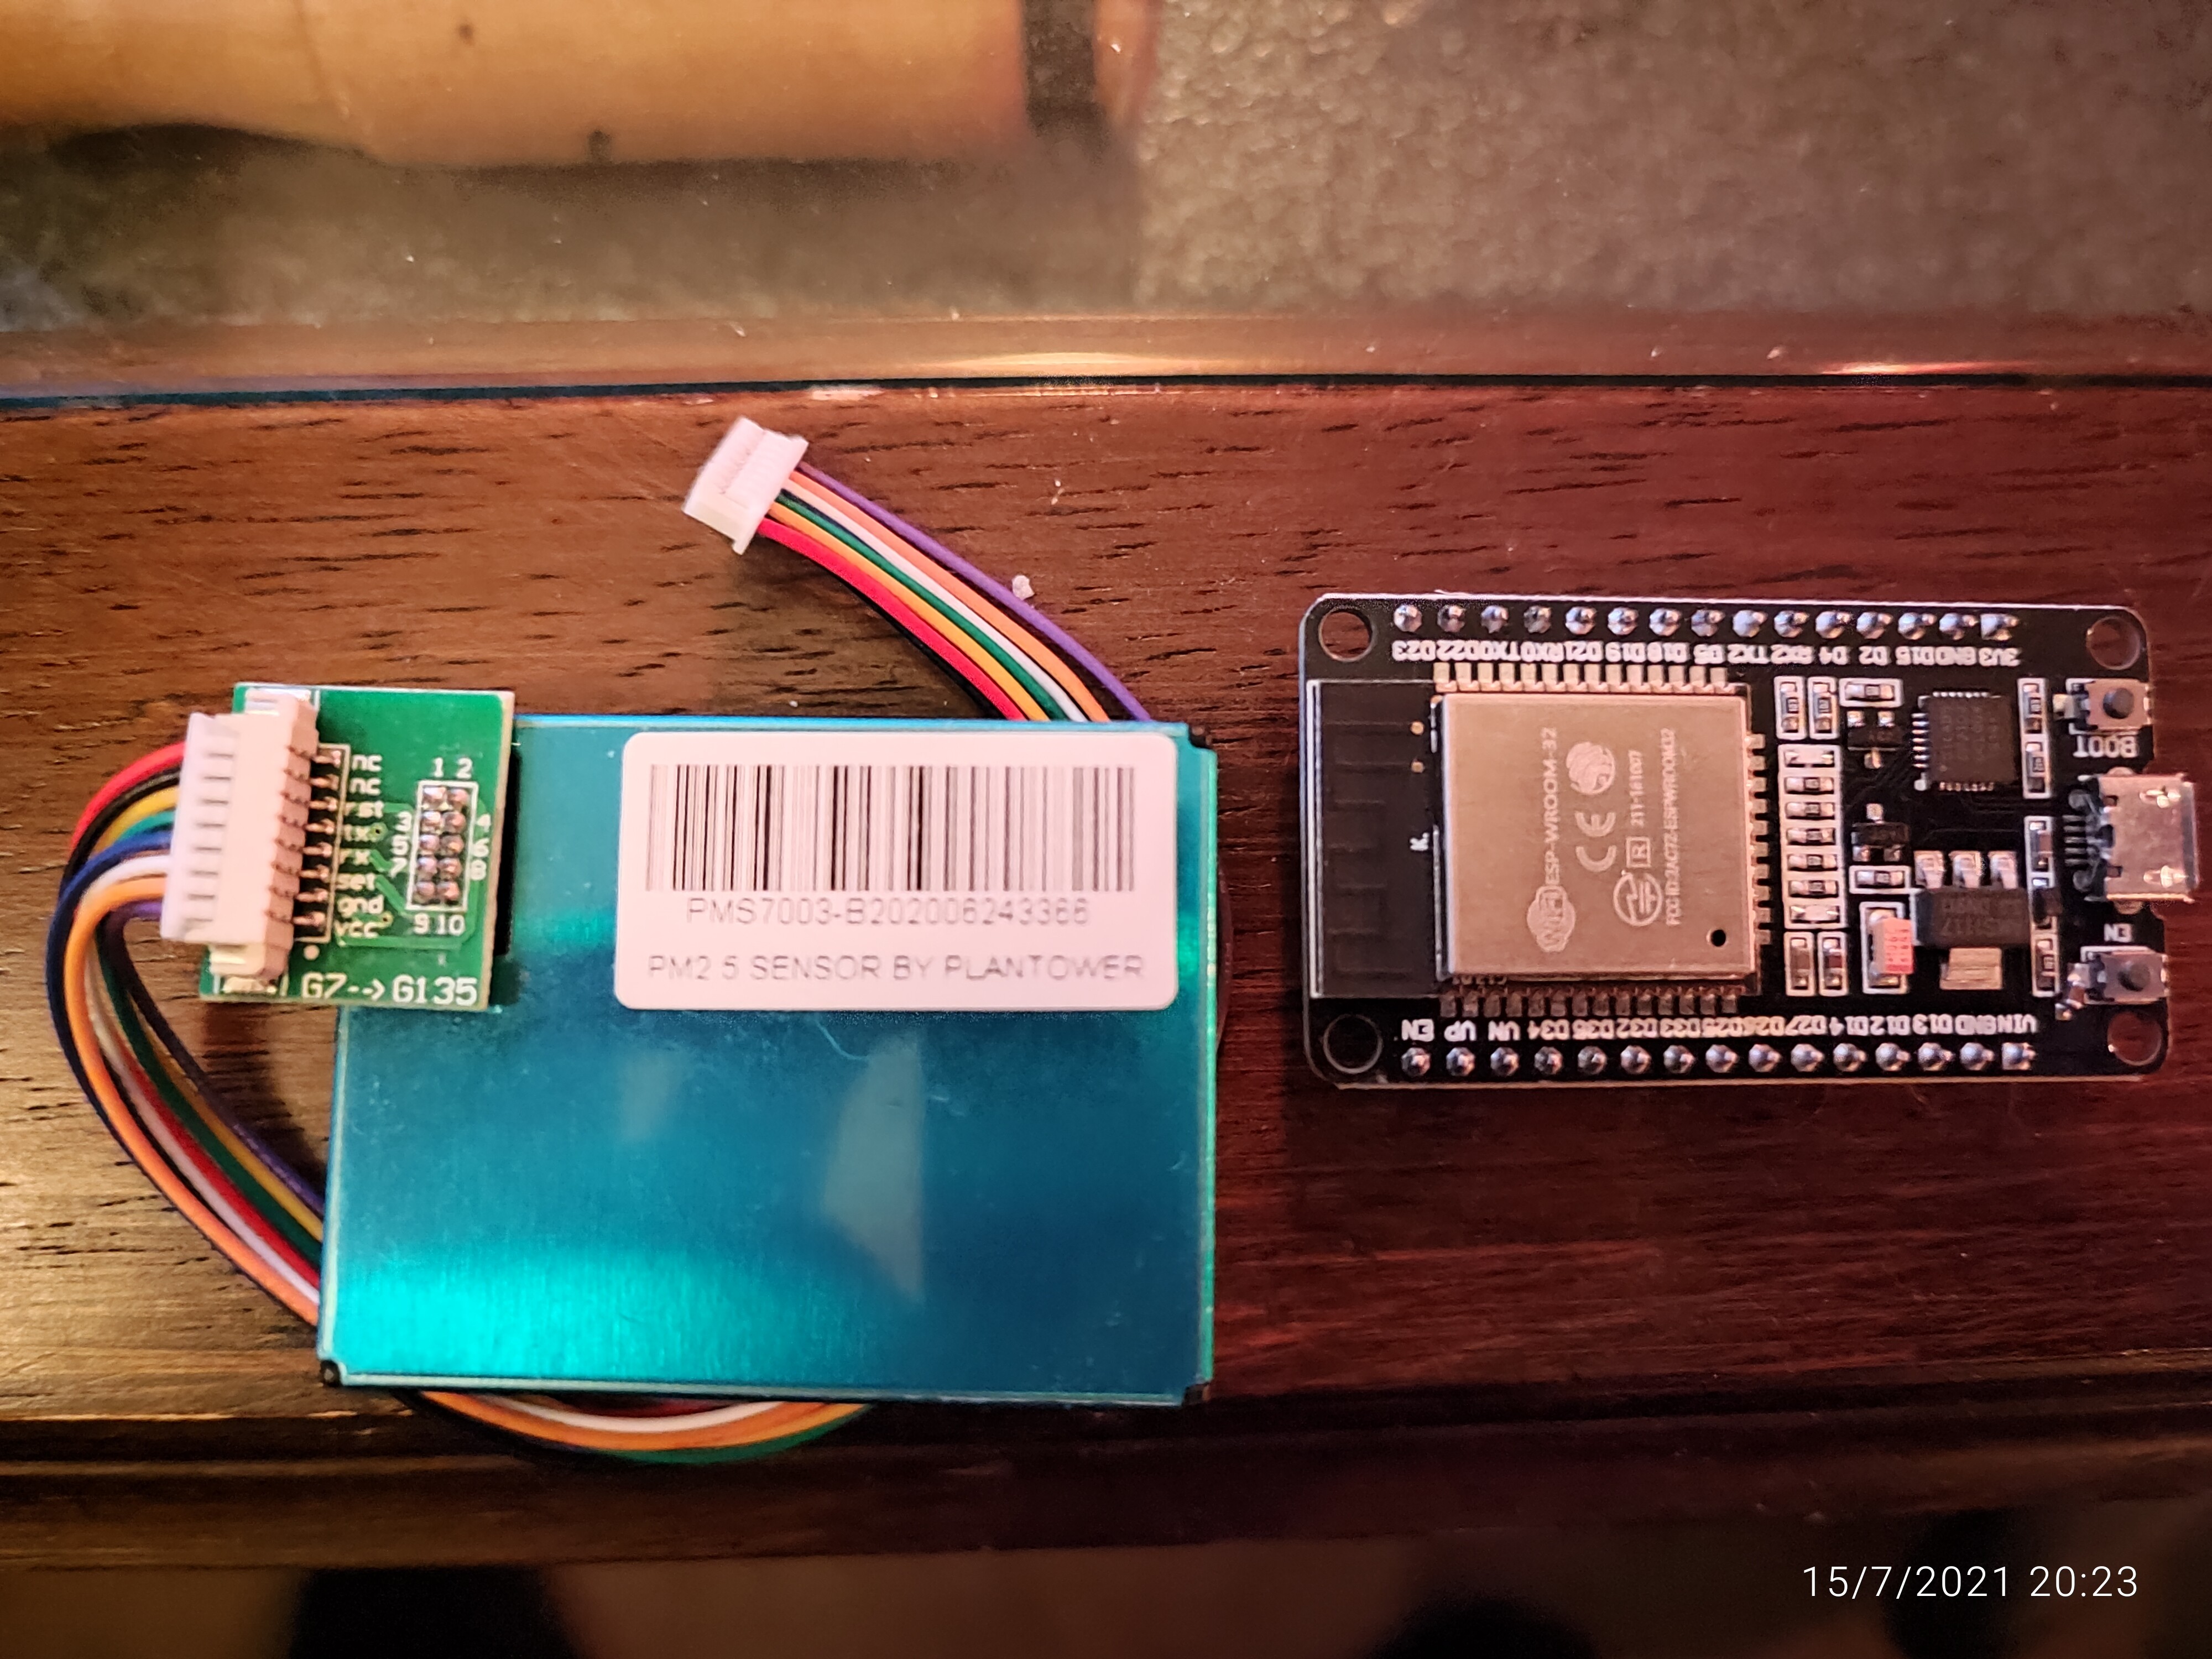
Rx and Tx are UART connections to the ESP board, the set pin is on a GPIO that is used to power down the device to save on the lifetime. I believe that the sensor is powered from 5v but communication is 3.3v levels.
I used the PMS5003 but may simply be the same interface.
I would post pictures but it not accessible for that.
Here is my esphome configuration. Note it is for a D1 mini so make sure you reference the board pinout for the proper pin names.
So for filtering, I found a way to dump the warm up period and do some more processing:
make another binary sensor that turns on 30secs after the PMS wakes up (pms_awake_and_warm)
create a template sensor (pm_2_5_cleaned) that returns the actual sensor value if the PMS is awake and warmed up, or returns it’s current value if not (note I think the ‘else’ can validly refer to itself like I’ve done, but I haven’t actually properly validated these calcs)
Add some more filters. I threw in a heartbeat followed by a moving average in order to try to fake a time-based moving average.
Note I don’t really know what I’m doing but seems to look reasonable… Pretty sure at least ditching the 30sec warm up is fine. Would like a better way to aggregate the sample periods (awake intervals) into one value.
uart:
  rx_pin: GPIO3
  baud_rate: 9600

#Useful thread https://github.com/esphome/feature-requests/issues/269

sensor:
#Wiring
#PMS7003  >> esp32doit-devkit-v1
  #VCC > VIN (5V)
  #GND > GND
  #TX > GPIO3 (RX)
  #SET > GPIO21 (or other GPIO. Controls sleep)

  - platform: pmsx003
    type: PMSX003
    pm_1_0:
      name: "PM <1.0µm"
    pm_2_5:
      name: "PM <2.5µm"
      id: pm_2_5 #add an id so you can use it below
    pm_10_0:
      name: "PM <2.5µm"


switch:
#Turns PMS sleep on and off.
  - platform: gpio
    pin:
      number: GPIO21
      inverted: no
    id: pms_set
    name: "PMS7003 is awake"

interval:
#Controls Sleep Interval by turning on/off above switch
  - interval: 180s
    then:
      - switch.turn_on: pms_set
      - delay: 60s
      - switch.turn_off: pms_set

#Take state from sleep/awake switch but adds 30sec lag, which is the 'warm-up period"  we want to discard
binary_sensor:
  - platform: template
    name: "PMS is awake and warm"
    id: pms_awake_and_warm
    lambda: |-
      if (id(pms_set).state) {
        return true;
      } else {
        return false;
      }
    filters:
      - delayed_on: 30s


  - platform: template
    name: "PM <2.5µm Cleaned"
    id: pm_2_5_cleaned
    lambda: |-
      if (id(pms_awake_and_warm).state) {
        return (id(pm_2_5).state);
      } else {
        return (id(pm_2_5_cleaned).state);
      }
    update_interval: 1s
    filters:
    #force a value every second (only)
    - heartbeat: 1s
    #Use last 10 values (seconds) in a moving average, and just push it out every 10 so we're not sending so much data.
    - sliding_window_moving_average:
        window_size: 10
        send_every: 10
        send_first_at: 10
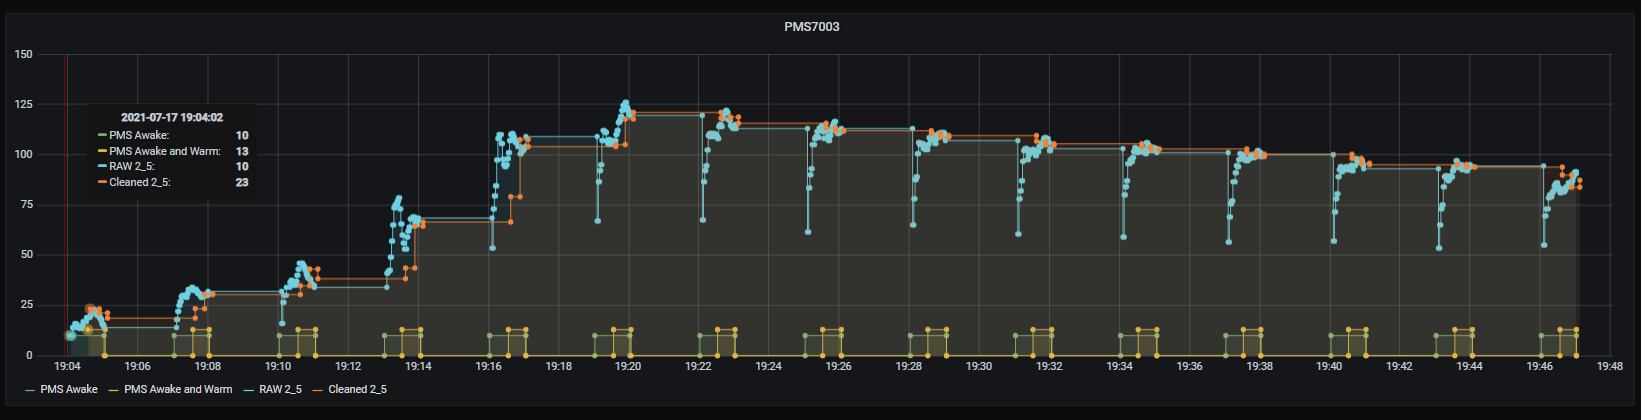
Here’s how my filtering looks across a period where 2.5 is increasing rapidly because I started cooking, then tailing off as smoke etc disperses.
Green indicates PMS is awake.
Blue is raw data from that period - you can see the ramp up during fan warm up pretty clearly (especially in the second half after I’ve finsished cooking).
Yellow indicates the period of data I am keeping (warm up ignored)
Orange is the final aggregated/smoothed data I’ll send/keep in HA.
I found that ESPHome has an option in templates to omit new sensor updates:
" return {}; if you don’t want to publish a new state (advanced)."
The result is that the sensor performs a sliding window of only valid readings, rather than “purging” the sliding window with stale values.
I am using your config from above, but just made one small change to the template sensor:
I removed the heartbeat
return {}; when the PMS is not warm
- platform: template
    name: "PM alt <2.5µm Concentration"
    id: pm_25_alt
    icon: mdi:chemical-weapon
    unit_of_measurement: "µg/m³"
    accuracy_decimals: 0
    lambda: |-
      if (id(pms_warm).state) {
        return (id(pm_25_raw).state);
      } else {
        return {};
      }
    update_interval: 1s
    filters:
    #force a value every second (only)
    # - heartbeat: 1s
    #Use last 10 values (seconds) in a moving average, and just push it out every 10 so we're not sending so much data.
    - sliding_window_moving_average:
        window_size: 10
        send_every: 10
        send_first_at: 10
I’ve got the same setup …. Pms5003 with a wemos d1 mini but can’t seem to get any readings from the sensor. I’m on my second sensor just to make sure it’s not because of the equipment.
When it is connected to power, am I supposed to hear an internal fan spinning up as it takes measurements? Or is there any indication of it being on?
thanks for confirmation … the pms5003 does not seem to power up; I don’t see/hear any movement at all.
I wonder if there’s an issue with the red breakout board …
You might check the jumpers are correct. Hard to tell given only the picture and perspective given. Also get a multimeter on them to verify they are as expected.
Yup, just did a check with multimeter and I think it was just the power that was loose. All is good now, only problem is that esphome didnt seem to like the sliding average function. I’m just messing around with it with the average function commented out.
When validating the code, I get “ Unable to find filter with the name ‘sliding_window_moving_average’ “
Thanks again for the assistance and the code provided here!
Edit: ok, after the initial 5 minutes where I was getting readings, now all I see are 0s or 1s. It spins up but doesn’t take much in terms of readings. I thought I read some experiences with this sensor that this essentially means it has crapped out ……
I’d check your connections again. I have two that have been running for around 1.5 years (1/10 duty cycle or so) with no sign of issues. Mine are all soldered though.
I took the breadboard out of the equation now – dupont wiring directly from the pins of the D1 mini directly to the pins on the PMS5003 breakout board. The sensor powers up, but again still reading 0s. Really hoping it’s not the breakout board …
I still had the backup sensor lying around so i tried that and same result. I think if it were a hardware problem, low chance that both are kaput? Definitely ‘user error’ on my part but not exactly sure what else could be wrong. Code i’m using is posted below for reference.
uart:
  rx_pin: D7 # This pin on the esp goes to the tx pin on the sensor
  baud_rate: 9600

sensor:
#Wiring
#PMS5003  >> esp8266 d1 mini
  #VCC > VIN (5V)
  #GND > GND
  #TX > D07 (rx_pin above)
  #SET > D06 (for Controlling sleep)

  - platform: pmsx003
    type: PMSX003
    pm_1_0:
      name: "PMS 1.0µm"
    pm_2_5:
      name: "PMS 2.5µm"
      #force_update: true
      id: pm_2_5 #add an id so you can use it below
    pm_10_0:
      name: "PMS 10.0µm"

switch:
#Turns PMS sleep on and off.
  - platform: gpio
    name: "PMS Awake"
    pin:
      number: D6  #Connect to the Set pin of the PMS air quality sensor
      inverted: no
    id: pms_set


interval:
#Controls Sleep Interval by turning on/off above switch
  - interval: 180s
    then:
      - switch.turn_on: pms_set
      - delay: 60s
      - switch.turn_off: pms_set

#Take state from sleep/awake switch but adds 30sec lag, which is the 'warm-up period"  we want to discard
binary_sensor:
  - platform: template
    name: "PMS Warm"
    id: pms_warm
    lambda: |-
      if (id(pms_set).state) {
        return true;
      } else {
        return false;
      }
    filters:
      - delayed_on: 30s

  - platform: template
    name: "PMS <2.5µm Cleaned"
    id: pm_2_5_cleaned
    lambda: |-
      if (id(pms_warm).state) {
        return (id(pm_2_5).state);
      } else {
        return {};
      }
    # update_interval: 1s
    # filters:
    # force a value every second (only)
    # - heartbeat: 1s
    # Use last 10 values (seconds) in a moving average, and just push it out every 10 so we're not sending so much data.
    #  - sliding_window_moving_average:
    #      window_size: 10
    #      send_every: 10
    #      send_first_at: 10
[09:11:38][D][sensor:124]: 'PMS 1.0µm': Sending state 0.00000 µg/m³ with 0 decimals of accuracy
[09:11:38][D][sensor:124]: 'PMS 2.5µm': Sending state 0.00000 µg/m³ with 0 decimals of accuracy
[09:11:38][D][sensor:124]: 'PMS 10.0µm': Sending state 0.00000 µg/m³ with 0 decimals of accuracy
[09:11:39][D][pmsx003:173]: Got PM1.0 Concentration: 0 µg/m^3, PM2.5 Concentration 0 µg/m^3, PM10.0 Concentration: 0 µg/m^3
[09:11:39][D][sensor:124]: 'PMS 1.0µm': Sending state 0.00000 µg/m³ with 0 decimals of accuracy
[09:11:39][D][sensor:124]: 'PMS 2.5µm': Sending state 0.00000 µg/m³ with 0 decimals of accuracy
[09:11:39][D][sensor:124]: 'PMS 10.0µm': Sending state 0.00000 µg/m³ with 0 decimals of accuracy
[09:11:40][D][pmsx003:173]: Got PM1.0 Concentration: 0 µg/m^3, PM2.5 Concentration 0 µg/m^3, PM10.0 Concentration: 0 µg/m^3
[09:11:40][D][sensor:124]: 'PMS 1.0µm': Sending state 0.00000 µg/m³ with 0 decimals of accuracy
[09:11:40][D][sensor:124]: 'PMS 2.5µm': Sending state 0.00000 µg/m³ with 0 decimals of accuracy
[09:11:40][D][sensor:124]: 'PMS 10.0µm': Sending state 0.00000 µg/m³ with 0 decimals of accuracy
[09:11:41][D][pmsx003:173]: Got PM1.0 Concentration: 0 µg/m^3, PM2.5 Concentration 0 µg/m^3, PM10.0 Concentration: 0 µg/m^3
[09:11:41][D][sensor:124]: 'PMS 1.0µm': Sending state 0.00000 µg/m³ with 0 decimals of accuracy
[09:11:41][D][sensor:124]: 'PMS 2.5µm': Sending state 0.00000 µg/m³ with 0 decimals of accuracy
[09:11:41][D][sensor:124]: 'PMS 10.0µm': Sending state 0.00000 µg/m³ with 0 decimals of accuracy
I gave that a go and i’m not sure it made much of a difference; I mean that I’m not convinced that the cooking is what caused the “blip”. The sensor was originally located in the middle of an unfinished basement where I was doing construction work. I don’t know if it would be able to pickup large dust particles … but after moving it to the kitchen when we were cooking … it still didn’t seem convincing.
I can’t really tell whether it’s just because of the “smoothing” of the graph that makes it look like there is variation in the readings, but all it is doing is just moving from 0 to 1 and back … the labels on the yaxis on the left is just 0 and 1.
Anyhow, I’ve given up on this project and decided to just pack it up
I got the same problem. It worked after it first turned on, but the values eventually went down to zero and never came back up. I can get it to blip up just a little bit if I literally blow some sawdust on it, but that’s it. 0 seems too low…
I ordered a new one in case this one is defective, but I’m afraid I’ll mess that one up too if it’s user error of some kind.
This is good, but have you checked whether your averages actually work the way you expect them to? I tried this but noticed my average slipping back 1 second every cycle until it started getting published as soon as the “warmed up” was set to true, meaning it was using values from the previous cycle to calculate the first average.
This is because the window_size of the moving average gets desynced from the delay of the interval and the delayed_on of the “warmed up” sensor. The window_size is a number of samples, and the delay and delayed_on are seconds. The number of samples is not exactly 1 per second, so eventually it drifts. I wonder if there’s a way to do a sliding average over a number of seconds instead of a number of samples.