Hi folks,
So been playing with my set up (never happy lol) and after using ESXi 6.7 for a bit, I moved to Proxmox as its super light and very easy to use.
I now have a small formfactor PC with 32Gb RAM, i7 7700k, Asus Strix Z270G Motherboard, 1050Ti low profile GPU and a SFX PSU.
Meaning I now have 3 VMs with docker containers on top
- CoreServices = Z2M, MQTT, mySQL, glances etc
- HA
- cctv = zoneminder (OR Shinobi + Deepstack) - i’m now testing both with GPU as deepstack is now 100% free!!
There are a few steps in this i’ll take you through:
0. Assuming you have proxmox installed already (if not a good guide here)
- BIOS
- Proxmox host config steps
- Creation of VM
- VM config
- Test
1. BIOS
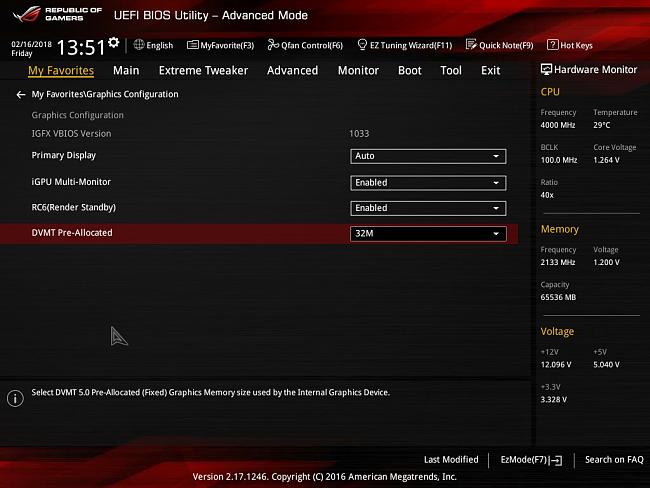
I cannot stress enough how important this is as basically virtualisation wont work if you don’t get this right.
I had to enable 4 things
a. Virualisation = enabled (this is usually on the CPU settings when in advanced settings)
b. vT-d = enabled (this on the Asus Mobos is located under SA or System Agent)
c. iGPU multi-monitor = enabled (located under the Graphics section of the SA page)

d. Primary monitor = onboard or CPU (don’t select GPU here)
Now Boot into the system normally
2. Proxmox Host Config
This part look more complex than it is, the best guide I found is this one
**STOP**
BEFORE CONTINUING OPEN AND READ THE GUIDE ABOVE!
Make sure to update-grub, and update-initramfs -u when asked to and finally reboot once completed
I used Ubuntu Server as my base OS for my VMs and ONLY enable SSH server as part of the process. I install docker manually afterwards. Make sure you have the ubuntu server iso image on your local storage of the proxmox host. This can be done via the GUI.
Top left select “Folder View” in the drop down, and look for local storage.
Select that and then select Content. Here you can upload the iso.
3. VM creation
Now be SURE to follow the VM set up info in the guide above, ensuring:
machine type = q35
BIOS = OVMF (UEFI)
And then once installed power down the VM and add the args and cpu flags as per the guide by accessing the VM config on the proxmox host console with your VM_ID:
nano /etc/pve/qemu-server/<VM_ID>.conf
Then in the hardware tab of the VM add the PCI device and your GPU (top one usually as the other are audio devices or other things)
Then boot up the VM 
NOTE if you have a scrambled screen (like a worn out CRT monitor) switch the Hardware for the display of the VM from default to VirtIO-GPU (virtio)
4. VM configuration
Once the VM is up and running you can now get the GPU running in the VM.
first test the GPU is present by running
lspci | grep "VGA"
and you should see your GPU.
Next test to review the state of the drivers
nvidia-smi
at this point (assuming you havent jumped ahead) you should get a message saying communication with the device is not possible, meaning you need to install the drivers).
Purists may want to do this manually, but I always found it a massive faff so I use the autoinstall. Run the following (as per this guide)
sudo apt install ubuntu-drivers-common
then
sudo ubuntu-drivers
check to see the recommended drivers (probably something like 440 at time of writing)
you can install manually, or if you want to proceed with the recommended tools and drivers:
sudo ubuntu-drivers autoinstall
Now at this point be sure to reboot your VM to ensure everything has had a chance to load up properly.
We can now test again
nvidia-smi
This time you should see this:
There are a number of reasons why you may not, including:
- Motherboard BIOS settings may need extra exploration
- Proxmox Config may need additional flags listed in the guide above.
If you do see this GREAT NEWS GPU is now functioning in the VM OS. Next stage is preparing for docker container usage. Good news is that CUDA and a bunch of nvidia stuff is already included in docker now, so all you need is the nvidia-container-toolkit. Based on this guide here is how to install it. First add the repo:
distribution=$(. /etc/os-release;echo $ID$VERSION_ID)
curl -s -L https://nvidia.github.io/nvidia-docker/gpgkey | sudo apt-key add -
curl -s -L https://nvidia.github.io/nvidia-docker/$distribution/nvidia-docker.list | sudo tee /etc/apt/sources.list.d/nvidia-docker.list
Now you can update and install:
sudo apt-get update && sudo apt-get install -y nvidia-container-toolkit
Finally restart docker:
sudo systemctl restart docker
5. test
Now the fun part, test.
simply run
sudo docker run --gpus all nvidia/cuda:10.0-base nvidia-smi
and you should see the same output as above. As nothing is using the GPU the container will shutdown.
Congratulations! At this point you are now able to add gpu flag to your docker container for use with Object Vision or maybe even Plex hardware transcoding 


