Proxmox GPU passthrough for GPU docker object vision or Plex transcoding

Hi folks,
So been playing with my set up (never happy lol) and after using ESXi 6.7 for a bit, I moved to Proxmox as its super light and very easy to use.

I now have a small formfactor PC with 32Gb RAM, i7 7700k, Asus Strix Z270G Motherboard, 1050Ti low profile GPU and a SFX PSU.

Meaning I now have 3 VMs with docker containers on top

  1. CoreServices = Z2M, MQTT, mySQL, glances etc
  2. HA
  3. cctv = zoneminder (OR Shinobi + Deepstack) - i’m now testing both with GPU as deepstack is now 100% free!!

There are a few steps in this i’ll take you through:
0. Assuming you have proxmox installed already (if not a good guide here)

  1. BIOS
  2. Proxmox host config steps
  3. Creation of VM
  4. VM config
  5. Test

1. BIOS
I cannot stress enough how important this is as basically virtualisation wont work if you don’t get this right.
I had to enable 4 things
a. Virualisation = enabled (this is usually on the CPU settings when in advanced settings)
b. vT-d = enabled (this on the Asus Mobos is located under SA or System Agent)


c. iGPU multi-monitor = enabled (located under the Graphics section of the SA page)
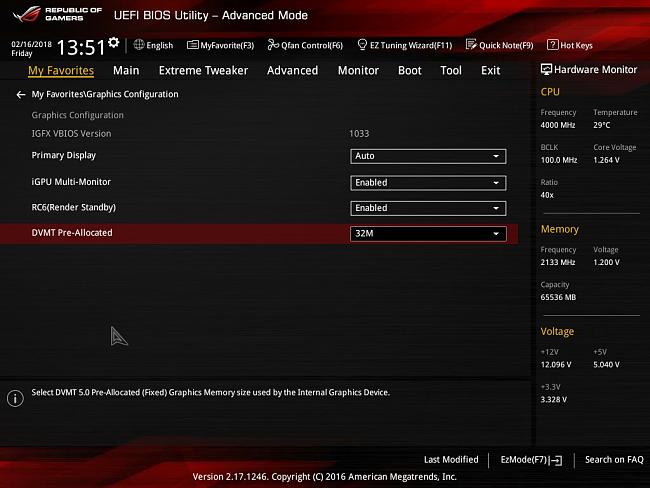
vt-d
d. Primary monitor = onboard or CPU (don’t select GPU here)
Now Boot into the system normally

2. Proxmox Host Config
This part look more complex than it is, the best guide I found is this one


                                              **STOP**

BEFORE CONTINUING OPEN AND READ THE GUIDE ABOVE!

Make sure to update-grub, and update-initramfs -u when asked to and finally reboot once completed

I used Ubuntu Server as my base OS for my VMs and ONLY enable SSH server as part of the process. I install docker manually afterwards. Make sure you have the ubuntu server iso image on your local storage of the proxmox host. This can be done via the GUI.
Top left select “Folder View” in the drop down, and look for local storage.
Select that and then select Content. Here you can upload the iso.

3. VM creation
Now be SURE to follow the VM set up info in the guide above, ensuring:
machine type = q35
BIOS = OVMF (UEFI)

And then once installed power down the VM and add the args and cpu flags as per the guide by accessing the VM config on the proxmox host console with your VM_ID:

nano /etc/pve/qemu-server/<VM_ID>.conf

Then in the hardware tab of the VM add the PCI device and your GPU (top one usually as the other are audio devices or other things)

Then boot up the VM :slight_smile:
NOTE if you have a scrambled screen (like a worn out CRT monitor) switch the Hardware for the display of the VM from default to VirtIO-GPU (virtio)

4. VM configuration
Once the VM is up and running you can now get the GPU running in the VM.
first test the GPU is present by running

lspci | grep "VGA"

and you should see your GPU.

Next test to review the state of the drivers

nvidia-smi

at this point (assuming you havent jumped ahead) you should get a message saying communication with the device is not possible, meaning you need to install the drivers).
Purists may want to do this manually, but I always found it a massive faff so I use the autoinstall. Run the following (as per this guide)

sudo apt install ubuntu-drivers-common

then

sudo ubuntu-drivers

check to see the recommended drivers (probably something like 440 at time of writing)
you can install manually, or if you want to proceed with the recommended tools and drivers:

sudo ubuntu-drivers autoinstall

Now at this point be sure to reboot your VM to ensure everything has had a chance to load up properly.
We can now test again

nvidia-smi

This time you should see this:

There are a number of reasons why you may not, including:

  1. Motherboard BIOS settings may need extra exploration
  2. Proxmox Config may need additional flags listed in the guide above.

If you do see this GREAT NEWS GPU is now functioning in the VM OS. Next stage is preparing for docker container usage. Good news is that CUDA and a bunch of nvidia stuff is already included in docker now, so all you need is the nvidia-container-toolkit. Based on this guide here is how to install it. First add the repo:

distribution=$(. /etc/os-release;echo $ID$VERSION_ID)
curl -s -L https://nvidia.github.io/nvidia-docker/gpgkey | sudo apt-key add -
curl -s -L https://nvidia.github.io/nvidia-docker/$distribution/nvidia-docker.list | sudo tee /etc/apt/sources.list.d/nvidia-docker.list

Now you can update and install:

sudo apt-get update && sudo apt-get install -y nvidia-container-toolkit

Finally restart docker:

sudo systemctl restart docker

5. test
Now the fun part, test.

simply run

sudo docker run --gpus all nvidia/cuda:10.0-base nvidia-smi

and you should see the same output as above. As nothing is using the GPU the container will shutdown.

Congratulations! At this point you are now able to add gpu flag to your docker container for use with Object Vision or maybe even Plex hardware transcoding :slight_smile:

3 Likes

Got the email about deepstack becoming free today and was realy happy! I’m not running any virtualization on top and I have my GPU installed and ready to use with docker, only been waiting for deepstack (or anything else) to be free with GPU support.

Please feel free to update on your progress on using it for your cctv setup! I’m running motioneye at the moment, but had to limit my 8MP cameras to 1080p resolution since it’s eating up the CPU. I’m hoping that they will add GPU support to motioneye, if not I’ll have to give shinobi another go!

But the deepstack part is on the todo list now!

i’m just in the process of building the opencv addon part of Zoneminder.
Whilst I prefer Shinobi UI, having Zoneminder docker (built by @dlandon - HUGE thanks for your work) with the hooks and object detection built in to the workflow seems a little easier.

Previously with Shinobi and Deepstack there was a fair amount of set up of automation or Node-Red to get the snapshot scanned and then the output decision, and back & forth between the systems.

  1. Motion was detected in Shinobi - send GET http picked up by Node-Red
  2. Node-Red calls HA to grab an image from the camera and save it somewhere
  3. Node-Red calls HA to process the image
  4. Node-Red observes the object numbers of the images scanned (say if person >0 or +1)
    (4.5 check value has just increased, ie did trees move and car is still in the drive vs new car appearing)
  5. Node-Red tells HA to send notification with saved snapshot image

Zoneminder effectively is the end-to-end process.
1.ZM - Motion Detected (User specific zones, and sensitivity)
2. ZM - Check for object (specify objects globally or per camera - ie look for cars outside not inside lol)
3. ZM - If object is present send MQTT msg
(3.5 ZM also checks if object was previously there - ie new car or same car and the tree moved)
4. Node-Red picks up MQTT and use Event image and send image alert (parse out JSON for event ID and use ZM url) via HA

More info on the Zoneminder docker container here:

If you follow the guide in the first post and install the docker below WITH the gpu flag, you will know its worked successfully if you enter the docker and check:

docker exec -it zoneminder /bin/bash

Then check nvidia-smi again

nvidia-smi

you should see a similar result as previous.

My docker command:

docker run -d --name="zoneminder" \
--net="bridge" \
--gpus="all" \
--privileged="true" \
-p 8080:80/tcp \
-p 9000:9000/tcp \
-e TZ="America/Los_Angeles" \
-e SHMEM="50%" \
-e PUID="1000" \
-e PGID="1000" \
-e INSTALL_HOOK="1" \
-e INSTALL_FACE="1" \
-e INSTALL_TINY_YOLO="0" \
-e INSTALL_YOLO="1" \
-v "/<path>/<to>/docker/zoneminder/config":"/config":rw \
-v "/<path>/<to>/docker/zoneminder/data":"/var/cache/zoneminder":rw \
dlandon/zoneminder:latest

Be sure to change /<path>/<to>/docker/zoneminder/config to your directory!

The instructions are pretty clear to get the docker running with GPU support.

Download 4 files (note I have the nvidia 440 drivers) & copy them to /config/opencv/
(You need to register for an nvidia developer account)

  1. CUDNN Runtime = libcudnn7_7.6.5.32-1+cuda10.2_amd64.deb
  2. CUDNN Dev = libcudnn7-dev_7.6.5.32-1+cuda10.2_amd64.deb
  3. CUDA tools package = cuda-repo-ubuntu1804-10-2-local-10.2.89-440.33.01_1.0-1_amd64.deb
    I used:
wget https://developer.download.nvidia.com/compute/cuda/repos/ubuntu1804/x86_64/cuda-ubuntu1804.pin
  1. CUDA PIN = cuda-ubuntu1804.pin
    I used:
wget http://developer.download.nvidia.com/compute/cuda/10.2/Prod/local_installers/cuda-repo-ubuntu1804-10-2-local-10.2.89-440.33.01_1.0-1_amd64.deb

to start the build you then need to run

./opencv.sh

This will validate each step before the (potentially) hour long build of opencv.
NOTE if the build fails for any reason you will need to stop, remove and rebuild the docker container before you can run opencv.sh again

Once it builds you have a GPU enabled object vision docker inspecting your camera events :slight_smile:

Now on to set up zoneminder if you havent already (I wont be covering that here unless there is interest)

  1. Zones for each monitor
  2. Configure ZM to use EventServer
  3. hooks to use
  4. Object vision specifics (which classes to look for, ignore previously detected things etc etc)
  5. Zoneminder HA integration

It may look a little daunting but dlandon has done an excellent job of giving examples in the config.ini files you need to customize.

1 Like

awesome info mate! I were running ZM before, but moved to motioneye because it seemd like a dead product. Might need to give it another try now…

Do you have wifi ip cameras in zoneminder. I have about 4 ip wifi cameras and when zm is running, my 2.4gh wifi is flooded to almost being unusable. I am wondering if you experience the same?

what resolution are you running them at?
we need better res for our eyes that AI does for processing :slight_smile:

I have 1 wifi the rest are wired though (but i also have 3 Unifi AC-AP Pros so that helps with all my wifi tech) - if you are using a single router you will likley have issues

I dont believe its just my router. I have 2 routers that I used to test. When the cameras and zoneminder was running, it wrecked both routers 2.4gh bands. If I stop the zoneminder container, everything is fixed. 5g is unaffected. Streaming at 1080p with rtsp. Tried moving the routers to different places as well.

Thanks a lot for the guideJamie! just finished the build with GPU support! What are you using for options in ZM for the camera and FFMPEG?

i didnt use hardware accel on the cameras actually - just keeping that for the object vision.
Check the Zoneminder forums they will prob have some good input

Did a little detour with blueiris since I couldn’t get hwaccel working for the cameras, I saw that you mentioned that you were trying out deepstack, how did you get the GPU activation key? When I try to activate my deepstack server it says “GPU version requires premium key”

Tried to upgrade my subscription but I can’t without paying, and I thought it were supposed to be free nowadays

apparently the new dockers should have that all sorted. Check out this thread: