Hey everyone! ![]()
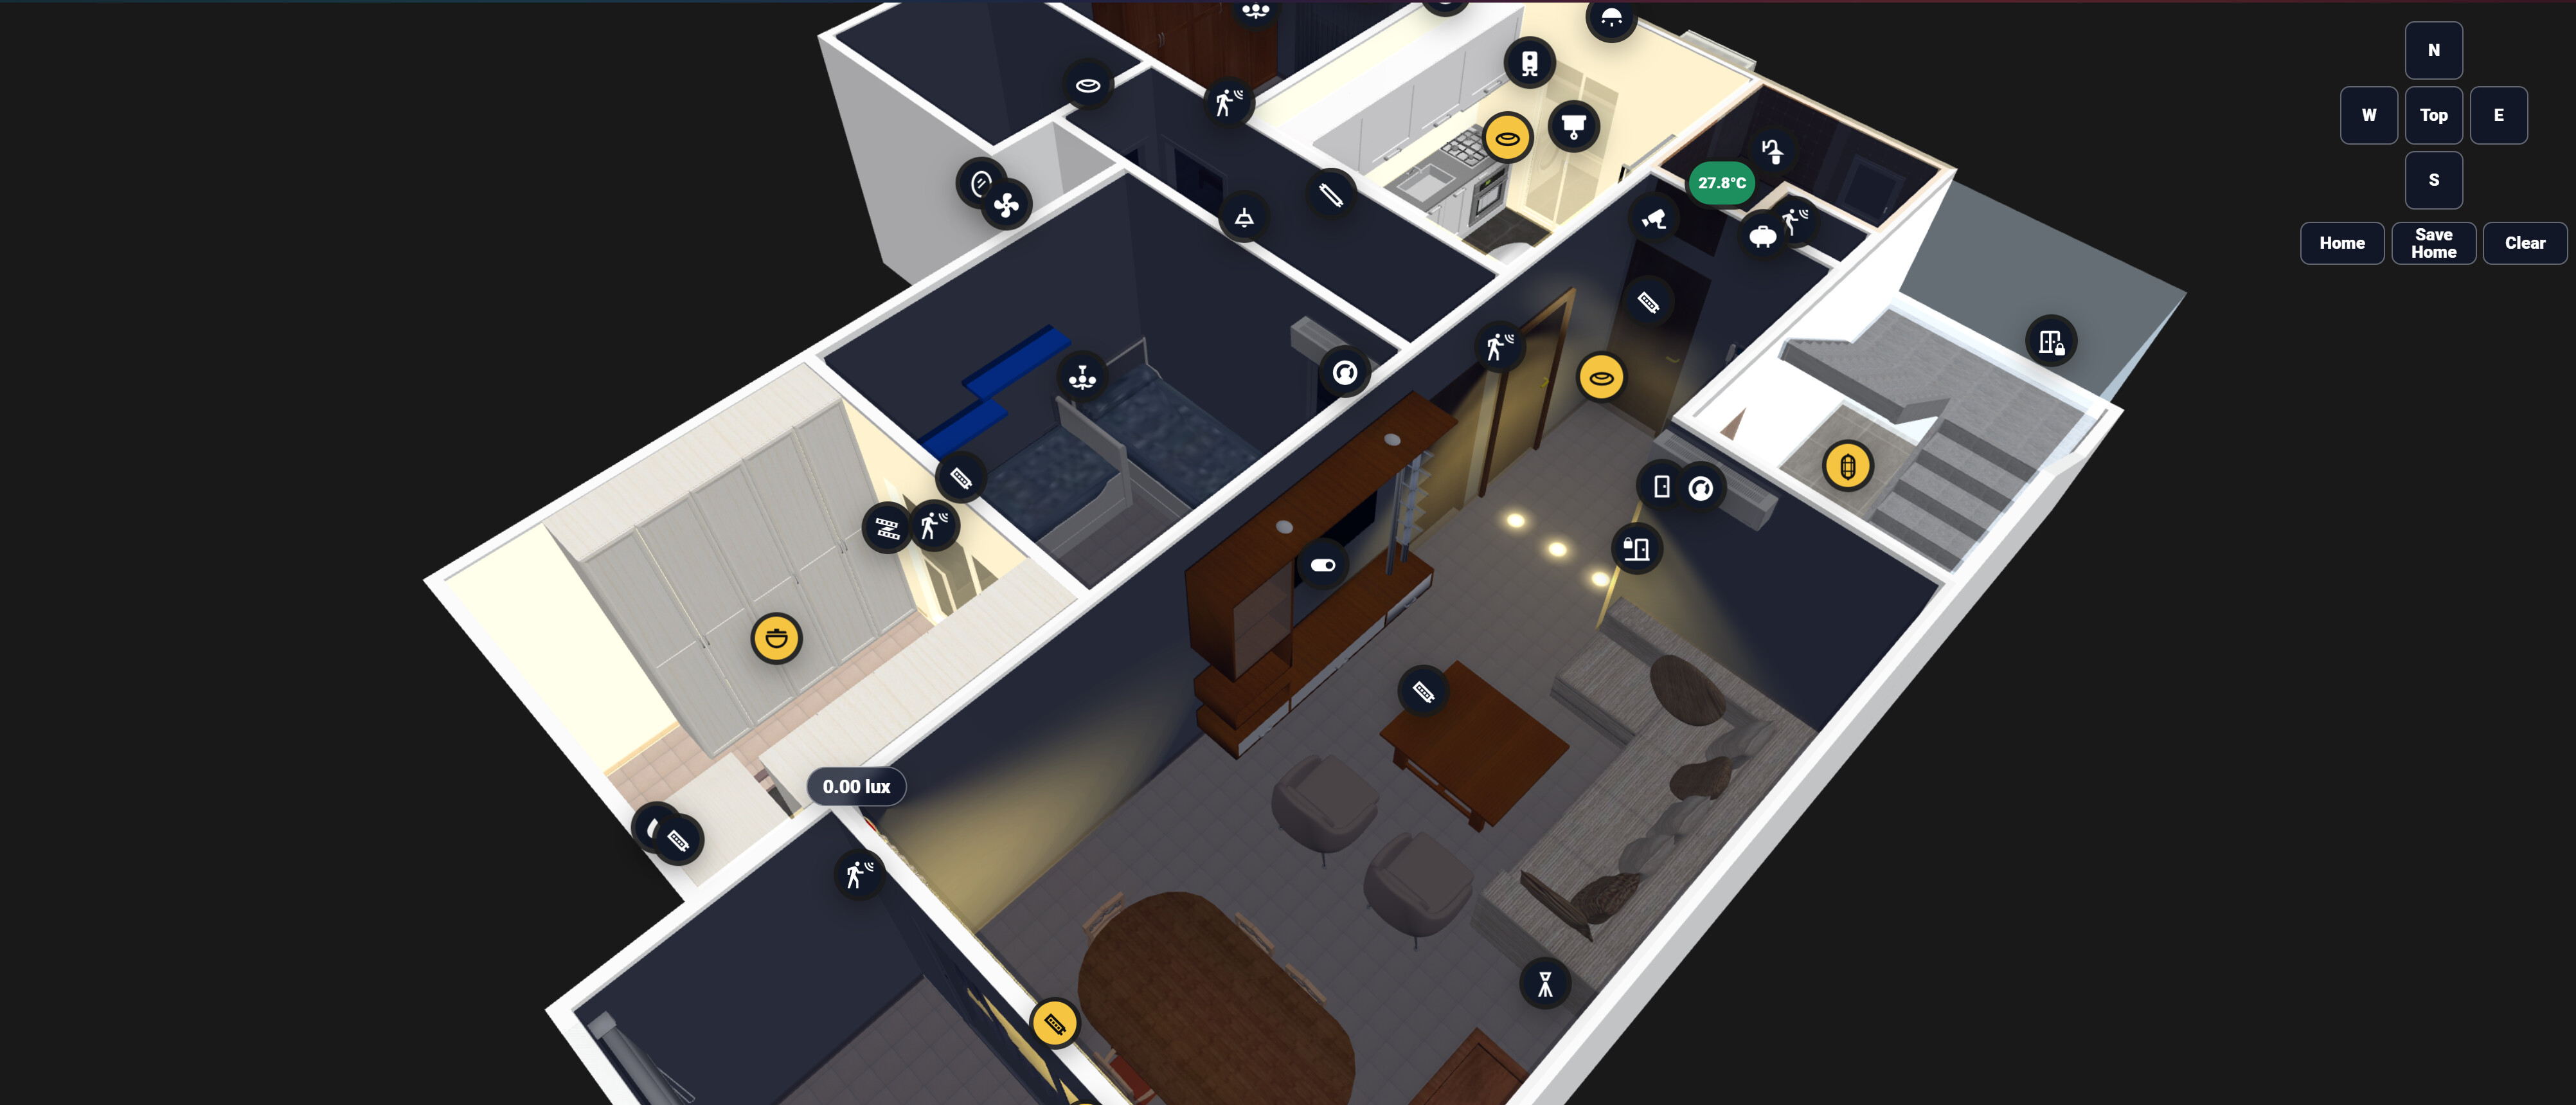
I've been working on a Lovelace custom card that brings a fully interactive 3D floorplan directly into Home Assistant - with real-time entity markers, room-level lighting simulation, and a complete edit workflow that lives entirely inside your dashboard. No external apps, no cloud service, no Blender skills required at runtime.
 What Is It?
Drop in a .glb 3D model of your home (exported from Sweet Home 3D ![]() Blender, or any 3D tool), and the card renders it live inside a Lovelace card. Every Home Assistant entity can be placed as a marker directly on the model surface. Lights, sensors, switches, cameras, locks - anything.
Blender, or any 3D tool), and the card renders it live inside a Lovelace card. Every Home Assistant entity can be placed as a marker directly on the model surface. Lights, sensors, switches, cameras, locks - anything.
The whole setup workflow happens inside Home Assistant's Edit Mode. You never leave the dashboard.
 Key Features
 100% Offline - No External Dependencies
The 3D model loads from your local /www/ folder. Three.js can be bundled locally too. Once set up, it works completely offline - no calls to external APIs, no cloud rendering, no latency.
 Drag, Drop & Place Markers
Switch to Edit Mode, click any entity in the sidebar, then click the exact point on the 3D model to drop the marker. Need to fine-tune? Drag it to a new position or type in exact X/Y/Z coordinates. Everything auto-saves to your browser and exports as clean YAML you paste into your card config.
 Two Lighting Render Modes Per Room
You define Brightness Zones by drawing a polygon around each room on the model floor. Each zone picks one of two render modes:
Area Mode - One large soft ambient glow fills the whole room floor uniformly. Perfect for rooms where you don't need per-fixture accuracy - just a warm realistic room glow that reacts to your lights being on or off.
Positional Mode - This is where it gets serious. Each light entity placed inside the zone renders its own:
- Floor light pool (clipped to the room polygon - no bleed through walls)
- Wall glow with type-accurate falloff
- Ceiling glow
- GI (Global Illumination) bounce - a secondary soft fill simulating light bouncing off the floor
 Four Light Types - Each Renders Differently
| Type | Real-World Equivalent |
|---|---|
| Spot | Ceiling downlight - renders a cone on the wall, bright floor hotspot, supports tilt X/Y to aim off-center |
| Cove | Indirect trough lighting - top-heavy wall wash that fades downward, soft uniform floor fill |
| Linear | LED strip - elongated floor pool, wall wash follows the drawn strip path |
| Lamp | Floor or table lamp - tight pool, soft outward wall glow |
 Advanced Render Parameters - 18 Knobs Per Light
Every light has a full parameter panel with live preview:
- Core: intensity, distance, decay
- Light shape: cone angle, penumbra, tilt, strip width/height
- Floor pool: hotspot size, saturation, outer scatter radius, GI bounce brightness/radius/warmth
- Wall glow: intensity, height coverage, vertical shift (raise or lower the wash on the wall)
Hover any parameter to see a tooltip explaining what it does and which light types it's most effective on.
Save your favorite tweaks as named presets that survive JavaScript updates (stored in localStorage + exported in YAML). Export parameters to a .json file and import them on another light.
 Light Paths for Strips and Cove Lighting
For Linear and Cove lights, draw the exact path of your LED strip on the model surface. Or use the Rectangle mode - set width, depth, and rotation and the card auto-generates a closed rectangular cove loop from a single center point.
✦ Sub-spots
A single HA light entity can control multiple rendered spot positions (sub-spots). Perfect for a group of ceiling spots wired to one switch - each renders its own cone and floor pool independently.
 Polygon-Clipped Rendering
All floor pools, ceiling glows, and GI bounce meshes are geometrically clipped to the room boundary. Light never bleeds through walls into the next room, no matter how large the pool radius.
 Illuminance Sensor Integration
Link a lux sensor to any zone. Low lux = room looks dark. At 300 lux it reaches your day shade. Above that it fades toward zero. Falls back to sun.sun if no sensor.
 Multi-Floor Support
Multiple floors, each with its own .glb model, marker layout, and zones.
 Install
Option 1 - HACS (Recommended)
Via hacs with custom repo URL: https://github.com/Hollako/Home-Assistant-3D-Floorplan
Option 2 - Manual
Download Home-Assistant-3D-Floorplan.js from the latest release and place it in /config/www/.
Then add the resource in Settings → Dashboards → Resources:
url: /local/Home-Assistant-3D-Floorplan.js
type: module
Card Configuration
type: custom:home-assistant-3d-floorplan
title: 3D Floorplan
model: /local/floorplans/home.glb
view_mode: "3d"
markers: []
Full docs, YAML reference, and parameter tables in the repo:
3D Floorplan Git Repo
Roadmap / What's Next
- SSAO (Screen Space Ambient Occlusion) for contact shadows between furniture
- More light type presets from the community
Would love to hear feedback, especially from anyone running this on less powerful devices. And if you share your screenshots I'd love to see how different floorplans look with the lighting! ![]()
Built with Three.js r0.165.0 - works in all modern browsers including the HA Companion App.