For everyone
Who wishes to take sensoring to the next level, but does not want to break the bank for the overpriced loggers that come with them. Here’s my first take on a way to DIY a Home Assistant SDI-12 data logger.
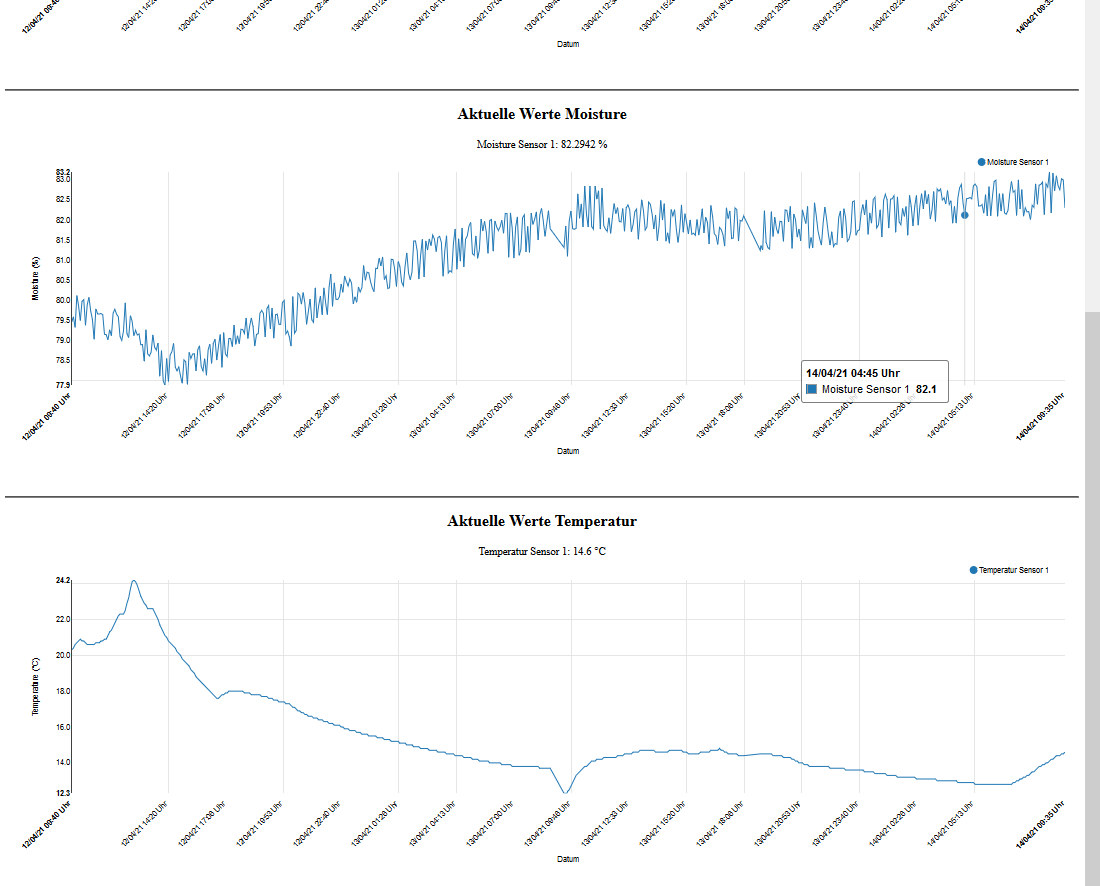
Why use Home Assistant for this? Well because it’s an awesome piece of automation software but also because it easily integrates sleek dashboards, notification services and .CSV logging.
Following needs/wishes:
- Log up to 61 SDI-12 sensors on the same wire *(hence the big advantage of SDI-12 sensors)
- Reliability
- Connectivity for telemetry
- Simple CSV output of data
- Phone/email notification on sensor not updating values and/or datalogger reboots
- Around €100 per data logger setup
Hardware used
- Raspberry Pi 4B 4GB
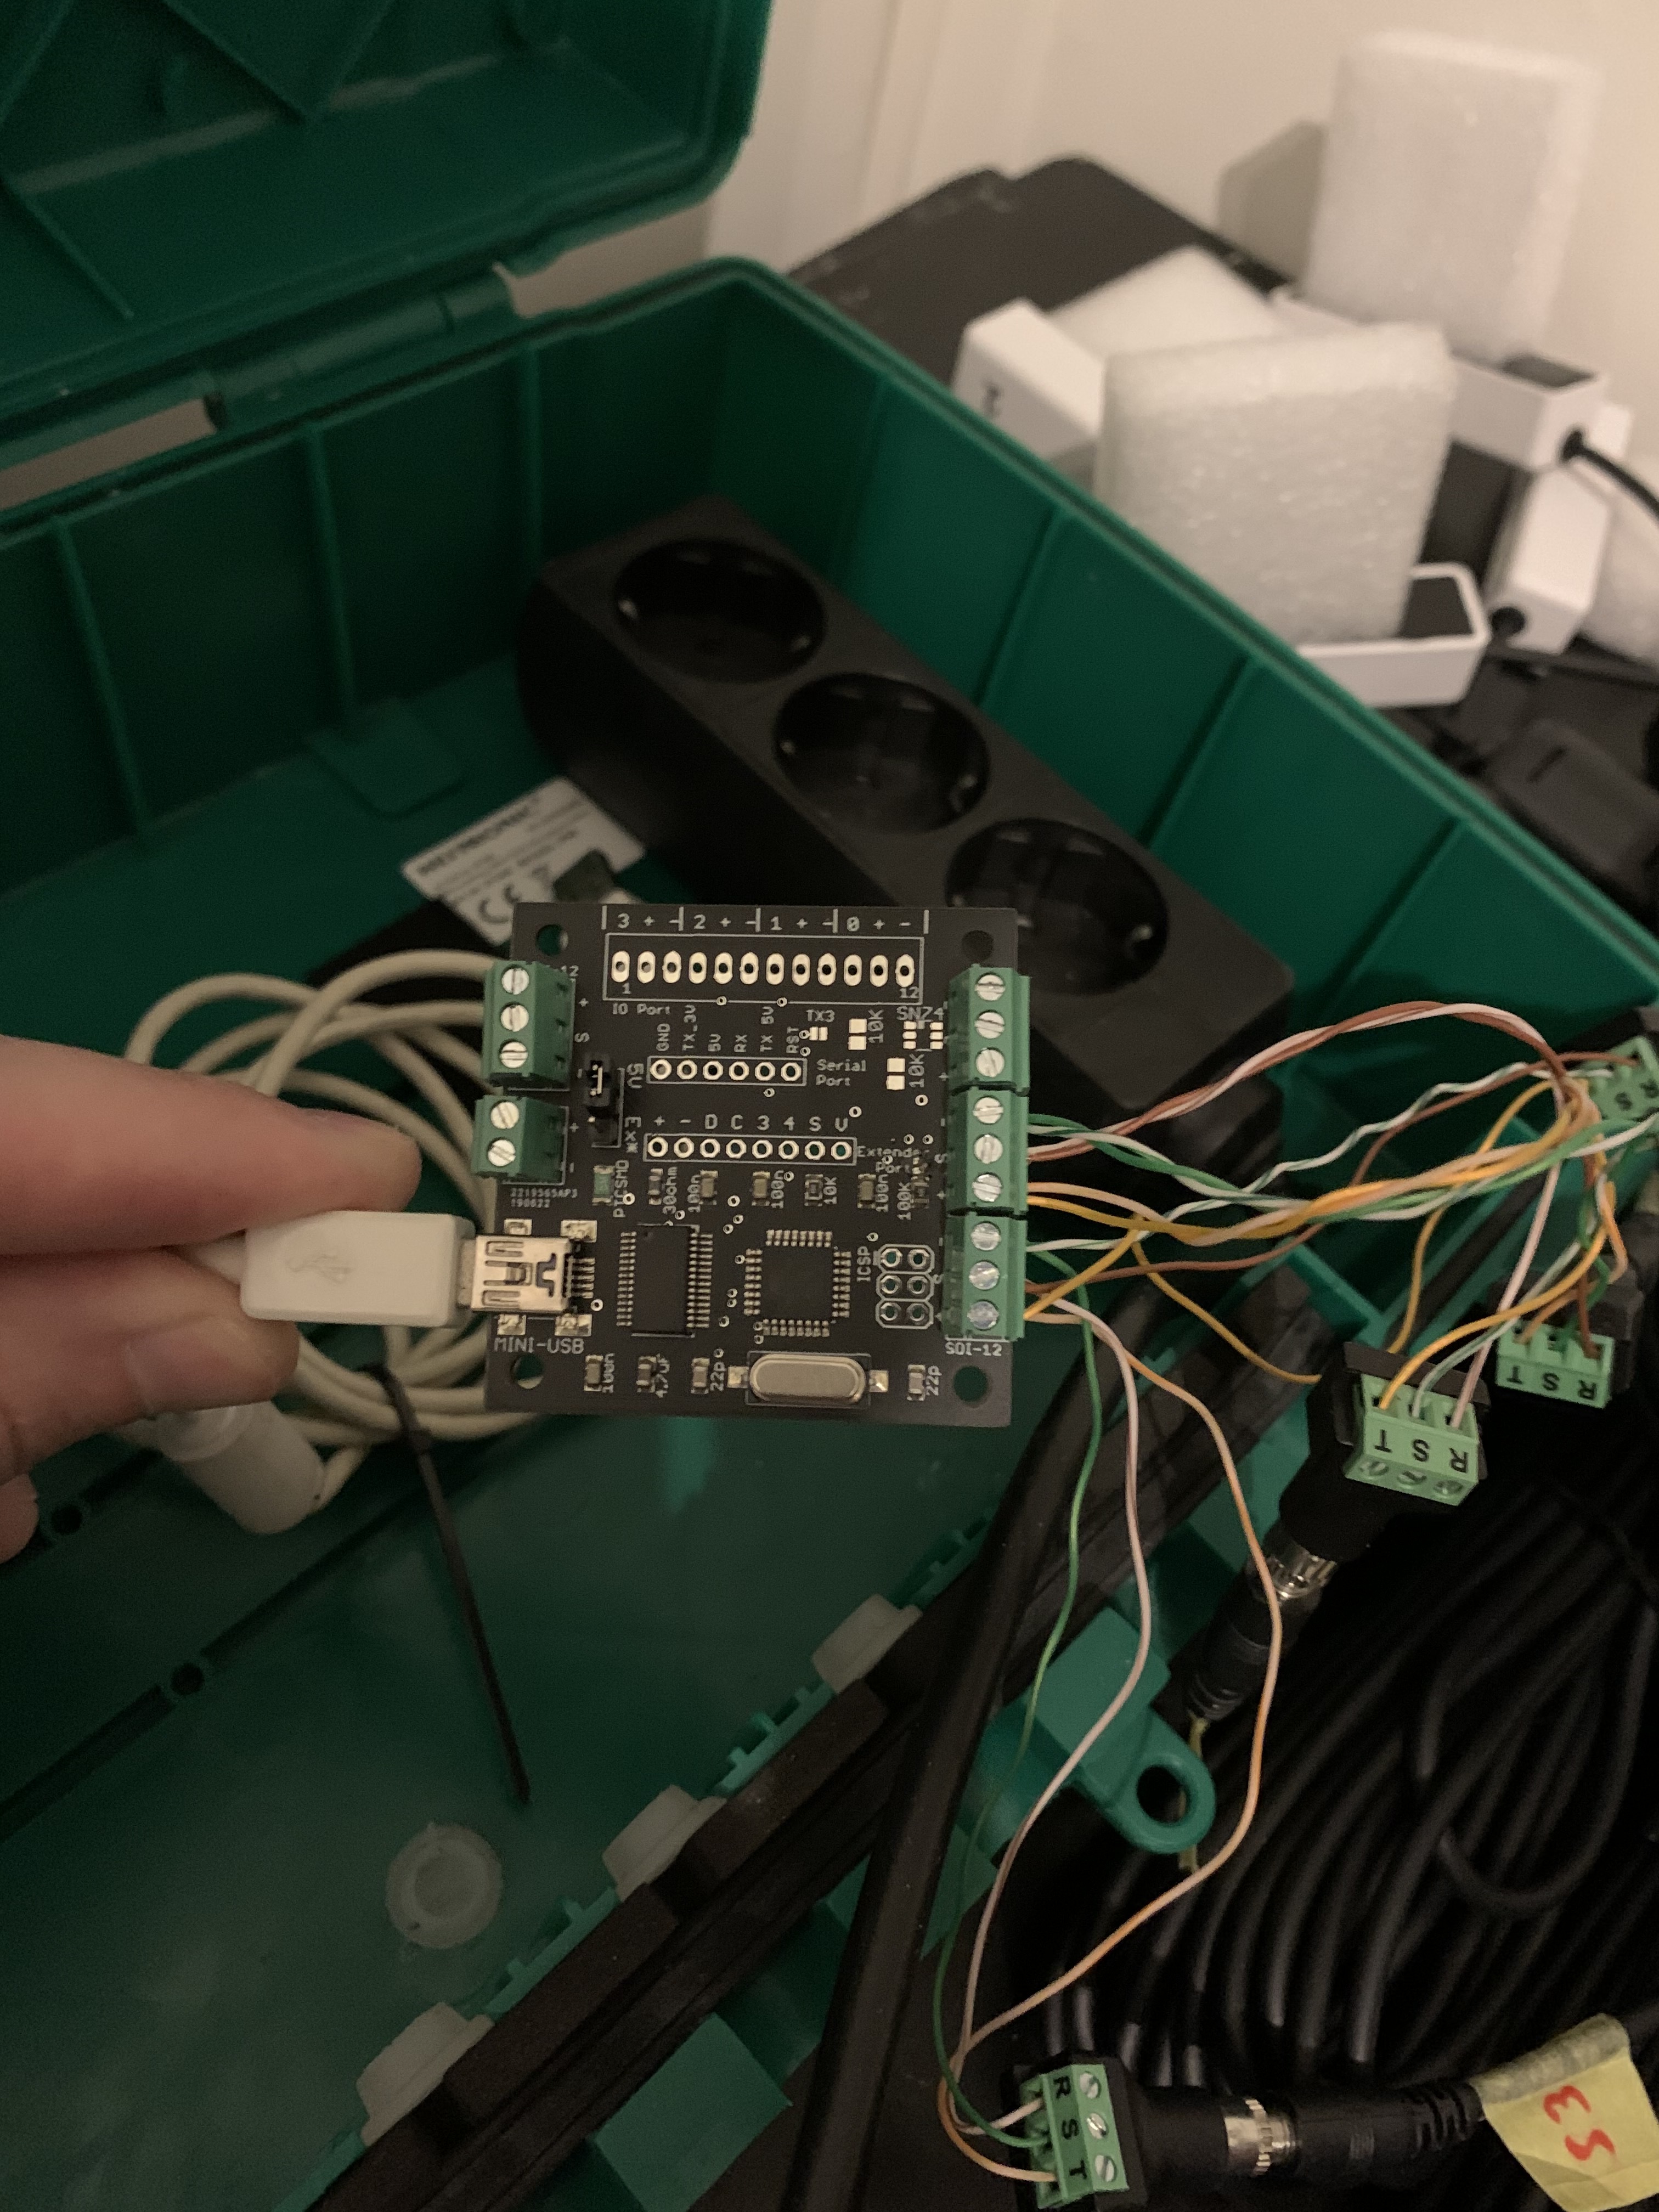
- SDI-12 USB adapter from Liudr<- credits to this guy for explaining SDI-12 very clearly on his blog and making SDI-12 available to simple blokes like me (SDI-12 USB adapter | Liudr's Blog)
- Small box for the SDI-12 USB adapter (https://www.amazon.nl/gp/product/B07QWBYQN8/ref=pe_19967891_404437601_pd_te_o_gr_im?_encoding=UTF8&pd_rd_i=B07QWBYQN8&pd_rd_r=7FNS5YBA51W2554SHC2T&pd_rd_w=HB7yT&pd_rd_wg=VwKul)
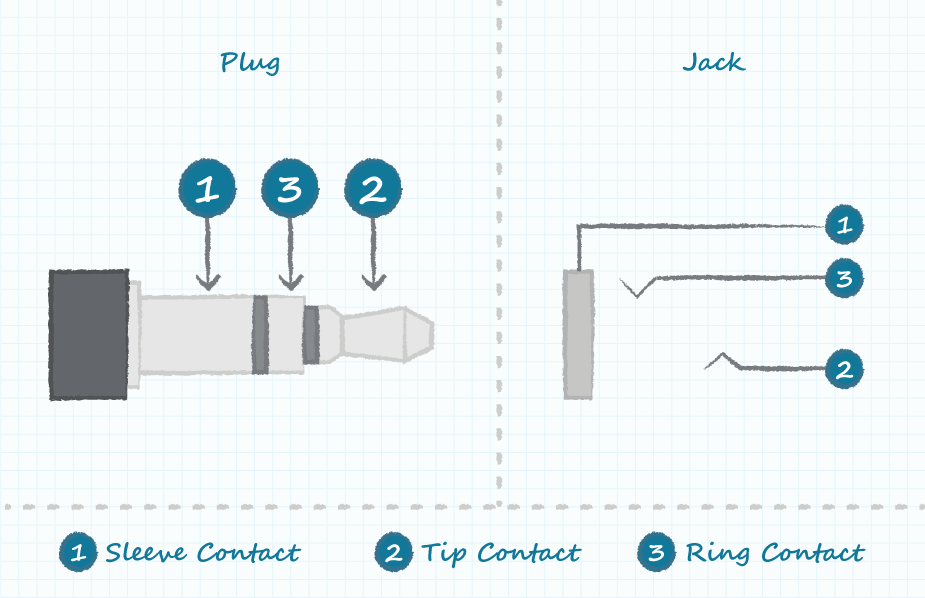
- 3,5mm female jack for simple Teros12 connection (Amazon.com)
- 4x Teros 12 soil sensors (TEROS 12 | Soil Moisture Sensor | METER Group)
- Kingston A400 SSD 120GB with compatible USB adapter for the Pi (Raspberry Pi 4 USB Boot Config Guide for SSD / Flash Drives)
- Greenhouse-proof box to store all components (https://www.reichelt.nl/nl/nl/veiligheidsbox-maximus-kabelverbinding-heit-21046-p288729.html?r=1)
- Optional awesomeness can be achieved with a 4g WiFi router on a prepaid, that fits in the box (field telemetry!)
How it works
The way Hass.IO is set up, the Pi will automatically boot if power is available (especially after a power cut). Furthermore, a notification will be sent on boot and the Pi will start logging sensor measurements.
Each measurement is directly saved to a .CSV file on the SSD. I use the Samba share addon to retrieve the log file over the network. If a sensor does not report a new value for i.e. volumetric water content for over 30 minutes, a notification will be sent as well.
Setup
For setup of the Pi to boot Hass.os on the SSD, I followed this thread: Installing Home Assistant on a RPi 4b with SSD boot
To get the right USB address that starts with ‘/dev/serial/…’ go to Supervisor within HassIO>System> click the three vertical dots in the bottom of the ‘Host’ tab >Hardware>Look for the line that lists your SDI-12 USB adapter and change it in your configuration.yaml. My address in the example below is ‘/dev/serial/by-id/usb-FTDI_FT232R_USB_UART_AC00Z2T4-if00-port0’
To assign a new address to the SDI-12 sensors I hooked the SDI-12 board up to my laptop and launched ‘Terminal’ by Br@y++(Terminal) Mind you to only hook up one sensor at a time when changing their address. Also bear in mind that SDI-12 sensors only be assigned a one-character address from the following characters: 0-9, a-z, A-Z hence 62 as the maximum number of sensors on the SDI-12 bus. **Please note that the Teros11/12 sensors are assigned adress 0 out of the factory and also print out a DDI serial startup string on power-up, resulting in gibberish readout in Home Assistant. The Teros11/12 will omit the DDI Serial startup string (sensor identification) when the SDI-12 address is nonzero. Changing the address to a nonzero address is recommended for this reason. (Thank you @matthewallen00 for pointing this out)
The serial output from a Teros12 sensor with address set to 1 looks like this: ‘1+1812.50+22.9+1’ it shows; the assigned sensor address, volumetric water content, temperature, and electric conductivity. My configuration below basically grabs every string that a sensor publishes over serial, then converts it to single sensor values.
For the sake of length, I’ll show my config for one Teros12 sensor, adding more sensors is currently copy/paste work, if someone has suggestions for templating all these blocks into shorter code that recognize separate sensors, I’d be all ears for input 
The awesome Liudr SDI-12 USB adapter (notice that I wired up four sensors to two inputs since every senor is individually addressed, it is theoretically possible to hook up 62 sensors to one input):
Teros12 unplugged to the DIYed female 3,5mm connector:

configuration.yaml
###################################################################
#                           SDI-12 Measure commands
###################################################################

switch:
  - platform: command_line
    switches:
      mm_sensor_1:
        command_on: 'echo "1M!" > /dev/serial/by-id/usb-FTDI_FT232R_USB_UART_AC00Z2T4-if00-port0'    # Sends a measurement request to sensor
        command_off: 'echo "1D0!" > /dev/serial/by-id/usb-FTDI_FT232R_USB_UART_AC00Z2T4-if00-port0'  # Retrieves measurement data from last measurement of sensor


###################################################################
#       Logging sensor outputs to a .CSV file and make Telegram messaging possible
###################################################################

notify:
  - platform: file
    name: filenotify
    filename: /media/soilsensors.csv #Places measurements inside media/soilsensors folder
    timestamp: true

  - name: aardevosensorbot
    platform: telegram
    chat_id: 11111111

telegram_bot:
  - platform: polling
    api_key: TelegramBotAPIkey
    allowed_chat_ids:
      - 11111111 # My Telegram chat with

###################################################################
#                           Untemplated SDI-12 string
###################################################################

sensor:
  - platform: serial
    serial_port: /dev/serial/by-id/usb-FTDI_FT232R_USB_UART_AC00Z2T4-if00-port0
    baudrate: 9600

  - platform: time_date
    display_options:
    - "date_time"

###################################################################
#                               SENSOR ADRESS
###################################################################

  - platform: template
    sensors:
      sensor_number_s1:
        friendly_name: Sensor Address 1
        value_template: >
          {% if '1' in states('sensor.serial_sensor') [0:1] -%}
            {{ states('sensor.serial_sensor').split('+')[0] }}
          {% else -%}
            {{ states.sensor.sensor_number_s1.state }}
          {% endif -%}


###################################################################
#                 VOLUMETRIC WATER CONTENT SENSORS
###################################################################

      vwc_s1:
        friendly_name: Volumetric Water Content Sensor 1
        unit_of_measurement: "θ"
        value_template: >
          {% if '1' in states('sensor.serial_sensor') [0:1] -%}
            {{ states('sensor.serial_sensor').split('+')[1] | default}}
          {% else -%}
            {{ states.sensor.vwc_s1.state }}
          {% endif -%}

      c_vwc_s1:
        friendly_name: Calculated Volumetric Water Content Sensor 1
        unit_of_measurement: "θ"
        value_template: >
          {{ ((6.771e-10) * (states('sensor.vwc_s1')|float ** 3) -
             (5.105e-6) * (states('sensor.vwc_s1')|float ** 2) +
             (1.302e-2) * (states('sensor.vwc_s1')|float) -10.848) }}

      filtered_vwc_s1:
        friendly_name: Filtered Volumetric Water Content Sensor 1
        unit_of_measurement: "θ"
        value_template: >
          {%- if states.sensor.c_vwc_s1.state|float >= 0 and states.sensor.c_vwc_s1.state|float <= 1 -%}
            {{(states.sensor.c_vwc_s1.state) | float | round (3) }}
          {%- else -%}
            nan
          {%- endif -%}

###################################################################
#                               TEMPERATURE SENSORS
###################################################################

      temperature_s1:
        friendly_name: Temperature Sensor 1
        unit_of_measurement: "°C"
        value_template: >
          {% if '1' in states('sensor.serial_sensor') [0:1] -%}
            {{ states('sensor.serial_sensor').split('+')[2] }}
          {% else -%}
            {{ states.sensor.temperature_s1.state }}
          {% endif -%}

###################################################################
#                        ELECTRIC CONDUCTIVITY SENSORS
###################################################################
      electric_conductivity_s1:
        friendly_name: Electric Conductivity Sensor 1
        unit_of_measurement: "dS/m"
        value_template: >
          {% if '1' in states('sensor.serial_sensor') [0:1] -%}
            {{ states('sensor.serial_sensor').split('+')[3] }}
          {% else -%}
            {{ states.sensor.electric_conductivity_s1.state }}
          {% endif -%}
automations.yaml
###################################################################
#   Sending measurement commands and retrieve data commands to/from the sensor
###################################################################
- id: Log all sensors
  alias: Log all sensors
  trigger:
    platform: time_pattern
#    seconds: '/60'             #Sends measurement requests every 60 seconds
    minutes: '/15'              #Sends measurement requests every 15 minutes
  action:
# MAKE MEAUREMENTS FOR SENSOR 1
    - service: switch.turn_on
      entity_id: switch.mm_sensor_1
    - delay: 00:00:00.2  #Delay is in to enable the sensor to initiate the measurements and respond with information about itself and how many measurements it made
    - service: switch.turn_off
      entity_id: switch.mm_sensor_1
    - delay: 00:00:00.8  #Delay is in for the sensor time to respond with the actual sensor data
    - service: notify.filenotify #Log sensors data directly after measurement was retrieved
      data_template:
        message: "{{ states.sensor.sensor_number_s1.state }};
                  {{ states.sensor.sensor_number_s1.state }};
                  {{ states.sensor.vwc_s1.state }};
                  {{ states.sensor.temperature_s1.state }};
                  {{ states.sensor.electric_conductivity_s1.state }};"


###################################################################
#                 Notifications on DataLogger restart
###################################################################

- alias: Notify on restart
  initial_state: 'on'
  trigger:
    - event: start
      platform: homeassistant
  action:
    - delay: 00:0:30
    - service: notify.aardevosensorbot
      data_template:
        title: '*Soil Sensor Datalogger*'
        message: 'DataLogger has just restarted!'

###################################################################
#                 Notifications on sensor update failure
###################################################################

- alias: Notify if sensor 1 state unchanged
  trigger:
    platform: time_pattern
#    hours: "/1"
    minutes: '/30'
#    seconds: '/20'
  condition:
    condition: template
    value_template: "{% if as_timestamp(states.sensor.date_time.last_updated) - as_timestamp(states.sensor.vwc_s1.last_updated) > 30*60 %}true{% endif %}"
  action:
  - service: notify.aardevosensorbot
    data:
      title: '*Soil Sensor Datalogger*'
      message: 'Sensor 1 failed to update volumetric water content for over 30 minutes'