Hi,
I’ve installed a Senseair K30 CO2 meter to an ESP32 and i’d like to share this with you.
Big thanks to martgras and znerk13 for showing the way (Add Senseair K30 CO2 sensor · Issue #1587 · esphome/feature-requests · GitHub).
Starting off with the most important question first: why choose the expensive Senseair K30 sensor, and not something else? The choice is based on this scientific publication, which shows the K30 to be a very good sensor.
- Tomomi Yasuda et al, Comparison of the Characteristics of Small Commercial NDIR CO2 Sensor Models and Development of a Portable CO2 Measurement Device, Sensors 2012, 12, 3641-3655
The result is backup-up by this peer-reviewed paper:
- Cory R. Martin et al, Evaluation and environmental correction of ambient CO2 measurements from a low-cost NDIR sensor, Atmos. Meas. Tech., 10, 2383–2395, 2017.
The result is also backup-up by this non-peer-reviewed paper, which also shows the K30 to be a good sensor:
- Mengna Li et al, Design of a Calibration System for Miniature Carbon Dioxide Sensors, FLOMEKO 2019, Lisbon, Portugal
Okay, based on these results, i choose the Senseair K30.
The K30 uses automatic baseline calibration (ABC) to auto-calibrate every 7.5 days. It assumes that lowest measurement in this period is the baseline value of 400 ppm. This mechanism works fine unless somebody is at home all the time (the baseline of 400 would never be reached in those 7.5 days). If the baseline is never reached, it is also possible to disable the ABC-mechanism, but i have not investigated this.
Hardware:
Power Supply: Mean Well RS-15-5
ESP32: ESP32 WROOM Devkit
CO2 sensor: Sensair K30
Bi-directional Logic Level Shifter 3.3v <-> 5v
The sensor is very flexible, it can be connected analog and digital via I2C and UART (modbus). I choose UART based on the previous work of martgras and znerk13.
Dupont pin headers are soldered onto the Senseair K30 UART terminal. In he picture below, from left to right: ground, 5v, RX, TX
From here, the RX and TX go to the Logic Level Shifter → ESP32 TX (GPIO1, orange cable) and RX (GPIO3, yellow cable).
As always, RX from the sensor goes to TX of the ESP and TX from the sensor goes to RX of the ESP.
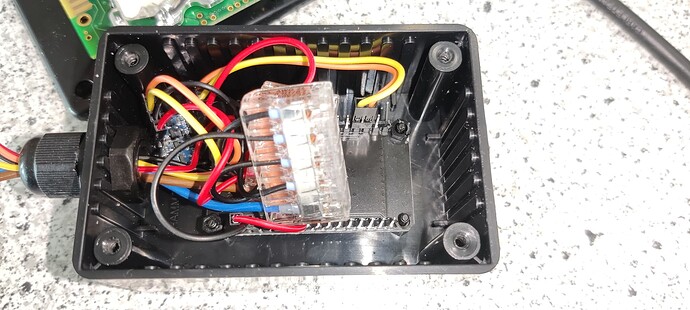
Screw the ESP into a project box and fixate the logic level shifter inside. Use a cable gland to fixate cabling in the project box.
Now, screw the Senseair K30 outside of the project box, on top of the lid. Make sure to only use two screws, not more. Reason: Senseair advices this to prevent strain on the pcb. Also make sure that both screws are isolated from each other and isolated from main ground (for example by using plastic screws). Connect the wires and screw the top on the project box.
CO2 sensors are sensitive to temperature, therefore the ESP32 is inside the box and the sensor is outside of the box attached via spacers. This is also the reason why the power supply is in another location.
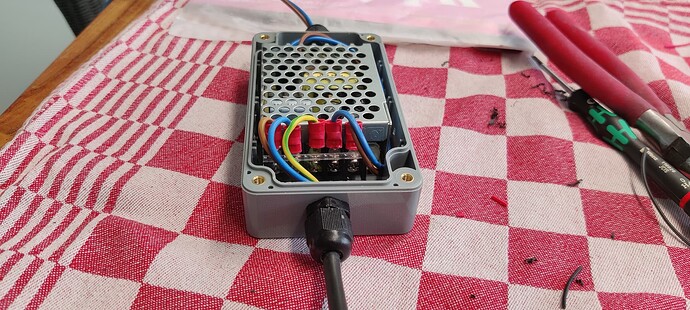
Building the power supply: this is pretty standard stuff. Crimp ring (or fork-style) connectors to the cables and screw the cables to the power supply. The power supply is placed into a ventilated project box (you can drill holes for this). Make sure to use cable glands to secure the 230v cables, otherwise you are creating a very dangerous situation.
Use thick cabling to go from the power supply to the esp32/K30 combination to prevent voltage drop. I’ve used 0.75mm squared cables. You can calculate the required wire thickness using this website: Voltage Drop Calculator
Inside the esp32 project box, i’ve placed two Wago 221’s (one for 5v, the other for ground) to divide the cables further into shorter smaller cables to which i crimped dupont connectors (for the ESP32 and the K30) and ferrules (for the Wago 221).
End-result of the device. Again, please be aware to place the power supply away from the K30 sensor to prevent warm-up and drifting CO2 measurements.
I’ve placed the device inside the ventilation shaft that is extracting air from my living room.
ESPHome is installed onto the ESP32. See the config below.
esphome:
  name: living-room-co2-meter
  friendly_name: Living Room CO2 Meter
  comment: ESP32ESP-32S Wroom Devkit v1 + Senseair K30

esp32:
  board: esp32dev
  framework:
    type: arduino

# Enable logging
logger:
  baud_rate: 0

# Enable Home Assistant API
api:
  encryption:
    key: "xxx"

ota:
  password: "yyy"

wifi:
  ssid: !secret wifi_ssid
  password: !secret wifi_password

  # Enable fallback hotspot (captive portal) in case wifi connection fails
  ap:
    ssid: "Living-Room-Co2-Meter"
    password: "zzz"

captive_portal:

uart:
  id: mod_uart
  tx_pin: 1
  rx_pin: 3
  baud_rate: 9600
  stop_bits: 1
  parity: none

modbus:
  send_wait_time: 200ms
  uart_id: mod_uart
  id: mod_bus

modbus_controller:
  - id: sensek30
    ## the Modbus device addr
    address: 0xFE
    modbus_id: mod_bus
    command_throttle: 500ms
    setup_priority: -10
    update_interval: 30s

sensor:
  - platform: modbus_controller
    modbus_controller_id: sensek30
    id: status_raw
    name: "CO2 Status Raw"
    internal: True
    address: 0
    register_type: "read"
    value_type: U_WORD
    accuracy_decimals: 0

  - platform: modbus_controller
    modbus_controller_id: sensek30
    id: co2
    name: "CO2 Level"
    address: 3
    unit_of_measurement: "ppm"
    register_type: "read"
    value_type: U_WORD
    accuracy_decimals: 0

text_sensor:
  - platform: template
    name: "CO2 Status"
    lambda: |-
      if (id(status_raw).state == 0) {
        return {"Ok"};
      }
      if (id(status_raw).state == 1){
        return {"Error"};
      }
      else {
        return "Unknown Code: " + to_string(id(status_raw).state);
      }
The end-result is looking very good.


