💡 Sensor Light - Motion Sensor - Door Sensor - Sun Elevation - LUX Value - Scenes - Time - Light Control - Device Tracker - Night Lights

After a good night sleep and some more considerations, I solved this by feeding the blueprint with a virtual motion sensor, which is loaded with either sensor1 or sensor2 data by some pre-processing automation rules.

@narandill , firstly welcome to the community.

Your welcome, glad you enjoy it.

You can have a door sensors as a trigger. You can use one or multiple Binary Sensors for the trigger sensor. If you are going to use 2 or more binary sensors in the trigger selection and 1 of them is a sensor that can stay in the ON state for some time (like a door sensor) then I would recommend you consider using a group helper as shown in our FAQ. If your just using one trigger sensor that stays on for a long time then you will not need a group helper and you can just add it to the automation by selecting it.

@Seger85

This would be because the Philips Hub would of controlled it and now the HA stick lets you have the control.

I use Shelly to do the control and they do a good transition. Maybe I need to get one of those sticks so I can test it out with a Philips globe :thinking:. It is on my list to do.

@elk Firstly welcome to the community.

You can have 2 motion sensors on each side of the stairs as I have 2 down my hall way and it works perfectly. My motion sensors are fast to react and clear in about 3 to 4 seconds if no motion is detected.

The problem you have if you would like to use the LUX as a option then it will need to send updates to HA without the need for the motion sensor to be triggered before a new value is sent.

Could you let us know what sensors you are using?

narandill suggested there could be a update if you are using Philips sensors. I would look into the sensor and the settings. Sometimes they have options that you need to set so you can have them reporting as needed.

If you get your sensors reporting LUX to HA without the need to be triggered (there must be a way or a setting) and you would like to have both LUX values considered and then averaged, then I would use the new “Sensor Group” that has just been release this month. I will do a FAQ on how to set this up correctly soon.

EDIT: Just read this

Not sure what you did but maybe read what I said above, If you need more help just let us know.

Hi @Blacky ,
I am using aquara motion sensors connected to home assistant through the zigbee2MQTT integration (aquaria motion sensor p1 @ zigbee2mqtt). The illuminance is only published when occupancy toggles. But, that is ok for me. Anyway, once the lights are on, I cannot use the LUX value, as the lights will determine the illuminance. This is why I use the “YES - My Ambient Light Sensor is affected by the Lights” option in the blueprint, and would expect the LUX is not used when the lights are already on.
Here is my solution, maybe it helps others who have a similar setup. It requires, the “virtual components” integration from HACS
1.) create virtual motion sensors in configuration.yaml, then register these sensors on your blueprint

binary_sensor:
  - platform: virtual
    name: 'Flur_Motion'
    initial_value: 'off'
    class: motion
sensor:
  - platform: virtual
    name: "Flur_Illuminance"
    class: illuminance
    initial_value: 20
    unit_of_measurement: lx

2.) Create an automation on the real motion detector and feed forward the values:

alias: Flur_Motion_Upstairs_ON
description: ""
trigger:
  - platform: state
    entity_id:
      - binary_sensor.aquara_motion_detector_occupancy
    to: "on"
condition: []
action:
  - service: virtual.set
    data_template:
      entity_id: sensor.virtual_flur_illuminance
      value: "{{states('sensor.aquara_motion_detector_illuminance_lux')}}"
  - service: virtual.turn_on
    data:
      entity_id: binary_sensor.virtual_flur_motion
mode: single

Then create similar automations for the 2nd motion sensor and create similar automations that clear the virtual occupancy sensor (maybe with a condition to only clear if both real sensors are “clear”).
I am waiting for my second sensor to arrive so that I can actually test this with 2 sensors :grinning:, but I feel very comfortable that it will work.
Anyway, I am very fresh into this HA motion topic and so happy I could find the template that solves most of my problems. Thx again.
Btw, I do also have a Hue Motion sensor which is connected to a Hue-hub, which I can monitor in HA through the Hue integration. Illuminance & temperature is reported by this sensor every 5 minutes.

FAQ

HOW TO ADD MORE THAN ONE AMBIENT LIGHT SENSOR TO THE AUTOMATION

With the new release of Home Assistant 2023.2.0, the HA team has added a new sensor to the helper group called “Sensor Group”. You can now group two or more ambient light sensors together.

How it works: Type “Arithmetic mean” = If one sensor reads 20 and the other sensor reads 40 then the sensor group will read 30, (20 + 40 = 60, divided by 2 sensors = 30). Note: There is a selection when creating the “Sensor Group” to have different types. This will change how the “Sensor Group” works. Example: The types you can choose from are, Minimum, Maximum, Arithmetic mean, Median, Most recently updated, Statistical range & Sum. We are using “Arithmetic mean” in this example but you can choose the one that bests suits you. For this automation I recommend you stick with either, Minimum, Maximum or Arithmetic mean.

If this is something you would like to use in the automation, then follow these steps.

ADD A AMBIENT LIGHT HELPER SENSOR GROUP TO THE AUTOMATION

  1. Go to Settings / Devices & Services / click on the “Helpers” tab / click “+ CREATE HELPER” and select “Group”.

  1. Select “Sensor group”.

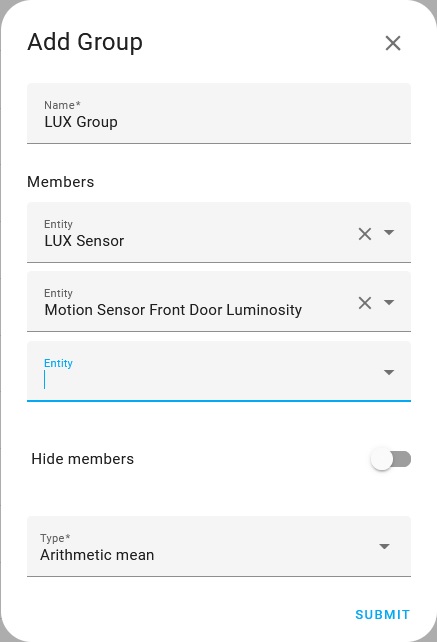
  1. Then enter a name, in this example we put “LUX Group”. Then select your “Members” or entities (all of them that will be in the blueprint automation). Keep “Hide Members” toggles OFF and select “Arithmetic mean” as shown below. Note: You can choose a different “Type” rather than “Arithmetic mean” if it suits you better. Once happy click submit.

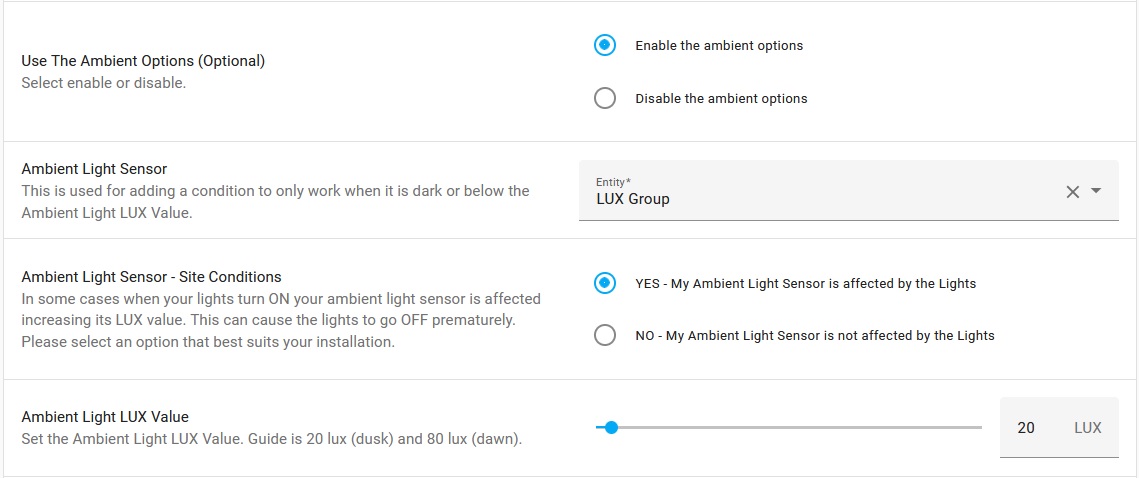
  1. Then go back into the automation and in the “Ambient Light Sensor" selection search for the name (Sensor Group) you just created, in this case “LUX Group” and select it. Now you have two or more ambient lux sensor averaging the readings for you in your automation. If you would like to add more or remove some entities you will have to go back into the helper and edit it (see below, edit helper).


.
Note: If one of your sensors is offline then it will report as unknown, have no lux value and you will not be able to select it in the “Ambient Light Sensor" selection. If you would like to ignore a sensor that is offline, report a lux value and still be able to select it in the “Ambient Light Sensor" selection then see read through the “Edit Helper” and toggle ON “Ignore non-numeric” option.

EDIT HELPER

  1. If you need to edit the Helper. Go back to Settings / Devices & Services / click on the “Helpers” tab / click the helper you would like to edit, in this case “LUX Group” and then select “Group Options”

  1. You will then see your entities and your options. Then just edit as required.

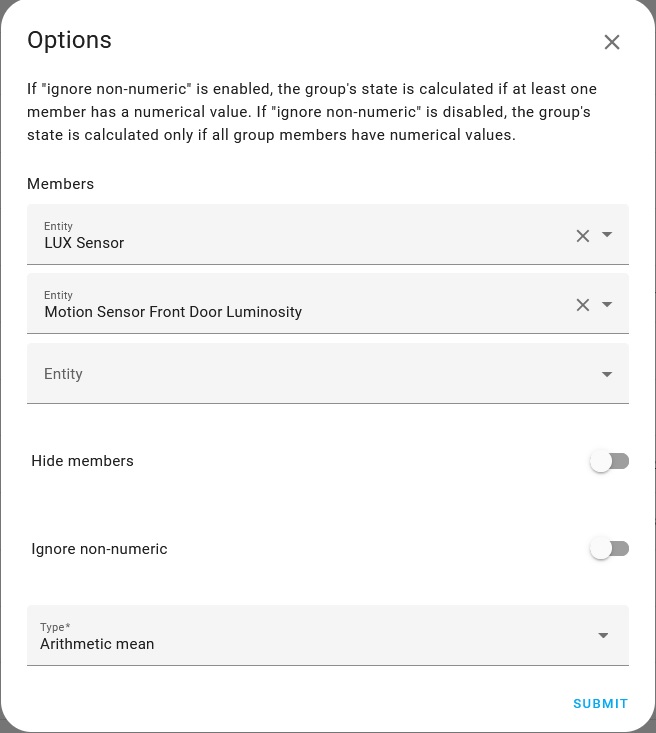
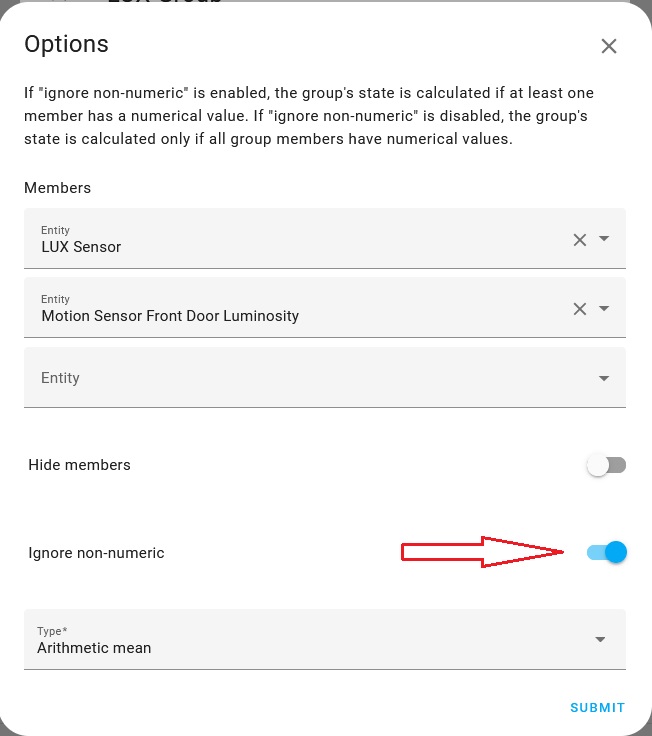
  1. You will also notice one extra option “Ignore non-numeric” and a description above for it. If one of your sensors is offline or unknown it will report as unknown. If you would like to ignore this then you can toggled it ON. Note: A offline sensor will also prevent you from selecting it in the “Ambient Light Sensor" selection of the automation.

Enjoy

Blacky :grinning:

Back to FAQ: Click Here

Back to “The Settings & Best Practice Guidelines” Click Here

Thanks for reply @Blacky, my door sensor goes to on state when I open the doors. It’s pretty simple to use it as an additional trigger. What I have in mind is a bit more complex - I don’t want to use door sensor as a additional trigger, but as a logic gate. Here’s the few examples:

  1. Turn the lights on when motion detected:
  • Initial state: bathroom doors are open (on), light is off, motion is off
  • When: motion goes on (so basically default logic of this blueprint)
  • Then: light goes on until time_delay runs out
  1. Someone closed the bathroom doors after triggering motion:
  • Initial state: bathroom door are open (on), light is on, motion is on
  • When: doors goes from open (on) to closed (off) and its before motion time_delay runs out. - here we know that someone is in the bathroom and until doors will open again we want to have the light on
  • Then: light stays on until time_delay runs out and after that, if motion is detected one more time - the lights should stay on until the doors are opened (on) again.
  1. Turn the lights on when doors are opened:
  • Initial state: bathroom doors are closed (off), light is off, motion is off
  • When: bathroom doors goes from closed (off) to opened (on)
  • Then: light goes on until time_delay runs out or if doors close without motion detected - a bit different logic as you see @Blacky than door sensor as a trigger in the blueprint
  1. Someone opened the bathroom doors after triggering motion:
  • Initial state: bathroom doors are closed (off), light is on, motion is on
  • When: doors goes from closed (off) to open (on)
  • Then: the light goes off

I hope that it’s logical :crossed_fingers: if not fell free to ask any questions.

Does that mean @Blacky that you also have Philips Hue Motion Sensors? I found pretty solid step-by-step guide how to OTA by ZHA here: How to update the firmware of ZigBee devices using Home Assistant — Rudd-O.com but unfortunately I’m clueless from where to download correct firmware version.

Hi @narandill thanks for you questions. Well tough of and laid out to understand.

As you said default logic.

Are you sure that someone is in the bathroom? or did they just leave and close the door?

If motion is detected inside the bathroom when this happens we know that someone is in the bathroom, lights on and the default logic will work.

As you open the door motion detected and light on… the default logic will work.

If you open the doors and walk out, leave the door open and no motion is detected light will go OFF, the default logic will work.

It seams that you may not need a door sensor but I can see your way of thinking. If your lights are not staying on when your in the bathroom maybe consider a mmWave sensors.

No, but if you use the Philips app I would say that they would have a update option. The link you provided is a bit technical if your not sure what to do. Maybe try the app as Philips should make it very simple to do.

Hey there! First of all, I wanted to thank you for this blueprint, I started using it a few weeks ago and it’s been working great and pretty much all the features I could want are included out of the box :slightly_smiling_face:.

There are two or three things I’ve run into that would be nice to either fix or make a bit more flexible:

The lux threshold before turning on the lights is currently limited to 500 as a maximum value, which in my case seems to be a bit low. I’ve positioned a single luminance sensor that I’m using globally with all my uses of the blueprint, and I positioned it right next to a window to check what the outside luminance is like. I’ve noticed that it gets kind of dark inside before the sensor reports a value below the threshold, even when set to 500, I’d like to be able to set it probably around 1000 if possible.

The other thing I’ve noticed is that when you have multiple sensors triggering the automation, it seems like the lights will turn off when a single motion sensor hasn’t detected movement for the timeout period. I would have expected the lights to stay on until all motion sensors stopped detecting occupancy for the timeout. I can probably work around this issue with a sensor group, but I wasn’t sure if this was expected behavior so I’m bringing it up :slightly_smiling_face:.

Last point, which is mostly just a wish list item that I can live without, is to be able to have the blueprint re-evaluate whether the lights should be on or off when the bypass trigger is deactivated. I’m currently using it with the option to keep the lights on when it’s activated, and I trigger this from the light switch to force on or off the lights. This would allow me to not have to know the state of the motion sensor when putting the lights back to “automatic” mode, since I don’t know for sure if the blueprint will send the off command or not in the future. It’s a minor item since I can always just turn it off and it will re-sync with the blueprint, it’s mostly for when I have guests and they don’t know about that little detail.

Thanks a bunch :slightly_smiling_face:

Hi @yrivardmulrooney firstly welcome to the community.

Your welcome, I am glad you like it :slightly_smiling_face: :+1:. Also thank you for asking the questions and for your suggestion.

This is in or FAQ. If you would like to enter 1000 or any other number the slider is not allowing then just simply type the number you would like in and click save :wink:.

This is also in or FAQ. I wouldn’t add the new “sensor group” but you can add a “Binary sensor group”. The FAQ is below, follow the steps in the link and it will walk you through it.

Q: I have more than one trigger sensor / binary sensor and my light will come ON then it will turn OFF and stay OFF? - or - The automation is not working correctly with 2 or more trigger sensor / binary sensor and is driving you crazy?

A: Please follow these steps Click Here

Thanks for your suggestion :+1:. I have this on my list to do as I would also like to have it linked with my Bathroom Humidity Exhaust Fan blueprint (both blueprints work together). I will try and get this out in the next release soon.

Well that’ll teach me not to read FAQs thoroughly enough :slightly_smiling_face:. Thanks for getting back to me.

1 Like

Well it made me do the update anyway :wink:… I have the new blueprint ready and will update now. Just doing final checks.

New update 2.7

Changed what happens when the by-pass is turned OFF. It will now re-evaluate the trigger sensor.

When the by-pass is turned OFF and trigger sensor is ON.

  • If the lights are OFF, turn lights ON and run automation.
  • If the lights are ON, leave lights ON and run automation.

When the by-pass is turned OFF and trigger sensor is OFF.

  • If the lights are ON, turn lights OFF and wait for the trigger sensor.
  • If the lights are OFF, leave lights OFF and wait for the trigger sensor.

Enjoy

Blacky :grinning:

2 Likes

Absolutely love every version! Very practical and reliable automation!

I would like to suggest addition of transition time!
Use case: For a smoother transition for night lights, giving the room a calmer ambience with a slower transition, easier on the eyes too!

1 Like

Hi @samuelthng

:heart:

Thanks for your suggestion :+1:. I have this on my list to do and would like to have this option included to. I will look into it again.

1 Like

Edit: For future comers. I disabled the “save state” option from the integrations page (choose light > configure) and the error is no longer showing. Blueprint is working fine!

Original post: I have the original aqara motion sensor, and I’ve setup a simple Turn ON lights for 1 minute when motion is detection. It looks like the sensor does activate the Lights ON scene, but it fails to activate the Lights OFF scene for some reason. I checked the Trace timeline and found an error. I’m not sure if it’s related but I’ve attached it for reference. Thanks!

New update 2.8

Fixed a bug when selected “Enable the By-pass - If lights are ON, turn lights OFF”. If trigger sensor was ON and stayed ON the light would not turn OFF.

Added the "By-pass Time Delay” option.

Use case.

  • You turn the by-pass on and you have “Enable the By-pass - If lights are ON, turn lights OFF” selected. You then need some time to exit before the lights turn off.
  • When you turn your by-pass off and at the same time your trigger sensor is off but your still in the room and need to keep the lights on while the motion sensor will trigger again soon (within the set by-pass time delay) and take over the automation. This will stop you flapping your arms around to trigger the sensor again so you lights will turn back on.

TIP: You can now also link this blueprint with my Bathroom Humidity Exhaust Fan blueprint. So if you use this blueprint to control the lights in your bathroom sometimes when having a shower the motion sensor doesn’t work when you behind the shower screen turning your lights off. If you put the bathroom exhaust fan used in my Bathroom Humidity Exhaust Fan blueprint into the by-pass of this automation the lights will stay on while you are in the shower. When the fan turns off it reset this automation and the light will stay on or go off depending on the trigger sensor.

Enjoy

Blacky :grinning:

2 Likes

Hey Blacky,

Thank you very much for your new update. I haven’t been in the HA world and your Blueprint for very long, but I am really very happy.

Maybe you or the community can help me with a thought that I can’t quite get through my head. As already mentioned, I am using your Blueprint, which works just fine. But now I also like to use Siri and tell it to set the light to 100% in the kitchen, for example, because I’m cooking and need more light than usual (65%) via the motion sensor. But now it is the case that the set brightness is reset to 65% by the motion sensor. I have no idea how I could implement this.

Can anyone follow me and is there perhaps already an idea for this?

Thank you very much
Seger

Hi @Seger85

Your welcome, glad you like it.

Now with the new update V2.8 and the new by-pass options it will work with the voice (Siri). We need to think of the voice as if we were to do it manually but we are just using our voice.

So what we will need to do is set up the by-pass so you can have manual control of your lights. In the FAQ it will walk you through the steps on “How to use the “Trigger Sensor By-pass” without having a physical switch”. In the FAQ we used “Sensor Light By-pass” as the name but you will need to think of a name that suits you better, maybe “Kitchen Lights By-pass”. Then you will need to enable the by-pass and select “Enable the By-pass - If lights are ON, leave lights ON”. Also maybe have the “By-pass Time Delay” set to the minutes that suits you.

So now when you ask Siri set the light to 100% in the kitchen you would say something like this.

“hey Siri, could you turn on the kitchen light by-pass and set the kitchen lights to 100%”.

or you could try this

“hey Siri, could you turn on the kitchen light by-pass for 1 hour and set the kitchen lights to 100%”.

If the 1 hour doesn’t work with Siri then you could try my Entity - Run ON Timer blueprint. Or you could just remember to ask Siri to turn off the kitchen light by-pass when you are done.

Hope this works, let us know how you go.

Disclaimer I don’t use voice commands yet.

Blacky :smiley:

Hey @Blacky,

Thanks again! I figured it was something to do with the bypass option. I will definitely have a look at it. In your description you mentioned separate bypass names, which I don’t think is quite optimal in the wake of the language glitch. I fiddled around a bit last night and something has come up, but there’s still one point where I’m stuck. If necessary, you can also integrate the thoughts into the Blueprint. So what have I done and what is the initial situation?

I currently have 3 different Blueprints (hallway, kitchen & bedroom “living room to come later”). Each room has max. 65% light intensity set via your Blueprint.

Attached is an example for viewing (this makes it easier):

alias: licht_kuche_automation
description: ""
use_blueprint:
  path: Blackshome/sensor-light.yaml
  input:
    motion_trigger:
      - binary_sensor.bewegungsmelder_kuche_1_0_occupancy
    time_delay: 6.5
    include_light_control: use_brightness
    light_brightness: 65
    include_bypass: bypass_disabled
    include_time: time_disabled
    after_time: "00:00:00"
    before_time: "00:00:00"
    include_night_lights: night_lights_enabled
    night_time_delay: 1.5
    include_night_light_control: use_night_brightness
    night_lights_after_time: "01:35:00"
    night_lights_before_time: "07:00:00"
    end_scenes: []
    night_light_brightness: 7
    night_lights:
      device_id:
        - 48feb7e201d1d2ee7b6158b4f277ea74
    include_ambient: ambient_enabled
    ambient_light_options: ambient_light_option_enabled
    ambient_light_value: 60
    ambient_light_sensor: sensor.bewegungsmelder_kuche_1_0_illuminance
    light_switch:
      device_id:
        - 48feb7e201d1d2ee7b6158b4f277ea74

Then I created an additional automation per room (which is called Light 100% - which is not quite right). Attached is the automation:

alias: licht_kuche_100_prozent_automation
description: ""
trigger:
  - platform: numeric_state
    entity_id: light.signify_netherlands_b_v_lwb010_huelight_2
    attribute: brightness
    above: 169.8
condition: []
action:
  - service: automation.turn_off
    data:
      stop_actions: false
    target:
      entity_id: automation.licht_kuche
  - service: script.xx_minuten_licht_automationen_wieder_einschalten
    data: {}
mode: single

As you can see from the automation, the automation switches off your main automation/blueprint as soon as the light goes above 65% and starts a script that specifies the minutes how long the automation should be off. After the time has elapsed, your Blueprint automation is switched on again. The advantage of this procedure is that I don’t have to say a separate name, I just have to set Brighter or Light to xx% percent. Furthermore, after the time has elapsed, your Blueprint is activated again and it automatically returns to the set value from your Blueprint when movement occurs.

Unfortunately, there is still a catch in my script that I can’t get past. If I am no longer in the room after manually increasing the brightness, your blueprint naturally lacks movement and the light remains on. I would like to set it so that if no movement is detected after XX minutes, the light goes out. I have already reached the point where your Blueprint is reactivated after the time lapse and the standard brightness is selected, but it continues to light up.

script

alias: xx Minuten Licht Automationen wieder einschalten
sequence:
  - delay:
      hours: 0
      minutes: 0
      seconds: 20
      milliseconds: 0
    alias: "Delay for xx minutes <65% light "
  - service: automation.turn_on
    data: {}
    target:
      entity_id:
        - automation.licht_flur_automation
        - automation.licht_kuche
        - automation.sz
  - choose:
      - conditions:
          - type: is_no_motion
            condition: device
            device_id: b561c53667f7e18f61e01b5ff0d4e8ed
            entity_id: binary_sensor.philips_sml001_motion_2
            domain: binary_sensor
          - condition: and
            conditions:
              - type: is_no_motion
                condition: device
                device_id: f29fd1904e863c533a1d9a69fac9e0d1
                entity_id: binary_sensor.philips_sml001_motion
                domain: binary_sensor
        sequence:
          - service: automation.trigger
            data:
              skip_condition: true
            target:
              entity_id: automation.licht_flur_automation
          - delay:
              hours: 0
              minutes: 0
              seconds: 15
              milliseconds: 0
            enabled: false
          - service: light.turn_off
            data: {}
            target:
              entity_id: light.flur_licht_gruppe
    enabled: true
mode: single

Maybe you can do something with the thoughts and maybe you also want to help me with the completion.

Thanks and best regards
Seger