Try creating a scene with your colour temp and adding that scene. Make sure you create another identical scene with the lights OFF and put it in the scenes OFF.
Hi @mjsblume It is probably just me but I am not full understanding what is happening but I will try to answer your post.
- you have a magic button that you switch ON and then a time delay of 6 hours starts before it turns itself OFF.
- If that magic button is also set in the blueprint it should disable any triggers you have and your lights should work as normal. If you go to lunch and you would like the light OFF you will have to turn it OFF manually. When you get back you will have to turn it back on manually. It will work like this until the magic button 6 hour time delay goes to OFF. If the light is turned ON and then the time delay goes to OFF the light will stay ON until a trigger happens and the blueprint automation runs.
- If them magic button is not connected to the by-pass in the blueprint then it should work as normal. The light may turn ON and OFF if you sit still but that is a motion sensor.
- If the magic button disables the motion sensor some howā¦then⦠not sure what is going on.
If the magic button is connected to the by-pass option in the blueprint and it is ON then this is how it should work. You will have to turn the light on manually.
I think you just need to manually turn the light back ON. If you donāt want to do that then a presence detectors is the go. I havenāt got mine yet as it all sold out but I will be getting one if he makes more.
This is the best documented Blueprint Iāve ever seen in this community.
Well done!!
And thanks for sharing!
Now you can add any Binary Sensors you like as the trigger, sometimes the blueprint will not function correctly when you have more than one motion sensor or binary sensor selected.
With the new presence sensors and even contact/door sensors you could have a scenario that the light will turn OFF and stay OFF even though the presence sensor has a ON state.
Sometimes you are just having problems with 2 or more motion sensor or binary sensor selected and it is just driving you crazy.
If you follow these steps you just may resolve your problems.
ADD A GROUP HELPER
- Go to Settings / Devices & Services / click on the āHelpersā tab / click ā+ CREATE HELPERā and select āGroupā.
- Select Binary sensor group.
- Then enter a name, in this example we put āSensor Light - Front Door - Groupā. Then select your āMembersā or entities (all of them that will be in the blueprint automation). Keep āHide Membersā and āAll Entitiesā toggles OFF as shown below.
- Then go back into the automation and in the āTrigger Sensor - Binary Sensors" selection search for the name (Group) you just created in this case āSensor Light - Front Door - Groupā and select it. Now only have one item selected here. If you would like to add more or remove some entities you will have to go back into the helper and edit it (see below)
- Now just go through the blueprint and click save. Hopefully you should have resolved your problems.
EDIT HELPER
If you need to edit the Helper. Go back to Settings / Devices & Services / click on the āHelpersā tab / click the helper you would like to edit, in this case āSensor Light - Front Door - Groupā. Click on the cogged wheel.
Then select āGroup Optionsā
You will then see your entities. Edit as required.
Enjoy
Blacky
Back to FAQ: Click Here
Back to āThe Settings & Best Practice Guidelinesā Click Here
Hi Edward, thanks for your kind words. It is nice to get feedback when people like it.
Back to top: Click Here
FAQ - How do you update the blueprint from version 1.4 - 1.7 to version 1.8 and above?
Before upgrading from Version 1.7 and below please see below upgrade options. If you are installing from new then you donāt need to do anything just install the blueprint.
- More user friendly selection for enabling and disabling options.
- Bug fix. Fixed a issue where light would not turn ON when option was made. Example: Using the new presence sensors, door sensor, contact sensor that hold their state to ON for long periods and one of the options being sun, LUX or time would pass through its condition and the light would remain OFF until you walk out of the room and entered again resetting the sensor or you would have to close the door and open it again because the trigger is in the ON state. Anyway it is fixed and is worth the upgrade.
UPGRADE OPTIONS
- Delete the automation, upgrade and set up again.
or - Follow the steps below.
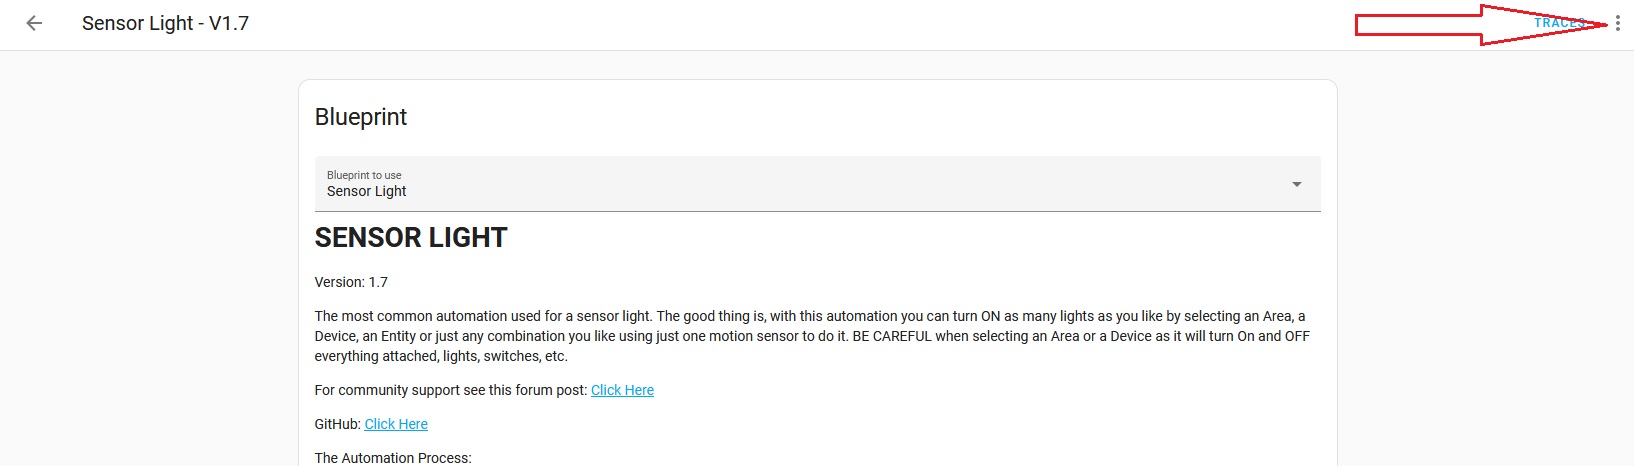
Go into your automation and click on the three dots. Select āEdit in YAMLā
Check you āambient_light_sensorā to see if the option is set to ānoneā. If you have a sensor here you can upgrade no need to read further. If you have ānoneā then we need to change it.
Replace the ānoneā with ā[ ]ā code below.
ambient_light_sensor: []
Click save. Now you ready to upgrade.
Enjoy
Blacky
Back to FAQ: Click Here
FAQ - Sun Option & Sun Elevation
Why did you use it and how can I set it?
I thought about āSunsetā and āSunriseā but HA recommend to use sun elevation as it works better throughout the year. So I took their advice and used the sun elevation.
It is really easy to set up.I would recommend you check your sun elevation degrees and set it to your requirements. Every site is different. A easy way to choose your setting is to find or add the sun to your dashboard. When you click on it, a pop up window will appear.
Then one night just watch the sunset and your elevation. Determine what elevation you would like to set so when the trigger is triggered and the sun is below your set point (elevation degrees) the light will come ON. Once you know your preference just change the sun elevation degrees in the blueprint.
Then just monitor if it is working correctly and to your liking. Change if necessary.
Enjoy
Blacky
Back to FAQ: Click Here
Back to āThe Settings & Best Practice Guidelinesā Click Here
Hi Dude,
Nice Blueprint, I have a question.
Is it possible to start a script instead of a scene?
I use the Adaptive Lighting Integration and scenes unfortunately do not work with templates
Hi @clipse , not currently in the blueprint but yes I could change it to also start a script.
Are you wanting to create a script that turns your lights ON and then create another script to turn your lights OFF just like scenes?
or
Are you wanting to start a script (Adaptive Lighting) and then let it do the rest?
Hi,
I just stumbled accross your blueprint and i think it is great thank you for the hard work and sharing with the community.
I tried the blueprint on a basic light with a motion and a lux sensor and it works great !
However i fail to see why it doesnāt work all the time with multiple binary sensors as trigger. My case is that i have more then 15 lights that rely on motion (sometimes 2 of them), door, and lux sensors. I understand creating helpers ⦠will⦠help but iād like to use the blueprint as it was designed so i can change stuff quickly and see all info in one place.
I have automations that rely on multiple triggers and they work just fine.
Thank you !
@Momo Thanks for the kind words.
A example: Motion detected, trigger received automation runs, motion is in the ON state, before it goes to the OFF state the door opened and goes to ON state, LUX goes to ON state and then motion goes to OFF state. Because motion has now gone to the OFF state it is ready to receive the next trigger. The door and the LUX will not send a trigger to the automation until the door is closed and opened again or the LUX go high and low again so the automation waits. The problem happens more when we have sensors that can be in a ON state for a long time like door, LUX, etc.
If you have 3 motion sensors apart from each other it can work well because they normal are only on for short time and keep sending triggers. But in saying that it is possible to have issues.
If you group the motion, door and the LUX sensor together it acts as one trigger. So you trigger motion and it goes to the ON state, then you open the door and it goes to ON state, then your LUX goes to the ON state, your door closes and then is OFF, motion then goes OFF but the LUX is still ON so the group or the trigger is still in a ON state waiting until all sensors go to the OFF state. Once that happens the time delay starts. Hope that make sense.
I try and name the helper group to the automation so I can find it easy. But normally we set it up and forget about it.
HA do a good job with groups so even though I do understand it is nice to have it all in one place as I to would like that, sometimes it is better to use what HA have perfected and maintain well like helper groups.
Here is the link on how to set up helper group if you need it. Click Here
I did more testing to pinpoint where the issue is coming from.
I put 2 motion sensors pretty close to each other and triggered only 1. Automation did not start as it failed on the first condition check.
condition:
- condition: or
conditions:
- condition: and
conditions:
- condition: state
entity_id: !input motion_trigger
state: 'on'
- condition: and
conditions:
- condition: state
entity_id: !input motion_trigger
state: 'on'
- condition: trigger
id: t2
- condition: and
conditions:
- condition: state
entity_id: !input motion_trigger
state: 'on'
- condition: trigger
id: t3
- condition: and
conditions:
- condition: state
entity_id: !input motion_trigger
state: 'on'
- condition: trigger
id: t4
This first conditon is shown in Traces as conditions/0
Entity Id 0 was evaluated as true, but the overall first condition as false.
This is the first condition:
I believe the problem comes from the fact that the sensors are both under the same entity_id , hence the automation expects them to be both On to continue, which is wrong.
They should be evaluated separate and if ANY of them is ON, the automation should continue.
And i think i fixed it
condition:
- condition: or
conditions:
- condition: and
conditions:
- condition: state
entity_id: !input motion_trigger
match: any
state: 'on'
only one sensor triggered, condition evaluated as true
Currently I have a script with a template for the lamp that retrieves the values from the adaptive lighting and adjusts accordingly.
If I let the lamp just turn on, I have partly a short flickering or have to wait a bit until the integration adjusts the lamp.
My script looks like this:
service: light.turn_on
data_template:
entity_id: light.hue_signe_esszimmer
brightness_pct: "{{ states('sensor.ct_helligkeit_esszimmer') }}"
color_temp: "{{ states('sensor.ct_mired_esszimmer') }}"
alias: Licht einschalten (mit Template Woche)
The light currently goes off via the normal light.turn_off command.
But of course I could also do this with a script.
I would tinker with it myself, unfortunately I know too little
Thank you, I will look into that and update the blueprint.
EDIT
Mine worked the first time with 2 motions sensors, but looked at the traces showed it stopped (what the). Then I changed it and the traces looked good and it worked. Then I removed it and it didnāt work. Put it back and it works.
I will update the Blueprint with your fix, thanks again.
Bug fix thanks to @Momo
When using multiple entities for the āTrigger Sensor - Binary Sensorsā. Would not run.
Enjoy
Blacky
Anytime
Now iām thinking of how to include some other check to keep lights on if standing still. For example check for TV power and if above 100W then do not turn lights off.
I like the idea of having an override switch like it is implemented but iām the type that always forget to press some button. So an automated check for some entity property would be great.
Remember the by-pass can be anything that has a ON state.
I will PM you.
I know but it is not enough. In my home office as we speak, working at PC. Lights just went off. PC is connected to a smart plug that sends power reports and status in HA. If iām working then power will be > 100W. If i leave for a longer time then PC will be in sleep/hibernate.
There is nothing else around that has the on status , except the plug - but that is on all the time.
The power check is in general a widely used trigger for automations.