💡 Sensor Light - Motion Sensor - Door Sensor - Sun Elevation - LUX Value - Scenes - Time - Light Control - Device Tracker - Night Lights

Hi @mjsblume It is probably just me but I am not full understanding what is happening but I will try to answer your post.

  1. you have a magic button that you switch ON and then a time delay of 6 hours starts before it turns itself OFF.
  • If that magic button is also set in the blueprint it should disable any triggers you have and your lights should work as normal. If you go to lunch and you would like the light OFF you will have to turn it OFF manually. When you get back you will have to turn it back on manually. It will work like this until the magic button 6 hour time delay goes to OFF. If the light is turned ON and then the time delay goes to OFF the light will stay ON until a trigger happens and the blueprint automation runs.
  • If them magic button is not connected to the by-pass in the blueprint then it should work as normal. The light may turn ON and OFF if you sit still but that is a motion sensor.
  • If the magic button disables the motion sensor some how…then… not sure what is going on.

If the magic button is connected to the by-pass option in the blueprint and it is ON then this is how it should work. You will have to turn the light on manually.

I think you just need to manually turn the light back ON. If you don’t want to do that then a presence detectors is the go. I haven’t got mine yet as it all sold out but I will be getting one if he makes more.

1 Like

This is the best documented Blueprint I’ve ever seen in this community.
Well done!!

And thanks for sharing!

5 Likes

FAQ - My light turns on but then turns off and stays off, or the automation isn’t working correctly with multiple trigger sensors or binary sensors.

Now, you can add any binary sensors you’d like as the trigger. However, the blueprint may not function correctly if more than one motion sensor or binary sensor is selected.

With the introduction of new presence sensors and contact/door sensors, you might encounter a scenario where the light turns off and stays off, even if the presence sensor remains in the ON state.

If you’re experiencing issues with multiple motion or binary sensors, and it’s driving you crazy, try following these steps to potentially resolve the problem.

ADD A GROUP HELPER

  1. Go to Settings > Devices & Services > click on the Helpers tab > click + CREATE HELPER and select Group.

  2. Select Binary Sensor Group.

    2

  3. Enter a name for the group, such as “Sensor Light - Front Door - Group”. Then, select the Members or entities that will be included in the blueprint automation. Ensure that the Hide Members and All Entities toggles are OFF, as shown below.

  4. Next, return to the automation and in the Trigger Sensor - Binary Sensors section, search for the group name you just created, such as “Sensor Light - Front Door - Group”, and select it. Ensure that only this group is selected here.

    If you need to add or remove entities, go back to the helper and edit it as needed (see below).

  5. Now, go through the blueprint and click Save. This should resolve your issues.

EDIT HELPER

If you need to edit the Helper, go to Settings > Devices & Services > click on the Helpers tab > select the helper you want to edit (e.g., “Sensor Light - Front Door - Group”) > click the cogwheel icon.

8

Then select Group Options.

You will then see your entities. Edit them as needed.

If you’d like to learn more about groups and their use, please click here.

Enjoy

Blacky :grinning:

Back to FAQ: Click Here

Back to “The Settings & Best Practice Guidelines” Click Here

3 Likes

Hi Edward, thanks for your kind words. It is nice to get feedback when people like it. :smiling_face_with_three_hearts:

Back to top: Click Here

3 Likes

FAQ - How do you update the blueprint from version 1.4 - 1.7 to version 1.8 and above?

New update 1.8

Before upgrading from Version 1.7 and below please see below upgrade options. If you are installing from new then you don’t need to do anything just install the blueprint.

  • More user friendly selection for enabling and disabling options.
  • Bug fix. Fixed a issue where light would not turn ON when option was made. Example: Using the new presence sensors, door sensor, contact sensor that hold their state to ON for long periods and one of the options being sun, LUX or time would pass through its condition and the light would remain OFF until you walk out of the room and entered again resetting the sensor or you would have to close the door and open it again because the trigger is in the ON state. Anyway it is fixed and is worth the upgrade.

UPGRADE OPTIONS

  1. Delete the automation, upgrade and set up again.
    or
  2. Follow the steps below.

Go into your automation and click on the three dots. Select “Edit in YAML”

Check you “ambient_light_sensor” to see if the option is set to “none”. If you have a sensor here you can upgrade no need to read further. If you have “none” then we need to change it.

1

Replace the “none” with “” code below.

    ambient_light_sensor: []

3

Click save. Now you ready to upgrade.

Enjoy

Blacky :grinning:

Back to FAQ: Click Here

FAQ - Sun Elevation Condition

Why did you choose to use sun elevation?

I initially considered using Sunset and Sunrise, with a time offset but Home Assistant recommends using sun elevation for more consistent performance throughout the year. Following their advice, I opted for sun elevation. This is because the actual light level differs when using a fixed time after sunset or sunrise during winter versus summer. By setting a sun elevation, you achieve consistent light levels throughout the year.

How do I set up sun elevation settings for my lights in the blueprint?

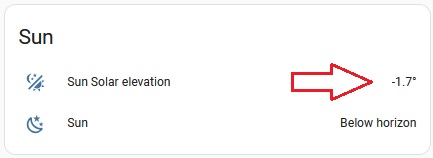
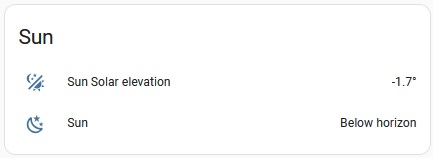
It’s really easy to set up. First, check your sun elevation degrees and set your Sun Elevation Falling and Sun Elevation Rising to match your specific location, as every site is different. The easiest way to do this is to add the sun solar elevation entity to your dashboard (see below). One evening, observe the sunset and note the elevation at which you’d like the lights to turn on. Set this value for Sun Elevation Falling. Repeat the process for sunrise, noting the elevation at which you want the lights to turn off, and set this for Sun Elevation Rising. Then, monitor to ensure it’s working correctly and meets your preferences. If adjustments are needed, you can easily make changes as necessary.

Note: If the slider doesn’t allow you to set your desired sun elevation degrees, simply type the value into the text box and click save.

135

Night Lights - Sun Elevation

When choosing to use a sun elevation condition for night lights, it is not necessary to enable the sun elevation condition for normal lights. The night lights sun elevation condition will function independently.

Note: If you’re incorporating sun elevation conditions for both normal lights and night lights, it’s recommended to use a lower value for night lights. This ensures smoother transitions and more accurate lighting adjustments based on ambient conditions.

Can the sun elevation be used to trigger the lights ON and OFF?

Yes, if the Trigger Sensor is ON (active, detected, etc.), the lights will turn ON and OFF when the sun elevation crosses the setpoints you have configured.

How do I add the Sun Solar Elevation Entity and Sun Entity to a Home Assistant Dashboard?

To add the sun solar elevation and sun entity to your dashboard, follow these steps:

  1. Access your Home Assistant instance through your web browser or the Home Assistant App.
  2. Navigate to the dashboard where you want to add the sun entities.
  3. Click on the pencil icon in the top right corner of the dashboard to enter edit mode.
  4. Click on the + Add Card button at the bottom right of the dashboard.
  5. In the pop-up window, scroll down and select the Entities card.
  6. If the card includes any default entities, click the X to remove them.
  7. Under Entities (required), click on the Entity dropdown and search for and select the Sun Solar Elevation (e.g., sensor.sun_solar_elevation) entity. This will display the sun elevation.
  8. Click on the next Entity dropdown and search for and select the Sun (e.g., sun.sun) entity. This will display whether the sun is ‘Above horizon’ or ‘Below horizon’.
  9. Optionally, give the card a title, such as Sun.
  10. Click the Save button to add the card to your dashboard.
  11. Click DONE in the top right corner to exit edit mode.

Now you will have the sun elevation and sun status displayed on your dashboard, allowing you to evaluate and adjust the sun elevation values for your automations.

136


Enjoy

Blacky :grinning:

Back to FAQ: Click Here

Back to “The Settings & Best Practice Guidelines” Click Here

Hi Dude,

Nice Blueprint, I have a question.
Is it possible to start a script instead of a scene?
I use the Adaptive Lighting Integration and scenes unfortunately do not work with templates :confused:

1 Like

Hi @clipse , not currently in the blueprint but yes I could change it to also start a script.

Are you wanting to create a script that turns your lights ON and then create another script to turn your lights OFF just like scenes?

or

Are you wanting to start a script (Adaptive Lighting) and then let it do the rest?

Hi,

I just stumbled accross your blueprint and i think it is great :slight_smile: thank you for the hard work and sharing with the community.
I tried the blueprint on a basic light with a motion and a lux sensor and it works great !

However i fail to see why it doesn’t work all the time with multiple binary sensors as trigger. My case is that i have more then 15 lights that rely on motion (sometimes 2 of them), door, and lux sensors. I understand creating helpers … will… help :slight_smile: but i’d like to use the blueprint as it was designed so i can change stuff quickly and see all info in one place.
I have automations that rely on multiple triggers and they work just fine.

Thank you !

@Momo Thanks for the kind words.

A example: Motion detected, trigger received automation runs, motion is in the ON state, before it goes to the OFF state the door opened and goes to ON state, LUX goes to ON state and then motion goes to OFF state. Because motion has now gone to the OFF state it is ready to receive the next trigger. The door and the LUX will not send a trigger to the automation until the door is closed and opened again or the LUX go high and low again so the automation waits. The problem happens more when we have sensors that can be in a ON state for a long time like door, LUX, etc.

If you have 3 motion sensors apart from each other it can work well because they normal are only on for short time and keep sending triggers. But in saying that it is possible to have issues.

If you group the motion, door and the LUX sensor together it acts as one trigger. So you trigger motion and it goes to the ON state, then you open the door and it goes to ON state, then your LUX goes to the ON state, your door closes and then is OFF, motion then goes OFF but the LUX is still ON so the group or the trigger is still in a ON state waiting until all sensors go to the OFF state. Once that happens the time delay starts. Hope that make sense.

I try and name the helper group to the automation so I can find it easy. But normally we set it up and forget about it.

HA do a good job with groups so even though I do understand it is nice to have it all in one place as I to would like that, sometimes it is better to use what HA have perfected and maintain well like helper groups.

Here is the link on how to set up helper group if you need it. Click Here

I did more testing to pinpoint where the issue is coming from.

I put 2 motion sensors pretty close to each other and triggered only 1. Automation did not start as it failed on the first condition check.

condition:
- condition: or
  conditions:
  - condition: and
    conditions:
    - condition: state
      entity_id: !input motion_trigger
      state: 'on'
  - condition: and
    conditions:
    - condition: state
      entity_id: !input motion_trigger
      state: 'on'
    - condition: trigger
      id: t2
  - condition: and
    conditions:
    - condition: state
      entity_id: !input motion_trigger
      state: 'on'
    - condition: trigger
      id: t3
  - condition: and
    conditions:
    - condition: state
      entity_id: !input motion_trigger
      state: 'on'
    - condition: trigger
      id: t4

This first conditon is shown in Traces as conditions/0

Entity Id 0 was evaluated as true, but the overall first condition as false.

This is the first condition:
image

I believe the problem comes from the fact that the sensors are both under the same entity_id , hence the automation expects them to be both On to continue, which is wrong.

They should be evaluated separate and if ANY of them is ON, the automation should continue.

1 Like

And i think i fixed it :slight_smile:

condition:
- condition: or
  conditions:
  - condition: and
    conditions:
    - condition: state
      entity_id: !input motion_trigger
      match: any
      state: 'on'

only one sensor triggered, condition evaluated as true

Currently I have a script with a template for the lamp that retrieves the values from the adaptive lighting and adjusts accordingly.
If I let the lamp just turn on, I have partly a short flickering or have to wait a bit until the integration adjusts the lamp.
My script looks like this:

service: light.turn_on
data_template:
  entity_id: light.hue_signe_esszimmer
  brightness_pct: "{{ states('sensor.ct_helligkeit_esszimmer') }}"
  color_temp: "{{ states('sensor.ct_mired_esszimmer') }}"
alias: Licht einschalten (mit Template Woche)

The light currently goes off via the normal light.turn_off command.
But of course I could also do this with a script.

I would tinker with it myself, unfortunately I know too little :confused:

@Momo

Thank you, I will look into that and update the blueprint. :grinning: :+1:

EDIT
Mine worked the first time with 2 motions sensors, but looked at the traces showed it stopped (what the). Then I changed it and the traces looked good and it worked. Then I removed it and it didn’t work. Put it back and it works.

I will update the Blueprint with your fix, thanks again. :+1:

New update 1.9

Bug fix thanks to @Momo

When using multiple entities for the “Trigger Sensor - Binary Sensors”. Would not run.

Enjoy

Blacky :grinning:

Anytime :slight_smile:

Now i’m thinking of how to include some other check to keep lights on if standing still. For example check for TV power and if above 100W then do not turn lights off.
I like the idea of having an override switch like it is implemented but i’m the type that always forget to press some button. So an automated check for some entity property would be great.

1 Like

Remember the by-pass can be anything that has a ON state.

I will PM you.

I know but it is not enough. In my home office as we speak, working at PC. Lights just went off. PC is connected to a smart plug that sends power reports and status in HA. If i’m working then power will be > 100W. If i leave for a longer time then PC will be in sleep/hibernate.
There is nothing else around that has the on status , except the plug - but that is on all the time.
The power check is in general a widely used trigger for automations.

@Momo back to the group but first need to add a binary sensor into your “configuration.yaml” . Then change the ‘sensor.septic_tank_power’ to your computer sensor power. restart HA. Make a group and put it into the group. 85 is your power.

binary_sensor:
  - platform: template
    sensors:
      computer:
        friendly_name: "work computer power"
        device_class: power
        icon_template: mdi:laptop
        value_template: >-
          {% if states('sensor.septic_tank_power')|float > 85 %}
            on
          {% else %}
            off
          {% endif %}