FAQ - Sun Elevation Condition
Why did you choose to use sun elevation?
I initially considered using Sunset and Sunrise, with a time offset but Home Assistant recommends using sun elevation for more consistent performance throughout the year. Following their advice, I opted for sun elevation. This is because the actual light level differs when using a fixed time after sunset or sunrise during winter versus summer. By setting a sun elevation, you achieve consistent light levels throughout the year.
How do I set up sun elevation settings for my lights in the blueprint?
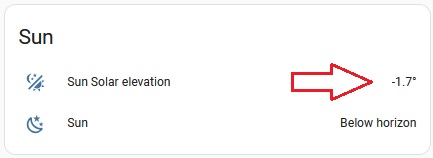
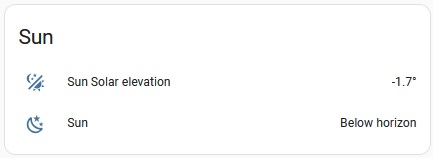
It’s really easy to set up. First, check your sun elevation degrees and set your Sun Elevation Falling and Sun Elevation Rising to match your specific location, as every site is different. The easiest way to do this is to add the sun solar elevation entity to your dashboard (see below). One evening, observe the sunset and note the elevation at which you’d like the lights to turn on. Set this value for Sun Elevation Falling. Repeat the process for sunrise, noting the elevation at which you want the lights to turn off, and set this for Sun Elevation Rising. Then, monitor to ensure it’s working correctly and meets your preferences. If adjustments are needed, you can easily make changes as necessary.
Note: If the slider doesn’t allow you to set your desired sun elevation degrees, simply type the value into the text box and click save.

Night Lights - Sun Elevation
When choosing to use a sun elevation condition for night lights, it is not necessary to enable the sun elevation condition for normal lights. The night lights sun elevation condition will function independently.
Note: If you’re incorporating sun elevation conditions for both normal lights and night lights, it’s recommended to use a lower value for night lights. This ensures smoother transitions and more accurate lighting adjustments based on ambient conditions.
Can the sun elevation be used to trigger the lights ON and OFF?
Yes, if the Trigger Sensor is ON (active, detected, etc.), the lights will turn ON and OFF when the sun elevation crosses the setpoints you have configured.
How do I add the Sun Solar Elevation Entity and Sun Entity to a Home Assistant Dashboard?
To add the sun solar elevation and sun entity to your dashboard, follow these steps:
- Access your Home Assistant instance through your web browser or the Home Assistant App.
- Navigate to the dashboard where you want to add the sun entities.
- Click on the pencil icon in the top right corner of the dashboard to enter edit mode.
- Click on the + Add Card button at the bottom right of the dashboard.
- In the pop-up window, scroll down and select the Entities card.
- If the card includes any default entities, click the X to remove them.
- Under Entities (required), click on the Entity dropdown and search for and select the Sun Solar Elevation (e.g.,
sensor.sun_solar_elevation) entity. This will display the sun elevation.
- Click on the next Entity dropdown and search for and select the Sun (e.g.,
sun.sun) entity. This will display whether the sun is ‘Above horizon’ or ‘Below horizon’.
- Optionally, give the card a title, such as Sun.
- Click the Save button to add the card to your dashboard.
- Click DONE in the top right corner to exit edit mode.
Now you will have the sun elevation and sun status displayed on your dashboard, allowing you to evaluate and adjust the sun elevation values for your automations.

Enjoy
Blacky 
Back to FAQ: Click Here
Back to “The Settings & Best Practice Guidelines” Click Here


 thank you for the hard work and sharing with the community.


