So, for the impatient folks, (like myself), I’ll start with my working config and why I’m using the settings I’ve chosen.
However, I must confess, this is a MOSTLY working configuration. Not because of an issue with ssocr, it’s working great. My problem is with my display and the fact it goes blank at times and empty images get captured and processed.
configuration.yaml
# Seven Segment OCR
image_processing:
 - platform: seven_segments
   x_position: 190
   y_position: 30
   width: 310
   height: 250
   threshold: 20
#   extra_arguments: -d 2-3 -C -a --background black -c digits -P --debug-image=www/snapshots/debug-test.jpg -o www/snapshots/test.jpg r_threshold erosion
   extra_arguments: -d 2-3 -C -a --background black -c digits r_threshold erosion
   source:
     - entity_id: camera.esphome_web_5a02ec_esp32_s3_cam
       name: "Noma Heater"
The commented line is my debug settings. You can include it or leave it out, your choice.
Where you can find details.
HA doc for SSOCR
SSOCR Executable Documentation
This page includes all the parameters, what they do, and how to use them.
https://www.unix-ag.uni-kl.de/~auerswal/ssocr/
Parameters: (production values)
(the debug values in the commented line are in the debug later in this post)
x_position, y_position, width, height
The ssocr program uses the ‘crop X Y W H’ command to determine the area of the photo to crop. As you would expect, these 4 parameters match up with the X Y W & H parameters of the crop command.
- x_position = 190 pixels from left edge of the captured image
- y_position = 30 pixels form the top edge of the captured image
- width = 310 pixels from x_position will mark the right edge of the capture zone
- height = 250 pixels from the y_position will mark the bottom edge of the capture zone

The closer you can get to cropping just the elements you want to capture, the better your results will be. So, spend some time and get this as accurate as you can.
Threshold: 20
Threshold sets the luminance threshold used to distinguish black from white as a percentage. However, if you do not set the -a parameter, threshold is adjusted by ssocr based on the luminance it calculates for the entire image. Also, the default threshold for HA ssocr is zero, and with my red on black display, I had to set a value for threshold to get any successful results.
Testing over multiple days showed that for my display, 20% worked best.
extra_arguments:
Now for the extra arguments, what they mean, and why I had to use them.
-d 1-2
HA includes the ability to specify a number of digits using the ‘digits: x’ parameter.
However, it does NOT allow you to specify a range of digits. x must be an integer or HA will throw an error when it restarts.
In my case, this Noma Oil heater display will show values from 5 to 35 degrees Celcius, and using HA ‘digit: x’ parameter does not work for me. So if you need a range, like I do, you need to include -d x-y or --number-digits=x-y in extra_parameters.
-C
This parameter omits decimal places. There are no decimals in my display and this prevents point light sources from being identified as a decimal, so adding it worked for me.
-a
This parameter prevents ssocr from calculating luminance thresholds from the image and uses the value you specify in ‘threshold: x’ as the absolute luminance threshold to use. (or at least thats my understanding of what it does).
I found that including this prevented false unknowns that were ocurring when lights that reflected on the black display background were turned on and off.
–background black
As you can see by the image I included to show cropping, my display is red text on a shiny black background. This parameter was imperative for ssocr to be able to deal with my display. If your display is black text on a light background, you shouldn’t need this parameter.
-c digits
This parameters isn’t absolutely necessary, but since I know that my display is only digits, limiting the character set to just digits was a no-brainer. Less processing for the program to find a correct match.
r_threshold
This is an ssocr command, not a parameter, and should be included after parameters.
It tells ssocr that it should use the ‘red channel’ to create a monochrome image with red being text and everything else being background. It worked wonders for improving the quality of the pre-processed image used to determine the text values.
erosion
This is an ssocr command, not a parameter, and should be included after parameters.
Okay, I’m not positive how this one works, but I believe, that it fills in pixels where the other processing parameters and commands may have left holes in the pre-processed image that ssocr uses to find the OCR value.
There’s more on this in the Debugging section below. If you’re getting some false ‘unknown’ results or incorrectly calculated values, give it a try.
source:
My source was a ‘Freenove ESP32-S3-WROOM CAM Board’ that I added to HA using ESPHome. If you need help with this, search for the text in quotes in this paragraph. I didn’t want to clutter this already very long post with unecessary link to an unrelated topic.
name:
This parameter is optional, but in my case, seriously shortened the name of the resulting SSOCR entity.
-
With no name parameter: image_processing.sevensegment_ocr_esphome_web_5a02ec_esp32_s3_cam
-
With a name parameter:
image_processing.noma_heater
And that’s my config.
It is MOSTLY working, but my display, NOT ssocr, has an annoying issue that still causes me grief. SSOCR runs every 10 seconds, captures a new image, and processes the OCR value, which is great. What’s not great, in my case, is that when the heater cycles to on, the LED display flashes on and off for about 4 seconds, and if SSOCR captures the image when the display is blank, I get a false ‘unknown’ for a result.
DEBUGGING
So my setup is HA as a Virtual Box guest running on a 16 Core AMD Ryzen systen running Kubuntu 24.10, with 2 cores and 4GB RAM dedicated to HA. I wasn’t able to find and run the ‘ssocr’ executable in an HA terminal or ssh session, but I’m sure it’s in there somewhere, since SSOCR is working. Perhaps it’s buried in a docker container. If someone knows, I’d love to know where to find it…
So, I did my debugging on my local Linux system using an installed version of the ssocr package and by downloading images from my HA instance using a browser or curl in a terminal session.
First some general details I determined while trying to get stable results.
- Glare from direct or even indirect lighting is your enemy!!! Here are two images, that show this pretty cleary. The first shows the hideous reflection that the camera picked up from the Noma Heater’s glossy black display.
The second is the same camera mount, but with a glare shield added.
- Closely cropped areas for the digits or text you are trying to capture is critical. It will seriously reduce the amount of processing required by ssocr to decode your text. And it will likely reduce false results.
- If your display is color text on a black background, then make use of the r_threshold, g_threshold, and b_threshold commands to create a monochrome image. It will greatly improve your results.
- Do NOT rely on “digits: -1” (HA default) unless you absolutely have to. Instead provide a precise number of digits using 'digits: ’ parameter or using 'extra_arguments -d ’ and a range of digits. If you see errors in the ‘HA core’ logs (which is where ssocr logs go), then you can try to determine why you are getting error results and improve your image processing using additional parameters if necessary.
- If you’re getting inconsistent results and your lighting is varying, try using the -a parameter and altering your threshold to see if it improves your results.
- SSORC only writes to the log if it detects an error. Doesn’t matter if you set the logger level to ‘DEBUG’ unless ssocr detects an error, there is no log output. However, you do NOT need to change the debug level of SSOCR or HA to get the debug output on error, just add the -P option to the ‘extra_parameters’ and the information will get logged.
- The output from ssocr to the HA Core debug log wasn’t very useful to me once I figured out how to replicate processing on my Linux system. Instead, I would just watch the logbook for the image_processing entity (in my case ‘Noma Heater’) for the times when changes occurred (OCR to Unknown, etc) and then examine the images before and after that time period. However, to do this, I had to retrieve and save a LOT of images from HA. Not a big issue in my case, since the images were 7-8Kb in size and I have GB of free space. But for others this may be problematic. So I included how to add debug output to the HA Core log even though I no longer use it.


My Debugging Process
First, the extra_arguments configuration entry with the 3 debug parameters I used.
extra_arguments: -d 2-3 -C -a --background black -c digits -P --debug-image=www/snapshots/debug-test.jpg -o www/snapshots/test.jpg r_threshold erosion
The 3 debug parameters in this line are
-P
Print debug text when the ssocr command runs. This text will be visible in the HA Core log, but ONLY when there is an error in processing an OCR value.
The code block below shows an example of the output with -P enabled.
The first line is the normal warning level output.
Everything else comes from the -P parameter.
The 3rd line from the bottom gives the explanation for what occurred - in this case no digits could be extracted (found) by ssocr.
2025-04-05 15:41:26.108 WARNING (SyncWorker_0) [homeassistant.components.seven_segments.image_processing] Unable to detect value: ================================================================================
flags & VERBOSE=4
thresh=20.000000
flags & PRINT_INFO=0
flags & ADJUST_GRAY=0
flags & ABSOLUTE_THRESHOLD=1
flags & DO_ITERATIVE_THRESHOLD=0
flags & USE_DEBUG_IMAGE=8
flags & DEBUG_OUTPUT=0
flags & PROCESS_ONLY=0
flags & ASCII_ART_SEGMENTS=0
flags & PRINT_AS_HEX=0
flags & OMIT_DECIMAL=1024
flags & PRINT_SPACES=0
flags & SPC_USE_AVG_DST=0
need_pixels = 1
min_segment = 1
min_char_dims = 1x1
ignore_pixels = 0
expected_digits.min = 2
expected_digits.max = 3
foreground = 255 (white)
background = 0 (black)
luminance  = Rec709
charset    = digits
height/width threshold for one    = 3
width/height threshold for minus  = 2
max_dig_h/h threshold for decimal = 5
max_dig_w/w threshold for decimal = 2
distance factor for adding spaces = 1.40
optind=17 argc=27
================================================================================
argv[argc-1]=/config/ssocr-Noma_Heater.png used as image file name
loading image /config/ssocr-Noma_Heater.png
image width: 800
image height: 600
0.00 <= lum <= 209.00 (lum should be in [0,255])
using threshold 20.00
got commands crop (argv[17]) 190 (argv[18]) 30 (argv[19]) 310 (argv[20]) 250 (argv[21]) rotate (argv[22]) 0 (argv[23]) r_threshold (argv[24]) erosion (argv[25])
 cropping from (190,30) to (500,280) [width 310, height 250] (from strings 190, 30, 310, and 250)
  cropped image width: 310
  cropped image height: 250
  2.00 <= lum <= 27.00 in cropped image (lum should be in [0,255])
using threshold 20.00
 processing rotate 0.000000 (from string 0)
 processing r_threshold
 processing erosion (1)
using jpg format for output image
writing output image to file www/snapshots/test.jpg
starting image segmentation
starting horizontal partitioning
horizontal partitioning found 0 digit(s)
looking for upper and lower digit boundaries
image segmentation found 0 potential digits
ssocr: expected between 2 and 3 digits, but found 0
using jpg format for debug image
writing debug image to file www/snapshots/debug-test.jpg
–debug-image=www/snapshots/debug-test.jpg
This parameter writes a debug image to my .config/www/snapshots folder.
The debug image includes framing and identification lines added by ssocr that show how it blocked out the characters, and IF it recognized segments.
These 2 images were taken 10 seconds apart.
The first was successful, and you can see the red and green identification lines that cross the successfully processed segments.
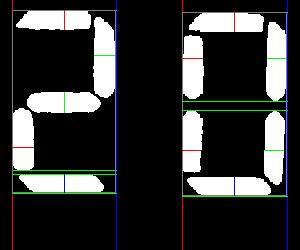
The second was unsuccessful, and if you look closely, you’ll see that there are no segments with identification lines crossing through them. It just includes the framing lines for where if found luminance artifacts.

To use this parameter as defined in my configuration, you either need a .config/www/snapshots folder, or modify the config to write to www/{filename}.jpg or www/{filename}.png
You can then view or retrieve this image using a browser or curl from http://{your ha URL}:8123/local/snapshots/debug-test.jpg
But since the image will be overwritten every 10 seconds, unless you happen to refresh your browser or download the file at exactly the right moment, you won’t get a copy of the image that caused the problem. And I also found it was helpful to have a before, during, and after image for comparison.
So I created a small script that downloads the images and sames them with a timestamp in the names so I could process them at my leisure (it’s documented below)
-o www/snapshots/test.jpg
This parameter writes an cropped and pre-processed image to my .config/www/snapshots folder.
This image is cropped and has had all the pre-processing performed. It can therefore be used after the fact by ssocr to view the debug output without having to go into the logs and try to find it.
Example:
Download and save test.jpg and debug-test.jpg images to your local system using curl.
curl -o test.jpg http://{ha url}:8123/local/snapshots/test.jpg
curl -o debug-test.jpg http://{ha url}:8123/local/snapshots/debug-test.jpg
Process the cropped and pre-processed image (test.jpg) locally and look at the debug output.
The 3rd line from the end of the debug output tells you why if failed, and the debug-test-local.jpg image should look exactly like the debug-test.jpg that you downloaded.
ssocr -d 2-3 -C --background black -c digits -P --debug-image=debug-test-local.jpg test.jpg
================================================================================
VERSION=2.24.0
flags & VERBOSE=4
thresh=50.000000
flags & PRINT_INFO=0
flags & ADJUST_GRAY=0
flags & ABSOLUTE_THRESHOLD=0
flags & DO_ITERATIVE_THRESHOLD=0
flags & USE_DEBUG_IMAGE=0
flags & DEBUG_OUTPUT=128
flags & PROCESS_ONLY=0
flags & ASCII_ART_SEGMENTS=0
flags & PRINT_AS_HEX=0
flags & OMIT_DECIMAL=1024
flags & PRINT_SPACES=0
flags & SPC_USE_AVG_DST=0
need_pixels = 1
min_segment = 1
min_char_dims = 1x1
ignore_pixels = 0
expected_digits.min = 2
expected_digits.max = 2
foreground = 255 (white)
background = 0 (black)
luminance  = Rec709
charset    = digits
height/width threshold for one    = 3
width/height threshold for minus  = 2
max_dig_h/h threshold for decimal = 5
max_dig_w/w threshold for decimal = 2
distance factor for adding spaces = 1.40
optind=9 argc=10
================================================================================
argv[argc-1]=image-2025_04_04_11_45_55.jpg used as image file name
loading image image-2025_04_04_11_45_55.jpg
image width: 300
image height: 250
0.00 <= lum <= 255.00 (lum should be in [0,255])
adjusting threshold to image: 50.000000 -> 50.000000
using threshold 50.00
no commands given, using image image-2025_04_04_11_45_55.jpg unmodified
starting image segmentation
starting horizontal partitioning
 start of potential digit 0 in image column 11
 end of potential digit 0 in image column 116
 start of potential digit 1 in image column 182
 end of potential digit 1 in image column 287
 start of potential digit 2 in image column 288
 end of potential digit 2 in image column 289
horizontal partitioning found 3 digit(s)
looking for upper and lower digit boundaries
image segmentation found 3 potential digits
ssocr: expected 2 digits, but found 3
using jpg format for debug image
writing debug image to file debug-test-local.jpg
These 3 files show this process in action.
First file is the pre-processed image (test.jpg)

The second file is the debug-test.jpg downloaded from HA
And the third file is the output (debug-test-local.jpg) from running ssocr against the pre-processed test.jpg file. If you compare it to the previous image, they are identical.
Adding parameters or commands to improve results
In this particular case, if I add the ‘errosion’ command when I process test.jpg image, it will fix the problem. This shows how you can use this trick of downloading images and re-processing the pre-processed images to try to improve your OCR processing results.
ssocr -d 2-3 -C --background black -c digits -P --debug-image=www/snapshots/debug-test.jpg erosion test.jpg
================================================================================
VERSION=2.24.0
flags & VERBOSE=4
thresh=50.000000
flags & PRINT_INFO=0
flags & ADJUST_GRAY=0
flags & ABSOLUTE_THRESHOLD=0
flags & DO_ITERATIVE_THRESHOLD=0
flags & USE_DEBUG_IMAGE=0
flags & DEBUG_OUTPUT=128
flags & PROCESS_ONLY=0
flags & ASCII_ART_SEGMENTS=0
flags & PRINT_AS_HEX=0
flags & OMIT_DECIMAL=1024
flags & PRINT_SPACES=0
flags & SPC_USE_AVG_DST=0
need_pixels = 1
min_segment = 1
min_char_dims = 1x1
ignore_pixels = 0
expected_digits.min = 2
expected_digits.max = 2
foreground = 255 (white)
background = 0 (black)
luminance  = Rec709
charset    = digits
height/width threshold for one    = 3
width/height threshold for minus  = 2
max_dig_h/h threshold for decimal = 5
max_dig_w/w threshold for decimal = 2
distance factor for adding spaces = 1.40
optind=9 argc=11
================================================================================
argv[argc-1]=image-2025_04_04_11_45_55.jpg used as image file name
loading image image-2025_04_04_11_45_55.jpg
image width: 300
image height: 250
0.00 <= lum <= 255.00 (lum should be in [0,255])
adjusting threshold to image: 50.000000 -> 50.000000
using threshold 50.00
got commands erosion (argv[9])
 processing erosion (1)
starting image segmentation
starting horizontal partitioning
 start of potential digit 0 in image column 13
 end of potential digit 0 in image column 115
 start of potential digit 1 in image column 183
 end of potential digit 1 in image column 286
horizontal partitioning found 2 digit(s)
looking for upper and lower digit boundaries
image segmentation found 2 potential digits
image segmentation found 2 digits
total width of digit area is 273
total height of digit area is 184
digits are at most 103 pixels wide and 182 pixels high
found 2 digits
digit 0: (13,11) -> (115,192), width: 102 (37.36%) height: 181 (98.37%)
  height/width (int): 1, max_dig_w/width (int): 1, max_dig_h/height (int): 1
digit 1: (183,13) -> (286,195), width: 103 (37.73%) height: 182 (98.91%)
  height/width (int): 1, max_dig_w/width (int): 1, max_dig_h/height (int): 1
looking for digit 1
looking for decimal points
looking for minus signs
checking for special case of a one as widest character
 widest digit is not a one, skipping extra decimal point search
starting scanline based recognition for remaining digits
Display as seen by ssocr:
  _   _
  _| | |
 |_  |_|

20
Here I used the same test.jpg as in the previous example. But the output file (debug-test-local.jpg) no longer matches the downloaded debug image (debug-test.jpg). Now the local debug image includes the identification lines that cross the individual number segments.
test.jpg
debug-test-local.jpg

debug-test.jpg
And finally, the bash shell script I use and run to download images while I’m waiting for an error to occur.
#!/usr/bin/bash

while true
do
  /usr/bin/curl -o image-$(date +"%Y_%m_%d_%I_%M_%S").jpg http://homeassist.local:8123/local/snapshots/test.jpg 2>/dev/null
  /usr/bin/curl -o debug-image-$(date +"%Y_%m_%d_%I_%M_%S").jpg http://homeassist.local:8123/local/snapshots/debug-test.jpg 2>/dev/null
  sleep 10
done
This dumps 2 images into whatever directory (folder) I run it in. The file names include the date and time. And if I compare it to the logbook, I can easily find and in most cases determine why the ocr processing failed.
Here is the logbook output that shows an unknown value was processed at 2:45:05pm on April 5th

And this snapshot of the folder where I was storing the images, clearly shows that the files captured at 2:45:09 were blank, but the images captured at 2:45:19 (after 2:45:15) were successfull. (this was caused by the heater element cycling and the display flashing on and off)

I probably learned more than this while getting a working config. But that’s all that I can remember. I hope it helps someone else who might be struggling with SSOCR. It really does work well once you get it tuned.
Cheers!