Simple, Reliable Sprinkler Controller with ESPHome

I put together this DIY sprinkler controller, hope you find it useful!

Final Product

Objectives

  • duplicate common features of commercial sprinkler controllers such as:
    • Ability to schedule day-of-week, time-of-day, and duration.
    • Ability to test zones
    • Rain delay feature
    • Works offline
  • Home Assistant integration allows:
    • System status
    • Manual zone controls for testing
    • Ability to set schedule
  • Super simple hardware
  • Inexpensive.

Hardware

I wanted to keep this as SIMPLE as possible, short of buying a commercial product. Because it is simple, it is also CHEAP.

Hardware list:

  • ESP8266 8 Channel Relay board ($12.99 from Aliexpress or $18.33 from Amazon)
  • 24v DC 1500mA wall-wart power supply ($14.99)
  • 3d printed housing (I printed with clear PETG, $18.99)
  • M3 screws, suitable for plastic ($11.29 or $12.99)
  • (optional) a bit of wire and solder
  • (optional) Orbit 57623 3/4" Sprinkler Valve ($17.43)

I used the Amazon products linked above in my prototype, total was about $35. Compare that to a similar commercial product, the Orbit b-hyve 8 Zone at $94 or the outdoor version at $168. Please note that some of these links are amazon affiliate links, which means I get a small commission at no cost to you.

The relay board:

This ESP8266 8 Channel Relay board is just the ticket. Sure, it costs slightly more than an ESP8266 and a separate 8 channel relay PCB, but you donā€™t have to assemble multiple parts into a project box, so you can build this project in a snap!

Hereā€™s a picture of the board, nice and tidy!

The power supply:

Iā€™m using a 24V DC 1500 mA ā€˜wall wartā€™ power supply. It seems to be fully sealed and it has weathered many rain storms without issue.

Iā€™m using the Orbit 57623 Sprinkler Valve which is intended to be operated with 24V AC. The spec sheet indicates it pulls up to 0.30 A inrush current and 0.19 A holding current. My benchtop power supply has it pulling about 0.50 A DC. You can run 2 of these valves simultaneously with some margin.

Iā€™m happy I can power the relay board and the sprinkler valve with one 24V DC power supply. Thatā€™s fewer parts! No separate 5v power supply here!

The housing:

Hereā€™s a link to my CAD file in onshape. You can export an STL for printing directly from that link, just right click on the ā€œpartā€ in the bottom left and select Export. No user account is needed. The external mounting holes are for #8 wood screws, or zip ties. Itā€™s splashproof, not IP68. Donā€™t put this where it will get blasted by a lawn sprinkler.

An optional modification to the PCB:

I want this PCB to supply 24V to my sprinkler valve, just by simply hooking it up directly to the screw terminals, just like an off-the-shelf commercial product. To that end, Iā€™ve added some jumper wires inside to supply 24V to the output of the relay.

This is totally optional, but makes for a cleaner install. If you donā€™t do this, you will just have to find some other way to provide the 24V to your valve, and put the relay in series.

Here you can see the unmodified board. I have labeled the relay outputs NO (normally open) COM (common) and NC (normally closed) in the bottom left.

Wire GND to all NC terminals.
Wire 24V to all NO terminals.
Consider filling the NO screw terminal with hot glue, as it will always be energized and it wonā€™t be needed for this application.

With this jumper wire configuration:
GND will always be connected to NC terminals.
When the relay is energized, 24V will be connected to COM terminals.
When the relay is not energized, GND will be connected to COM terminals.

Customize your Installation

In ESPHome, create a new device and name it something like ā€œEast Balcony Sprinkler Controllerā€. Skip Installation. Select ESP8266. Configuration will be created, skip installation (again).

Once created, open your notepad and copy these unique items:

  • API encryption key
  • OTA password
  • AP password

Now you can delete everything in your new configuration and replace it with the YAML, pasted below. Edit the ā€œsubstitutionsā€ section to suit your installation. Make sure to paste in the unique keys you just copied. This configuration assumes you have already set up WIFI SSID and WIFI password in your secrets.yaml file.

substitutions: # set up unique values for this hardware instance
  name_of_device: east-balcony-sprinkler-cntrl
  id_prefix: east_balcony
  name_prefix: East Balcony
  api_key: "paste_api_key_here"
  ota_password: "paste_OTA_password_here"
  ap_password: "paste_ap_password_here"

esphome:
  name: $name_of_device
  friendly_name:  ${name_prefix} Sprinkler Controller

esp8266:
  board: esp12e
  restore_from_flash: True


# Enable logging
logger:
  level: DEBUG

# Enable Home Assistant API
api:
  encryption:
    key: $api_key

ota:
  password: $ota_password

wifi:
  ssid: !secret wifi_ssid
  password: !secret wifi_password
  ## uncomment and edit the following line to flash a device with a different name. 
  ## comment the following line out after initially flashing the device, or it won't be found
  # use_address: test123.local

  # Enable fallback hotspot (captive portal) in case wifi connection fails
  ap:
    ssid: "ESPHome-Sprinkler-Controller"
    password: $ap_password

captive_portal:
    
sprinkler:
  - id: ${id_prefix}_sprinklers
    main_switch: "Sprinkler Cycle Active"
    auto_advance_switch: "Auto Advance"
    valve_overlap: 5s
    valves:
      - valve_switch: "Zone 1 Active"
        enable_switch: "Zone 1 Auto"
        run_duration_number: 
          id: zone_1_run_duration
          name: "Zone 1 Run Duration"
          icon: "mdi:timer-outline"
          initial_value: 1
          unit_of_measurement: min
        valve_switch_id: ${id_prefix}_valve_sw1
      - valve_switch: "Zone 2 Active"
        enable_switch: "Zone 2 Auto"
        run_duration_number: 
          id: zone_2_run_duration
          name: "Zone 2 Run Duration"
          icon: "mdi:timer-outline"
          initial_value: 1
          unit_of_measurement: min
        valve_switch_id: ${id_prefix}_valve_sw2
      - valve_switch: "Zone 3 Active"
        enable_switch: "Zone 3 Auto"
        run_duration_number: 
          id: zone_3_run_duration
          name: "Zone 3 Run Duration"
          icon: "mdi:timer-outline"
          initial_value: 1
          unit_of_measurement: min
        valve_switch_id: ${id_prefix}_valve_sw3
      - valve_switch: "Zone 4 Active"
        enable_switch: "Zone 4 Auto"
        run_duration_number: 
          id: zone_4_run_duration
          name: "Zone 4 Run Duration"
          icon: "mdi:timer-outline"
          initial_value: 1
          unit_of_measurement: min
        valve_switch_id: ${id_prefix}_valve_sw4
      - valve_switch: "Zone 5 Active"
        enable_switch: "Zone 5 Auto"
        run_duration_number: 
          id: zone_5_run_duration
          name: "Zone 5 Run Duration"
          icon: "mdi:timer-outline"
          initial_value: 1
          unit_of_measurement: min
        valve_switch_id: ${id_prefix}_valve_sw5
      - valve_switch: "Zone 6 Active"
        enable_switch: "Zone 6 Auto"
        run_duration_number: 
          id: zone_6_run_duration
          name: "Zone 6 Run Duration"
          icon: "mdi:timer-outline"
          initial_value: 1
          unit_of_measurement: min
        valve_switch_id: ${id_prefix}_valve_sw6
      - valve_switch: "Zone 7 Active"
        enable_switch: "Zone 7 Auto"
        run_duration_number: 
          id: zone_7_run_duration
          name: "Zone 7 Run Duration"
          icon: "mdi:timer-outline"
          initial_value: 1
          unit_of_measurement: min
        valve_switch_id: ${id_prefix}_valve_sw7
      - valve_switch: "Zone 8 Active"
        enable_switch: "Zone 8 Auto"
        run_duration_number: 
          id: zone_8_run_duration
          name: "Zone 8 Run Duration"
          icon: "mdi:timer-outline"
          initial_value: 1
          unit_of_measurement: min
        valve_switch_id: ${id_prefix}_valve_sw8

switch:
  # relays
  - platform: gpio
    id: ${id_prefix}_valve_sw1
    pin: GPIO16
    restore_mode: ALWAYS_OFF
  - platform: gpio
    id: ${id_prefix}_valve_sw2
    pin: GPIO14
    restore_mode: ALWAYS_OFF
  - platform: gpio
    id: ${id_prefix}_valve_sw3
    pin: GPIO12
    restore_mode: ALWAYS_OFF
  - platform: gpio
    id: ${id_prefix}_valve_sw4
    pin: GPIO13
    restore_mode: ALWAYS_OFF
  - platform: gpio
    id: ${id_prefix}_valve_sw5
    pin: GPIO15
    restore_mode: ALWAYS_OFF
  - platform: gpio
    id: ${id_prefix}_valve_sw6
    pin: GPIO0
    restore_mode: ALWAYS_OFF
  - platform: gpio
    id: ${id_prefix}_valve_sw7
    pin: GPIO4
    restore_mode: ALWAYS_OFF
  - platform: gpio
    id: ${id_prefix}_valve_sw8
    pin: GPIO5
    restore_mode: ALWAYS_OFF
  # day of week toggle switches
  - platform: template
    id: ${id_prefix}_sunday
    name:  Sunday
    icon: "mdi:calendar-range"
    entity_category: config
    restore_mode: RESTORE_DEFAULT_ON
    optimistic: true
  - platform: template
    id: ${id_prefix}_monday
    name:  Monday
    icon: "mdi:calendar-range"
    entity_category: config
    restore_mode: RESTORE_DEFAULT_ON
    optimistic: true
  - platform: template
    id: ${id_prefix}_tuesday
    name:  Tuesday
    icon: "mdi:calendar-range"
    entity_category: config
    restore_mode: RESTORE_DEFAULT_ON
    optimistic: true
  - platform: template
    id: ${id_prefix}_wednesday
    name:  Wednesday
    icon: "mdi:calendar-range"
    entity_category: config
    restore_mode: RESTORE_DEFAULT_ON
    optimistic: true
  - platform: template
    id: ${id_prefix}_thursday
    name:  Thursday
    icon: "mdi:calendar-range"
    entity_category: config
    restore_mode: RESTORE_DEFAULT_ON
    optimistic: true
  - platform: template
    id: ${id_prefix}_friday
    name:  Friday
    icon: "mdi:calendar-range"
    entity_category: config
    restore_mode: RESTORE_DEFAULT_ON
    optimistic: true
  - platform: template
    id: ${id_prefix}_saturday
    name:  Saturday
    icon: "mdi:calendar-range"
    entity_category: config
    restore_mode: RESTORE_DEFAULT_ON
    optimistic: true
  # scheduled time enable switches
  - platform: template
    id: ${id_prefix}_schedule1_enabled
    name: Enable Schedule 1
    icon: "mdi:clock-outline"
    entity_category: config
    restore_mode: RESTORE_DEFAULT_ON
    optimistic: true
  - platform: template
    id: ${id_prefix}_schedule2_enabled
    name: Enable Schedule 2
    icon: "mdi:clock-outline"
    entity_category: config
    restore_mode: RESTORE_DEFAULT_ON
    optimistic: true
  - platform: template
    id: ${id_prefix}_schedule3_enabled
    name: Enable Schedule 3
    icon: "mdi:clock-outline"
    entity_category: config
    restore_mode: RESTORE_DEFAULT_ON
    optimistic: true
  # rain delay switches (can be cancelled, auto-resetting)
  - platform: template
    id: ${id_prefix}_raindelay_24h_enabled
    name: Enable 24h Rain Delay
    icon: "mdi:weather-cloudy-clock"
    restore_mode: RESTORE_DEFAULT_OFF
    optimistic: true
    turn_on_action:
      then:
        - delay: 
            hours: 24
        - switch.turn_off: ${id_prefix}_raindelay_24h_enabled
  - platform: template
    id: ${id_prefix}_raindelay_48h_enabled
    name: Enable 48h Rain Delay
    icon: "mdi:weather-cloudy-clock"
    restore_mode: RESTORE_DEFAULT_OFF
    optimistic: true
    turn_on_action:
      then:
        - delay: 
            hours: 48
        - switch.turn_off: ${id_prefix}_raindelay_48h_enabled

datetime:
  - platform: template
    name: Schedule 1 Start Time
    entity_category: config
    id: ${id_prefix}_s1t
    type: time
    optimistic: true
    restore_value: true
  - platform: template
    name: Schedule 2 Start Time
    entity_category: config
    id: ${id_prefix}_s2t
    type: time
    optimistic: true
    restore_value: true
  - platform: template
    name: Schedule 3 Start Time
    entity_category: config
    id: ${id_prefix}_s3t
    type: time
    optimistic: true
    restore_value: true

sensor:
  - platform: wifi_signal # Reports the WiFi signal strength/RSSI in dB
    name: "WiFi Signal dB"
    id: wifi_signal_db
    update_interval: 60s
    entity_category: "diagnostic"
  - platform: copy # Reports the WiFi signal strength in %
    source_id: wifi_signal_db
    name: "WiFi Signal Percent"
    filters:
      - lambda: return min(max(2 * (x + 100.0), 0.0), 100.0);
    unit_of_measurement: "%"
    entity_category: "diagnostic"
  - platform: uptime
    name: Uptime
    entity_category: "diagnostic"

binary_sensor:
  - platform: status
    name: "Connection Status"

# set up time and check every minute (or second) for scheduled actions
time:
  - platform: homeassistant
    id: ha_time
    on_time:
      # Every 1 minute
      - seconds: 0
        minutes: /1
        then:
          - script.execute: ${id_prefix}_script1
    on_time_sync:
      then:
        - logger.log: "Synchronized system clock"


script:
    # check what day of the week it is currently, and if we have the schedule enabled today
    - id: ${id_prefix}_script1 
      then:
        lambda: |-
          int dow = id(ha_time).now().day_of_week;
          if      ((dow == 1 && id(${id_prefix}_sunday).state == true)
          ||       (dow == 2 && id(${id_prefix}_monday).state == true)
          ||       (dow == 3 && id(${id_prefix}_tuesday).state == true)
          ||       (dow == 4 && id(${id_prefix}_wednesday).state == true)
          ||       (dow == 5 && id(${id_prefix}_thursday).state == true)
          ||       (dow == 6 && id(${id_prefix}_friday).state == true)
          ||       (dow == 7 && id(${id_prefix}_saturday).state == true)) {
            id(${id_prefix}_script2).execute();
          }
    # if current time is equal to any of the scheduled start times, start the sprinkler cycle
    - id: ${id_prefix}_script2
      then:
        lambda: |-
          int hour = id(ha_time).now().hour;
          int minute = id(ha_time).now().minute;
          if      ((hour == id(${id_prefix}_s1t).hour && minute == id(${id_prefix}_s1t).minute && id(${id_prefix}_schedule1_enabled).state == true && id(${id_prefix}_raindelay_24h_enabled).state == false && id(${id_prefix}_raindelay_48h_enabled).state == false)
          ||      (hour == id(${id_prefix}_s2t).hour && minute == id(${id_prefix}_s2t).minute && id(${id_prefix}_schedule2_enabled).state == true && id(${id_prefix}_raindelay_24h_enabled).state == false && id(${id_prefix}_raindelay_48h_enabled).state == false)
          ||      (hour == id(${id_prefix}_s3t).hour && minute == id(${id_prefix}_s3t).minute && id(${id_prefix}_schedule3_enabled).state == true && id(${id_prefix}_raindelay_24h_enabled).state == false && id(${id_prefix}_raindelay_48h_enabled).state == false)) {
            id(${id_prefix}_script3).execute();
          }
    # start the sprinkler cycle
    - id: ${id_prefix}_script3
      then:
        - sprinkler.start_full_cycle: ${id_prefix}_sprinklers
        - lambda: ESP_LOGI("main", "Sprinkler cycle has begun!");

Initial Flash with ESPHome

Connect your FTDI to 5V, GND, RX to TX and TX to RX.

Plug the supplied pin jumper between GND and IO0.

Also, you must supply external power to the board. You can use the 24V DC power supply.

Hereā€™s what it looks like:

Steps:

  1. Load the YAML into your ESPHome web interface.
  2. Hold the RST button.
  3. Plug in the external power source (24V DC plug).
  4. Plug your FTDI usb into your PC.
  5. In ESPHome, click install via wired connection.
  6. Count to 5 and release the RST button.
  7. Wait patiently, it will probably begin the upload soon. If not, try again.

(I had to do this a few times for it to work successfully, but I did it for 3 boards from 2 sources)

Once the flash is successful, unplug the FTDI, power, and remove the jumper. Plug it back in to 24V DC power and the device should connect to WIFI. Shortly thereafter you should see a notification in Home Assistant that your new device has been discovered. Go ahead and add it!

You can test each relay right away by toggling the zones.

Final Assembly

The housing has a slot for the barrel plug adaptor that comes with the 24V DC power supply listed above. Just add some jumper wires for power, slot the barrel plug into the receptacle, and assemble the lid. The barrel plug adaptor is marked with (+) and (-), donā€™t mix it up. I recommend M3 stainless flathead screws (amazon).

Making the final connections

If you made the optional jumper wire modification above, then just hook up your irrigation valve to the NC and COM terminals. Polarity does not matter. Then plug in your barrel plug.

Home Assistant Dashboard Setup

Hereā€™s a simple dashboard with all of the controls:
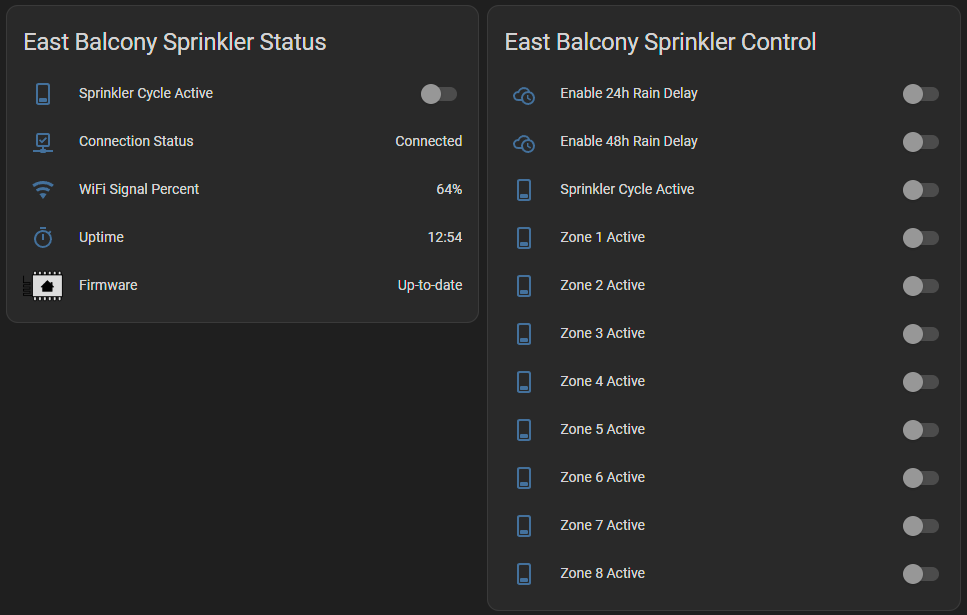
Hereā€™s the YAML configuration for a basic Home Assistant dashboard:

Status Card
type: entities
entities:
  - entity: switch.east_balcony_sprinkler_cntrl_sprinkler_cycle_active
    name: Sprinkler Cycle Active
  - entity: binary_sensor.east_balcony_sprinkler_cntrl_connection_status
    name: Connection Status
  - entity: sensor.east_balcony_sprinkler_cntrl_wifi_signal_percent
    name: WiFi Signal Percent
  - entity: sensor.east_balcony_sprinkler_cntrl_uptime
    name: Uptime
  - entity: update.east_balcony_sprinkler_controller_firmware
    name: Firmware
title: East Balcony Sprinkler Status
show_header_toggle: false
Control Card
type: entities
entities:
  - entity: switch.east_balcony_sprinkler_cntrl_enable_24h_rain_delay
    name: Enable 24h Rain Delay
  - entity: switch.east_balcony_sprinkler_cntrl_enable_48h_rain_delay
    name: Enable 48h Rain Delay
  - entity: switch.east_balcony_sprinkler_cntrl_sprinkler_cycle_active
    name: Sprinkler Cycle Active
  - entity: switch.east_balcony_sprinkler_cntrl_zone_1_active
    name: Zone 1 Active
  - entity: switch.east_balcony_sprinkler_cntrl_zone_2_active
    name: Zone 2 Active
  - entity: switch.east_balcony_sprinkler_cntrl_zone_3_active
    name: Zone 3 Active
  - entity: switch.east_balcony_sprinkler_cntrl_zone_4_active
    name: Zone 4 Active
  - entity: switch.east_balcony_sprinkler_cntrl_zone_5_active
    name: Zone 5 Active
  - entity: switch.east_balcony_sprinkler_cntrl_zone_6_active
    name: Zone 6 Active
  - entity: switch.east_balcony_sprinkler_cntrl_zone_7_active
    name: Zone 7 Active
  - entity: switch.east_balcony_sprinkler_cntrl_zone_8_active
    name: Zone 8 Active
title: East Balcony Sprinkler Control
show_header_toggle: false
Setup Card
type: entities
entities:
  - type: section
    label: What zones?
  - entity: switch.east_balcony_sprinkler_cntrl_zone_1_auto
    name: Zone 1 Auto
  - entity: switch.east_balcony_sprinkler_cntrl_zone_2_auto
    name: Zone 2 Auto
  - entity: switch.east_balcony_sprinkler_cntrl_zone_3_auto
    name: Zone 3 Auto
  - entity: switch.east_balcony_sprinkler_cntrl_zone_4_auto
    name: Zone 4 Auto
  - entity: switch.east_balcony_sprinkler_cntrl_zone_5_auto
    name: Zone 5 Auto
  - entity: switch.east_balcony_sprinkler_cntrl_zone_6_auto
    name: Zone 6 Auto
  - entity: switch.east_balcony_sprinkler_cntrl_zone_7_auto
    name: Zone 7 Auto
  - entity: switch.east_balcony_sprinkler_cntrl_zone_8_auto
    name: Zone 8 Auto
  - type: section
    label: What days?
  - entity: switch.east_balcony_sprinkler_cntrl_sunday
    name: Sunday
  - entity: switch.east_balcony_sprinkler_cntrl_monday
    name: Monday
  - entity: switch.east_balcony_sprinkler_cntrl_tuesday
    name: Tuesday
  - entity: switch.east_balcony_sprinkler_cntrl_wednesday
    name: Wednesday
  - entity: switch.east_balcony_sprinkler_cntrl_thursday
    name: Thursday
  - entity: switch.east_balcony_sprinkler_cntrl_friday
    name: Friday
  - entity: switch.east_balcony_sprinkler_cntrl_saturday
    name: Saturday
  - type: section
    label: What times?
  - entity: switch.east_balcony_sprinkler_cntrl_enable_schedule_1
    name: Enable Schedule 1
  - entity: time.east_balcony_sprinkler_cntrl_schedule_1_start_time
    name: Schedule 1 Start Time
  - entity: switch.east_balcony_sprinkler_cntrl_enable_schedule_2
    name: Enable Schedule 2
  - entity: time.east_balcony_sprinkler_cntrl_schedule_2_start_time
    name: Schedule 2 Start Time
  - entity: switch.east_balcony_sprinkler_cntrl_enable_schedule_3
    name: Enable Schedule 3
  - entity: time.east_balcony_sprinkler_cntrl_schedule_3_start_time
    name: Schedule 3 Start Time
  - type: section
    label: What durations?
  - entity: number.east_balcony_sprinkler_cntrl_zone_1_run_duration
    name: Zone 1 Run Duration
  - entity: number.east_balcony_sprinkler_cntrl_zone_2_run_duration
    name: Zone 2 Run Duration
  - entity: number.east_balcony_sprinkler_cntrl_zone_3_run_duration
    name: Zone 3 Run Duration
  - entity: number.east_balcony_sprinkler_cntrl_zone_4_run_duration
    name: Zone 4 Run Duration
  - entity: number.east_balcony_sprinkler_cntrl_zone_5_run_duration
    name: Zone 5 Run Duration
  - entity: number.east_balcony_sprinkler_cntrl_zone_6_run_duration
    name: Zone 6 Run Duration
  - entity: number.east_balcony_sprinkler_cntrl_zone_7_run_duration
    name: Zone 7 Run Duration
  - entity: number.east_balcony_sprinkler_cntrl_zone_8_run_duration
    name: Zone 8 Run Duration
title: East Balcony Sprinkler Setup
show_header_toggle: false

Tip: If you install the Expander Card, you can neatly pack away all those setup fields.

Future work:

None of this is necessary, just would be nice:

  • Incorporate schedule functionality directly into the ESPHome Sprinkler Component. Currently, the Sprinkler Component only supports scheduling and storing the run Duration on the device. It must hear from Home Assistant to kick off an irrigation cycle, therefore it requires a reliable wifi connection. It relies on the user to schedule irrigation via something like Schedule or Scheduler Card. I have hacked together ā€œon deviceā€ scheduling here, but it would be awesome if someone could build this functionality into ESPHome Sprinkler Component natively.
  • Try out the 2, 4 and 16 channel boards.
    • The 4 channel version of the board also accepts 120 or 220 V AC with its built in power supply, great for mains AC projects if you donā€™t need 24V.
    • The 16 channel version looks like it has some GPIO expanders, because the ESP8266 does not have enough pins. It also has spare GPIO pins. (see comment below, this has been done)

I hope you enjoyed this show and tell.

12 Likes

Excellent write up, and extremely clean wiring on the board. I have bookmaked this post and plan to replicate it as I already purchased the 8 channel board with this in mind.

2 Likes

I agree, awesome write up.

out of interest, the orbit valves are 24V AC not DC, while they will work with DC usually you should drop the voltage to 12V to reduce the operating current and operating temperature to prevent burning out the solenoids. This link would explain it better: Understanding 24VAC Sprinkler Valves Ā« RAYSHOBBY.NET

Looking at the relay board it would be as simple as swapping you power supply.

How difficult would it be for an outside sprinker company to use? Every fall I have a company come out to blow out my sprinklers. I honestly dont know what they need to do with the actual system, but I know they do need access to the control.

Iā€™ve ordered the parts still as I would like to do this. One other thing I would recommend for future improvement although I dont even know if its possible, is a safety kill switch.

My current cloud connected controller has a internal setting of 30 minutes. If any sprinkler is on for 30 minutes and it doesnt recieve a signal to turn it off after 30 minutes, it automatically turns it off.

That is my one big worry with DIY systems like these;

  1. DIY controller is told to turn on sprinkler by HA
  2. HA goes down
  3. Sprinkler never told to turn off, water bill costs me a full year college tuition.

Printing up the case!

in ESPHome, sprinkler is on a timer on the actual ESP8266 chip, ie HA doesnā€™t tell it turn off it, turns off based on a timer.

If you are concerned with the ESP chip restarting, Iā€™m using a drive open and drive close solenoid, so i use the below, that when ever the chip turns on it drives the valve closed regardless.
image

Note this is different to the write up above, as the orbit valves are normally closed solenoids, ie as soon as the solenoid doesnā€™t have power, then a spring will close the valve automatically.

As for the question about outside use of the different zones, you can either provide them with a tablet onsite, or add some sort of manual push button to actuate the valves. I didnā€™t look closely at the relay board but given its driving 8 relays i doubt you have enough GPIOā€™s left to do anything useful, but you could always hard wire a 10k resister from the 3V3 to a momentary switch, and back to the GPIO for each relay (ie while they hold the momentary button it would actuate the valve until released.

The sprinkler code in ESPHome runs directly on the ESP itself. Home Assistant tells it to start, and for how long to run. Then the esp does the rest. If HA goes down the routine will still finish at the specified time.

Thanks @DunkyDaMonkey for the heads up on 24VDC operation. Let me run some tests. I can easily run the solenoid for an extended period at 24VAC, 24VDC, and 12VDC, while measuring the solenoid temperature. I have been running 24VDC for 6 months without issue, so Iā€™m not too worried.

Hey @nappyjim,

I wouldnā€™t recommend this if you want an external contractor to be able to operate your sprinkler system. You would need to add functionality for it to be operated with physical buttons. There are 1 or 2 additional GPIOā€™s available on this board I believe, if you wanted to implement ā€œstartā€ and ā€œstopā€ buttons. The ESPHome sprinkler code already has a built-in ā€œAuto Advanceā€ functionality, where if you start a cycle, it will go through each valve in sequence of your set duration.

Regarding a physical kill switch. If you use the design above, you can simply pull out the DC barrel plug from the device to kill it. If you are using the orbit valves mentioned above, they will close when the valves are no longer powered. When you plug the device back in, it will start your sprinklers again at the programmed time.

Regarding the 30 minute timer, I think anything you program into the device itself is likely to fail as well if the ESP8266 locks up. You may be able to rely on the ESP8266ā€™s software and hardware watchdog timers however. This may already be configured by ESPHome, Iā€™m not sure.

If you are really worried about water leaks, you could purchase a stand-alone device that will shut off your water if it detects an extended period of high-usage. You could also make such a device with ESPHome.

Yeah I was thinking about adding one of the Moen ā€˜Floā€™ devices to always monitor water volume going out. But thats like $500 bucks

@reggleston4
Is it normal when first supply power to the board for the first time, that all the relays turn off and on down the line, over and over?

@nappyjim Yeah, I think that was the default behavior for one of the devices I purchased. Nothing to worry about.

@DunkyDaMonkey I performed some tests with 24VAC, 24VDC, and 12VDC. I measured current, temperature, and solenoid retraction force. Here are the results.

I measured AC current on the 110V mains side, so we have an apples to apples comparison for the 3 power supplies. With the solenoid energized, the current was:

24VAC: 60 mA at 110V
24VDC: 34 mA at 110V
12VDC: 22 mA at 110V

I measured the temperature of the solenoid with a thermocouple, up to 20 minutes:

        0 min        5 min          10 min     15 min     20 min
24VAC - 74 F         96 F           119 F      134 F      144 F
24VDC - 73 F         108 F          140 F      165 F      179 F
12VDC - 80 F         88 F           97 F       103 F      106 F

As you can see, the 24VDC does cook the solenoid if left to run 20 minutes. I donā€™t run any zone more than 10 minutes, so Iā€™m not too worried about it.

I even measured maximum retraction force using some hot glue, string, balance beam, and kitchen scale. In the test, I apply incrementally higher loads (about 25 grams higher each time) and then energize the solenoid. The test is failed if the solenoid fails to retract. The solenoid is weakest in this configuration, whereas if it is energized and then you apply the load, it is very strong.

24VAC: 154 grams max (1.51 newtons)
24VDC: 117 grams max (1.15 newtons)
12VDC: very little force

The 12VDC has such little retraction force, I wasnā€™t able to measure it. It would retract with no load, however it would fail to retract with a very small load applied. The 24VDC performed well up against the 24VAC power supply.

Side note: the solenoid makes a very loud 60Hz buzzing sound when powered with 24VAC and dry. After a few wet cycles it is much quieter.

All this considered, I would not recommend a 12VDC power supply. I plan to keep using the 24VDC power supply. I will find out if one burns up in practice, but so far it is no issue for cycles of a few minutes in length.

The orbit valve is piloted via a 1.5mm orifice. In this valve, the solenoid must open against your household water pressure. The valve is rated for 150 psi (thatā€™s 1.03 MPa or N/mm^2). Therefore, in theory the valve solenoid may require up to 1.81 N of retraction force at the rated 150 psi, which is slightly higher than the measured capability above, but not by much. In practice, the necessary force is probably lower because you can adjust the solenoid depth in the valve such that the starting position of the solenoid is closer to the energized position. Even at worst case, the 24VDC power supply should be good up to 95 psi.

nice job dude,

The 24AC current draw doesnā€™t make sense relative but the rest of the results are what I would have expected. I am curious if the current draw increased at all at 24VDC as the coil heats up the resistance should increase marginally resulting in more current. But thatā€™s just curiosity for you.

If I end up swapping out or add more valves from my system, maybe Iā€™ll test operating it at 12V. (my current valve is 12V push and pull actuator).

I just realized my solenoids take 24VAC. What would I need to change to get this to still work? Im assuming I cant do the jumpering behind the board as you did cause thats 24VDC.

Most sprinkler solenoids are intended to be used with 24VAC. Try using 24VDC to actuate the solenoids, it will likely work just fine. I wrote a lot of details about testing a solenoid with 24VAC, 24VDC, and 12VDC above.

Given the concerns re control from HA I started a esphome scheduler ising an external rtc last winter but ran out of time will restart work in December GitHub - pebblebed-tech/RTC_Scheduler: Realtime scheduler for ESPHome looking for help to get it over the line and incorporated in esphome

Thank you reggleston4 for putting this together. Greatly appreciated.

I had a real nightmare trying to get this board going. For others following along, this is what I did.

  1. Make sure your FTDI USB to TTL adapter is set at 3.3V via a jumper, not 5V (if your board has this). Supposedly 3.3 is required for programming but you still need to power the board with at least 5V via the power terminals in the top left of the board.

  2. On the ESP board, make sure there is a jumper bridging IO0 and GND on the header pins. This puts the board into programming mode. Yes, the instructions state this, but I missed it.

  3. Even though web.esphome.io said it was a success, then Iā€™d get a failure message: ā€œAn error occurred. Improv Wi-Fi Serial not detectedā€. I tried all sorts of things but I removed the jumper and rebooted it to see if it had made its own Wi-Fi AP. I checked via my phone and it was broadcasting its own Wi-Fi AP. I connected to it via its web interface and I was able to set my home Wi-Fi details and then I could see it in ESPHome of HA to be able to adopt it.

I wanted to say thank you for your write up on how to integrate the 8 relay board. I was successful in using an 8 relay board right up to the point were I tried to use my 24v AC power supply that was existing to power my valves and ended up back feeding power to the board. You live and learn. Since I have other plans for additional ports for other projects I also got a 16 port board, that you mentioned you may work with in the future. It took some digging but I was able to make this board work and here is the YAML that I used to make it work. The flashing procedure is basically identical other than the board I received only used 3v not 5v so ensure you are using the correct voltage for your flashing.

I hope this may help others in the future.

substitutions: # set up unique values for this hardware instance
  name_of_device: sprinkler16
  id_prefix: sprinkler16_id
  name_prefix: sprinkler16
  api_key: "x9HtmUvv7KnEmaeBuoO3VWjZp013dSyy/fxqZyegDkw="
  ota_password: "af7b179db6de1ad264c02fd5883624d1"
  ap_password: "itsapassword!"

esphome:
  name: $name_of_device
  friendly_name:  ${name_prefix} Sprinkler Controller

esp8266:
  board: esp01_1m
  restore_from_flash: True

# Enable logging
logger:

# Enable Home Assistant API/OTA
api:
  encryption:
     key: $api_key
  
ota:
    password: $ota_password

wifi:
  ssid: !secret wifi_ssid
  password: !secret wifi_password
  ## uncomment and edit the following line to flash a device with a different name. 
  ## comment the following line out after initially flashing the device, or it won't be found
  # use_address: test123.local

  # Enable fallback hotspot (captive portal) in case wifi connection fails
  ap:
    ssid: "ESPHome-Sprinkler-Controller"
    password: $ap_password

captive_portal:

sprinkler:
  - id: ${id_prefix}_sprinklers
    main_switch: "Sprinkler Cycle Active"
    auto_advance_switch: "Auto Advance"
    valve_overlap: 5s
    valves:
      - valve_switch: "Zone 1 Active"
        enable_switch: "Zone 1 Auto"
        run_duration_number: 
          id: zone_1_run_duration
          name: "Zone 1 Run Duration"
          icon: "mdi:timer-outline"
          initial_value: 1
          unit_of_measurement: min
        valve_switch_id: ${id_prefix}_valve_sw1
      - valve_switch: "Zone 2 Active"
        enable_switch: "Zone 2 Auto"
        run_duration_number: 
          id: zone_2_run_duration
          name: "Zone 2 Run Duration"
          icon: "mdi:timer-outline"
          initial_value: 1
          unit_of_measurement: min
        valve_switch_id: ${id_prefix}_valve_sw2
      - valve_switch: "Zone 3 Active"
        enable_switch: "Zone 3 Auto"
        run_duration_number: 
          id: zone_3_run_duration
          name: "Zone 3 Run Duration"
          icon: "mdi:timer-outline"
          initial_value: 1
          unit_of_measurement: min
        valve_switch_id: ${id_prefix}_valve_sw3
      - valve_switch: "Zone 4 Active"
        enable_switch: "Zone 4 Auto"
        run_duration_number: 
          id: zone_4_run_duration
          name: "Zone 4 Run Duration"
          icon: "mdi:timer-outline"
          initial_value: 1
          unit_of_measurement: min
        valve_switch_id: ${id_prefix}_valve_sw4
      - valve_switch: "Zone 5 Active"
        enable_switch: "Zone 5 Auto"
        run_duration_number: 
          id: zone_5_run_duration
          name: "Zone 5 Run Duration"
          icon: "mdi:timer-outline"
          initial_value: 1
          unit_of_measurement: min
        valve_switch_id: ${id_prefix}_valve_sw5
      - valve_switch: "Zone 6 Active"
        enable_switch: "Zone 6 Auto"
        run_duration_number: 
          id: zone_6_run_duration
          name: "Zone 6 Run Duration"
          icon: "mdi:timer-outline"
          initial_value: 1
          unit_of_measurement: min
        valve_switch_id: ${id_prefix}_valve_sw6
      - valve_switch: "Zone 7 Active"
        enable_switch: "Zone 7 Auto"
        run_duration_number: 
          id: zone_7_run_duration
          name: "Zone 7 Run Duration"
          icon: "mdi:timer-outline"
          initial_value: 1
          unit_of_measurement: min
        valve_switch_id: ${id_prefix}_valve_sw7
      - valve_switch: "Zone 8 Active"
        enable_switch: "Zone 8 Auto"
        run_duration_number: 
          id: zone_8_run_duration
          name: "Zone 8 Run Duration"
          icon: "mdi:timer-outline"
          initial_value: 1
          unit_of_measurement: min
        valve_switch_id: ${id_prefix}_valve_sw8
      - valve_switch: "Zone 9 Active"
        enable_switch: "Zone 9 Auto"
        run_duration_number: 
          id: zone_9_run_duration
          name: "Zone 9 Run Duration"
          icon: "mdi:timer-outline"
          initial_value: 1
          unit_of_measurement: min
        valve_switch_id: ${id_prefix}_valve_sw9
      - valve_switch: "Zone 10 Active"
        enable_switch: "Zone 10 Auto"
        run_duration_number: 
          id: zone_10_run_duration
          name: "Zone 10 Run Duration"
          icon: "mdi:timer-outline"
          initial_value: 1
          unit_of_measurement: min
        valve_switch_id: ${id_prefix}_valve_sw10
      - valve_switch: "Zone 11 Active"
        enable_switch: "Zone 11 Auto"
        run_duration_number: 
          id: zone_11_run_duration
          name: "Zone 11 Run Duration"
          icon: "mdi:timer-outline"
          initial_value: 1
          unit_of_measurement: min
        valve_switch_id: ${id_prefix}_valve_sw11
      - valve_switch: "Zone 12 Active"
        enable_switch: "Zone 12 Auto"
        run_duration_number: 
          id: zone_12_run_duration
          name: "Zone 12 Run Duration"
          icon: "mdi:timer-outline"
          initial_value: 1
          unit_of_measurement: min
        valve_switch_id: ${id_prefix}_valve_sw12
      - valve_switch: "Zone 13 Active"
        enable_switch: "Zone 13 Auto"
        run_duration_number: 
          id: zone_13_run_duration
          name: "Zone 13 Run Duration"
          icon: "mdi:timer-outline"
          initial_value: 1
          unit_of_measurement: min
        valve_switch_id: ${id_prefix}_valve_sw13
      - valve_switch: "Zone 14 Active"
        enable_switch: "Zone 14 Auto"
        run_duration_number: 
          id: zone_14_run_duration
          name: "Zone 14 Run Duration"
          icon: "mdi:timer-outline"
          initial_value: 1
          unit_of_measurement: min
        valve_switch_id: ${id_prefix}_valve_sw14
      - valve_switch: "Zone 15 Active"
        enable_switch: "Zone 15 Auto"
        run_duration_number: 
          id: zone_15_run_duration
          name: "Zone 15 Run Duration"
          icon: "mdi:timer-outline"
          initial_value: 1
          unit_of_measurement: min
        valve_switch_id: ${id_prefix}_valve_sw15
      - valve_switch: "Zone 16 Active"
        enable_switch: "Zone 16 Auto"
        run_duration_number: 
          id: zone_16_run_duration
          name: "Zone 16 Run Duration"
          icon: "mdi:timer-outline"
          initial_value: 1
          unit_of_measurement: min
        valve_switch_id: ${id_prefix}_valve_sw16

sn74hc595:
  - id: 'sn74hc595_hub'
    data_pin: GPIO14
    clock_pin: GPIO13
    latch_pin: GPIO12
    oe_pin: GPIO05
    sr_count: 2
# Individual output relays
switch:
  - platform: gpio
    id: ${id_prefix}_valve_sw1
    pin:
      sn74hc595: sn74hc595_hub
      # Use pin number 0
      number: 0
      inverted: false
  - platform: gpio
    id: ${id_prefix}_valve_sw2
    name: "Valve 2"
    pin:
      sn74hc595: sn74hc595_hub
      # Use pin number 1
      number: 1
      inverted: false
  - platform: gpio
    id: ${id_prefix}_valve_sw3
    name: "Valve 3"
    pin:
      sn74hc595: sn74hc595_hub
      # Use pin number 2
      number: 2
      inverted: false
  - platform: gpio
    id: ${id_prefix}_valve_sw4
    name: "Valve 4"
    pin:
      sn74hc595: sn74hc595_hub
      # Use pin number 3
      number: 3
      inverted: false
  - platform: gpio
    id: ${id_prefix}_valve_sw5
    name: "Valve 5"
    pin:
      sn74hc595: sn74hc595_hub
      # Use pin number 4
      number: 4
      inverted: false
  - platform: gpio
    id: ${id_prefix}_valve_sw6
    name: "Valve 6"
    pin:
      sn74hc595: sn74hc595_hub
      # Use pin number 5
      number: 5
      inverted: false
  - platform: gpio
    id: ${id_prefix}_valve_sw7
    name: "Valve 7"
    pin:
      sn74hc595: sn74hc595_hub
      # Use pin number 6
      number: 6
      inverted: false
  - platform: gpio
    id: ${id_prefix}_valve_sw8
    name: "Valve 8"
    pin:
      sn74hc595: sn74hc595_hub
      # Use pin number 7
      number: 7
      inverted: false
  - platform: gpio
    id: ${id_prefix}_valve_sw9
    name: "Valve 9"
    pin:
      sn74hc595: sn74hc595_hub
      # Use pin number 8
      number: 8
      inverted: false
  - platform: gpio
    id: ${id_prefix}_valve_sw10
    name: "Valve 10"
    pin:
      sn74hc595: sn74hc595_hub
      # Use pin number 9
      number: 9
      inverted: false
  - platform: gpio
    id: ${id_prefix}_valve_sw11
    name: "Valve 11"
    pin:
      sn74hc595: sn74hc595_hub
      # Use pin number 10
      number: 10
      inverted: false
  - platform: gpio
    id: ${id_prefix}_valve_sw12
    name: "Valve 12"
    pin:
      sn74hc595: sn74hc595_hub
      # Use pin number 11
      number: 11
      inverted: false
  - platform: gpio
    id: ${id_prefix}_valve_sw13
    name: "Valve 13"
    pin:
      sn74hc595: sn74hc595_hub
      # Use pin number 12
      number: 12
      inverted: false
  - platform: gpio
    id: ${id_prefix}_valve_sw14
    name: "Valve 14"
    pin:
      sn74hc595: sn74hc595_hub
      # Use pin number 13
      number: 13
      inverted: false
  - platform: gpio
    id: ${id_prefix}_valve_sw15
    name: "Valve 15"
    pin:
      sn74hc595: sn74hc595_hub
      # Use pin number 14
      number: 14
      inverted: false
  - platform: gpio
    id: ${id_prefix}_valve_sw16
    name: "Valve 16"
    pin:
      sn74hc595: sn74hc595_hub
      # Use pin number 15
      number: 15
      inverted: false

 # day of week toggle switches
  - platform: template
    id: ${id_prefix}_sunday
    name:  Sunday
    icon: "mdi:calendar-range"
    entity_category: config
    restore_mode: RESTORE_DEFAULT_ON
    optimistic: true
  - platform: template
    id: ${id_prefix}_monday
    name:  Monday
    icon: "mdi:calendar-range"
    entity_category: config
    restore_mode: RESTORE_DEFAULT_ON
    optimistic: true
  - platform: template
    id: ${id_prefix}_tuesday
    name:  Tuesday
    icon: "mdi:calendar-range"
    entity_category: config
    restore_mode: RESTORE_DEFAULT_ON
    optimistic: true
  - platform: template
    id: ${id_prefix}_wednesday
    name:  Wednesday
    icon: "mdi:calendar-range"
    entity_category: config
    restore_mode: RESTORE_DEFAULT_ON
    optimistic: true
  - platform: template
    id: ${id_prefix}_thursday
    name:  Thursday
    icon: "mdi:calendar-range"
    entity_category: config
    restore_mode: RESTORE_DEFAULT_ON
    optimistic: true
  - platform: template
    id: ${id_prefix}_friday
    name:  Friday
    icon: "mdi:calendar-range"
    entity_category: config
    restore_mode: RESTORE_DEFAULT_ON
    optimistic: true
  - platform: template
    id: ${id_prefix}_saturday
    name:  Saturday
    icon: "mdi:calendar-range"
    entity_category: config
    restore_mode: RESTORE_DEFAULT_ON
    optimistic: true
  # scheduled time enable switches
  - platform: template
    id: ${id_prefix}_schedule1_enabled
    name: Enable Schedule 1
    icon: "mdi:clock-outline"
    entity_category: config
    restore_mode: RESTORE_DEFAULT_ON
    optimistic: true
  - platform: template
    id: ${id_prefix}_schedule2_enabled
    name: Enable Schedule 2
    icon: "mdi:clock-outline"
    entity_category: config
    restore_mode: RESTORE_DEFAULT_ON
    optimistic: true
  - platform: template
    id: ${id_prefix}_schedule3_enabled
    name: Enable Schedule 3
    icon: "mdi:clock-outline"
    entity_category: config
    restore_mode: RESTORE_DEFAULT_ON
    optimistic: true
  # rain delay switches (can be cancelled, auto-resetting)
  - platform: template
    id: ${id_prefix}_raindelay_24h_enabled
    name: Enable 24h Rain Delay
    icon: "mdi:weather-cloudy-clock"
    restore_mode: RESTORE_DEFAULT_OFF
    optimistic: true
    turn_on_action:
      then:
        - delay: 
            hours: 24
        - switch.turn_off: ${id_prefix}_raindelay_24h_enabled
  - platform: template
    id: ${id_prefix}_raindelay_48h_enabled
    name: Enable 48h Rain Delay
    icon: "mdi:weather-cloudy-clock"
    restore_mode: RESTORE_DEFAULT_OFF
    optimistic: true
    turn_on_action:
      then:
        - delay: 
            hours: 48
        - switch.turn_off: ${id_prefix}_raindelay_48h_enabled

# these numbers will be used to set run-time
number:
  # schedule 1
  - platform: template
    name: Schedule 1 Start Hour
    entity_category: config
    id: ${id_prefix}_s1h
    min_value: 0
    max_value: 23
    initial_value: 1
    step: 1
    unit_of_measurement: h
    mode: box
    optimistic: true
    restore_value: true
  - platform: template
    name: Schedule 1 Start Minute
    entity_category: config
    id: ${id_prefix}_s1m
    min_value: 0
    max_value: 59
    initial_value: 20
    step: 1
    unit_of_measurement: min
    mode: box
    optimistic: true
    restore_value: true
  # schedule 2
  - platform: template
    name: Schedule 2 Start Hour
    entity_category: config
    id: ${id_prefix}_s2h
    min_value: 0
    max_value: 23
    initial_value: 1
    step: 1
    unit_of_measurement: h
    mode: box
    optimistic: true
    restore_value: true
  - platform: template
    name: Schedule 2 Start Minute
    entity_category: config
    id: ${id_prefix}_s2m
    min_value: 0
    max_value: 59
    initial_value: 20
    step: 1
    unit_of_measurement: min
    mode: box
    optimistic: true
    restore_value: true
  # schedule 3
  - platform: template
    name: Schedule 3 Start Hour
    entity_category: config
    id: ${id_prefix}_s3h
    min_value: 0
    max_value: 23
    initial_value: 1
    step: 1
    unit_of_measurement: h
    mode: box
    optimistic: true
    restore_value: true
  - platform: template
    name: Schedule 3 Start Minute
    entity_category: config
    id: ${id_prefix}_s3m
    min_value: 0
    max_value: 59
    initial_value: 20
    step: 1
    unit_of_measurement: min
    mode: box
    optimistic: true
    restore_value: true

sensor:
  - platform: wifi_signal # Reports the WiFi signal strength/RSSI in dB
    name: "WiFi Signal dB"
    id: wifi_signal_db
    update_interval: 60s
    entity_category: "diagnostic"
  - platform: copy # Reports the WiFi signal strength in %
    source_id: wifi_signal_db
    name: "WiFi Signal Percent"
    filters:
      - lambda: return min(max(2 * (x + 100.0), 0.0), 100.0);
    unit_of_measurement: "%"
    entity_category: "diagnostic"
  - platform: uptime
    name: Uptime
    entity_category: "diagnostic"

binary_sensor:
  - platform: status
    name: "Connection Status"

# set up time and check every minute (or second) for scheduled actions
time:
  - platform: homeassistant
    id: ha_time
    on_time:
      # Every 1 minute
      - seconds: 0
        minutes: /1
        then:
          - script.execute: ${id_prefix}_script1
    on_time_sync:
      then:
        - logger.log: "Synchronized system clock"


script:
    # check what day of the week it is currently, and if we have the schedule enabled today
    - id: ${id_prefix}_script1 
      then:
        lambda: |-
          int dow = id(ha_time).now().day_of_week;
          if      ((dow == 1 && id(${id_prefix}_sunday).state == true)
          ||       (dow == 2 && id(${id_prefix}_monday).state == true)
          ||       (dow == 3 && id(${id_prefix}_tuesday).state == true)
          ||       (dow == 4 && id(${id_prefix}_wednesday).state == true)
          ||       (dow == 5 && id(${id_prefix}_thursday).state == true)
          ||       (dow == 6 && id(${id_prefix}_friday).state == true)
          ||       (dow == 7 && id(${id_prefix}_saturday).state == true)) {
            id(${id_prefix}_script2).execute();
          }
    # if current time is equal to any of the scheduled start times, start the sprinkler cycle
    - id: ${id_prefix}_script2
      then:
        lambda: |-
          int hour = id(ha_time).now().hour;
          int minute = id(ha_time).now().minute;
          if      ((hour == id(${id_prefix}_s1h).state && minute == id(${id_prefix}_s1m).state && id(${id_prefix}_schedule1_enabled).state == true && id(${id_prefix}_raindelay_24h_enabled).state == false && id(${id_prefix}_raindelay_48h_enabled).state == false)
          ||      (hour == id(${id_prefix}_s2h).state && minute == id(${id_prefix}_s2m).state && id(${id_prefix}_schedule2_enabled).state == true && id(${id_prefix}_raindelay_24h_enabled).state == false && id(${id_prefix}_raindelay_48h_enabled).state == false)
          ||      (hour == id(${id_prefix}_s3h).state && minute == id(${id_prefix}_s3m).state && id(${id_prefix}_schedule3_enabled).state == true && id(${id_prefix}_raindelay_24h_enabled).state == false && id(${id_prefix}_raindelay_48h_enabled).state == false)) {
            id(${id_prefix}_script3).execute();
          }
    # start the sprinkler cycle
    - id: ${id_prefix}_script3
      then:
        - sprinkler.start_full_cycle: ${id_prefix}_sprinklers
    
1 Like

Great news, ESPHome and Home Assistant finally implemented Datetime a few days ago! Now ESPHome can store a time onboard the device, and Home Assistant has an entity for setting the time. I have updated the original post with new YAML configuration that removes the clunky number entities for specifying start time and replaces them with nice time entities. I have also updated the dashboard YAML and associated photos.

Just a heads up: if you want to incorporate this change into an existing installation, make a note of your irrigation schedule settings before uploading the new code.

2 Likes