Smart Lock with Gears

Summary

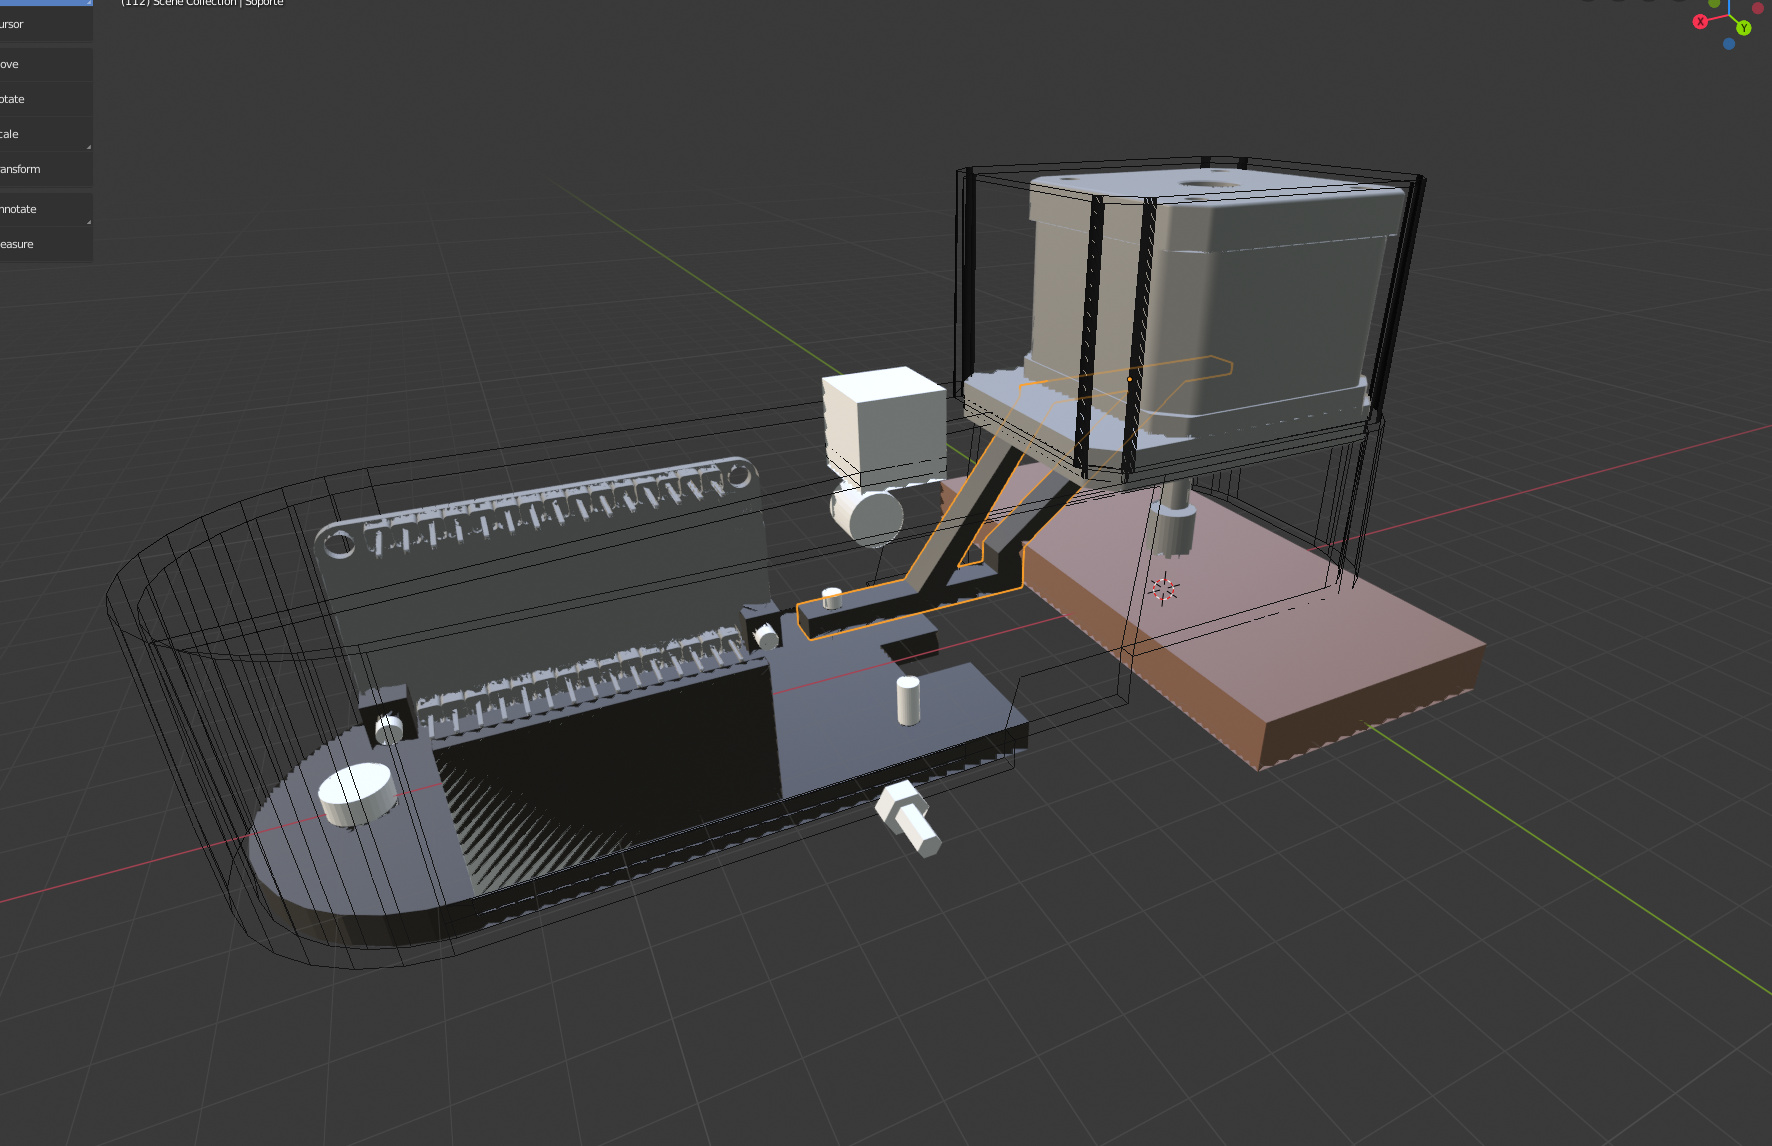
This is my 2nd version of a smart lock which is using a stepper motor which allows the user to turn the key manually. This is very useful if the lock supports anti-lockout which will enable someone from the outside still use his key manually.
It’s designed to be used for European Cylinders and it’s possible to fit it without the need of screws.

Checkout my video demonstration:

Usage

To control the lock from the inside you can add a button on the ESP32, but on the outside you need something more secure. These are some of my ideas:

  • Using buttons on Home Assistant interface.
  • If you have the Home Assistant app on your phone, you can stick NFC tags and program them to unlock the door.
  • Use an RFID controller like the RDM6300, RC522 and PN532. You can have your personal NFC tags that you can scan on the device. Be warned that the Tag UID can be replicated and the phones emit a random UID.
  • Add a Fingerprint sensor like the R503. Check this on how I did it.

For locking you can be more creative because security is not a concern.

  • Using a button connected to the ESP32.
  • Automatically lock every time the door closes with a magnetic sensor.
  • With a Bluetooth LE toothbrush using the ESPHome integration.
  • Zigbee/ZWave smart buttons.
  • If you are using Asterisk, you can create an extension that calls the Home Assistant API to unlock.
  • Using a smart speaker. Be careful with these because they allow you to unlock, but you need to provide a pin. You are heavily depending on an online service that can be hacked, so I wouldn’t recommend it.

Installation

The components that I used are these:

  • ESP32s
  • Nema 23 Stepper Motor
  • A4988 Stepper Motor Driver
  • 3D printed model available here

And this is how everything is connected:

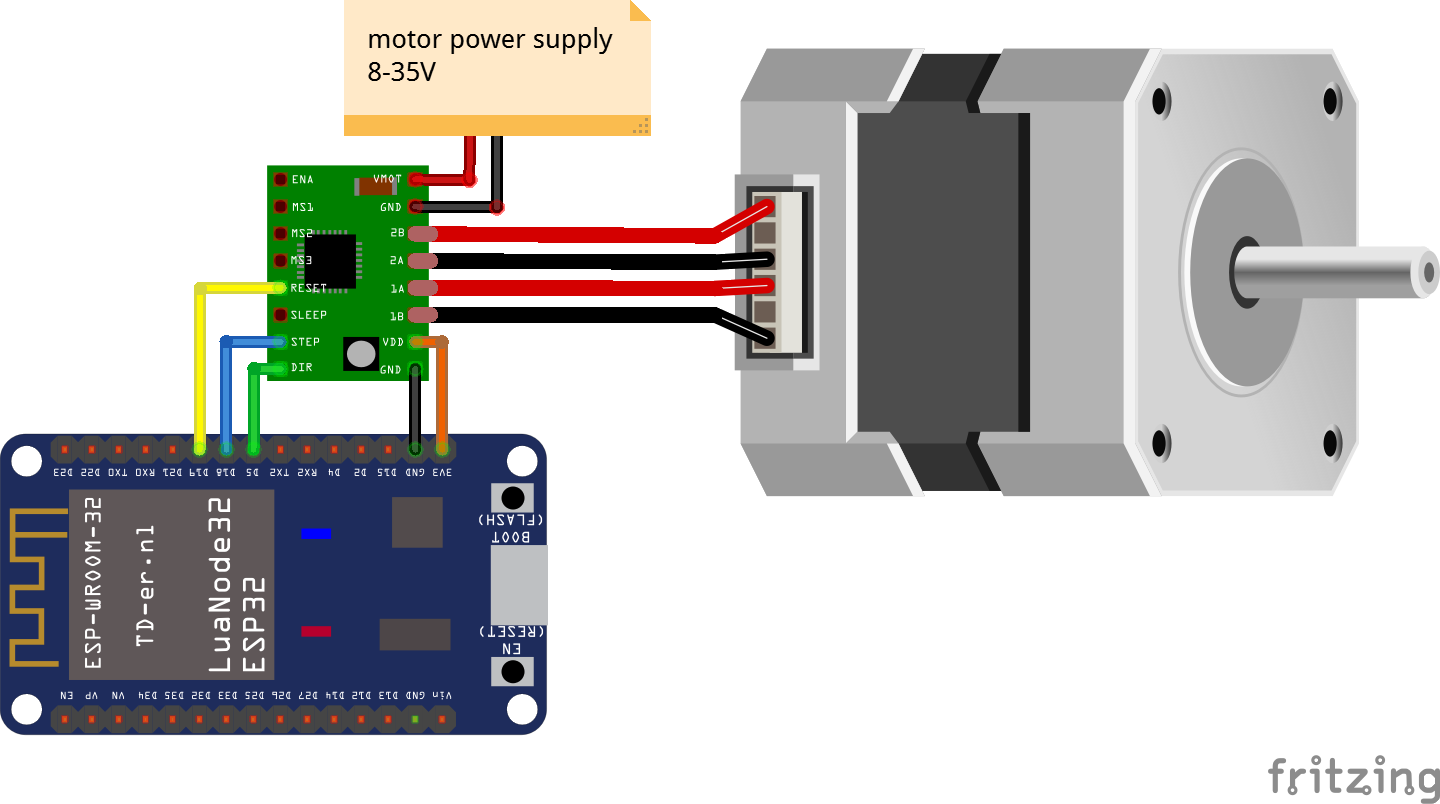
I am using ESPHome to control the motor because it can easily integrate with Home Assistant and supports all features I need out of the box.
The code is designed so when unlocked, the latch will open for 2 seconds and then go to neutral position. After that it will set the neutral position to 50 in case the lost of steps on the motor. This is considered Unlocked.
When it’s locked, it will turn all the way to the desired position and send the locked state on Home Assistant.

Here is the configuration on ESPHome:

esphome:
  name: smartlock
  platform: ESP32
  board: nodemcu-32s

wifi:
  ssid: <yourssid>
  password: <yourpassword>

# Enable logging
logger:

# Enable OTA updates
ota:

# Enable Home Assistant API
api:

globals:
  - id: is_locked
    type: bool
    restore_value: yes
    initial_value: 'true'

switch:
  - platform: template
    name: "Lock Switch"
    id: lock_switch
    lambda: "return id(is_locked);"
    turn_on_action:
      - stepper.set_target:
          id: my_stepper
          target: 2300
      - globals.set:
          id: is_locked
          value: 'true'
    turn_off_action:
      - stepper.set_target:
          id: my_stepper
          target: -500
      - wait_until: # Wait until endstop reached
          lambda: 'return (id(my_stepper).current_position == id(my_stepper).target_position);'
      - globals.set:
          id: is_locked
          value: 'false'
      - delay: 2s # Leave latch open
      - stepper.report_position:
          id: my_stepper
          position: -370
      - stepper.set_target:
          id: my_stepper
          target: 0

stepper:
  - platform: a4988
    id: my_stepper
    step_pin: GPIO18
    dir_pin: GPIO05
    max_speed: 600 steps/s
    sleep_pin: GPIO19

This lock doesn’t have a feedback if the motor actually reached its destination so I created a new switch that forces to unlock the door:

switch:
  - platform: template
    name: "Reset Position"
    id: reset_position
    lambda: "return false;"
    turn_on_action:
      - stepper.report_position:
          id: my_stepper
          position: 750

Final Words

I’ve been using this smart lock for several days now and the only problem I faced is that sometimes the motor didn’t move enough, which resulted the latch not opening all the way. This was not a problem getting inside because of the reset_position button I created. [update after 2 months] The problem was with the motor driver which I replaced and now it works perfectly without the need of reset_position.

As I mentioned this is my 2nd version of the Smart Lock. If you want, you can check the 1st version here which is using a worm motor that locks the key in place.

Hope you like it!

15 Likes

Hallo, let me show my own Smart Lock, the idea is similar, I moved the code from Tasmota to EPShome just today so it needs to be polished and some features are still missing, I added an extra button that will close the door when I exit, or open, if closed, a buzzer to let me know if it closes when I exit, open/close action can be accessed from the web interface in case HA is down, next step will be to add a IR sensor for proper homing and a finger print reader, running on Nodemcu8266.
I also added a switch inside the lock, that has been a bit tricky, but now I can get a feedback from the lock and know whether it is open or not.
In my first iteration I also used a gear but it did not work well, the gear would easily skip as the cylinder/key can be quite loose. So I bought a cylinder without key slot in the inside, removed the handle and coupled to the Nema shaft with a shaft coupler.

esphome:
  name: portero_casa
  platform: ESP8266
  board: nodemcuv2
  on_boot:
    priority: 100 # Highest priority, ensures light turns on without delay.
    then:
      - output.turn_on: gpio_d6
      - output.turn_on: gpio_d7
      - output.turn_on: gpio_d8

wifi:
  ssid: "cccc"
  password: "dddd"

  # Enable fallback hotspot (captive portal) in case wifi connection fails
  ap:
    ssid: "Portero Casa Fallback Hotspot"
    password: "dddd"

captive_portal:

web_server:
  port: 80

# Enable logging
logger:

# Enable Home Assistant API
api:
  services:
  - service: open
    then:
      - switch.turn_on: open_portero_casa
  - service: close
    then:
      - switch.turn_on: close_portero_casa
   
ota:

switch:
  - platform: template
    name: "Open portero casa"
    id: open_portero_casa
    turn_on_action:
      - stepper.report_position:
          id: nema
          position: 0
      - output.turn_on: stepper_en
      - if:
          condition:
            binary_sensor.is_on: door_state
          then:
            - stepper.set_target:
                id: nema
                target: -4488
            - delay: 6s
            - stepper.set_target:
                id: nema
                target: -3200
            - delay: 2s 
          else:          
            - stepper.set_target:
                id: nema
                target: -1288
            - delay: 3s 
            - stepper.set_target:
                id: nema
                target: -100
            - delay: 2s 
      - output.turn_off: stepper_en
      - switch.turn_off: open_portero_casa

  - platform: template
    name: "Close portero casa"
    id: close_portero_casa
    turn_on_action:
      - stepper.report_position:
          id: nema
          position: 0
      - output.turn_on: stepper_en
      - if:
          condition:
            binary_sensor.is_off: door_state
          then:         
            - stepper.set_target:
                id: nema
                target: 3200
            - delay: 4s
      - output.turn_off: stepper_en
      - switch.turn_off: open_portero_casa

output:
  - platform: gpio
    pin: D6
    id: gpio_d6
  - platform: gpio
    pin: D7
    id: gpio_d7
  - platform: gpio
    pin: D8
    id: gpio_d8
  - platform: esp8266_pwm
    pin: D0
    frequency: 1000 Hz
    id: pwm_output
  - platform: gpio
    pin: D4
    inverted: True
    id: stepper_en

stepper:
  - platform: a4988
    id: nema
    step_pin: D3
    dir_pin: D2
    max_speed: 1600 steps/s

    # Optional:
    acceleration: inf
    deceleration: inf

# Example usage in a light
light:
  - platform: monochromatic
    output: pwm_output
    name: Buzzer

binary_sensor:
  - platform: gpio
    pin: D1
    name: "Door Button"
    on_click:
      min_length: 100ms
      then:
        - switch.turn_on: close_portero_casa

  - platform: gpio
    pin: D5
    name: "Door State ON is closed"
    device_class: door
    id: door_state
3 Likes

I bought the R503 fingerprint sensor which I have connected it to my Raspberry PI. I’ve chosen not to connect it with ESP32 because I already had installation going to my Raspberry, so I didn’t have to drill a new hole on my wall.
The easiest way to mount it is to use an old CD/DVD and widen the hole in the middle.

I’ve released a service for Raspberry which communicates through MQTT messages with the fingerprint sensor and it works flawlessly till now. I highly recommend it for unlocking the door.

You can find it in my github repository here.

hi, this looks interesting, what power supply are you using? thanks for any info.
Mark

I am using a standard 5V Micro USB for the ESP32 and a 12V power supply for the motor, though you can use any voltage from 8-35V. I would recommend checking the specs of your motor though.

I have added a 502 grow fingerprint sensor too, had not to drill any hole as I was able to route them through the hole of the handle´s screw.
I am also going to try and use a TMC2130 as stepper driver to get proper homing and latch opening roation, using its GuardStall feature.

Tell us more about this stallGuard tech. I’ve never heard of it before. From what I found out it can understand when it reaches the end, but I don’t understand exactly how it’s achieved.
Also will this work with the existing ESPHome integration for stepper?

P.S. Could you show us a video/photo of your implementation?

The driver senses the current flow so it can detect when the motor is under torque stress or finds an obstacle to whatever it is moving. Basically you get a sensorless homing device.
That said there is no direct implementation in HA, but you can get this data both from SPI or from a cfg pin which gets high whenever the stall flag is triggered. The current sensing limit has to be set with SPI.
Yes let me write down some documentation and I ll post it here.

You can get started here: https://github.com/simonemarin/esphome_smartlock

Thanks for sharing your process.
I’ve also tried using the motor directly on the key, but the latch needed more power to move it even with my Nema23 motor. Maybe it was my 12V charger fault because I am using just 2 Amps.
Also another concern of mine was that it would stick too much out of the door, so the gears help a lot.
If I redesigned it, I would use a nema17 with less gear ratio so that it would be more compact and also add a case for esthetics.

Yes I have actually modified slightly the mechanical door lock loosing a bit the tension of the latch spring and I am even using what seems to be an even smaller stepper than yours, iirc it is a 34mm. I have plenty of current on my power supply though. I have added a picture of the casing, as far as I am concerned there is no practical issue with the stepper sticking a bit out. As mentioned before the looseness of the cylinder made it very difficult to mesh the gear together, maybe a different design removing the strain from the cylinder may work too, it should be counterbalanced on the other side.

I’ve updated my Smart Lock with a new version for those who don’t need so much power to move the key.
It’s available on thingiverse: Smart Lock Nema 17 by bkbillybk - Thingiverse

3 Likes

Hi @bkbilly! I’m about to build a smart lock and really like your solution. I love that it’s so quiet im comparison to many others. There’s 3 things I’d like to know:
1.) Can the key on the inside be grabbed and turned by hand to lock and unlock?
2.) When the key is turned by hand from the outside (or inside if possible), is that motion automatically recognized and the state of the lock changes in Home Assistant? Before seeing your video I thought I’d need a motor with an encoder to achieve this. But since it’s my first ever project I’m not sure if this is the way to go.
3.) In your demo video at 0:06, when the latch of the door is pulled, there’s a louder noise. Is that because the motor tries to turn the key further than possible? If so, is it possible to avoid that to further reduce the noise?
Thanks a lot!

Hi @adrion

  1. I chose to use a stepper motor because when it’s idle, you can still turn it. I’ve programmed it to disable the motor once it reaches it’s desired position, so you can turn the key manually. It’s not as easy as moving the key without the motor and the gears, but it can be turned by anyone.
  2. For getting the position of the key, you need to add an encoder, but I find it that it complicates the project and it’s not needed. There are two options on how to coop with this issue. You can create a button on Home Assistant that sets the value of the motor to unlocked, or locked which I find it too much effort for the user. Another option which I am using is to send a command to lock/unlock and it will reach it’s end position, so it’s like a reset, though it makes a lot of noise.
  3. The noise from the lock comes from the stepper motor reaching it’s end, that’s why the unlatch makes so much noise. You can set better positions for this or change the speed of the motor to make it more silent. You can also choose a better motor driver like the TMC2208 I am currently using. Recently I’ve made these changes and it’s much better.

I hope this info helps you create your Smart Lock and I would love to see what you come up with!

Hi @bkbilly, thanks for all the information!
1.) Can a DC motor, like the worm motor of your first version, not be turned when it’s idle? I assumed this is possible for all motors, but if not I understand why a stepper motor is needed.
2.) I’m not sure if I fully understand the second option. Let’s say the door was unlocked by hand and the state in HA is still locked. To fix that, you send a unlock command to unlock the door. The motor then tries to turn the key further to the opening position than possible and because of that a lot of noise is created. Did I get it right?
3.) I was thinking about getting this 1.2Nm closed-loop nema 23 stepper motor with magnetic encoder to be able to implement a mechanism to detect locks and unlocks done by hand. I think for this motor the TMC2208 is not sufficient. I couldn’t find an encoder-included nema 17 motor with enough Nm, I was reading 1-1.5Nm are needed to rotate a key, what exact nema 17 motor do you use?
Thanks again!

  1. The worm motors contain a lot of gears to reach the desired torque which makes it almost impossible to turn the shaft by hand. The only motor I found that can easily be turned is a stepper motor which still doesn’t have enough torque to open the latch, so I use gears to step up the torque.
  2. That’s correct, I didn’t describe it very well. One change that I made to make it more silent and faster was to shorten the length of the wires. To do this I moved the stepper driver and the esp32 underneath the lock.
  3. I didn’t know that there were stepper motors with encoder, it is quite interesting and it could be used to set the status of the lock. This motor seems to be fully compatible with the TMC2208 driver. You just need to connect the encoder to the ESP32 device to get the encoder values, so it needs some configuration on your ESPHome. I using a Nema 23, not 17 device and I think it has similar torque as the one you sent.

In the future I might look into adding an encoder on my stepper motor, though I rarely use a key anymore. It could be used though for making it unlock/lock when someone starts turning the key.

Thank you @bkbilly, your answers helped me a lot! I’ll need some time to put everything together, but I’ll happily give you an update when it’s done. One more thing though: For a nema 23 motor usually a 24V+ power supply is recommended. Did I get it right that you are using a 12V one? I’d prefer 12V instead of 24V, but asking myself if 12V will give enough torque. Or if the key could be turned directly with the shaft, without additional gears, if a higher voltage is used. Do you have thoughts on that, what made you choose 12V?

For a power supply I used what I had laying around. I recently upgraded it to a 18V and I think it has more torque, though I haven’t tested it much to tell you for sure.

The motor should support almost any voltage. The limited factor should be the driver you are using which for the TMC2208 is around 36V.

I am pretty sure that even using a high voltage for powering the motor, you will need more torque. You will only find the correct answer on your own smart lock because each door needs different torque. I had to print 3 different gears to find what works for mine.

I realized that I haven’t mentioned about another lock I’ve created which uses a smaller stepper motor because it doesn’t need to open the latch.
@adrion I am posting this here in case you want to take an inspiration for a slightly different design.