Hope this doesn’t turn out to be a really dumb query… 
I have a Z-Wave Honeywell Thermostat that works perfectly for our geothermal system: it sets a ‘daytime’ temp at 6:00am and a ‘nighttime’ temp at 8:00pm. I change the preset period temp for winter and again for summer. That’s it…done by a simple automation, it’s easy for me to edit.
Enter my wife: hates it as she can’t control the thermostat (not that she could edit the schedule on the OLD manual one either…but I digress). Is there a “simple” (for both of us) front-end method that I could give her to either change the time for the temp change and/or the set temp for the future (yes, she can do the temp change regularly and manually on the t-stat screen, but can’t set it “permanently”).
Given that the way it’s set up now is to disable the regular onboard scheduler, the only way is via HA currently. Hope that all makes sense.
What is currently changing the set point or preset… an automation? If so, post the automation…
Pretty simple really…and the nighttime is the inverse.
alias: Tstat - daytime
description: ""
triggers:
  - trigger: time
    at: "06:00:00"
    weekday:
      - sun
      - mon
      - tue
      - wed
      - thu
      - fri
      - sat
conditions: []
actions:
  - action: climate.set_temperature
    metadata: {}
    target:
      device_id: 9957b3b39f3dd76b381db6f5266d749f
    data:
      temperature: 22
      hvac_mode: heat
mode: single
This is one of my long-term projects too. No themostates programming but making things inside HA accessible to other people.
I tried a few methods. Big dashboards don’t work because no one whats to get off their butt and interact with a wall-mounted iPad, not when ythey have a phone or watch nearby. They also do not want to use a phone app to change a setting.
So,… I think I’m lkey very small LCD touch screens up to about 4 inches square but the 3x4 screen work well as they are the same size as cover plats on conventional wall switches. Then on these tiny screen you expose ONLY the controls that are frquenty used, no more than about four of them. These work for mostly selecting “scenes” or disabing a motion detector from turning off the lights.
The other method is to make the parameter you want you wife to be able to set a helper and expose it to Apple Homekit. Then the number whows on her phone and is accessible to Siri. The trick here is the NEVER to a bulk export to Apple home as it makes ther Apple Home app cluttered and unusable. be very selective. Write now I ony have ther front door lock and a few lights exposed to Apple. “Hey Siri, Unlock the Door” works now on my 12 years old z-wave lock.
I doubt you want a small LCD screen just for the thermostate programming so exporting it to her phone might be best.
Here is the why to go: Think about what you want FIRST. What interface would be best, phone, physical control on the wall, large tablet-size dashboard? and THEN ask aroubd how do build that. literally anythomg is possible.
Next I’ll be working with a local LLM chat box and I want to interface it to HA so I can say “Robbie, I’m comming home early today from work, can you have thre house warm by 2:30? Thanks.” The AI then figures out when to turn on the heat. Or in your case “I want a perment change, keep the rooms all at 73F in the daytime.”
That said, I’m find that with more sensors and automations I don’t need nteract as much with HA.
All you need to do is to create two Input Datetime Helpers (time-only). Then you can use those in their corresponding Time triggers:
alias: Tstat - daytime
description: ""
triggers:
  - trigger: time
    at: input_datetime.hvac_daytime
    weekday:
      - sun
      - mon
      - tue
      - wed
      - thu
      - fri
      - sat
conditions: []
actions:
  - action: climate.set_temperature
    metadata: {}
    target:
      device_id: 9957b3b39f3dd76b381db6f5266d749f
    data:
      temperature: 22
      hvac_mode: heat
mode: single
You can also create Input Number Helpers that store the desired value for the set point… and you could take it one step further by also creating an Input Select that holds the value for the mode you want to use, so you don’t need to edit your automations, just change the mode. To make the automation dynamic like that, it will take a couple basic Templates
Example automation including templates
The following assumes helper entity ID’s as follows:
- input_number.hvac_daytime_heat
- input_number.hvac_daytime_cool
- input_select.hvac_mode
… and that the Input Select’s options are
alias: Tstat - daytime
description: ""
triggers:
  - trigger: time
    at: input_datetime.hvac_daytime
    weekday:
      - sun
      - mon
      - tue
      - wed
      - thu
      - fri
      - sat
conditions: []
actions:
  - variables:
      mode: "{{ states('input_select.hvac_mode') }}"
  - action: climate.set_temperature
    metadata: {}
    target:
      device_id: 9957b3b39f3dd76b381db6f5266d749f
    data:
      temperature: |
        {{ states('input_number.hvac_daytime_' ~ mode) | float(22) }}
      hvac_mode: "{{ mode }}"
mode: single
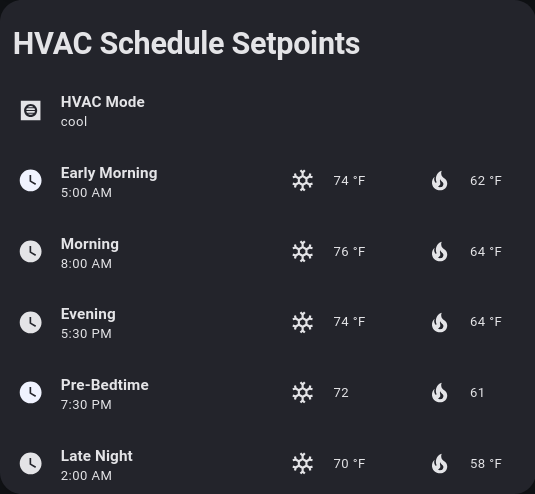
Here’s an example of the card I use for a similar automation:
... and a basic version of its config to go with the automation above.
type: custom:stack-in-card
mode: vertical
title: HVAC Schedule Setpoints
cards:
  - type: tile
    entity: input_select.hvac_mode
    icon: mdi:hvac
    name: HVAC Mode
  - type: grid
    columns: 2
    square: false
    cards:
      - type: grid
        columns: 1
        square: false
        cards:
          - type: tile
            entity: input_datetime.hvac_daytime
            name: Daytime
      - type: grid
        columns: 2
        square: false
        cards:
          - type: tile
            entity: input_number.hvac_daytime_cool
            name: " "
            icon: mdi:snowflake
          - type: tile
            entity: input_number.hvac_daytime_heat
            name: " "
            icon: mdi:fire
  - type: grid
    columns: 2
    square: false
    cards:
      - type: grid
        columns: 1
        square: false
        cards:
          - type: tile
            entity: input_datetime.hvac_nighttime
            name: Daytime
      - type: grid
        columns: 2
        square: false
        cards:
          - type: tile
            entity: input_number.hvac_nighttime_cool
            name: " "
            icon: mdi:snowflake
          - type: tile
            entity: input_number.hvac_nighttime_heat
            name: " "
            icon: mdi:fire
A simple click of any of the helpers brings up their “More Info” menu, allowing them to be be changed. It combines core Tile and Grid cards using the custom Stack-In-Card.
That looks ideal!! Can use that same style for handling watering duties for the garden and trees etc. too I’d guess. Thanks…will play with that idea!