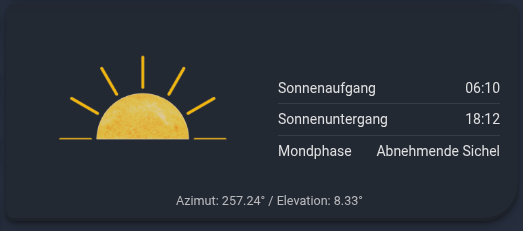
This is a custom Lovelace card used to visualize the current position of the sun with various configuration options, as well as the current moon phase and the display of additional relevant solar times. The Card is translated into English and German. (github page).
You need the sun.sun entity provided by Home Assistant when your Home location is configured. The moon.phase entity is optional and only required to display the current moon phase.
To get the Moon sensor, go to Settings → Devices & Services → Add Integration and search for Moon. This is Home Assistant’s built-in Moon integration.
If you like the Card, I would appreciate a Star rating on my github .
Add this repository to HACS. To do so, use the following link.
The “Sun Position Card” should now be available in HACS. Click “INSTALL”.
The resource will be added to your Lovelace configuration automatically.
Manual Installation via Hacs
Open HACS in Home Assistant.
Go to “Frontend” and click the three dots in the top right corner.
Select “Custom repositories”.
Add the URL to your GitHub repository and select “Lovelace” as the category.
Click “ADD”.
The “Sun Position Card” should now be available in HACS. Click “INSTALL”.
The resource will be added to your Lovelace configuration automatically.
Manual Installation in HA
Manual Installation
Download the sun-position-card.js, sun-position-card-editor.js and the images folder from the repo in github.
Place the sun-position-card.js and sun-position-card-editor.js files and the images folder in config/www/community/Sun-Position-Card/. You will have to create the community and Sun-Position-Card folders.
Add the resource to your Lovelace configuration through the Home Assistant UI:
a. Go to “Settings” → “Dashboards”.
b. Click on the three dots in the top right corner and select “Resources”.
c. Click on “+ ADD RESOURCE”.
d. Enter /local/community/Sun-Position-Card/sun-position-card.js as the URL and select “JavaScript Module” as the Resource type.
e. Click “CREATE”.
Restart Home Assistant.
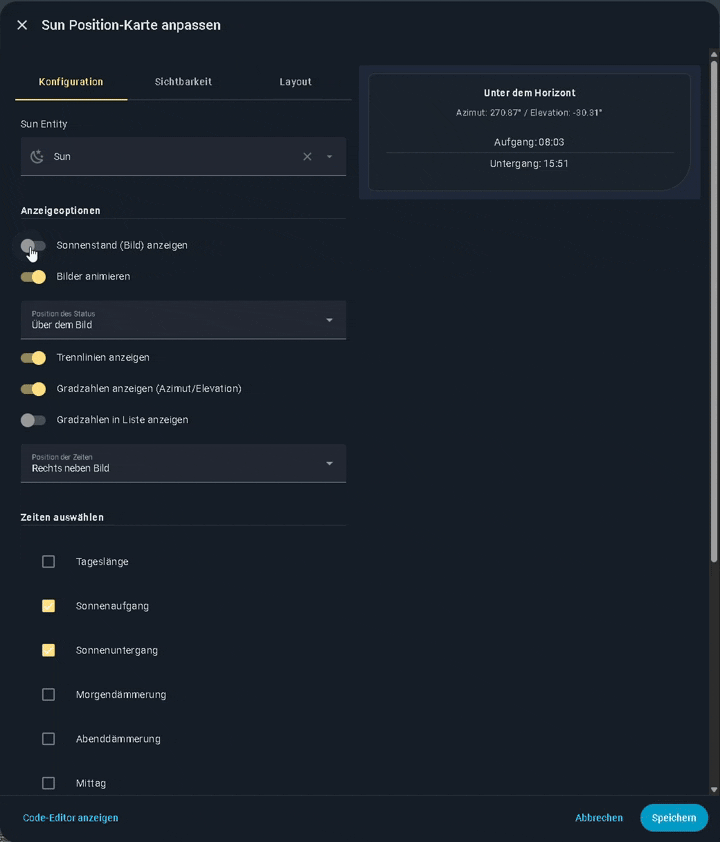
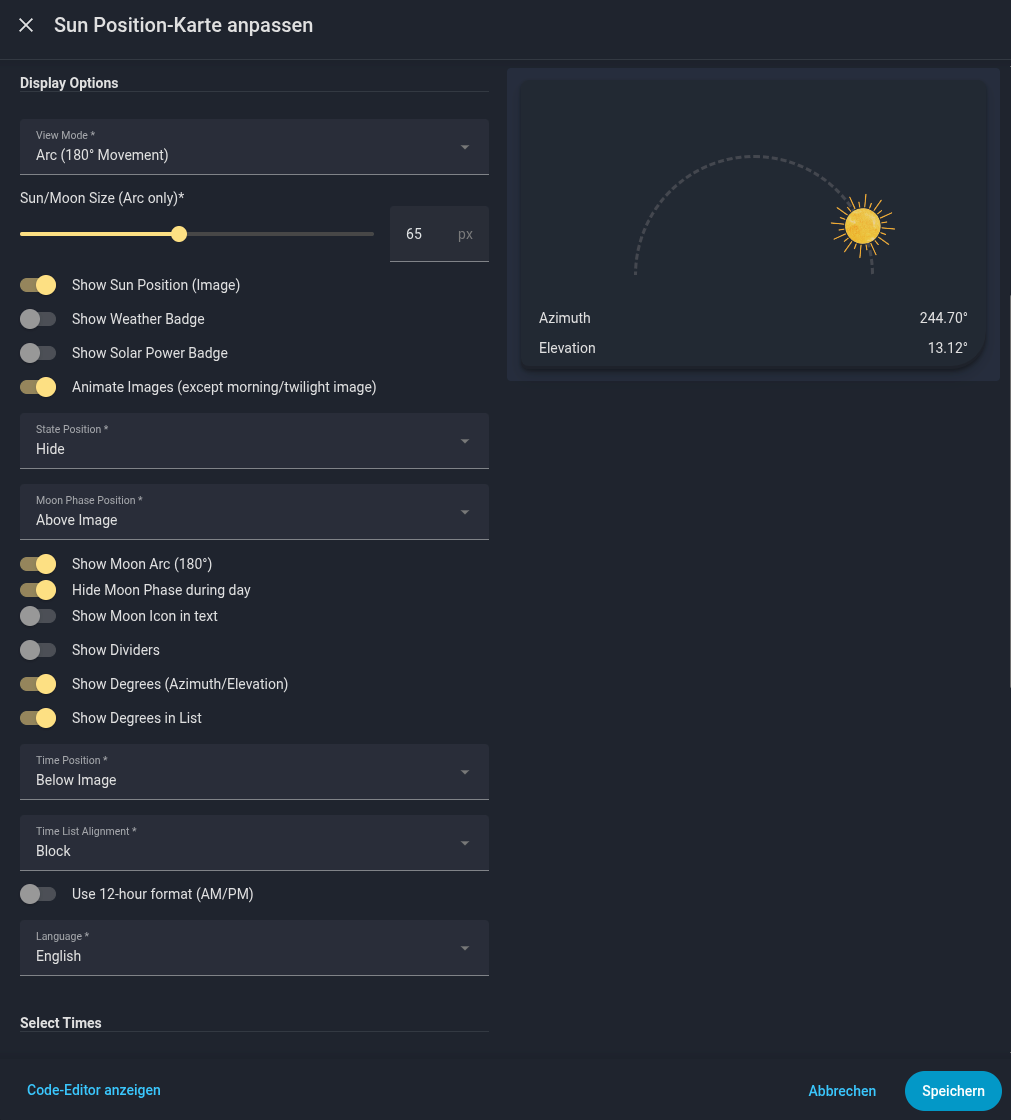
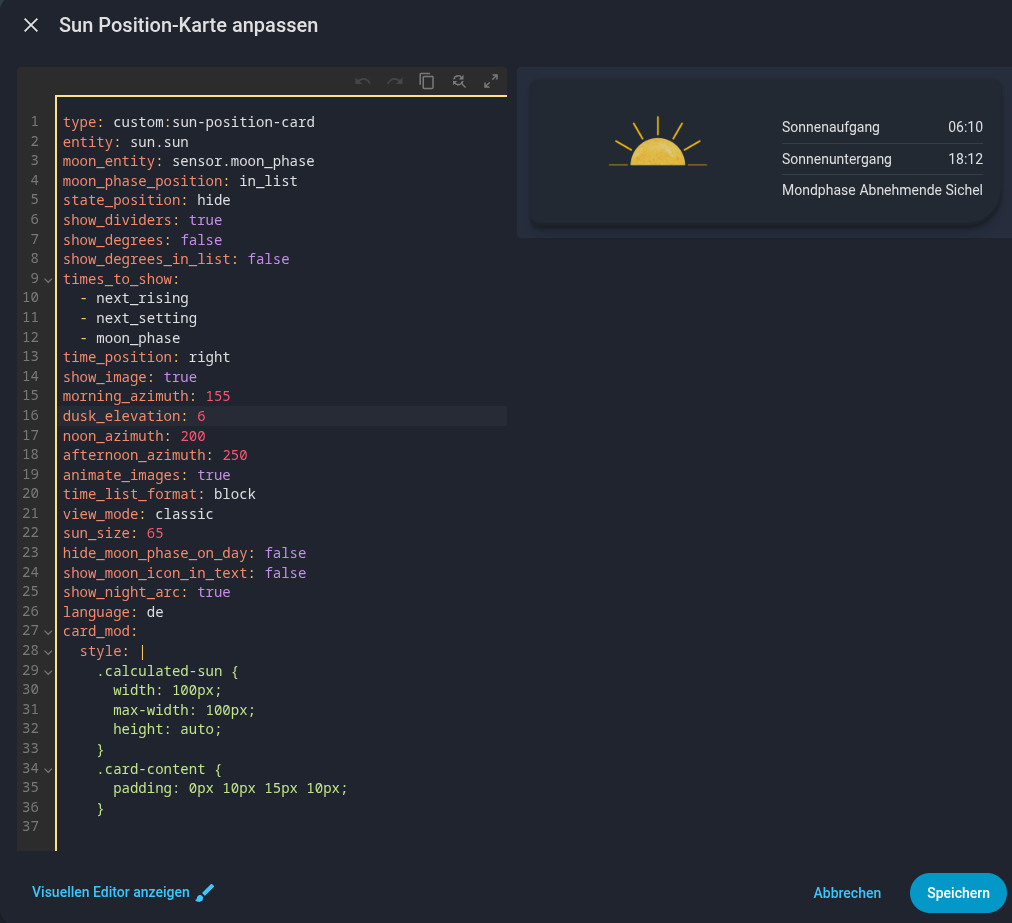
Configuration
Although the UI configuration is recommended, the card can also be configured manually using the YAML editor:
Options
name
typ
required
description
standard
type
string
Yes
custom:sun-position-card
entity
string
Yes
Die Entität Sonne, normalerweise sun.sun.
moon_entity
string
No
Die Entität Mond, normalerweise sensor.moon_phase.
moon_phase_position
string
No
Position Text Mondphase im Verhältnis zum Bild.
above, in_list
times_to_show
list
No
Eine Liste von Zeiten, die angezeigt werden sollen.
Hi everyone, I hope I have found the bug causing the cache issue in my other card and fixed it in the new release. After updating, all fields should now be available in the card editor (you might need to clear the cache as usual).
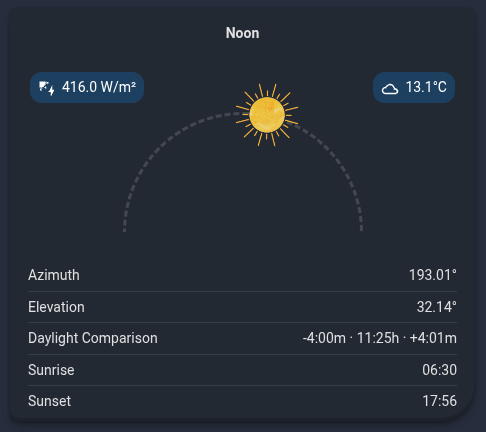
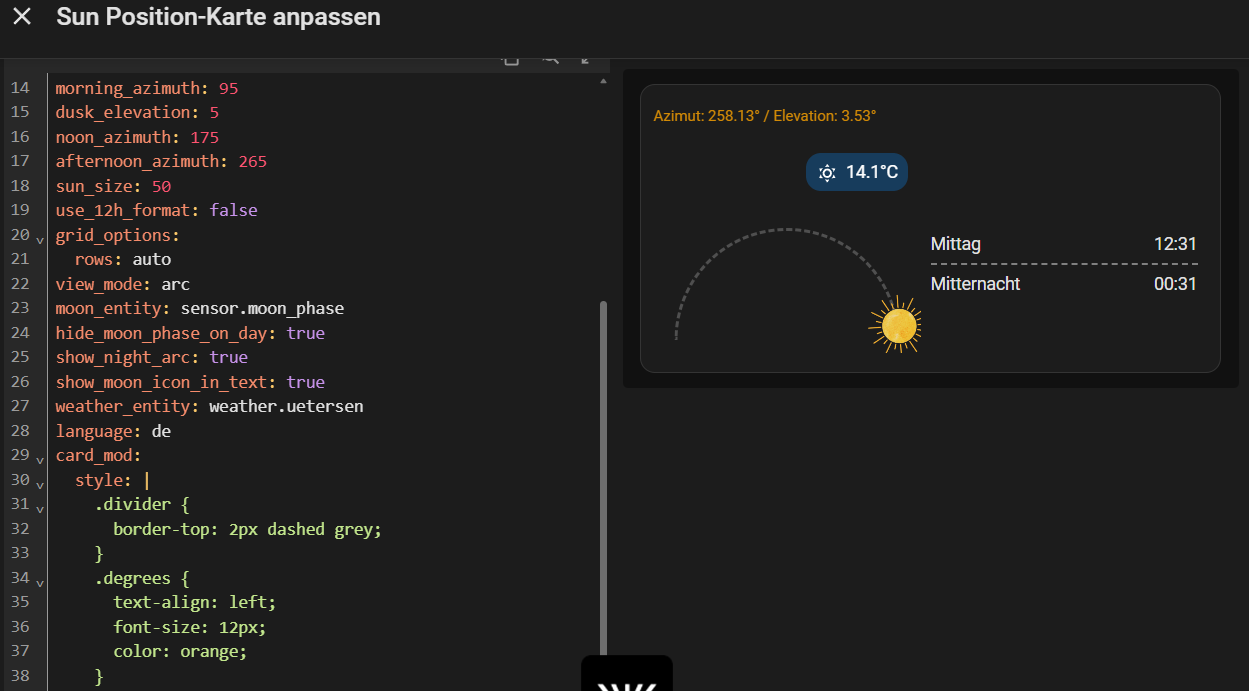
In the new version v_1.5 I have also implemented the weather, as promised. You can view the weather status in the timeline or place it as a badge on the main image. Additionally, the calculation for the sun’s position in the large view mode (when the timeline is displayed below the sun position image) has been corrected. The sun now moves precisely along its arc there as well.
Now your own temperature sensor should be able to be configured with version 1.5.1. Here’s how I’ve implemented it: the weather sensor still needs to be configured, then a new input field will appear where you can enter your temperature sensor. This sensor will then override the temperature reading from the weather sensor. This way, you still always have the current weather status (sunny, cloudy, etc.) nicely integrated. I think this works best and will also be easier to use for future development.
Good evening, I have just released v_1.6. As always, it takes a little while for you to receive the update notification. A few new features have been added.
you can now resize the sun image in arc view to your desired size.
an icon showing the current moon phase can now be displayed behind the moon phase text.
moon phase text can be hidden during the day and displayed after sunset.
a few optimizations for the card editor and the card itself.
Hi, i have updated the card with an Italian translation, as someone requested it and provided the translation. If you need further translations, please let me know or create an issue on my GitHub profile titled “Add translation”.
Hi, I noticed that the moon images used in your project are the same ones I created for my card. I spent quite a bit of time editing each image individually, so it was nice and a bit surprising, to see them being reused…
Totally fine with them being reused… it’s great to see more projects like this in the community.
Thank you so much, the pictures are fantastic and by far the best I’ve found. Your name sounds familiar right away. I only use 8, so not all of them like in your card. The sun images I created myself, but the desire arose to also be able to display the moon.
Cool Card. I like the looks. Thanks for the work.
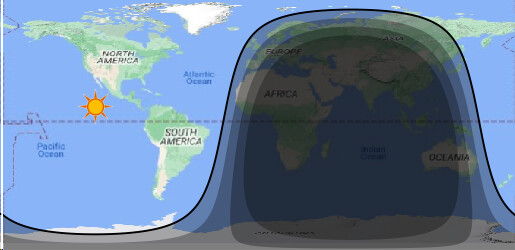
I found it while looking for a card showing me day and night with terminator lines. Maybe you have an interest in integrating this in your card: Back in the old days, there was a desktop background that showed a satellite picture of the earth with the Terminator and the Day / Night Zone. This was based on the Nasa Blue marble (Months and Night) Pictures, where they overlayed day and night. Blue Marble: Next Generation, Base Map - NASA Science
They even overlayed it witch a cloud pattern layer. I don’t know where they sourced that. but i also find it a bit of overkill for HA.
I also found a predefined module to calculate the terminator: Terminator boundary calculator (and plotting) · GitHub but i lack the skills to put it together myself at the moments. Result could be something like this:
Hi, thanks for your input. This is a great idea for implementation. I will see what i can do, but it takes some time, had to do other things at the moment.
Hi, thanks for your input. That’s a great idea for implementation. I will see what I can do, but it will take some time. I have other things to do at the moment.
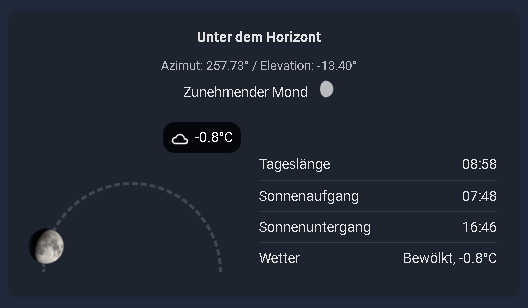
I have released an update. The logic checks the sun’s azimuth to correctly differentiate between dawn and dusk now.
Hi, a small new release, v_2.0, was released today. In addition to the arc mode for the moon, you can now display a time-of-day comparison. Hopefully, my calculations are correct, but it looks good so far. Users who prefer English can now set the time format to 12/24h.
That comparison feature is amazing. I love it. I live in a somewhat northerly latitude, and those extra 8 minutes per day are a treat to watch!!
Thanks for creating this!!
One of the features I’ve been searching for (and this is how I found this project) is something that will tell me the time of the moonrise and the moonset for my location. I’d love that data in the text area, just like the sunrise/set data. I’m guessing that data is already calculated, as it would define that moon arc. Could that be easily added?
Thank you for the assistance…that was one of the possibilities i got after
my walkthrough of the detailed configuration menu.
My current map structure with YAML looks like that:
Now I thought, it would be nice to dig a little deeper with Card-Mod.ding
-perhaps, maybe, there is a second alternative to get this ‘from Top to Bottom’
But this makes no difference. If I target the shadow container found via inspector, that doesn’t do anything either. The docs imply this element is available.
Hi, thanks for your feedback @Zappos . Sorry, I forgot to correct the readme file (will do this on weekend). I have changed the sun-image so you can all scale it in ArcView. Therefore the .sun-image class no longer works. Please use the following card_mod:
Excellent, thanks for that. Works now
One more thing that would be useful is a tap_action… I can’t get that to work. I’d like to open another view on click that shows a lot more information.

 Sun Position Card
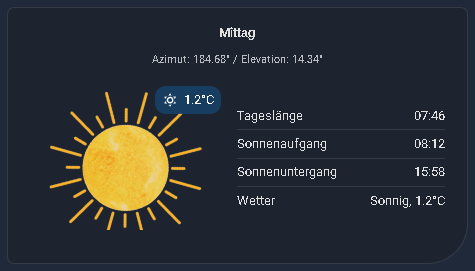
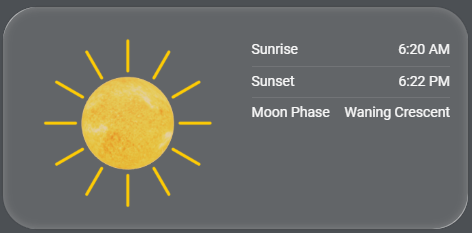
 Sun Position – Classic Display
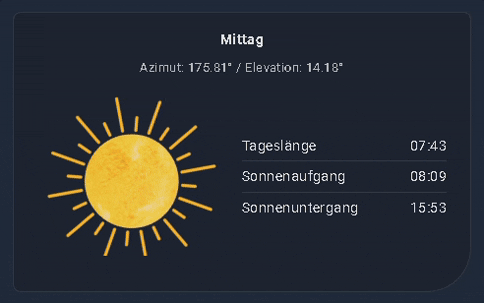
 Sun Position – Calculated Display
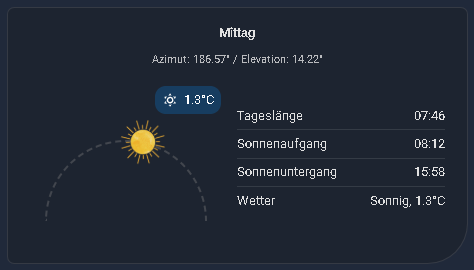
 Sun Position – Calculated Arc
 Moon Phases – Visual Display (8 Phases)
 Animated Sun Position
 Customizable Times
 Weather Status - NEW
 Flexible Layout
 Adjustable Thresholds
 UI Configuration
 Multilingual support (en, de, fr, it, nl)