Copy the results and paste them to a text file for safe keeping. You’ll reference this at a later time.
Migration
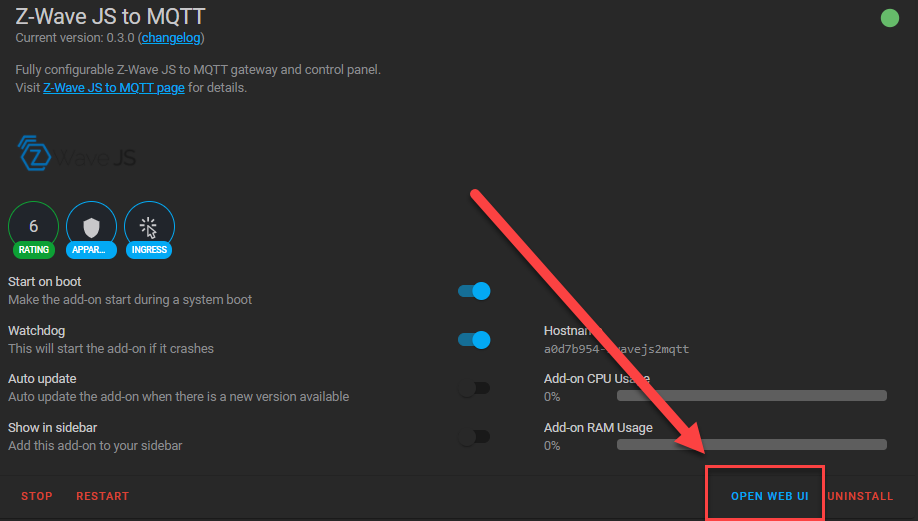
Install ZWave JS UI addon from the community addons.
This a complete ZWaveJS + MQTT communication + Web UI module. It is not an only bridge between ZWaveJS and MQTT, it replaces the official ZWaveJS addon.
Copy device and network_key from OpenZwave configuration.
device - This is the path for the USB Stick network_key - This is the key used when adding a secure node.
Fix all ‘unknown’ devices by waking them up. No need for a refresh node, just wake them up.
NOTE: This will require you to wake the devices up phsycially. Meaning you have to go to the device and wake it yourself. Most zwave devices have a periodic wakeup period where they wake up once a day. If you don’t want to walk around the house and wake devices, you can simply wait for the device to wake itself. Just be warned, it may take a day or 2 for this to happen.
Install Zwave JS integration. You should have a list of devices that matches devices in the ZWave JS UI control panel.
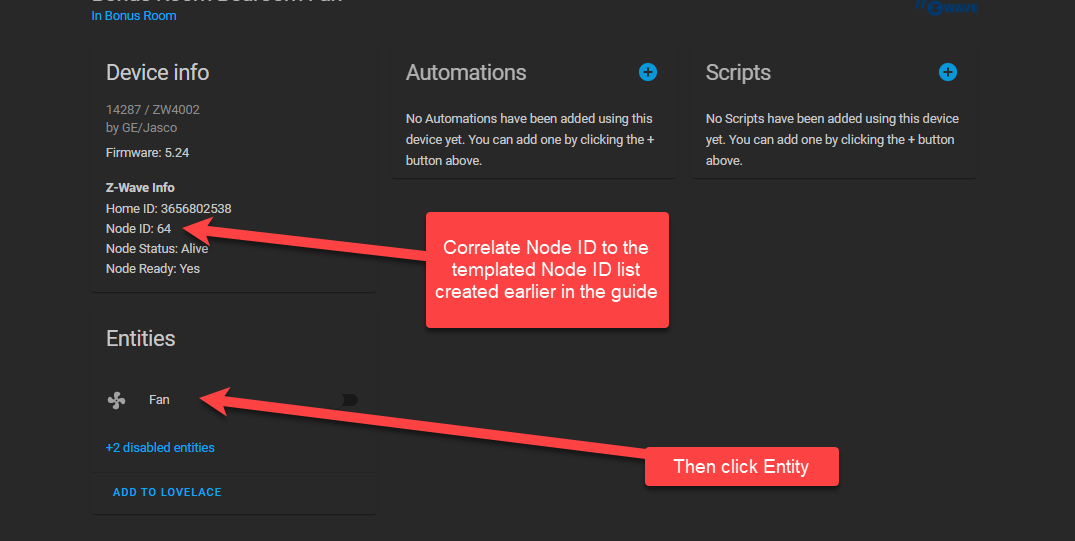
Rename Devices using the text file as a reference from the Preparation #4 step. This is the most time consuming step
Might want to add a note there just for the absent minded of us like myself that would forget to also turn off the “Start On Boot” and “Watchdog” options at the same time.
So I solved this problem, it was indeed because OZW had crashed when trying the template. After restarting OZW to get the mesh back up, I was able to get the template to work.
I installed ZWJSMQTT, copied the key/device path from OZW, stopped it, started ZWJSMQTT and it’ll start briefly, but then it’ll stop with the following repeating in the logs:
2021-02-05 18:59:51.308 INFO ZWAVE: Connecting to
2021-02-05 18:59:51.322 INFO ZWAVE: Controller status: Driver: "path" is not defined:
2021-02-05 18:59:51.324 WARN ZWAVE: Retry connection in 3 seconds...
2021-02-05 18:59:54.336 INFO ZWAVE: Connecting to
2021-02-05 18:59:54.347 INFO ZWAVE: Controller status: Driver: "path" is not defined:
2021-02-05 18:59:54.348 WARN ZWAVE: Retry connection in 3 seconds...
2021-02-05 18:59:57.363 INFO ZWAVE: Connecting to
2021-02-05 18:59:57.376 INFO ZWAVE: Controller status: Driver: "path" is not defined:
2021-02-05 18:59:57.376 WARN ZWAVE: Retry connection in 3 seconds...
2021-02-05 19:00:00.389 INFO ZWAVE: Connecting to
2021-02-05 19:00:00.403 INFO ZWAVE: Controller status: Driver: "path" is not defined:
2021-02-05 19:00:00.404 WARN ZWAVE: Retry connection in 3 seconds...
2021-02-05 19:00:03.416 INFO ZWAVE: Connecting to
2021-02-05 19:00:03.426 INFO ZWAVE: Controller status: Driver: "path" is not defined:
2021-02-05 19:00:03.427 WARN ZWAVE: Retry connection in 3 seconds...
2021-02-05 19:00:06.437 INFO ZWAVE: Connecting to
2021-02-05 19:00:06.451 INFO ZWAVE: Controller status: Driver: "path" is not defined:
2021-02-05 19:00:06.452 WARN ZWAVE: Retry connection in 3 seconds...
EDIT 1 (because apparently you cannot do consecutive replies):
Okay, so you cannot actually configure the driver/device path (to your Z-Wave stick) in the configuration tab of the Z-Wave JS to MQTT add on, you have to start it, quickly open the web UI for it and set the device path and key, then save it before it just gets automatically stopped.
With regards to the key you cannot just copy it straight from the configuration tab of OZW, you have to remove all of the ,0x from the key.
Due to the lack of context I have no idea what URL is meant.
I’m guessing the connection should go through MQTT so the webUI of ZwaveJS2MQTT seems irrelevant.
That’s going to be the IP of your server. If it’s on the same system, it’s going to be ws://localhost:3000. If it’s on separate hardware its going to be ws://IP_OF_SEPARATE_HARDWARE:3000.
You didnt have to delete the OZW integration in order to rename the entities that ZWave JS integration finds?
I tried on a VM test instance of HA and with OZW 1.6 I added my light switch and named it light.office.
Disabled OZW1.6 add on, added ZWAVEJSMQTT add-on, added Z WAVE JS integration, and the entities came through.
But I could NOT name the entity light.office because HA said it was already used. I had to delete the OZW integration in order to get rid of the origina light.office entity (or I could have renamed it to light.office_old or something of the sorts.
When I try to add the zwave js integration, I get a failed to connect message when the URL box pops up. Everything is on the same machine so it should just stay at the default as far as I can tell.
Do you have a screenshot ? I have the ws server on and the zwave js to mqtt panel, and the settings area is available, but there is nowhere to paste any such configuration?
Ok thanks, I did not understood this has to be done manually for each device.
I think the reinterview thing basically mess with everything, I’ll try to awake them one by one… like you say in the guide
What is the difference between the “Official add-on” for Z-Wave JS and the community Z-Wave JS to MQTT add-on? Are there any considerations we should take when choosing one over the other ?
Does the Network config need to be set to anything in this screen? I have a feeling this is blocking port 3000 and not allowing me to connect the ws://localhost:3000 in the Zwave JS integration config.