Intro
How to replicate basic functionality of Tado radiator valves in HA, so they can be used offline, without the need for Tado cloud.
Aimed at new users of HA.
Support for:
- Offline Operation - using Apple’s HomeKit protocol.
- Schedules.
- Manual Override in HA.
- History of tempature / heating.
Out of scope for this guide:
- Tado boiler controls (I don’t have this part).
- Manual Override at the thermostat.
- Battery indication - not supported by HomeKit integration.
- Temperature offset.
- Geofencing.
- Open window detection.
- Early Start heating.
Requirements:
- Tado bridge v3 - for HomeKit support.
How it will look / operate
Before explaining how to set it all up, let me show you what the end result will look like.
- Thermostat control for each valve
with a slider control that will pause the schedule.
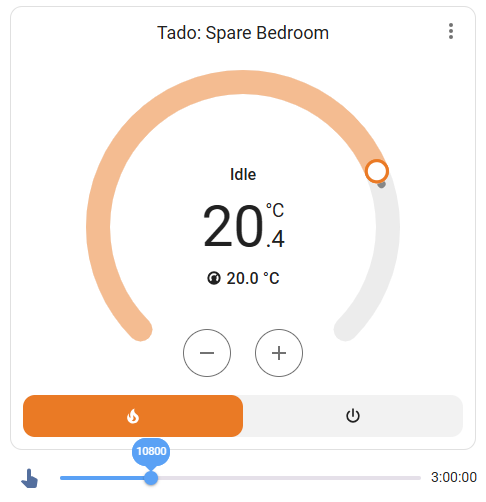
- If you manually set the temperature, it will remain until the next scheduled change.
- If you instead want to resume the schedule at a different time, move the slider to pause the schedule for an amount of time. This will countdown, and when it reaches zero, the schedule temperature will take over.
- If you want to resume the schedule temperature while the timer is set, simply move the slider all the way to zero (the left).
- If you want to pause the schedule indefinitely, go to the Schedules tab, and toggle off the coresponding schedule.
-
Schedule configuration
with time blocks, much like the Tado version
Creating a schedule:
Heating (dash) > Schedules > Add (under a given schedule)- Entity > Make scheme > Next.
- Time - as with the image above:
- Pick the days for your schedule to apply.
- Add time blocks to partition the day.
- For each block, set Action = Heat, and the Temperature.
- Options:
- Conditions > Add
- Group = Climate
- Entity = your radiator valve
- Condition = is not
- State = off
- Save.
- Conditions > Add
- Group = Timer
- Entity = timer you have created for this valve (more on this later)
- Condition = is not
- State = active
- Save.
- any/all toggle = all
- Re-eavalute when conditions change = on
- Conditions > Add
- Save.
eg Conditions will resemble:
These conditions need to be added manually for EVERY schedule (sorry).
If you forget, you will find the schedule will switch the heating back on when you have it off or paused, using the slider.


Setup
-
Add Tado Bridge to HA
We cannot use the Tado integration for this, as it works using Tado cloud.
So instead we will use the HomeKit integration.
HA comes with the HomeKit integration built-in with the default config.
Settings > Devices & Services
If your Tado Bridge is on the same network as your HA instance, you should see it discovered here as a HomeKit device.
If not, try reset the homekit settings on your tado bridge, using the factory reset button - How can I reset the HomeKit configuration of the Internet Bridge? | Help Center for tado° V3+ and earlier devices
(don’t worry, it won’t wipe the unit completely, only the homekit settings).
Add the bidge device, it will ask for a homekit pin, which is printed on the back of the unit (of form XXX-XX-XXX).
Once the bridge is added, all the thermostats already paired with the bridge should appear in HA.
You should see them in the Devices tab by serial number, and from here you can rename them (select > pencil) to something more human friendly, eg “Tado: Bedroom”.
You should also see thermostat controls appear in the Overview (left pane). -
Install HACS - as per User documentation - HACS.
Then use HACS (left pane) to add the following features (search > download):
- Scheduler component - scheduling
capabilities. - Scheduler Card - the awesome time-block
schedule config, as pictured above. - slider-entity-row - for the user-friendly slider interface.
- Decluttering Card - help reduce repetition in your raw dashboard config.
- Scheduler component - scheduling
-
Create Timers
These will be used when pausing the schedules for a duration.
For each radiator valve, create a timer with the same name:
Settings > Devices & Services > Helpers (tab) > Create.- Timer > Name = same as corresponding valve > Create.
-
Create a Dashboard
Settings > Dashboards > Add dashboard > New dashboard from scratch.- Title = Heating
- Pick Icon.
- Create.
Then we have two methods for populating the dashboard…
-
By raw yaml config
This is the quickest method, and allows you to amend configuration across all your cards in one go, with a little more custom control. But it is much more technical, requiring a little work with yaml syntax.
Make sure the entity names match between your valves and your timers.
Settings > Devices & Services > Entities.
For each “climate.my_tado_valve”, you should have a “timer.my_tado_valve”.
If the name does not match, edit the timer > entity id.Heating (dash) > edit (pencil) > menu (top-right, 3 vertical dots) > Raw confiugration editor.
Paste in the following, amending for your valve names, and save.decluttering_templates: tado: card: type: entities entities: - type: custom:hui-thermostat-card entity: climate.[[entity_name]] show_current_as_primary: true features: - type: climate-hvac-modes - type: custom:slider-entity-row entity: timer.[[entity_name]] max: 43200 step: 300 full_row: true hide_state: false show_icon: true icon: mdi:cursor-pointer tado_schedule: card: type: custom:scheduler-card time_step: 5 title: '[[entity_name]]' include: - climate.[[entity_name]] - timer.[[entity_name]] exclude: [] discover_existing: false sort_by: - title display_options: primary_info: days secondary_info: 'Next change: {action} {relative-time}' icon: action show_header_toggle: true views: - type: sections max_columns: 4 title: Overview path: overview sections: - type: grid cards: - type: custom:decluttering-card template: tado variables: - entity_name: tado_bedroom - type: custom:decluttering-card template: tado variables: - entity_name: tado_bathroom - type: grid cards: - type: custom:decluttering-card template: tado variables: - entity_name: tado_hall - type: custom:decluttering-card template: tado variables: - entity_name: tado_office - type: sections max_columns: 4 title: Schedules path: schedules sections: - type: grid cards: - type: custom:decluttering-card template: tado_schedule variables: - entity_name: tado_bedroom - type: custom:decluttering-card template: tado_schedule variables: - entity_name: tado_bathroom - type: custom:decluttering-card template: tado_schedule variables: - entity_name: tado_hall - type: custom:decluttering-card template: tado_schedule variables: - entity_name: tado_office -
By hand
Heating (dash) > edit (pencil)Edit “Home” view: Title = Overview > Save.
Add Card (plus in main panel) > Entities.
You’ll see 3 example entitites and a preview of the card on the right.Entities:
- Amend 1st entity to one of your Tado valves (eg climate.tado_bedroom).
- Edit (pencil) > Code editor (“{ }”) > Add the line:
type: custom:hui-thermostat-card
(you’ll see the preview update with the thermostat control).
Visual editor (looks like a checklist icon)- Show current temperature as primary infomration = on
- Features (dropdown) > Add > Climate HVAC modes
Back.
- Edit (pencil) > Code editor (“{ }”) > Add the line:
- Amend 2nd entity to the timer corresponsing to the valve (eg timer.tado_bedroom).
- Edit (pencil) > Code editor (“{ }”) > Add the line:
type: custom:slider-entity-row
Visual editor- icon - pick desired icon (eg mdi:cursor-pointer)
- max = 43200 (12hr)
- step = 300 (5min)
- full_row = on (makes the slider extend all the way along the row)
- show_icon = on
- Edit (pencil) > Code editor (“{ }”) > Add the line:
- Delete 3rd example entity
- Save
Repeat adding cards rest of your Tado valves.
Add View (plus in top panel): Title = Schedules > Save.
Add Card (plus in main panel) > Custom cards (scroll to bottom) > Scheduler Card.- Entities:
- climate - select ONE of your radiator valves.
- timer - and the corresponding timer you created for it.
- Other:
- Custom (tab)
- Title = eg Bedroom
- Show all schedules = off
- Time step = 5min.
- Sorting Options
- Order = Display title
- Show active on top = off
- Primary info = Summary
- Secondary info = Repeated days of the week
- Show header toggle = on
- Custom (tab)
- Save
Repeat adding a schedule card for rest of your valves.
Save the dashboard.
You can add schedules as described in the earlier chapter “Schedule configuration”.
- Amend 1st entity to one of your Tado valves (eg climate.tado_bedroom).
Finally
Now that your Tado vavles can be controller through HA, you can remove them from Tado cloud.
Alternatively, you can just set them to manual mode “until you resume schedule”. All HA adjustments will be manual from the point of view of Tado cloud.
And now of course, you are free to add radiator valves from other manufactures to HA, and control them within the same pane as your Tado valves!