After some search (maybe not the right keywords  please accept my apologies if the topic was already covered in the past), I didn’t find a simple path to produce Subflows that include a good node status reporting (without complex function in the Subflows), which is sometimes useful to keep the “big picture” on complex flows.
This is why I would like to share step by step how I create my Subflows in my Node-RED instance from scratch.
As you probably know, Subflows have limitations like not keeping the status of a node or not have the ability to use inject node as it is in regular flow which is sometimes annoying when doing an automation from scratch, as we need to test and catch relevant outputs.
Then my process of building a flow is the following :
In this example, I will create a simple automation (that I will need to use in many part of my house automation). The automation will simply stop my Sonos and take a snapshot while making several other steps that ensure that I’m in the “correct” configuration when I will restore it later.
-
I create an empty regular flow tab where I will start to build my “complex” automation that might take place further in a Subflow, name it with
DEVprefix following with the name of what would be my Subflow in its final version, in this case:DEV Sonos | stop > myarr_salon (snapshot)and start of building my automation nodes: -
When I’m satisfied with what I want to run, I select all the created nodes and group them together (upper right corner menu > groups > group selection). I name the group with my final Subflow name. I now have a block that I can easily move & copy, and that is ready to be placed everywhere in my Node-RED:
-
Now I can test it, either by connecting my first node directly somewhere in my automation by just moving the block. Sometimes I need to use the block multiple different flows, then I keep it in my DEV tab, and I juste add a
link innode that will allows me to call it from almost every where juste by placing alink outnode where I need to use it. By doing this, I’m able to test and debug my automation easily and get the correct node status for several use cases
-
When I’m satisfied with my automation and it is ready for production, I transform the flow in a Subflow (by selecting my nodes inside the groups, except
msgandlink innodes; I goto the upper right corner menu > Subflows > Selection to Subflow), then I edit the Subflow as followed by :


- renaming the Subflow with my final name, here:
Sonos | stop > myarr_salon (snapshot) - verifying that my inputs and outputs are correctly connected to my nodes
- adding
catch: allnode that I link to amsgnode; this will catch all potential errors and display them to the debug windows - adding
status: allnode that I link to thestatusof the node, which will allow me to have better feedbacks of Subflow nodes and what’s happens inside at the flow level
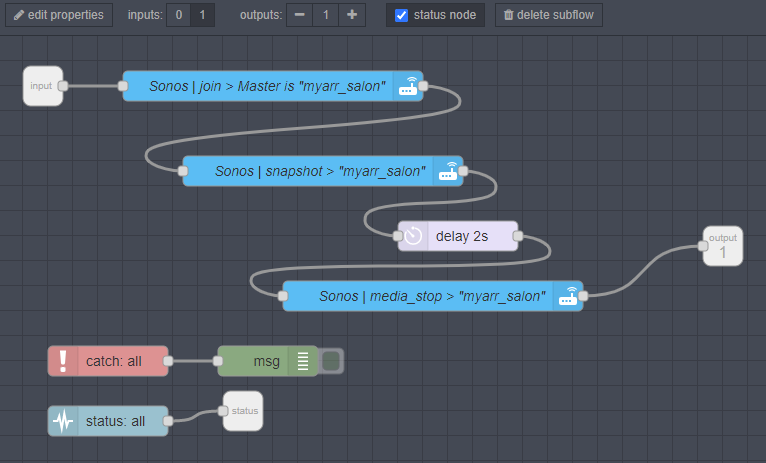
- And finally, I’m able to use my Subflow node every by having a status report (that changed during the executed node within the subflow)

Hope this small tuto will helps to improve your automations integration in node-RED.