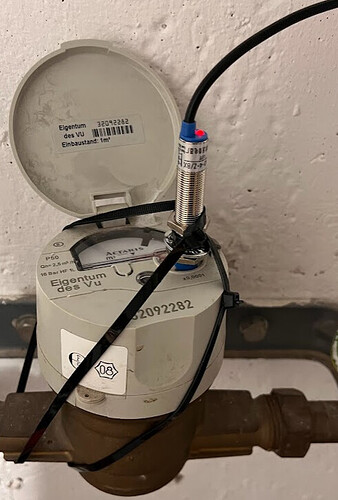
Following some of the threads and reading some bit, finally made me decide to build my own sensors using ESP Home. And what can I say…another slippery slope…so easy and a lot of fun building and configuring it. So I thought I’d share what I did and how it works now.
First: water consumption. With the latest upgrades to Homeassistant we can now track water consumption, so I wanted to have that too. I basically followed the guide from Pieter Brinkman (Build a cheap water usage sensor using ESPhome and a proximity sensor - PieterBrinkman.com)
But with a few changes. So my hardware list (all Amazon Europe links)
- I used these sensors ( LJ12A3-4-Z/BX DC 5V). Important that it is the 5V sensor. There are a lot of 6 to 36 V sensors out there, but they won’t work with the D1Mini boards. Pieter fond them on Aliexpress (bigger ones) but I didn’t want to wait that long, so found these smaller ones on Amazon and it works.
https://smile.amazon.de/gp/product/B09JP8CPK6/ref=ppx_yo_dt_b_asin_title_o02_s00?ie=UTF8&psc=1 - D1 Mini board
https://smile.amazon.de/gp/product/B0754N794H/ref=ppx_yo_dt_b_asin_title_o05_s00?ie=UTF8&psc=1 - Some project boxes:
https://smile.amazon.de/gp/product/B07VFMW13H/ref=ppx_yo_dt_b_asin_title_o05_s02?ie=UTF8&psc=1
I have the same meter as Pieter, so 1 pulse for every 0,1 Liter, so that bit was easy:
Schematics: Blue wire to GND, Brown wire to 5V and Black to pin D6
ESPHome code (here I found some difference to Pieter, I think in his code there is a bit too much. The initial bit of my code (IP Adress, Wifi signal etc) are not necessary, but I just like that:
esphome:
  name: water-consumption

esp8266:
  board: d1_mini

# Enable logging
logger:

# Enable Home Assistant API
api:
  encryption:
    key: "xxx"

ota:
  password: "xxx"

wifi:
  ssid: !secret wifi_ssid
  password: !secret wifi_password

   # Enable fallback hotspot (captive portal) in case wifi connection fails
  ap:
    ssid: "water-consumption"
    password: "Hw5hAe0gpyMz"

# Enable Web server.
web_server:
  port: 80

# Sync time with Home Assistant.
time:
  - platform: homeassistant
    id: homeassistant_time

# Text sensors with general information.
text_sensor:
  # Expose ESPHome version as sensor.
  - platform: version
    name: "water-consumption ESPHome Version"
  # Expose WiFi information as sensors.
  - platform: wifi_info
    ip_address:
      name: "water-consumption IP"
    ssid:
      name: "water-consumption SSID"
    bssid:
      name: "water-consumption BSSID"

# Exposed switches.
# Switch to restart the water-consumption.
switch:
  - platform: restart
    name: "water-consumption Restart"

sensor:
  # Uptime sensor.
  - platform: uptime
    name: "water-consumption Uptime"

  # WiFi Signal sensor.
  - platform: wifi_signal
    name: "water-consumption WiFi Signal"
    update_interval: 60s

# Water Pulse meter#

  - platform: pulse_meter
    pin: D6
    name: "Water Flow Rate"
    id: water_flow_rate
    unit_of_measurement: "L/min"
    icon: "mdi:water"
    timeout: 20s
    total:
      name: "Water Meter Total"
      unit_of_measurement: "m³"
      id: water_meter_total
      accuracy_decimals: 3
      device_class: water
      state_class: total_increasing
      filters:
        - multiply: 0.001
After that, there are 2 sensors in Homeasisstant:
- water_flow_rate for the current flow of water
- water_meter_total for use in the energy dashboard
And the result:
I double checked with the actual reading on the meter and it works very accurately.
So my second project was an ultrasonic sensor to measure the level of salt tablets in my water softener. I used this guide for that:
And what can I say…it works flawlessly as well.

Very happy with the result and happy I finally learned a bit of ESPHome. Now what to do with the extra board and sensors I have left…need to think of some new projects…


