Ways to run a 2nd add-on for zwave-js-ui?

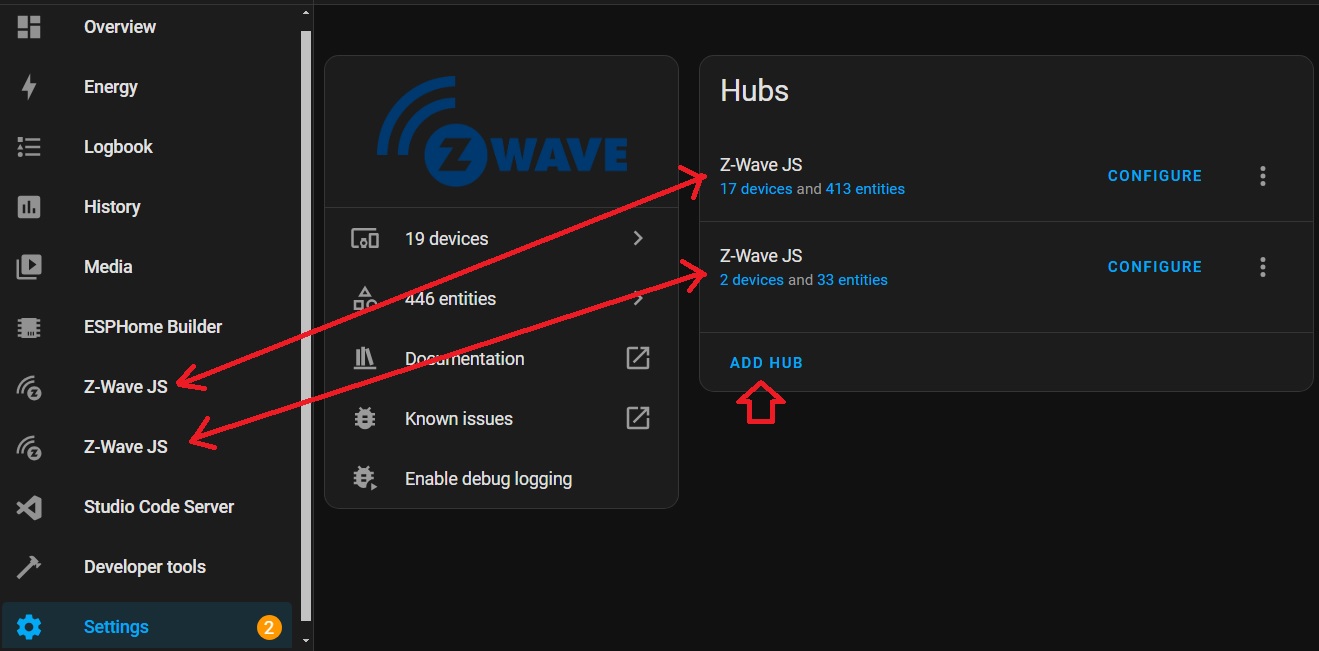
I want to add a second z-wave controller away from my main house controller (for Long Range).

The Home Assistant Z-Wave integration supports multiple “hubs” so that doesn’t seem like much of a problem. But I need another instance of zwave-js-ui to manage the controller.

One option is to run zwave-js-ui in Docker on it’s own server (e.g. Raspberry Pi) and then add a hub with a url like: ws://my-remote-zwave-js-server.local:3000. I’m not sure how concerned to be about that security-wise.

Here’s my add-on question:

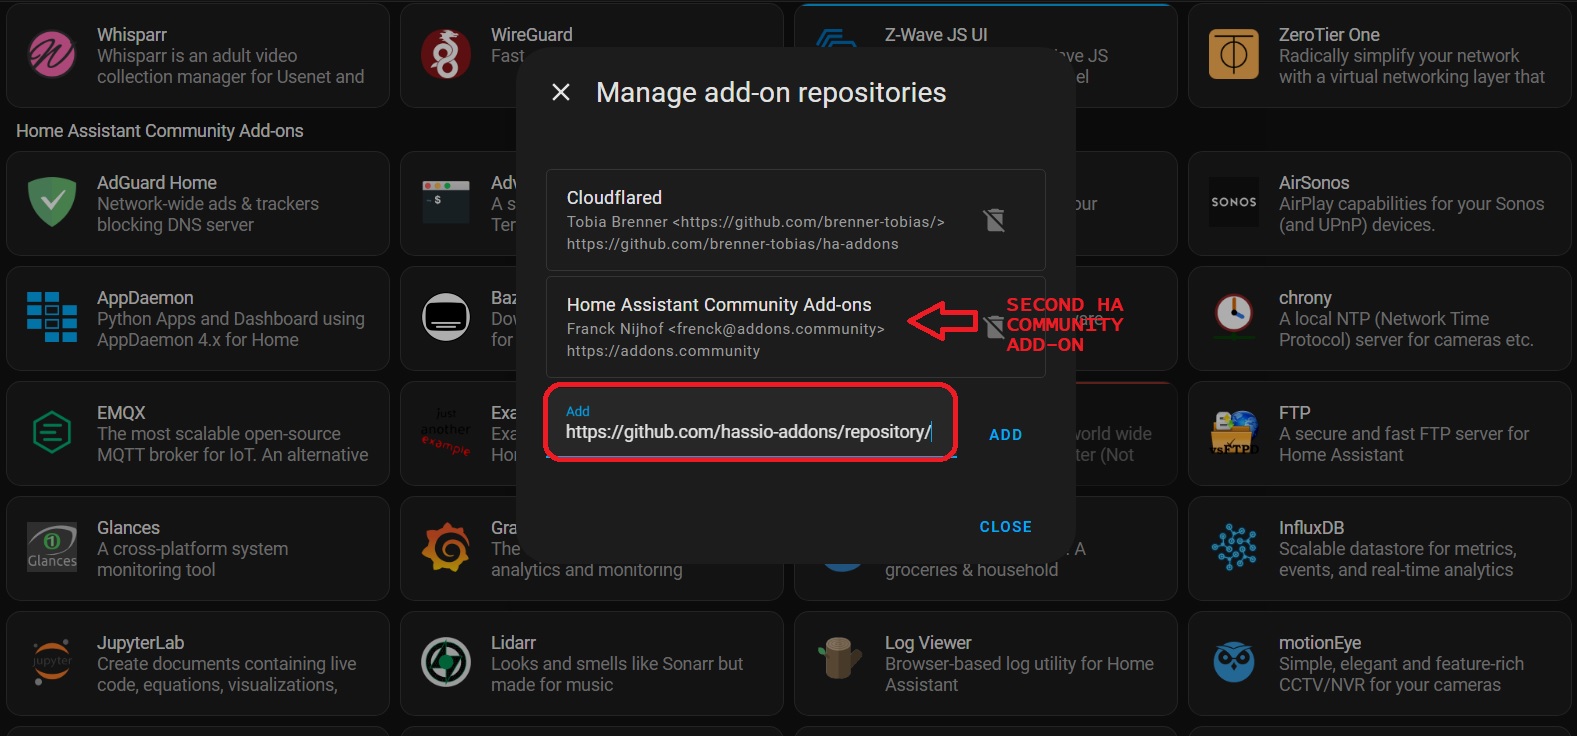
I’m considering using a serial-over-ethernet Z-wave controller (like the TubesZB kit), so I don’t really need another machine to run zwave-js-ui. I don’t think there’s way to run a 2nd copy of an add-on, but is there any reason the second copy couldn’t be run as a local add-on?

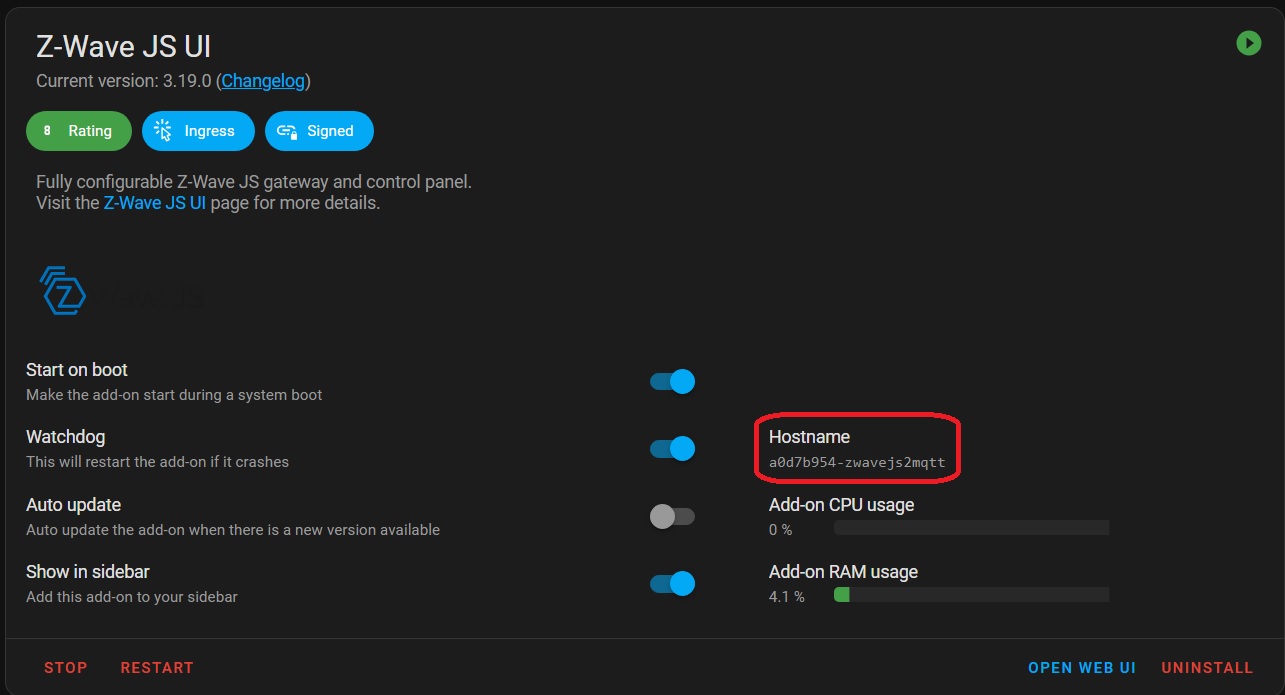
For example, could I bring in the zwave-js-ui add-on code as a local add-on and modify the slug in the add-on’s config.yaml to make the supervisor start the container with a different hostname?

Or are there other things that would need to be changed to allow the add-on to run? That is, something to make the add-on seem unique to the supervisor as a different add-on?

Thanks,

1 Like

That’s the typical solution and likely the best choice.

I have not seen anyone try to add a second AddOn instance for ZWaveJS-UI, but here are a couple of thoughts:

  • This has been done for ZigBee2MQTT AddOn (See here), but not sure at all this can be done for ZWaveJSUI.
  • There is actually an “Edge” respository for ZwaveJSUI. It may be possible to have the “stable” version AddON as well as the (Bleeding) “Edge” version of the AddON, but not sure if there will still be any naming collisions.

I don’t see why this approach wouldn’t work. The only downside is you are now responsible for updating it, and Z-wave JS UI updates are pretty frequent. This may help Tutorial: Making your first add-on | Home Assistant Developer Docs

I received a 2nd controller today (the TubesZB kit) and then copied the zwave-js-ui repository files to my addons directory. Then I made a few simplle modifications to config.yaml, namely the panel name and icon to differentiate it from the other copy running. I also updated the name and slug, although not sure updating the slug is needed since it’s a local addon with a “local_” prefix.

The local (second) addon is working as expected right now.

My Addons page now shows these. The second controller is going to be mainly used for long range, so that’s why I added the “LR” on the name.

After adding my controller and a zwave switch in zwave-js-ui I then added a new hub in Home Assistant, and my integration shows this:

I’m not quite sure where that “Z-Wave JS” name comes from. Maybe the websocket reports that?

Was all pretty quick. I will have to manually update the version to trigger an update when needed.

2 Likes

It’s just the hard-coded title assigned to the integration instance when it’s installed (or here). You can click the ... and select the Rename option to change it. It would be nice if it was default named to something unique to the network, such as the network’s Home ID or product name of the connected controller, but that information may not be available at that time.

Where is HUBS located? Can you provide your config.yaml edits? Thanks

Go to settings > devices and services > click on the Z-Wave Logo

There’s wasn’t much changed. I think I described all the changes I did. But, here’s a diff.

Pardon my random comments I added. Trying to learn about addons as I was doing this.

You will note that the current verion is 3.19.0 but I created my copy at 3.18.0. So, Home Assistant won’t see updates automatically. I have to manually go in and update that version if I wanted the addons page to show that there’s an update available.

~ wget -qO - https://raw.githubusercontent.com/hassio-addons/repository/refs/heads/master/zwave-js-ui/config.yaml | diff -u -  addons/zwave-js-ui-lr/config.yaml
--- -	2025-01-23 14:59:06.796542465 -0800
+++ addons/zwave-js-ui-lr/config.yaml	2025-01-23 14:59:04.270224265 -0800
@@ -1,13 +1,18 @@
-name: Z-Wave JS UI
-version: 3.19.0
-slug: zwavejs2mqtt
-description: Fully configurable Z-Wave JS gateway and control panel
+name: Z-Wave JS UI LR
+# I can't really change this version here for my testing because it will try and fetch a newer version
+# from github, which doesn't exist.
+# I guess one solution is to use the Dockerfile approach and have more control.
+version: 3.18.0
+slug: zwavejs2mqttlr
+description: Copy of Z-Wave JS UI for a second controller.
 url: https://github.com/hassio-addons/addon-zwave-js-ui
 codenotary: [email protected]
 ingress: true
 ingress_stream: true
-panel_title: Z-Wave JS
-panel_icon: mdi:z-wave
+
+## Change panel icons so it's clear which is which
+panel_icon: mdi:alpha-z-box
+panel_title: Z-Wave LR
 startup: system
 init: false
 timeout: 30
@@ -15,12 +20,14 @@
 - aarch64
 - amd64
1 Like

I’m going to reply to this thread, to save the next person doing multiple z-wave controllers the pain of this ordeal. And the pain of being told “just use a Docker”. :rofl:
Like Busman I’m using multiple TubesZB kits with Zooz 800 GPIO boards (they work great!).

Getting two Z-Wave JS UI Add-ons
Yes, you can install two versions of the Z-Wave JS UI. If you add a ‘/’ to the end of the GitHub link, HA will let you add a second community store.
So, navigate to Settings > Add-ons. Click the blue “Add-on Store” button. Click the three dots in the upper right > Repositories.
Paste in; “GitHub - hassio-addons/repository: Home Assistant Community Add-ons

Now you have a second instance of " Home Assistant Community Add-ons".
If you need more, you can use the beta repo and the edge repo. Otherwise, you will have to do your own fork or manual install as mentioned in the posts above.

Setting up the second interface
Easy part. Now that you have two stores, install the second Z-Wave JS UI. Set up your second interface as you did the first. At this point, you can add your devices or go back latter to add them.

Connecting to HA
This is where the other issue comes up. First, some explanation for us noobs that are expected to just get it.
Every part of documentation you read will state to use “ws://a0d7b954-zwavejs2mqtt:3000” to connect JSUI to HA. Where does that come from?
Navigate to Settings > Add-ons. Click the the Z-Wave JS UI box. In the right column is the Hostname. This is where that comes from. This is important.
The first instance will be “a0d7b954-zwavejs2mqtt”. The second instance of JSUI will have a different hostname. Copy that hostname and save it.

So, to connect it, navigate to Settings > Devices & services. Click on the Z-Wave box. The bottom of the right hand box, click the “Add Hub” button.
Just like your first instance, uncheck the Supervisor box. Now type in “ws://hostname-zwavejs2mqtt:3000”, where the hostname is what you copied from the second JSUI box.

Your finished! You should have two stable versions of JSUI, and both of them talking to the HA.

14 Likes

Thanks for taking the time to write this up, I was getting ready to fire up yet another docker container on my Synology. For the HomeSeer ZNET users, you don’t need to install multiple instances of ZWave JS, only ZWave JS UI. Working great on my system with two ZNets. I can finally decommission my Windows VM with the sole purpose of HomeSeer. My Homelab is finally Windows free.

Looks like you can add a third instance with two // at the end as well.

1 Like