AI Weather Widget
Just wanted to share a cool weather widget I made for one of my dashboards!
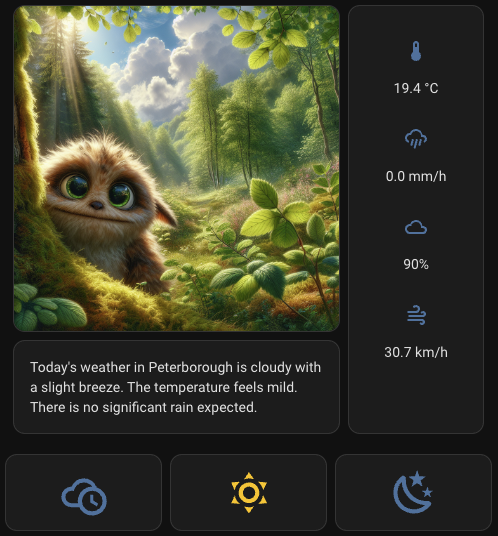
It uses OpenAI Conversation to generate text-based weather descriptions along with an AI generated image representing a cute, forest-dwelling creature experiencing the given weather conditions.
It generates 3 sets of weather info, each with a corresponding image:
- current weather
- day weather
- night weather
The weather info to display is selected using the buttons under the main widget.
Screenshots
Current Weather

Day Weather
Night Weather

Challenges
I faced some interesting challenges with this one. Turns out trying to generate an image that uses weather info to describe the scene results in very weird images that often included random text, symbols and numbers, usually unrelated to the actual weather info. I also wanted the image to represent the time of day i.e. the current time for the current weather, noon for day weather and 11pm for night weather. Trying to include the time often resulted in the AI adding a static time in the image which I didn’t want.
To get around these around issues I had to do a few things:
- Get the AI to generate a plain text weather description that didn’t include any numbers or measurements
- Feed the plain text weather description into another AI conversation process along with the time I wanted to use and get the AI to generate the image generation prompt, making it descriptive in a creative writing style
- Feed the AI generated image prompt to the generate image action
After lots of trial and error it’s finally doing what I want! ![]()
How does it work?
Automations
There’s an automation for each weather state. The current weather automation runs every hour and the day & night automations run every 3 hours. These fetch the latest relevant weather info for the given weather state and execute the open AI actions (see challenges above) to generate the forecast and images. The final step of each action is to emit an event containing 2 attributes - the forecast and the image url.
Templates
There’s trigger templates that listen for the events (one for each state) and store the image in an image entity and the text forecast in a sensor attribute e.g.
- trigger:
    alias: "Update weather_day image"
    platform: event
    event_type: weather_day
  image:
    name: "weather_day"
    url: "{{ trigger.event.data.url }}"
  sensor:
    name: weather_day
    state: none
    attributes:
      forecast: '{{ trigger.event.data.forecast }}'
State Selector
For the weather state selection buttons, there’s an input_select that holds the selected state i.e. current, day or night. There’s 3 template binary_sensor that set their on/off state based on the input_select e.g.
- binary_sensor:
    name: weather_night
    state: "{{ states('input_select.weather_selection') == 'night' }}"
Although I could’ve conditioned the displayed weather from the input_select alone, I wanted the button for the currently selected state to be highlighted (on) so that’s why I added the binary sensors.
When a given state button is pressed, it updates the input_select with the new state for that button and because the binary sensors are based on the input_select, they’re all updated automatically.
UI
Main Widget
The main widget uses a grid layout with 2 columns. The image and weather text are stacked in a vertical stack card in the first column and a glance card shows the weather metrics in the second column. There’s 3 of the vertical stacks, one for each weather state and they’re conditioned based on the binary_sensor for the given state being on.
State Selector
The state selector is a simple horizontal stack with a button for each weather state. The on press action sets the input_select as described previously.