After my original post got deleted, here is the replacement with corrected code indention.
Ventilation Recommendation
This project provides a set of Home Assistant template blueprints that help you decide when ventilation actually makes sense.
- Calculate absolute humidity
 based on existing sensor values
 - Estimate the potential humidity improvement

- Get clear ventilation recommendation

- Reduce indoor humidity

- Avoid unnecessary heat loss

- For data-driven automations for smart and efficient airing decisions

1. Calculate the Absolute Humidity
This one is the most basic sensor. It simply calculates the absolute humidity based on Temperature (°C) and relative Humidity (%).
Can be used for statistics  or as trigger for automation
  . The Input values are also available as attributes:

Setup
To set up this sensor, you need to do two things:
- Import this Blueprint

- Add one ore multiple sensors to your
configuration.yaml(ortemplate.yaml):
template:
  - use_blueprint:
      path: Flo-R1der/absolute-humidity.yaml
      input:
      temperature: #weather-station-or-forecast-or-room-temperature
      relative_humidity: #weather-station-or-forecast-or-room-humidity
    name: Absolute Humidity #outside-or-room-name
    unique_id: absolute_humidity_ #outside-or-room-name
Obviously you need to fill the correct entity-id for each input sensor. You can set up one sensor for each area you want to track (outside, living room, bedroom, bath, …).

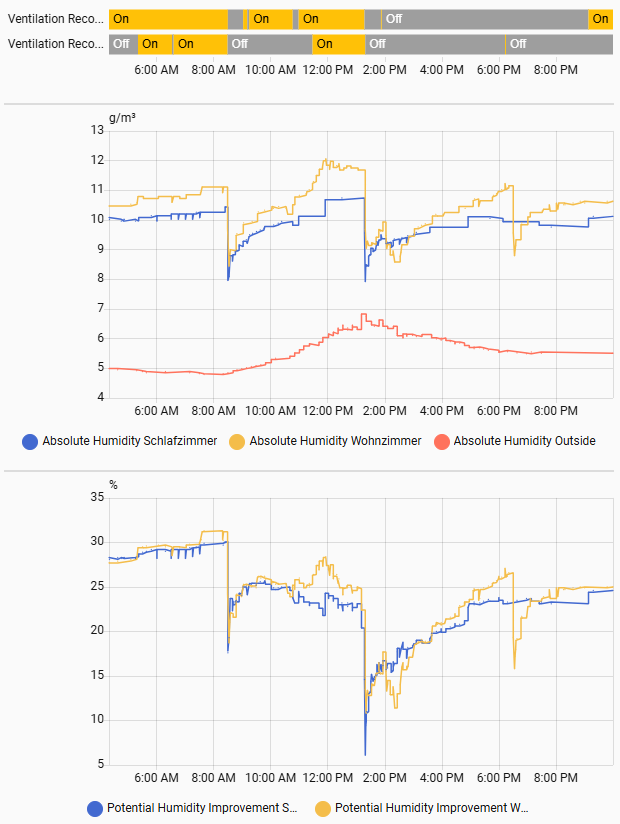
Note: You can see the cocking for lunch and dinner, as well as the ventilation having an effect on both: absolute humidity and temperature. Also the absolute humidity outside is always lower then inside. This sensor makes both values comparable!
2. Calculate the Potential Humidity Improvement
This sensor compares the inside and outside Temperature (°C) and relative Humidity (%) to calculate the theoretical improvement.
Can be used for statistics or as trigger for automation . The Input values are also available as attributes:

This is done in three steps:
- Calculates the outside absolute humidity
- Calculates the theoretical humidity with the air from outside
- Subtracts the calculate humidity from the measured humidity. Result = this sensor value
Setup
To set up this sensor, you need to do two things:
- Import this Blueprint
- Add one ore multiple sensors to your
configuration.yaml(ortemplate.yaml):
template:
  - use_blueprint:
      path: Flo-R1der/potential-humidity-improvement.yaml
      input:
        outside_temperature: #weather-station-or-forecast
        outside_humidity: #weather-station-or-forecast
        inside_temperature: #room-temperature
        inside_humidity: #room-humidity
    name: Potential Humidity Improvement #room-name
    unique_id: potential_humidity_improvement_ #room-name
Obviously you need to fill the correct entity-id for each input sensor. You can set up one sensor for each room you want to track (living room, bedroom, bath, …).

NOTE: When ventilation takes place, the potential improvement drops and rises again afterwards.
3. Ventilation Recommendation
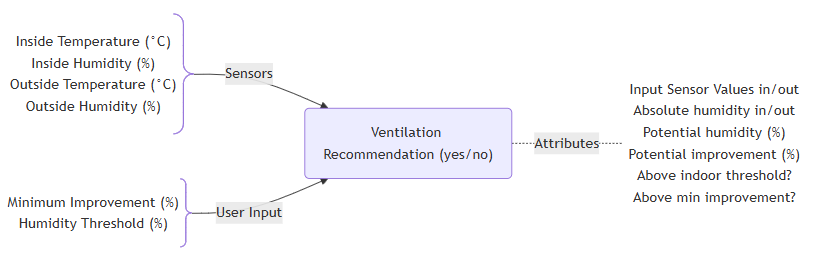
This sensor compares the inside and outside Temperature (°C) and relative Humidity (%) to calculate the theoretical improvement and directly give an advice if ventilation is recommended or not.
Can be used as trigger for automation or as an traffic light system to inform users via UI or any external lights. The Input values are also available as attributes:
Setup
To set up this sensor, you need to do two things:
- Import this Blueprint
- Add one ore multiple sensors to your
configuration.yaml(ortemplate.yaml):
template:
  - use_blueprint:
      path: Flo-R1der/ventilation-recommendation.yaml
      input:
        outside_temperature: #weather-station-or-forecast
        outside_humidity: #weather-station-or-forecast
        inside_temperature: #room-temperature
        inside_humidity: #room-humidity
        minimum_improvement_value: 10 #change-if-required
        threshold_room_humidity: 50 #change-if-required
    name: Ventilation Recommendation #room-name
    unique_id: ventilation_recommendation_ #room-name
Obviously you need to fill the correct entity-id for each input sensor. Adjust the values for minimum_improvement_value and threshold_room_humidity if you like. You can set up one sensor for each room you want to track (living room, bedroom, bath, …).
Tip:
Instead of the fixed numbers in yaml forminimum_improvement_valueandthreshold_room_humidity, you can also useinput_numberhelpers for more dynamic adjustment of those two input values.minimum_improvement_value: "{{ states('input_number.min_ventilation_improvement')|int }}" threshold_room_humidity: "{{ states('input_number.humidity_threshold')|int }}"
 Like My Work?

Part My Smart Home Stuff.
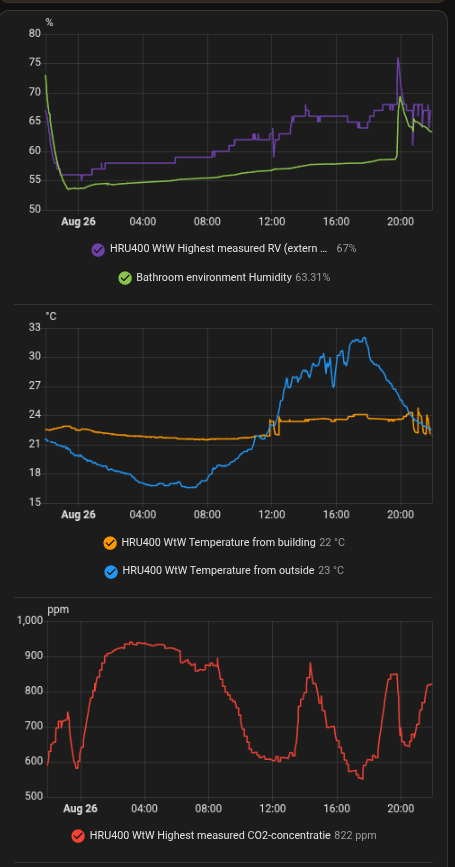

 , but it helped keeping the house cool this summer