Hey guys, need some help here. How can the following condition be translated to Node RED? many thanks in advanced
        - condition: template
          value_template: "{{ trigger.to_state.state|float < states.climate.calefaccion.attributes.current_temperature|float + 1 }}"
So as I’m sure you’re aware, the trigger variable is defined only in templates within HA automations. Which means there’s no direct translation of that particular one to Node RED. Node RED has a template node but you can’t use it for that one or you’ll just get a trigger is undefined error since you aren’t in the context of an HA automation.
Therefore I need a bit more context to answer your question. I see that is a condition, is that in the condition section of your automation or is that a condition action? If its in the condition section then you should use a trigger node and do something like this:
That JSONata expression btw is
$number($globalContext("homeassistant.homeAssistant.states['climate.calefaccion'].attributes.current_temperature")) + 1
If it’s a condition as part of the list of actions to control which actions are executed when then it’s a bit different. You use a switch node for that and unfortunately what you put in that switch node varies slightly depending on whether your flow was triggered from a state: changed node or a trigger: state node.
Your switch node would basically look like this (the JSONata expression is the same as before)
The difference between the two starter nodes is what goes in the Property field at the top. If your flow was started from a state: changed node then it looks like my screenshot (put msg.data.new_state.state). If it was started from a trigger: state node then change the value in that field to msg.data.event.new_state.state since the trigger node returns the entire event object in data instead of just the new_state and old_state fields.
Note that in both cases, make sure to say that the state type is number in your trigger: state or state: changed node so it converts the state value to a number for you. Otherwise you will need to instead use a JSONata expression for the Property field as well and do this to convert from string to float:
$number(data.new_state.state)
2 Likes
wow, I really appreciate all the time you took. I’m gonna have to delve into it to digest all the information but definetely it’s gonna help a lot. It is a condition in the condition section, but I appreciate you helped out with both of them because I’ll be needing them soon. Thanks again, really
and regarding this, when should I use the trigger: state node instead of the events: state? when should I use which?
Np, glad to help 
You can basically think of trigger: state as the advanced mode version of events: state. They both trigger on state change of the entity (or entities) you specify (either only on actual state change or any change in state including attributes) and they both let you convert the state to its correct type (boolean, number, or string).
But for events: state you only have one option for conditional to control the trigger, a single comparison on the state of the entity. And there’s max two outputs, one if the state change passes your conditional and one if it fails.
trigger: state on the other hand lets you provide a list of conditionals on pretty much anything you want (current state of the entity, previous state of the entity, some other entity, etc.). Then you get two basic outputs that always look the same, one for ‘all conditionals passed’ and one for ’ one or more conditionals failed’. But you also can specify any number of other outputs as well as conditionals for them as well, all of which will be evaluated on each state change of the entity.
Basically just depends on your needs. If you just want something to fire on any state change or any state change when the state meets a conditional, go with basic mode. If you need more then that, advanced mode. Although I will say there are two additional things to keep in mind:
- If your flow is on the complicated side and looks at the output message from the
events: state or trigger: state node and uses it in logic, consider using trigger: state even if you only need events: state initially. The reason is as I mentioned earlier the output message of these two has a different schema. If down the line you find you actually need the more advanced logic of trigger: state you’ll have to refactor any logic based on the schema of events: state output message
- If you want to check the ‘expose to Home assistant’ also consider just using a
trigger: state instead of an event: state even if your logic is simple. Basically for a similar reason to #1, if down the line you find you need more advanced logic it’ll be a more annoying change. You’ll have to delete the first node, restart HA, delete the restored switch, then add the new node now that the name is freed up again. Not a big deal but also avoids a small hassle.
2 Likes
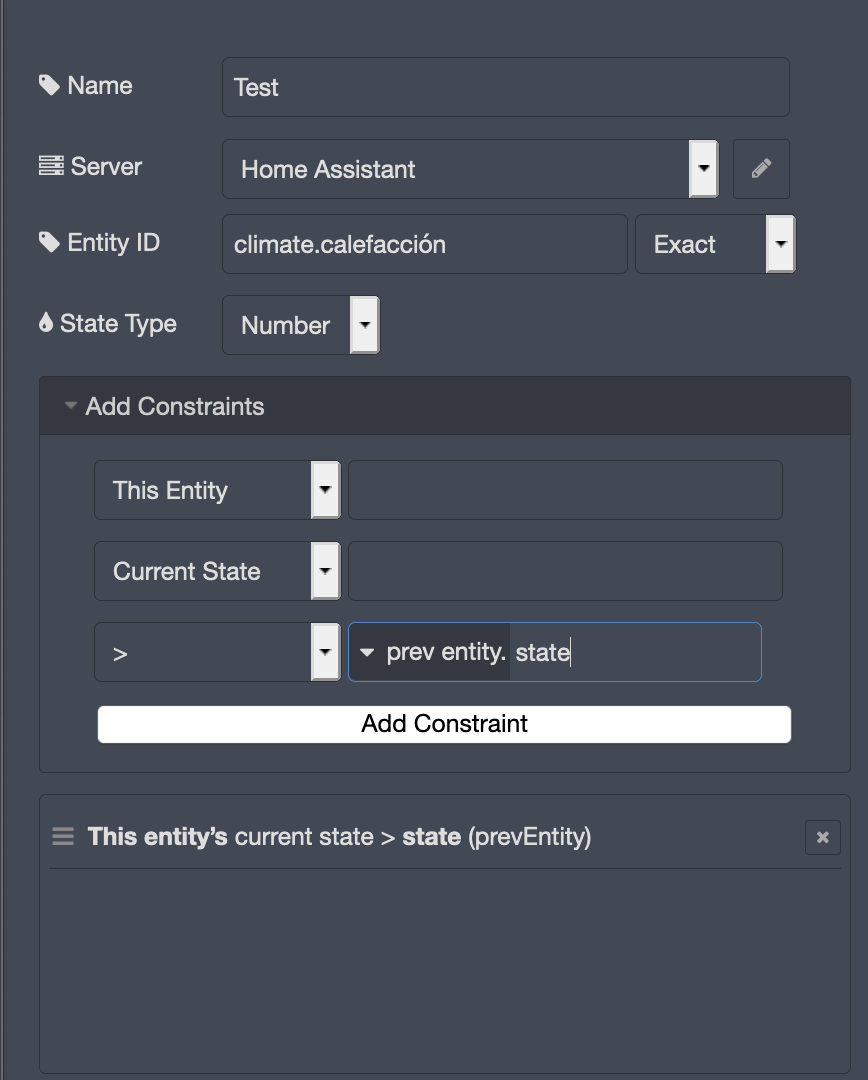
Still digesting it but :D, in this very same scenario, having climate.calefacción as the trigger, if I wanted to do the following?
{{ trigger.to_state.state|float > trigger.from_state.state|float}}
I don’t see how I could do that
Actually that’s an easy one. When building constraints in the trigger: state node one of its options is to compare against values in the previous state or current state of the changed entity. So this:
{{ trigger.to_state.state|float > trigger.from_state.state|float}}
just becomes this:
1 Like
Well thanks a lot my man, you have definetely cleared out lots of doubts I had going into Node Red, I very much appreciate.
see you around!
1 Like