Same here, looks like the comfoair rs232 implementation is not the best. I’ve observed also with the original controller that it was taking some time for successful readings/controls.
So now i’m in the step to use the custom card.
I don’t know if i followed the correct way, but as the entity is not yet “discoverable” ( This is still a work in progress), i guess i have to create it manually.
To do so, i added in the configuration.yaml, the following:
climate:
  - platform: mqtt
    name: ca350_fan
    send_if_off: true
And i’ve installed the custom card “lovelace-comfoair”, added a card in the dashboard, for which ones i guess i’m close to get it working:

- Fan speed (status + command) are not working, should I specifiy somewhere (in the climate declaration?) a mapping to the “fan” entity?
- Which temperature is supposed to be the ones in the top middle? (Should i map it?)
- For the buttons / infos in the bottom, i guess they are for the bypass/filter/summermode indicator, should the other 2 ones do something?
==> Edit: I found it in the code, it represents the binaries ca350_fan_speed_supply, ca350_filterstatus, ca350_bypass_valve (for the valve + preheater), and ca350_summer_mode (grey color is close to the black )
)
Hi,
did you activate the climate Option in hacomfoairmqtt ?
HAEnableAutoDiscoveryClimate = True
If you activate it, everything should be automatically configured. With the Widget I still have some open topics:
- Make active elements more visible
- Make the active Fan more visible
- Control the Temperature
Ah great, it works better with this parameter. (I was thinking that it should not be used because it was “in progress”). Thank you! (i’ve set this parameter to true, and removed the entry in configuration.yaml.)
For the visibility, what i can say for the “fan” ones, when i clic on a fan, the visibility on this one is good:

But to get the updated value in the screen, i have to refresh the page, so the “grey circle” disapears (any option to activate to get a refresh directly in the screen without refreshing the entired page?).
Hmm it seems that i have an bug in the widget. There is an timing issue in the service (read in interval and write instantly) this is why i never seem to stumble on it. I thought i was just not patient enough 
I will try to take a look in the coming days.
1 Like
Hello,
As this was my first custom integration in HA, i’ve written the different steps which i have followed, and some explanations (based of course on the previous posts + documentation). If it’s too much “beginner oriented” don’t hesitate to tell me, i can remove this post, otherwise i hope i can help some other beginners like me. Don’t hesitate if a modification is required.
As a prerequesite, you need to have a MQTT broker installed in your HA.
Architechture
First of all, a quick overview on the different physical devices and connections:

Note: The Raspberry has a raspbian installation.
Hacomfoairmqtt installation
- Connect to the raspberry via SSH
- Install the required packages:
sudo apt-get install python3-pip python3-yaml python3-serial
sudo pip3 install paho-mqtt python-etcd
- Copy the hacomfoairmqtt files to the raspberry
sudo mkdir /usr/local/share/mytmp
sudo mkdir /usr/local/share/ca350
sudo git clone https://github.com/adorobis/hacomfoairmqtt/ /usr/local/share/mytmp/
sudo mkdir /usr/local/share/ca350/bin
sudo cp /usr/local/share/mytmp/src/ca350 /usr/local/share/ca350/bin/
- Edit ca350 script with your personal configuration, so in my case:
sudo nano /usr/local/share/ca350/bin/ca350
- Change the following entries (to be adjusted with your personnal data):
SerialPort='/dev/ttyUSB0' --> To be adjusted with your Serail port
MQTTServer='192.168.1.XXX' --> Ip address of my HA (which has the MQTT broker)
MQTTUser = ‘myuser’ --> User set in my MQTT broker settings
MQTTPassword = ‘mypassword’ --> Password set un my MQTT broker settings
HAEnableAutoDiscoveryClimate = True --> To publish the climate entity
- Ctrl + o so save
- Ctrl + x to exit
At this stage, launching the following command, the raspberry starts to publish the data:
sudo python3 /usr/local/share/ca350/bin/ca350
Last step on the raspberry, create a service to enable the automatic start at each boot.
- Create the file:
sudo nano /etc/systemd/system/comfoair2mqtt.service
- Fill it with this content (you can adjust the user if you prefer to use another user):
[Unit]
Description=comfoair2mqtt
After=network.target

[Service]
ExecStart=python3 ca350
WorkingDirectory=/usr/local/share/ca350/bin/
StandardOutput=inherit
StandardError=inherit
Restart=always
User =root

[Install]
WantedBy=multi-user .target
- Ctrl + o to save
- Ctrl + x to exit
- Start the service:
systemctl start comfoair2mqtt
- And enable it for automatic boot
systemctl enable comfoair2mqtt
At this stage, the raspberry will publish automatically (even after a reboot), the different entities are now available in HA with a “ca350” name (climate.ca350_climate, fan.ca350_fan, sensor.ca350_outsidetemp …), so they can be used, example:
Lovelace MQTT Comfoair card installation
Now let’s get a better view for HA display.
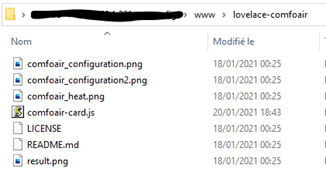
Let’s download comfoair-card.js (https://github.com/TimWeyand/lovelace-comfoair/blob/beeddb434ece08b3309784bb7538ede491245c10/comfoair-card.js), and store it under your www folder, in HA.
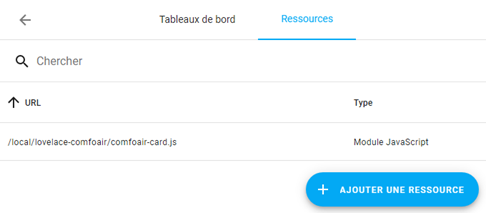
Now add this file as a resource for lovelace:
Configuration -> Lovelace customizing -> Resources tab -> ‘+ add resource’
Fill “url” with which ones you added the file in the step before, changing “www” in “local”, so in my example, I stored the file in /www/lovelace-comfoair, so I put /local/lovelace-comfoair/comfoair-card.js. Resource type is Javascript module.
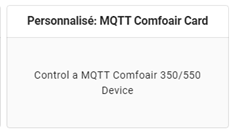
At this moment, a new card is available for your dashboards.
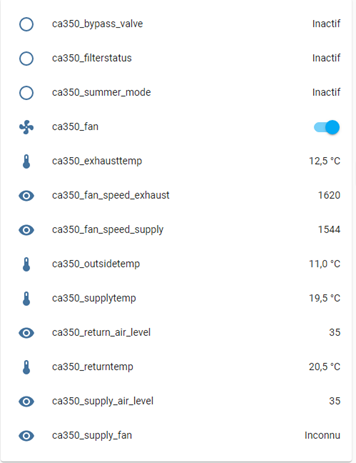
Now go on your desired dashboard, add a card, and a new customized card will be available:
The link to every entity is already done by default (with the “ca350” names), so you should not modify anything:

Now let’s enjoy your new card to manage your MVHR.
Thanks again to @adorobis and @TimWeyand for your support and for the work done!
9 Likes
Looks great! I’m so happy that my initial work is so much better now thanks to @TimWeyand and your guide @Dapolux deserves a dedicate page in the Community Guides section of the forum.
1 Like
For anyone trying to replicate this, I will reply to this thread with things that were different on my machine (a normal Debian installation):
- There seems to be a config file now, so instead of editing the ca350 file in /bin, do the following:
sudo cp /usr/local/share/ca350/config.ini.dist /usr/local/share/ca350/bin/config.ini
- Then edit the config.ini file instead
So the MQTT stuff is working, I am seeing values under /comfoair and I am seeing a config entry under
/homeassistant/sensor/ca_outsidetemp.
However, the device and sensors are not autocreated in Homeassistant.
What am I doing wrong?
Here is what the script is outputting:
*****************************
* CA350 MQTT Home Assistant *
*****************************

01-02-2021 13:24:18 INFO: Changed RS232 mode to 3
01-02-2021 13:24:18 INFO: Home Assistant MQTT Autodiscovery Topic Set: homeassistant/fan/ca350_fan/config
01-02-2021 13:24:18 INFO: Home Assistant MQTT Autodiscovery Topic Set: homeassistant/sensor/ca350_[nametemp]/config
01-02-2021 13:24:19 INFO: Home Assistant MQTT Autodiscovery Topic Set: homeassistant/climate/ca350_climate/config
01-02-2021 13:24:20 INFO: Successfull subscribed to the comfoair/on/set topic
01-02-2021 13:24:20 INFO: Successfull subscribed to the comfoair/speed/set topic
01-02-2021 13:24:20 INFO: Successfull subscribed to the comfoair/comforttemp/set topic
01-02-2021 13:24:20 INFO: Successfull subscribed to the comfoair/ha_climate_mode/set topic
01-02-2021 13:24:20 INFO: Successfull subscribed to the comfoair/ha_climate_mode/fan/set topic
How have you configured the MQTT integration? If via configuration.yaml check that you don’t have the discovery: false there. If via gui check the following in the system options of MQTT integration:

If I recall properly I’ve seen somewhere a post suggesting to remove the integration and re-configure it from scratch. The discovery is enabled by default.
I’ve double-checked this a few times, it is configured via the UI and the option from your screenshot is enabled.
I am also using the HACS shelly autodiscovery plugin and already have a bunch of automations built on top of those devices.
When I remove and re-configure the integration, will the automations still work or would I need to rebuild all of that?
Hi,
from the logs it looks fine. Do you have more informations for us?
- How is MQTT configured in Home Assistant? (discovery_prefix? discovery? - no yaml configuration for mqtt?)
- Do you have except of the ca350_* entities other auto discovery entities in homeassistant/[type] ?
- Do both alive messages exist (homeassistant/status and comfoair/status)?
Best,
Tim
OK, let’s see…
-
MQTT was configured using the UI with the following options:
- Enable discovery: on
- Enable birth message: on
- Birth message topic: homeassistant/status
- Birth message payload: online
- Birth message QoS: 0
- Birth message retain: off
- Enable will message: on
- Will message topic: homeassistant/status
- Will message payload: online
- Will message QoS: 0
- Will message retain: off
- (a bunch of shellies
-
homeassistant/status = online, same for comfoair/status

The shellies come in via https://github.com/bieniu/ha-shellies-discovery and I have a custom tasmota device with a bunch of sensors that were autocreated, so in theory, it should work…
Thanks a lot!
Pete
Just for reference:

I am a bit flabbergasted… It works, but I don’t know how?


This is the list of all devices in the UI no ca350 there…

It seems the entities are there however…

1 Like
I have one other issue… Is there a way to get the custom UI working in the iOS App?
This is what I get on my iPhone:

Interestingly I have the same behaviour. All entities have been discovered but they don’t show up in the MQTT integration. Other than that all works great
I’ve created a set of automations that would spin up the ventilation to full blast for a period of time (usually 30 min in my case) and then returns to the previous state. This is helpful when you’ve used the bathroom, taken a shower or had some smelly cheese in the Fondue (greetings from Switzerland!). In german, this is called “stosslueften”, hence the names below.


If you would like to replicate that, here are the instructions:
- Create the following helpers:

The Timer actually needs a run-time set. In my case I’ve set it to 30 min (00:30:00).
- Add the following automations to automations.yaml or create them via the UI:
- id: StosslueftenTimerstart
  alias: Stosslüften Start
  trigger:
  - platform: state
    entity_id: input_boolean.stossluften_toggle
    to: 'on'
  condition: []
  action:
  - service: timer.start
    entity_id: timer.stosslueften
  - service: notify.pushovernotifier
    data:
      message: Stosslüften an für {{ (states.timer.stosslueften.attributes.duration).split(":")[1]
        | int }} min.
  - service: input_text.set_value
    data:
      value: '{{ states.fan.ca350_fan.attributes.speed }}'
    entity_id: input_text.stossluften_initial_state
  - service: fan.set_speed
    data:
      speed: high
    entity_id: fan.ca350_fan
  mode: single
- id: StosslueftenTimerFinish
  alias: Stosslüften Abbruch
  trigger:
  - platform: state
    entity_id: input_boolean.stossluften_toggle
    to: 'off'
  condition: []
  action:
  - service: timer.finish
    entity_id: timer.stosslueften
  - service: notify.pushovernotifier
    data:
      message: Stosslüften aus (zurück auf {{ states.input_text.stossluften_initial_state.state
        }})
  - service: fan.set_speed
    data:
      speed: '{{ states.input_text.stossluften_initial_state.state }}'
    entity_id: fan.ca350_fan
  mode: single
- id: StosslueftenTimerstop
  alias: Stosslüften Stop
  trigger:
  - platform: event
    event_type: timer.finished
    event_data:
      entity_id: timer.stosslueften
  action:
  - service: input_boolean.turn_off
    entity_id: input_boolean.stossluften_toggle
I use Pushover to notify me when these Fan events are triggered. You can safely leave that out or adapt it to your notification solution of choice.
On your dashboard you then need to add the timer and the boolean_input to see how much time is left for the fast ventilation and to turn it on by hand using the boolean_input switch (this also allows for turning it off before the timer expires).
Hope this is helpful for someone 
2 Likes
Nice, another idea is to set high or medium speed when humidity in a bathroom exceeds set value. Another one to set it to away when people are not at home, to low at night and to medium in high usage times e.g. mornings and evenings when bathrooms are used or Sunday noon when there is a lot of cooking in the kitchen
And on my todo list: set the ventilation to medium when the cooker hood is turned on - need to get some sensor or smart switch in it first.
set the ventilation to medium when the cooker hood is turned on - need to get some sensor or smart switch in it first
In my installation I have air being pulled from the kitchen and the bathrooms, the other rooms are only getting air pushed in. So, in my case, it would be better to open the window, turn off the ventilation and turn the cooker hood at the highest level. Otherwise I would pull potentially fatty air into the kitchen ventilation vents and into the bathrooms.
I haven’t quite figured out how the fan modes work in the Comfoairs. On the Comfosense control, I can set input or output only. It might also be a good idea to only blow new air in from the outside when the cooker hood is on and don’t pull air out, but I’m not quite sure that this is the way the fan controls work (temperature exchange wouldn’t really work, would it?). In any case, fan control (other than speed) is not supported yet, is it?
I think this is exactly how the comfoair behaves when you have cooker hood connected to it (there is such possibility).
Indeed. It is on a to do list but not sure if possible at all. This is not in the protocol documentation we have. But for some other models with RS485 interface this option is there.