ZigBee Arrival Sensor For Car

Hi Everyone,

I thought I would share a a project that might be an interest to the community. I had a couple ST arrival sensor from back in the day. I used them in my car to track my car come and go. We got an additional car and need a new sensor. I found that they are discontinued and very hard to find.

I thought it would be fun to make one myself. I started to make one with the same functionality with the original ST arrival sensor with the following improvement. I use a recharge-able battery which will be filled up during a drive. I also use a powerful Zigbee module with an external module.

I added motion sensor and vibration sensor to help securing my car while it is parked outside the house.

Here is a short demo how it work. I am using Zigbee2Mqtt.

Here is one of the thing that I do with the sensor in automating my garage door. Warning: if you have amazon echo nearby, you may want to turn off the mic.

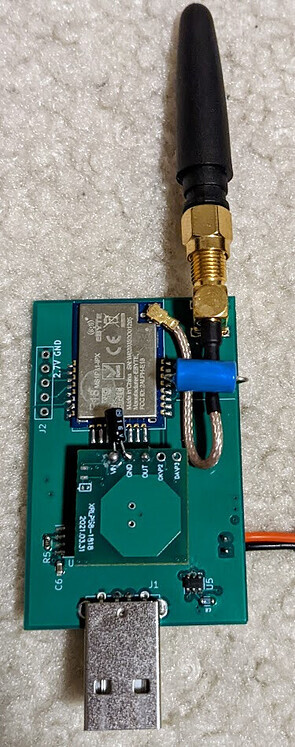
Here is how the sensor look like.

I made a handful of boards. If you are interested on testing it out please feel free to PM me. There will be reasonable cost for the sensor because I have to recover the component cost. I am just a hobbyist.

update: detail for driver and installation for the sensor.

update: Factory reset procedure.

update: I forget to mentioned that I uses Zigbee2Mqtt with sonoff zigbee 3.0 usb dongle plus as coordinator. I don’t have access to other type of Zigbee2mqtt compatible dongle at the moment to test.

update: Some insight on what make my sensor unique.

update: V2 board with boxes design for it.

update: Released sensor is available for purchase, PM me if you like to get one.

update: example of compatible battery.

update: Case options for Arrival Sensor.

Update: Zigbee2MQTT 1.25.2 include the arrival sensor converter as part of their release

Update: I just want to make sure that I mentioned that the sensor is DIY kit with component is soldered. A case may be needed to complete the sensor and ensure a nice and safe use.

“Warning: The use of LIPO batteries may be dangerous. Proper precautions must be taken at all times. By using a LIPO battery, the user assumes all risks and liabilities associated with the use of these batteries, including the risk of fire or explosion. It is the user’s responsibility to ensure that the battery is properly installed and maintained. I cannot be held liable for any damage or injury caused by the use of a LIPO battery”

20 Likes

That’s amazing. I don’t have a garage door but I could see that being super useful

2 Likes

More information please.
What exactly are the things this zigbee module could do? Where do you put this module? How do you connect / power the module?

1 Like

The module is a simple zigbee module that has capability to report battery voltage, binary input and temperature at regular interval. While our hub receiving these reports, we know the module is present at home.

The module contain vibration and radar motion sensor.

In summary, the module can detect human presence in your car. It can detect significant vibration the car subjected to like if someone bumped to my parked car. It can detect whether my car is powered on or off. I talk about how shortly. And at last, we can detect whether the car is present at home.

I put this module in each of my car. Some of my car has usb port. Some I bought cigarettes lighters to usb converter. In the picture, you will notice the usb connector. This is the way I detect the car is powered.

Let me know if this is not clear.

1 Like

@polargeek, thank you for the kind words. Yes, I started to use it with more than just my garage door.

For my hobby, I do some soldering work. I am always worry whether I have turned off my soldering iron before I leave home. I use automation to detect when the car is power on, I send status of all my devices/windows or doors that I am worried about. It saves me a few minutes of driving back in case I did not turn off something/ close some window. This automation may not work in less than 1/10 occasion. Sometime, you just change oil and need to start the car on the sport without ever leaving the home. You will get some notification. I am not bothered by it since it is kind of rare in my life.

Out of curiosity did you write your own firmware or use something like the configurable firmware from https://ptvo.info/ ?

It is a specific firmware for the custom board.

NOTE: If you running Zigbee2MQTT version 1.25.2 or newer, you do not need to manually copy the external converter. Zigbee2MQTT has included the converter as part of their release. You can directly start the pairing/joining process. Please watch for my notes below. They are still valid.

I just want to add some information on how to use the sensor. I uses Zigbee2MQTT. All I need to do is to copy “external converter”. In zigbee2mqtt, for devices that has not been commercialized, the driver does not get included in the release. Zigbee2mqtt allow us to make our own driver called external converter.

Here is the external converter for the sensor.

You will need to copy the driver to the zigbee2mqtt config folder. Then, you will add the converter in the configuration like below.

Then, restart the zigbee2mqtt instance and start pairing in zigbee2mqtt. When the sensor is discovered, you will see something like below in the zigbee2mqtt dashboard.

At this point, all the entity above will be available to your Home Assistant to automate.

Here are my personal notes.

  1. Once everything is assembled, I personally power the sensor without battery connected. I use a stable DC power and pair the sensor with the hub. I do not have issue paring the sensor with battery. However, I know internally that I coded some slow down during battery powered to save energy. Therefore, I like to pair my sensor while it is in DC mode. Once paired, you can power down the sensor and install the battery. I recommend you charge the battery fully before you install it in the car for convenience.
  2. I am told that you should have the antenna installed when the module is powered. If you do not have the antenna installed, it may damaged the radio. On my personal sensor, I did forget install the antenna a few time while on power. I immediately taken care of the issue. I did not observe any issue. I would re-qualify the recommendation that we probably should not leave the sensor on power without antenna for a long time. If you have to do this for short period of time (a few second), I would not worry about it. I find the module is quite hardy.
  3. if you get your motion radar sensor here is the pinout where you can wire it.
  4. Once you have the sensor ready to install in your car, I recommend that you find a place in the car where it is not exposed to the sun. Putting the sensor behind the windshield is probably not a good idea. I want everyone of us to be careful when handling battery.

That’s a great project ! :raised_hands:
I’m just curious about the range of the zigbee.
How far away does the car have to be for it to work?

1 Like

The “short” answer is if you watch the first video, the distance is approximately 2 to 3 house away from my house as the car is moving in the video.

If you are interested on long answer, here they are.

From what I observe during my testing, the speed of the car impact the range. If the car is parked, the sensor will connect as far as 5 houses way from mine. If I drive above 30 miles per hour pass my house, it may not detect the sensor at all. I do not know this for a fact as I live in a community. I do not want to test this scenario.

Antenna is also play a role. The antenna pictured has 3dbi gain. If I fit it with longer antenna, it will make the range further. I do not have number on what the range differences between 3dbi vs 9dbi antenna. This is less important than the next point.

Lastly, the car and our house is in a way a Faraday cage. The car is extreme case of this because of the steel and glass around it. If you really want to extend the range this is the biggest thing to tackle. One thing I do is to get an external antenna like this for my mini cooper.

https://www.amazon.com/Airiton-Magnetic-Wireless-Security-Surveillance/dp/B093WM3HD2

I test with having one of my Zigbee repeater outdoor. Our house is a Faraday cage as well. I have wooden house which is not bad. But, concrete and steel garage door does not help with the range.

Please be warn though, I personally required myself to be able to see my house before the garage door is open. I do not want to have my garage door opened when I am 10 houses away. I don’t think we want to over extend the range as well.

I am testing the above out of curiosity. At the end of the day, I did not overthink it. I just go with what I have and put the sensor in my car. My Zigbee network detect the sensor when I am coming home from 2 to 3 house away. I am happy.

1 Like

Amazing project! Congratulations.

1 Like

Thank you.

I like your project.
Are you going to publish your schematic and firmware?
I was thinking about creating something similar - ZigBee arrival sensor for the keychain.
It looks like you are using the E18 chip, was it difficult to implement the zigbee protocol?

1 Like

@Tropaion,

Thank you for your feedback and questions.

I have not decide whether I would make the schematic and firmware available. This is just a hobby project. At one point, once I have it refined, I will give it a consideration.

The E18 is one of older zigbee MCU. The difficulty working with such MCU is relative. If you have a lot of embedded development experience, it shouldn’t be a problem.

1 Like

I will definitely be following the progress of this project! FYI, I have posted some related questions here:

https://community.home-assistant.io/t/use-a-zigbee-device-as-presence-sensor/387989/

Please consider CC1352P or CC2652P, and maybe make use of open configuration for PTVO firmware:

https://ptvo.info/

Need PTVO Premium version to create battery-powered DIY devices with effective power management.

https://ptvo.info/zigbee-configurable-firmware-features/premium/

Open hardware solution would be great but I am sure that I and manu other like to buy finished product.

@Hedda, thank you for your suggestions. I will look into CC1352P or CC2652P. I can’t promise anything. Today, based on what I know about them is that they are more expensive than the CC2530+CC2952 combo. The cost may not be significant for major manufacturer but perhaps not for me (a hobbyist).

I will keep you and everyone updated here. I have a batch of 10 board ordered with some improvement. In this batch, I have the board assembled by PCB manufactures to test their capability to source the components and its assembly quality.

1 Like

@iharyadi I recommend that you especially look into the type of pre-certified CC2652 and CC1352 radio modules from RF-star/RFSTAR and Ebyte which have in recent years become popular as used in both commercial first-to-market products (for first-mover advantage) and DIY Zigbee communities since they are now very commonly used in open source hardware Zigbee Coordinator USB and GPIO-Shield/HAT adapters by the Zigbee2MQTT and ZHA communities as well as being supported to be configured via the latest PTVO custom firmware tool. See example:

https://www.szrfstar.com/product/list-196-en.html

https://www.szrfstar.com/product/235-en.html

https://www.szrfstar.com/product/237-en.html

https://www.szrfstar.com/product/236-en.html

https://www.szrfstar.com/product/188-en.html

https://www.ebyte.com/en/product-view-news.aspx?id=766

https://www.ebyte.com/en/product-view-news.html?id=1002

https://www.ebyte.com/en/product-view-news.html?id=1002

CC2652P and CC1352P versions has 20dBm+ power-amplifers compared to CC2652R and CC1352R.

For examples of DIY open-source hardware using these CC2652 and CC1352 radio modules checkout:

https://electrolama.com/ / https://github.com/electrolama?tab=repositories

https://zig-star.com/ / https://github.com/mercenaruss?tab=repositories

https://github.com/egony?tab=repositories

https://github.com/codm?tab=repositories

https://github.com/Gio-dot/Z-Bee-Duo

https://github.com/cyijun/OpenZ3Gateway

https://github.com/tube0013/tube_gateways

CC2652 and CC1352 radio modules from RF-star/RFSTAR and Ebyte only cost ~$6-14 per unit if you order a few from Aliexpress (they will obviously cost even less if instead import more via Alibaba). Ex:

https://www.aliexpress.com/item/1005003527541390.html

https://www.aliexpress.com/item/1005001677721370.html

https://www.aliexpress.com/item/1005001647897822.html

https://www.aliexpress.com/item/1005001678003022.html

https://www.aliexpress.com/item/1005001615475580.html

https://www.aliexpress.com/item/1005002947088435.html

So my guess is their higher cost should not increase the overall BOM for the finished product by more than ~$2-5 if switch to using new CC2652P instead of using old CC2530+CC2952 combo radio module.

I think their significant benefits over older the now obsolete CC2530/CC2531 clearly outweigh their higher cost for any new products. Especially when considering CC2530/CC2531 only supports Zigbee 1.2 and are close to end-of-life so have not gotten new SDK with security updates for many years now.

The benefits of CC2652 and CC1352 is not only faster MCU with more flash storage and more RAM but much better power management and Zigbee 3.0 support, and of course they keep getting updated SDK.

Since CC2530/CC2531 are obsolete and deprecated as in “no longer recommend” for new products which means that risk is there won’t be long-life firmware with security and bug-fixes via upstream/SDK.

1 Like

This firmware for DIY end devices or routers is exceptional, I highly recommend. I’ve only used it with CC253x devices, but I understand he supports the CC2652 family as well. There are not as many development board options for the CC2652 device as for the CC253x devices. I’ve had good success with CC253x both on battery and mains powered, and they are very low cost and available today. Do get a couple and CC debugger all for well under USD 50 and experiment with what kind of I/O and sensors you can bring into your zigbee Home Automation environment.

I’ve only used this firmware with devices attached to my zigbee2mqtt setup. This firmware is very well supported by the zigbee2mqtt folks. I have yet to see if the integration is as good with the firmware attached to a ZHA or Hue zigbee setup.

IMHO, for end devices and routers, I did not think the CC253x is going to be obsolete for a very long time, they just work and are solid. The basic CPU in them is going on 30 years already and shows no sign of not being used in many IOT and IIOT applications. For coordinators, I agree the CC253x is at end of life, just too underpowered.

Zigbee Configurable Firmware v2.5
https://ptvo.info/

1 Like

@Hedda, I am sure newer TI mcu is superior compared to the aging CC2530+CC2952. This is obvious.

Specific to this arrival sensor, It is an end device. @dproffer make a really good point that as end device, cc2530 is still very capable. Developing an end device is different from developing a Zigbee coordinator or a router. For this project, I am leaning to stick with CC2530 at start. It check all the box for this project at this moment. I will always have my eye on CC2652 for the future of this project or my other projects.

In regard to the firmware, I have no doubt that PTVO is a good firmware. However, my goal is to have more refine firmware specific for an arrival sensor. One of the many examples why I would like to have my own firmware is that I am using dual power supply (battery and DC). I would like to advantage that I can be more aggressive when the sensor is powered with DC. This is hard to do with a general purpose firmware. Just FYI, There are many things that I am able to optimize with specific firmware.