n.b. French translation HERE
Last update : 2025-04-27
Hi,
For the attention of users of this superb integration v1.4.5 from @basbruss, which nevertheless has some incomprehensible and confusing glitches, particularly in “Climate” mode, here’s how I worked around its few “teething problems” to achieve efficient and satisfactory operation of my roller shutters and BSO…
Let’s hope that @basbruss will soon give us the gift of a new version… This integration is truly of great interest and great potential; it would be a shame to stop there.
Here is a French translation of the logic diagram developed by @basbruss to better understand what this integration can offer us.

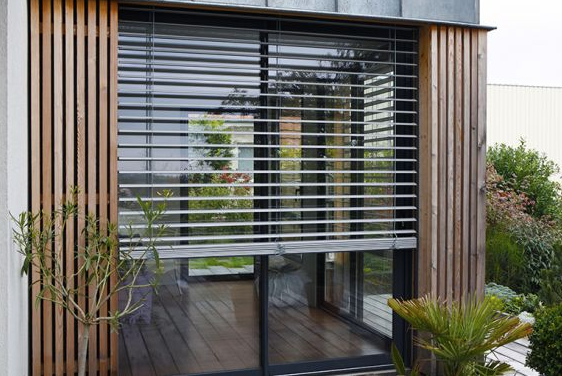
First, we’ll stick with Basic Mode, which allows you to adjust the height of the shutters to keep the sun out of your eyes, on your desk, or in the room.
A - Vertical roller shutter in BASIC MODE only
It’s best to stick to the values below to fully understand how this integration works (and any temporary weaknesses).
Stick to a single roller shutter until you’ve mastered all the functions, otherwise you might end up tearing your hair out like I did… Ideally, whenever possible, you should choose the one located where you work to immediately see how the shutter reacts to the changes made on the computer.
Prerequisite for this integration, which really lacks clear explanations:
- a shutter at 100% means 100% open
- a shutter at 0% means 0% open, therefore closed
After installing the integration and choosing Vertical Blind as the shutter type, let’s move on to the configuration.
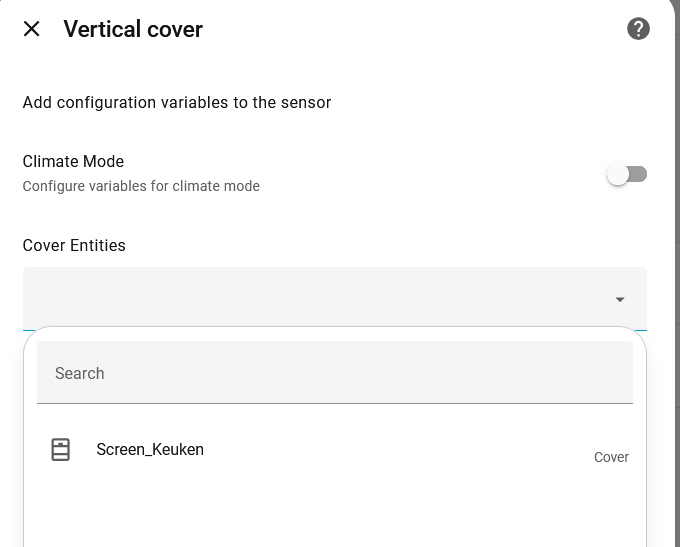
a1 - Configuration - Vertical Cover Tab
- Climate Mode: OFF
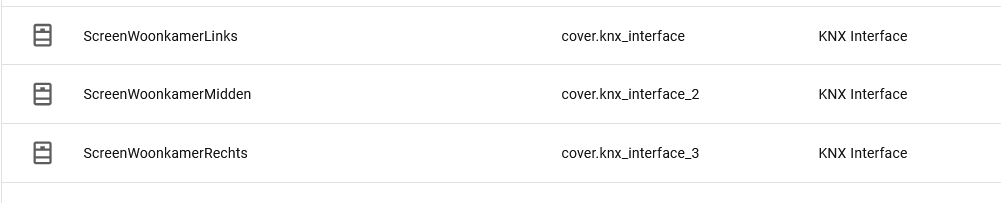
- Entity: the vertical roller shutter
- Window Height: the height of the roller shutter
- Shaded area: 1.0 m to start (this is the theoretical horizontal distance*** between the outer edge of the shutter and the boundary between sun and shade at the bottom of the shutter).
- Window Azimuth: azimuth of the shutter’s facade
- Default position: default position of the shutter if it is not (azimuth or elevation) in the sun zone. Mini position ≤ Default position ≤ Maxi position
- Maximum position: 100%
- Minimum position: 0%
- Minimum elevation: 3 to 5°
- Left field of view: 85°
- Right field of view: 85°
- Sunset position: 50% - This is the position of the shutters after sunset. Mini ≤ Sunset position ≤ Maxi
- Inverse the state: do not check
- Setup Blindspot: do not check
- Set custom open/close positions…: do not check!
a2 - Settings - Options tab
- Starting time: 7:0:0
- Manual reset override duration: check
- End time: 23:0:0
- Always adjust position to sunset…: check
- Leave the other options at default
a3 - Dashboard
At this point, we can now import the corresponding entities into a section that will allow us to view and control all the roller shutters in a single table.

- The top left tile displays the current position of the roller shutter, the top right tile displays the position calculated by Adaptive Cover, its default position, its sunset position, and its left and right field views.
- Next are the active and passive entities of the roller shutter for Basic mode.
a4 - How it works

- if the sun is within the window’s field of view and its elevation in the sky is higher than the defined Minimum Elevation of the Sun, then the shutter adopts the calculated position to obtain the desired Shaded Area.
- otherwise, the shutter adopts the default position.
- or the Sunset Default position if it is nighttime (between sunset and sunrise).
Unless Adaptive Cover is disabled (Switch Toggle Control), the shutter’s position will always be calculated to avoid sun exposure, provided the sun is within the window’s field of view (azimuth and elevation) and between the set start and end times. And this applies regardless of the weather, whether it’s sunny or not!
For those like me who live in the Paris region, lucky enough to have three days of sunshine every three months, this Basic Mode will allow them to configure their shutters regardless of the weather! ![]()
![]()
![]()
Depending on the settings you define, the shutter, outside the calculated period or if the integration is stopped, can remain in its calculated position, its default position, or after sunset.
We’ll see that Climate Mode fortunately allows for further automation, not without some teething problems that will need to be worked around. However, in parallel with Adaptive Cover’s actions, it will still be necessary to supplement the shutter movement with HA or Node Red automations in the early morning, during the day, in the evening, or at night, in the event of a prolonged absence.
a5 - Definition of Shaded Area

As can be seen in these sectional views, the Shaded Area is the horizontal distance between the outer edge of the shutter at the bottom of the window and the beginning of the shaded area in the room at the same level. In other words, if you want to protect your office work surface from the sun’s rays, as in the example on the left, you’ll have to do some trial and error to find the right value.
The major problem is that the time it takes for the shutter to unfold its slats until they uncover the bottom of the window and finally open (10 to 12%) is not taken into account.
As a result, the opening calculation will position the shutter at different heights depending on whether you start with a fully open or closed shutter.
Hence the need to play with the Shaded area parameter to find the best compromise.
Note: It seems that the “Set custom open/close positions…” option allows you to correct these discrepancies, but all my attempts have yielded inconsistent results, with interference on other parameters, especially since any input in this option is then impossible to erase.
a6 - Manual Override
Manual Override Duration allows you to set the time after which the shutter will return to the calculated position after a manual operation.
e.g.: you open the shutter to go out onto the terrace; you have 15 minutes before the shutter returns to its calculated position.
To do this, the Manual Override switch must be set to ON. If you want to return to the calculated position without waiting for the override period to elapse, press Reset Manual Override, but you must first select Reset Manual Override Duration in the Options tab.
Feel free to run all the necessary simulations and adopt your own settings when you are satisfied and fully reassured about the shutter’s operation.
For a BSO, you will need to create a Vertical Blind and a Tilted Blind. You will notice that changing the position of one interferes with the other. Good news, I read that @basbruss is working on merging the two services into one
B - CLIMATE MODE - Triggers
Now that your shutters are correctly configured in Basic Mode, let’s focus on Climate Mode so that it provides maximum functionality despite its current limitations.
As with Basic Mode, only work on one shutter until you have fully mastered Climate Mode.
Several triggers are available to improve shutter automation:
b1 - Indoor Temperature Sensor (°C)
Generally the room thermostat
b2 - Indoor Comfort Temperature Range
In this temperature range (between minimum and maximum comfort), the Control Method will be in Intermediate mode. Otherwise, it will be in Summer or Winter mode.
b3 - Outdoor Temperature Sensor (°C)
Replaces the Weather Services sensor if used.
b4 - Summer Mode Switch Threshold (°C)
Triggers the switch to Summer mode (shutter 100% closed).
b5 - Presence/Absence Switch
In the event of unoccupancy (Presence entity), the integration logically assumes that there is no need to calculate the Shaded Area. The shutter will therefore be set to the Default value, Sunset default, 100% open, or 100% closed, depending on whether the sun is in its field of view or whether the indoor temperature is outside the defined comfort range.
- Personally, I prefer to strengthen shutter management in the event of unoccupancy with Node Red and integrate it with existing automatic alarms (short absences, daily absences, long absences, night mode, etc.). * Although this is an option, it’s preferable to create an input_boolean.on_presence that will always be visible and actionable in the Dashboard.
b6 - Exterior light sensor (lux)
When it comes to managing shutters to avoid being bothered by the sun, this measure is completely ineffective!
Indeed, while the illumination of direct sunlight at sunrise, sunset, or at its zenith can vary from 400 to 120,000 lux, that of a cloudy sky facing away from the sun can reach 10 to 25,000 lux.
It’s difficult, under these conditions, to trust a lux meter…
- We will therefore not use this trigger as such, but for lack of anything better, we will use this function in another way…
- To do this, we will create a lux meter - input_number.lux_virtuel (range 1,000 to 10,000 - with a step of 1,000) to replace the outdoor lux meter.
b7 - Outdoor brightness trigger (lux)
Minimum brightness at which the Lux function will be applied.
b8 - Weather services (cloud cover and outdoor temperature)
It’s also difficult to fully trust real-time weather services to rely on forecasted weather conditions.
The information transmitted (sunny, partly cloudy, clear) is too imprecise and often delayed over time. * I therefore chose not to use this trigger in this degraded mode, but we’ll see later that it can remain a backup option.
- Let’s keep in mind, however, that this trigger also provides the local outdoor temperature, information that will be replaced by an Outside Temperature Sensor if used.
b9 - Irradiance Measurement (W/m2)
This is certainly the most effective trigger for measuring sunlight on the facade, thanks to the installation of a pyranometer.
A device connected to an ESP32 via RS485 that I plan to install. I’ll come back to it later (unless other users with the device can tell us about the effectiveness of such a device…)
b10 - Transparent Blind
I refuse to translate this option until I’m sure I understand it! Initially interpreted as an option for curtains (sheers), here it’s more a matter of making the position calculation transparent (neutralizing it). In any case, it’s impossible to find the slightest explanation for this function, which will also be useful to us later.
Everything is now ready to take care of the climate in degraded mode.
Set the Climate switch to ON** in the Fine tune Blind settings tab and proceed to configuring all these triggers!
C - CLIMATE MODE - Settings
If you have changed them in the meantime, retrieve the recommended settings for the Basic Mode test (see a1 and a2)
c1 - Fine-tune Blind Settings tab
- Set the Climate Mode switch to ON
c2 - Climate settings tab
- Inside temperature entity: insert the room temperature sensor
- Low temperature threshold: 17°C
- High temperature threshold: 28°C
- Outside temperature sensor: insert the outdoor temperature sensor
- Minimum outside temperature for summer mode: 30°C
- Presence entity: insert the ON Presence button (see b1)
- Lux sensor: insert the virtual lux meter (see b2)
- Lux threshold: 4,000 lux
- Irradiance sensor: - (unless you have a pyranometer connected, in which case the Luxmeter trigger is useless)
- Irradiance threshold: 300 W/m2 by default
- Transparent blind: ON
- Weather entity: -
c3 - Triggers
- Set the virtual lux meter to 2,000 lux
c4 - Dashboard Display
- Complete your map with the 3 switches Vertical Climate Mode, Vertical Lux, and Vertical Outside Temperature
Your vertical shutter dashboard should now look like this:

D - CLIMATE MODE - Logic Diagram and Operation
Let’s summarize: At this point, we have seen that Basic Mode alone allows, within the defined time limits, Azimuth, and Sun Elevation, but regardless of the weather, whether there is sun or not!, to position the shutters to protect against the sun. Direct illumination.
The Climate Mode, with the Presence Mode switch still set to ON, will now allow us to check the current situation (the Control Method entity):

-
Intermediate: the indoor temperature is below the Comfort range and the brightness (Lux) is above the reference value (green circuit on the diagram - theoretically sunny weather). We’re back in Basic Mode, but we’ve taken brightness into account, even though this value isn’t significant (for the moment)…
-
Winter: the brightness is lower than the setpoint (theoretically very overcast), the indoor temperature is below the Mini Comfort setting, but the sun is shining through the window. We open the shutter 100% to let the heat in.
-
Summer: the indoor temperature is above the Comfort setting and Transparent Blind is checked. We close the shutter to prevent heat from entering the room. Otherwise, we return to Basic Mode.
Notes:
-
An inserted Weather (Weather Station or Weather Services) will replace the Brightness (Lux) sensor!
-
The outdoor temperature sensor will replace the indoor temperature sensor in the calculations if the Outside Temperature switch is enabled!
-
I still have so much trouble understanding this term Transparent, but it works…
-
I deliberately set a wide comfort range (17°C - 28°C) to avoid seeing the shutters automatically close or open 100%. You’re then free to choose the right range depending on the room.
The Usefulness of the Virtual Lux Meter
Without a connected pyranometer, which we’ve seen is apparently the only reliable sensor capable of calculating the shutter position to protect the room from sunlight beyond the Shaded Area, we’ll have to do it manually (or vocally with Assist).
d1 - Sunny Period
- Switch Vertical Climate mode to OFF
- Switch Vertical Lux to OFF
Climate Mode is disabled; the calculation is done in Basic mode only. The shutter position is calculated to respect the Shaded Area.
d2 - Cloudy Period
- Switch Vertical Climate mode to ON
- Switch Vertical Lux to ON
Climate Mode is activated, the brightness of the virtual lux meter (2,000 lux) is below the Lux threshold (4,000 lux), and the room temperature is within the comfort range.
The shutter adopts the default position!
In both cases, the position calculations outside of the time slots and after Sunset are respected.
n.b.: the lux values declared in this tutorial are arbitrary and allow you to simulate a period of time without sun. You could therefore just as easily choose 30 lux and 20 lux. The main thing is that the amount of lux allowing the calculation to be triggered in Climate mode (4,000) is greater than that of the virtual sensor (2,000) so that the calculation returns to Basic mode
Does manual intervention mean Degraded Mode? Actually, not so much, since again, without irradiance measurement (W/m2), the shutter’s behavior is unreliable!
Let’s summarize:
-
You have a connected pyranometer: that’s perfect, you don’t need the virtual lux meter or the weather trigger.
-
You’re not too demanding about the information transmitted by your weather station: remove the Lux Group from the Climate Mode Group and use Weather.
-
Otherwise, switch to manual degraded mode as described above and let Assist help you!
E - Dashboard Optimization
Once you’ve mastered these behaviors, you can add all your shutters by choosing your own settings. Finally, to have a Dashboard that allows you to control all the panels and interact effectively with all the parameters, you still need to create Entity Groups to control them for all the panels at once:
- Group Toggle Control
- Group Lux
- Group Climate and Lux (in which we add Climate Mode and Group Lux)
- Group Manual Override
So, to switch from a sunny period to an overcast period, you simply need to activate the Climate and Lux Groups.
Add a few well-chosen tiles (Switch Presence, Sun Azimuth, Sun Elevation, Outdoor Temperature, Indoor Temperature, etc.) to feel like a captain aboard an Airbus A-380!!!

F - Let’s go further with Climate Mode
All roller shutters now operate in degraded mode with a virtual lux meter, which requires systematic manual intervention (remember that we still don’t have a pyranometer):
- it’s sunny: Climate mode is OFF
- it’s cloudy: Climate mode is ON
We’re going to replace the light information with the climate conditions from a weather station. As we saw previously, this is far from reliable in real time, but it’s better than unsuitable light information.
f1 - Weather Station (Weather entity)
To do this, in the Climate settings tab, enter the Weather entity with the station of your choice and leave only Sunny as the condition to trigger the calculation, as other probable sunshine conditions (partly cloudy, cloudy, etc.) remain far too random.
By default, we now leave the Climate mode switch set to ON and set the Virtual lux meter to 5,000 lux (>4,000).
- As long as the weather information is correct, the roller shutters protect against glare on sunny days or assume their default position on cloudy days.
- Otherwise, deactivate the Climate switch while the information is wrong.
Please note:
- Weather entity provides the cloud cover status (sunny) AND the outdoor temperature at the station location.
- If an outdoor temperature sensor is also registered in Outside temperature sensor, this will be used for the calculations.
If you’re lucky enough to live in a very sunny region, you’ll have very little manual intervention required.
Here are the main functions of this integration, with some functions and/or additional details will be added later. In any case, please feel free to share your comments, suggestions, and/or experiences.
Thank you for your attention,
patrickp78