Advanced Automations in Home Assistant

I bet most folks have a bunch of mostly identical automations with mostly copy-pasted code, and I wanna show you intermediate and super advanced ways of reducing your automations down to 1.

I don’t think my methods are the end-all-be-all, but they’re better than what most folks have.

Simplest on-off lights example

Many folks simply wanna turn on and off lights with a smart button whether it be in the wall or on a counter:

  • Press up: Turn on lights.
  • Press down: Turn off lights.

I simplified this, and yet, it’s still hard it is to scale up even this simple of an automation.

What many regular folks do (the “intended” way)

Most people do automations the “intended” way, even if it’s the worst way. I think they’re right to think this is the way to do it because Home Assistant hides the better ways of managing automations from you.

Example

You need one automation for each action and each type of thing you wanna do for each room.

Automation for “lights on”
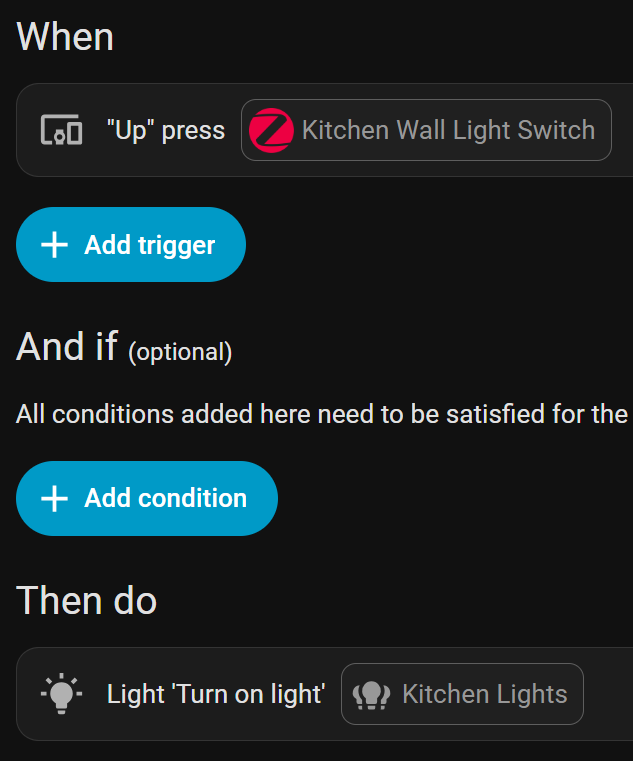
  1. Trigger: Every button press type from every device you want to turn on the lights in a single room.
  2. Action: Turn on the lights in one room.

Automation for “lights off”

  1. Trigger: Every button press type from every device you want to turn off the lights in a single room.
  2. Action: Turn off the lights in one room.

Nearly Identical?

Yes, those two automations are nearly identical, and yet you need to make one for each action or set of actions you wanna make.

How does this scale up?

You can combine all your “on” button presses into a single automation:
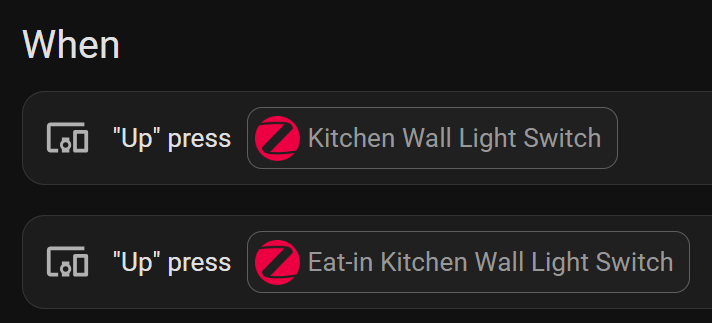
But this doesn’t scale up because if you have 10 rooms and 4 types of actions for each room (on, off, dim up, dim down): 4 button actions and 10 rooms means 40 mostly copy-pasted automations.

Adding more complexity

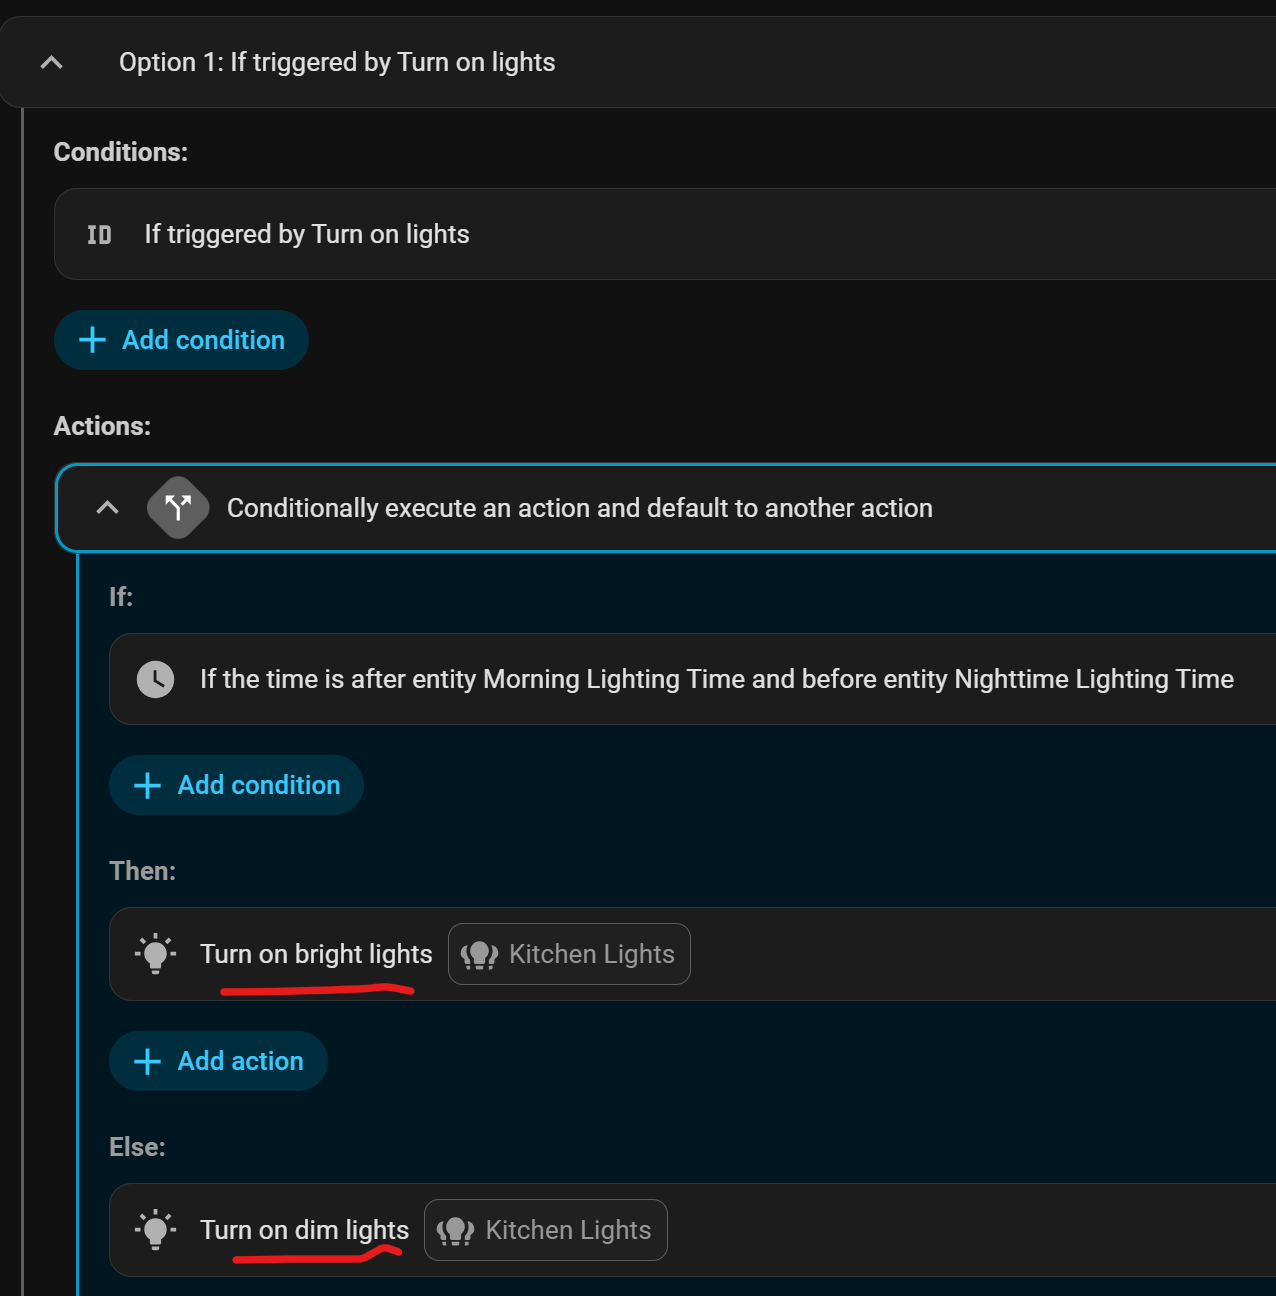
If you wanna change the brightness level based on a condition like daytime or nighttime, then you need two “on” automations for each room with the Condition applied to each and a nearly identical action.

With 2 conditions: 1 button action with 2 conditions, 3 button actions with no conditions, 10 rooms: 80 mostly copy-pasted automations.

As you can see, this doesn’t scale very well.

Maintance is a nightmare

With all these mostly copy-pasted automations, you will eventually need to change something.

If you change it in one, you’ll probably wanna keep it the same for all other rooms. Doing so means you have to add a new automation or modify an existing one for each and every room. Good luck!

For me, I did some quick math, and I’d have well over 1000 automations minimum for the amount of rooms, conditions, light actions at each switch, and other triggers I’d need.

Advanced Home Assistant (welcome to my house)

I’m far into the deep end with the way I’ve configured automations. I want to do as little management and copy-paste as possible, so I rely on scripts, action blocks, loops, and events.

For each room, you should only have a single automation. To achieve this lofty goal, use Trigger IDs:
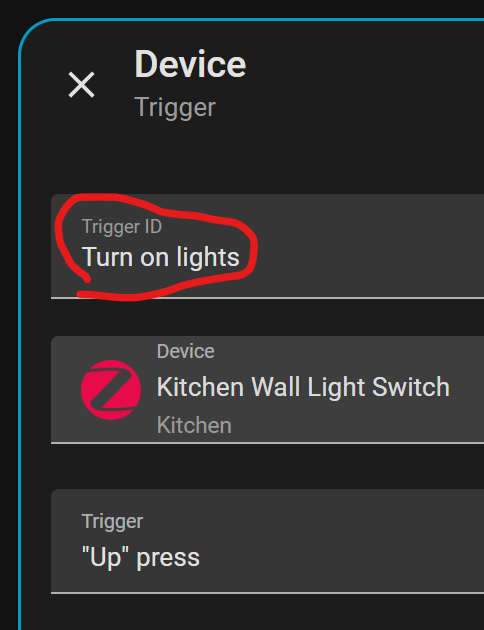
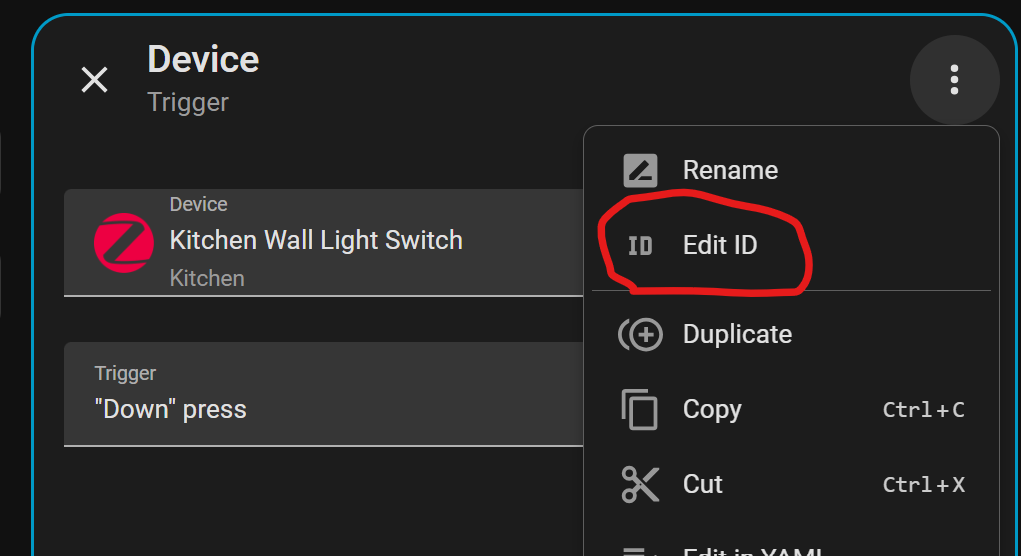
A Trigger ID is a piece of text you can use to change which actions get executed.

You can add it by clicking “Edit ID”:
“Condition” is never used

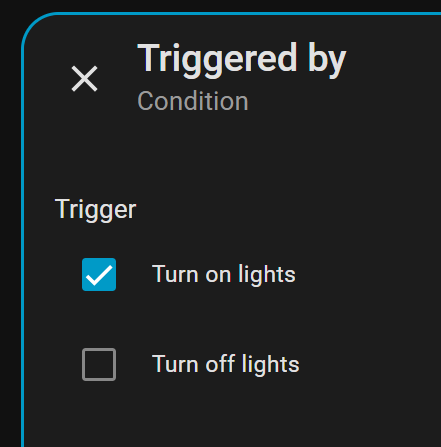
When you use Trigger IDs, your “Condition” area of the automation will almost always be unused. I don’t use it in any of my 75 automations. You need to replace it with “Choose”, “If-Then”, or other selectors.

Then you use the “Triggered By” condtion:
Using “Choose” (god power action block)

I use at least one “Choose” block in every automation. Choose blocks let you choose from multiple “Option” blocks based on a different Condition of your choosing.

Example: Based on this Trigger ID, execute the actions in this option:
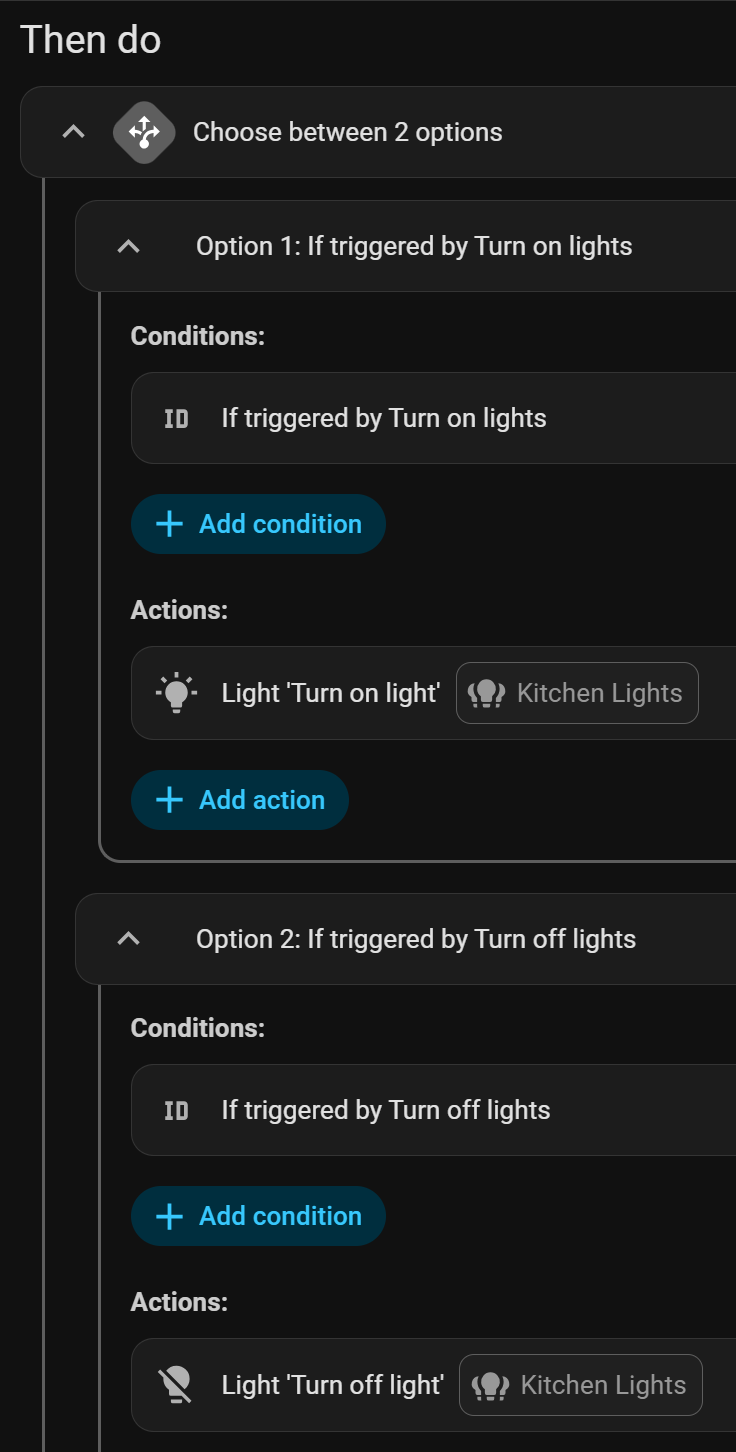
You can also nest an “If-Then” or “Choose” block inside the Option block if you need to add even more Conditions:
Using Scripts for repeated actions

Scripts allow you to take chunks of the “Actions” in your Automations and reuse them in other automations.

I use Scripts for both simple and complex actions that I want to standardize. I even have one for turning off the lights that comes with the transition time baked in.

Fields are a thing

While not exposed by default (because apparently everyone wants to waste time copy-pasting for life), you can use “Fields” to customize your scripts:
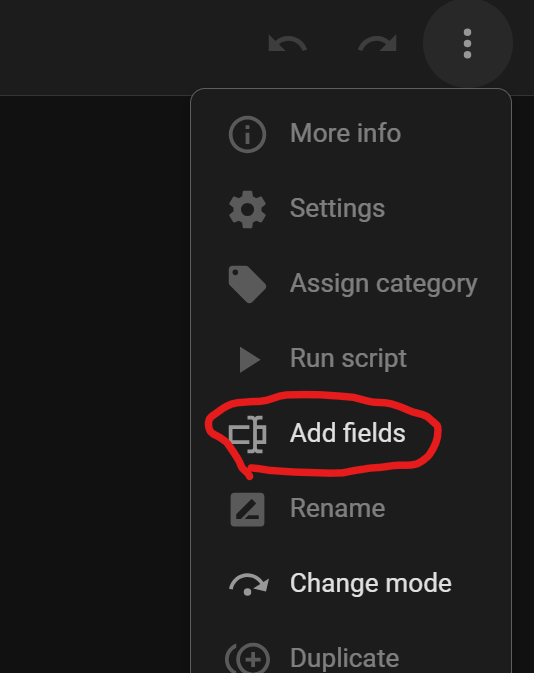
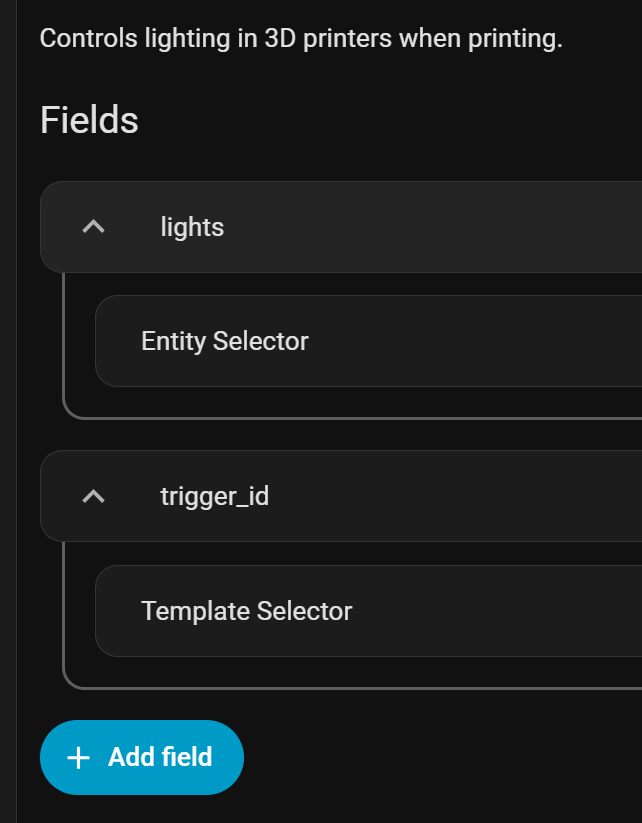
Fields let you pass values to your script like the lights you wanna modify. This way, you can have single script to turn on lights and which lights it turns on depends on what you pass into the lights field (in my example).

:warning: Expert level: Triggered loops

I have quite a few scripts with loops to keep them running over time. They’re able to respond to triggers without having to add those triggers to each automation.

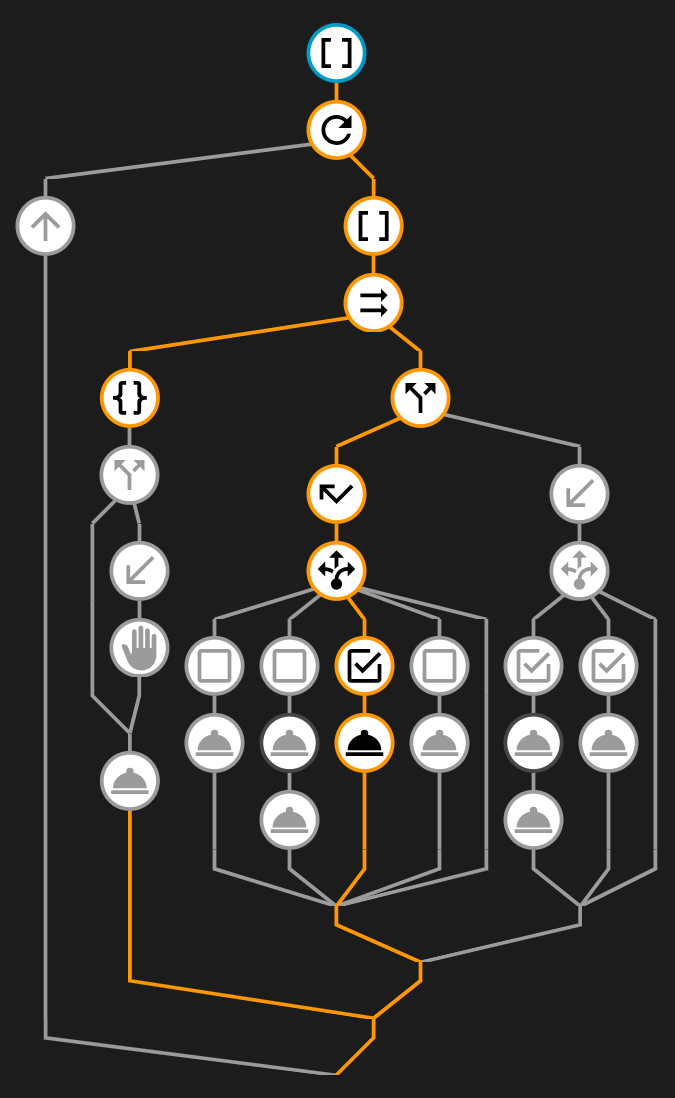
A couple views of Scripts I use with a loop (from Traces):
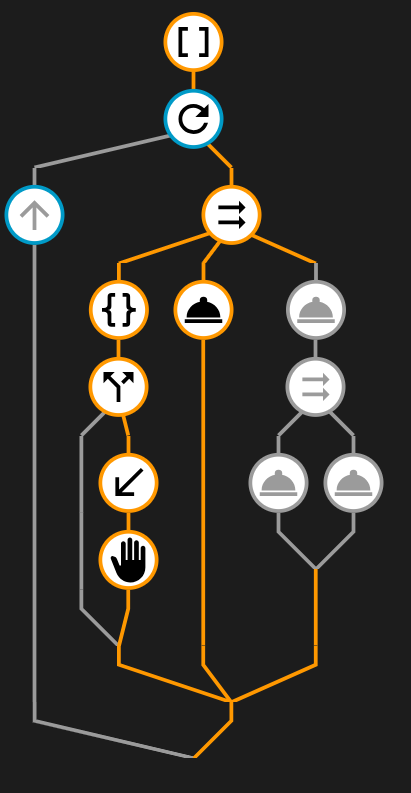
Every time you run it, that arrow icon on the left will bump up with the number of times it’s looped.

I also have a shut-off (that hand icon) which kills the script if another one starts with the same ID. This ensures there are never 2 scripts floating out there controlling the same sets of lights.

Looping Example

Instead of adding these triggers to every automation:

At 7am, change the lighting to daylight mode and at 8pm, make it nighttime mode.

I instead added them to the script using a “Wait for Trigger” action:

But that’s just the “wait” part, so it doesn’t stop the script when it finishes. You need to wrap the whole thing in a “Repeat Until” action, so it loops when the script finishes:
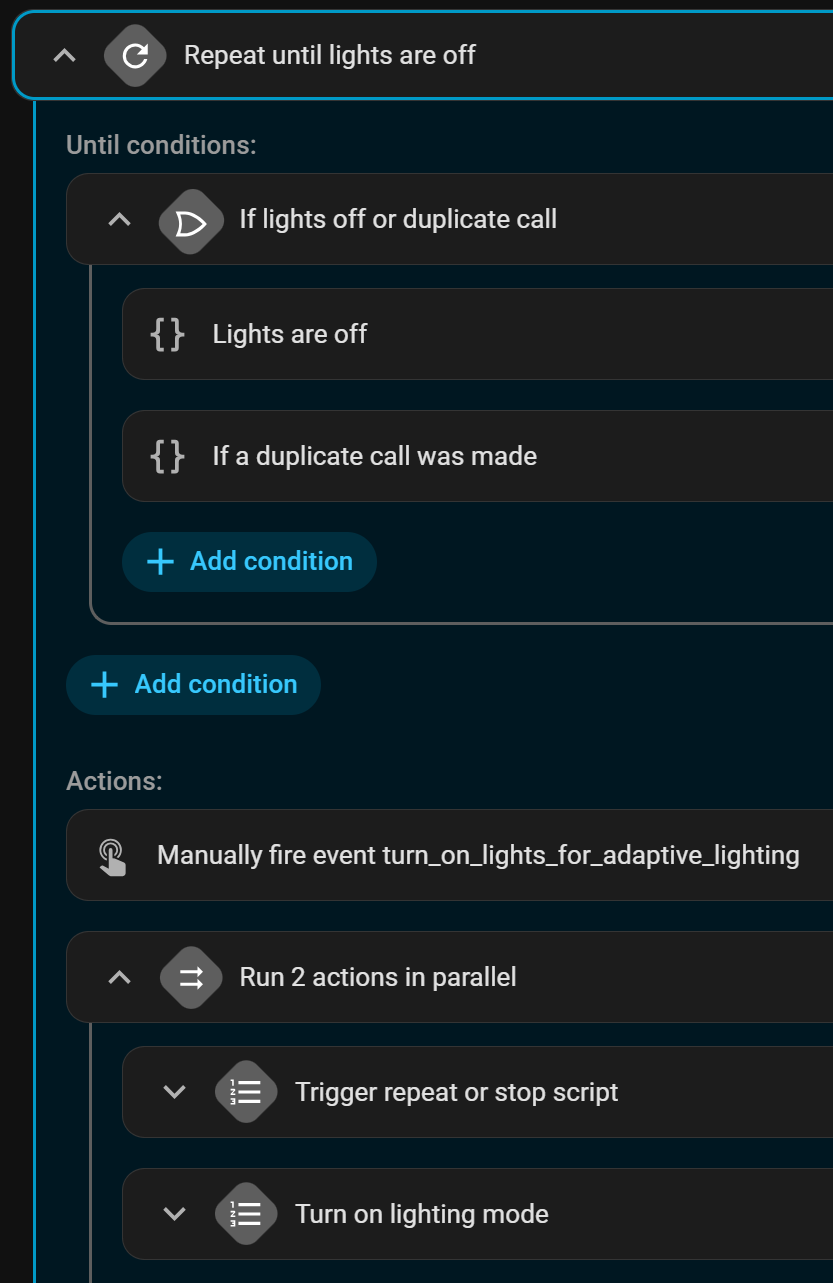
And because of our “Wait for Trigger”, the script only finishes when the trigger occurs. If you kill off the script some other way, then it also stops repeating.

Stop a looping Script

To stop a looping script, you need to use the “Stop” action:
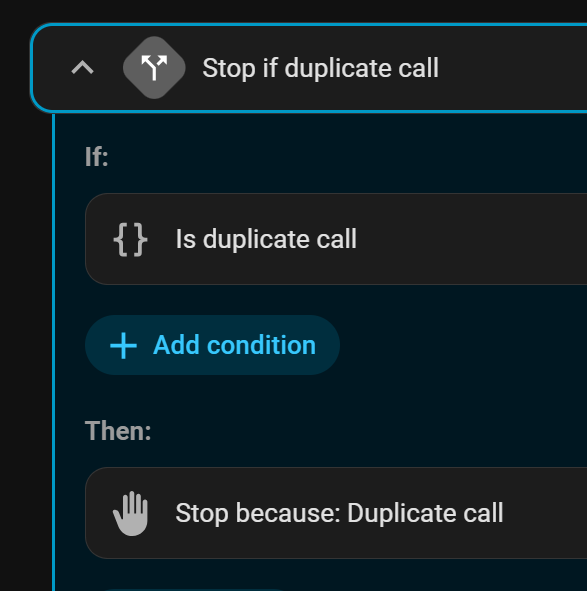
As you can see, I added it after a condition I set.

Using a Manual Event Trigger or Action

One way to trigger a stop is to listen for a specific event with a “Wait for Trigger” like so:
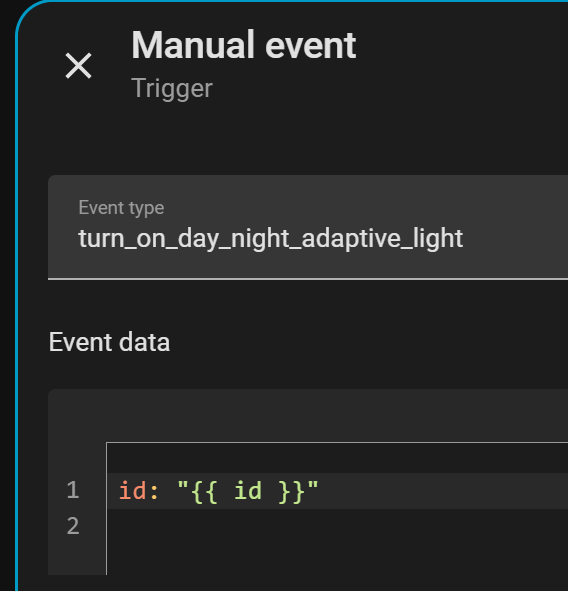
I fire this event off using the “Manual Event Action” when starting my script to stop any existing runs:
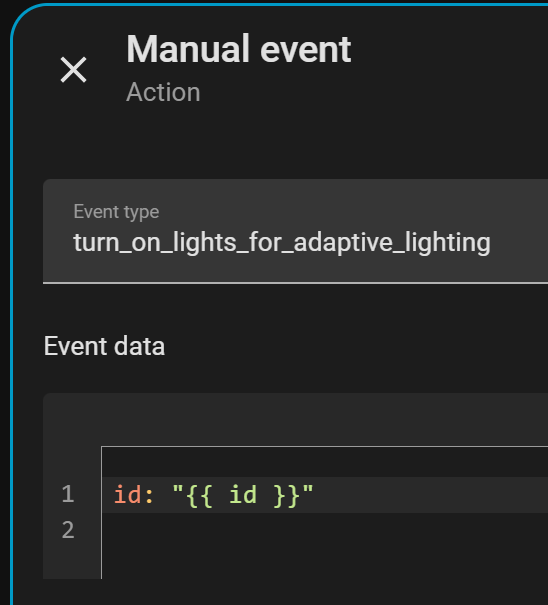
They look identical, but one’s a trigger (waiting for the event), and the other is the action which sends out the event.

Conclusion

Hopefully, this guide helps you build better automations!

The way I’m using script loops is exactly the way I code in TypeScript with RxJS at home. Lots of async tasks that need cancellation and the ability to run in the background concurrently.

I’ve been coding like this for nearly a decade, so I’m glad I found a way to make Home Assistant build automations with the same process.

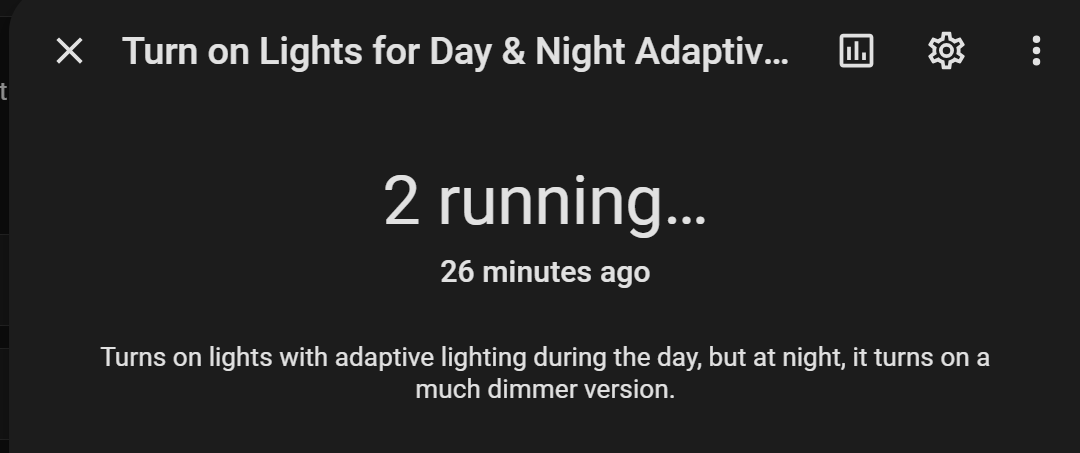
Sadly, Home Assistant is lacking many of the debugging tools I’m used to. If you click “Run” (without running the script or automation), it at least shows you how many are currently running, but it doesn’t give you any insight into what they’re doing or what state they’re in:
1 Like

I would strongly advise against doing this. It has been known to crash home assistant due to OOM errors.

Home assistant automations should be state driven. A state changes, (a condition is checked) an action occurs, the automation finishes. That’s it.

4 Likes

Hmm :thinking:. How would you have outta memory issues if I’m allowing for garbage collection?

It’s only a few long-running scripts. I have 2 per automation, so up to 56 if every automation was triggered during the day, but it’s typically 20 or less at any given time.

I added cancellation and ensured if a new one fires off, the old one dies. I even showed it working in that last image with only 2 running scripts because a couple sets of lights were on, but everything else had turned off.

So I’m really wondering how this could be problematic.

A traditional “memory leak” happens when the last reference to a block of memory is cleared, without actually freeing the memory.

In a garbage collected language we often say memory is being leaked when we maintain a reference to some memory longer than we need to - i.e. we have no intention of reading that memory again.

In its purest form an OOM error occurs when the amount of memory we are hanging on to (unnecessarily) exceeds the available memory that the process is allowed to use.

If the internals for HA were written assuming that all automations runs would be short lived - its a reasonable design choice to not clean up until the automation terminates. If that is the case, then simply having a long running** automation would (eventually) be enough to cause an OOM error.

** - Running is not the same thing as waiting - typically very little happens while something is idle/waiting.

I have gone down an adjacent path:

You should only have a single automation - for one function.

This is a reflection that I have multiple rooms and multiple lights, but as you say control of them is very similar - I don’t see a need to break my automations on a per room basis when all rooms operate similarly.

Everyone is free to choose their own approach - my approach may not make sense / work for others.

The core of my philosophy is that I try to minimize the number of branches in my automations, ideally:

  • At most 1 if/else
  • At most 1 choose
  • At most 1 loop

In that I find it is very easy to keep automations readable if they have almost no branching, specifically:

  • There is a trigger.
  • There are some condtions.
  • There is a sequential list of actions.

I do some other tricks such as updating state (inputs) and then triggering other automations on those - which I must admit does add some complexity, but overall I am happy with this design.

So far I have been able to keep the number of automations less than the number of devices - it’s not a great metric, but as the system grows something has to give:

  1. More complex automations.
  2. More automations.
  3. Less functionality

I am not willing to trade #1 or #3 so it has to be #2.

1 Like

This would scare me :slight_smile:

I would replace all of that with one automation.

Add all your room light control buttons as triggers under triggers with IDs that classify the action of the button that was pressed (on, off, brightness up, brightness down, preset scene etc.)

In the action use a variables section to …

  1. identify the [area] to which the button belongs.
  2. identify the lights by [area] you want to affect.

Perform the ID action on the lights

I would find what you’re suggesting a maintenance nightmare in all honesty, but each to their own, and I’m glad it’s working for you.

3 Likes

To add to what others have said: it’s problematic since what you’re proposing is going against HA’s strength, which is a state-based, event-driven design/architecture. It’s an anti-pattern. It’s like writing procedural (imperative) code in a functional (declarative) language.

Some automations can really be done very elegantly once you discover the power of templates too.

2 Likes

How is Wait For Trigger different than simply having an automation trigger?

I use wait_template frequently to test that a state change happened, but always with a timeout that is only a few seconds.

Someone probably mentioned this, but this long-lived automation also won’t survive a HA restart.

In some cases the point where you Wait For Trigger could be the point where you break a single automation into two - with the trigger condition becoming the start of the second automation.

Clearly if no other action was taken the second automation may trigger more than it should as it only has the single trigger. You can work around that by adding additional conditions that check something from the first automation (last execution time or the state of something modified by the first automation).

Using a Wait For Trigger avoids the need to do the extra checks because the running automation has state (both the fact that it is running and any variables you set inside the automation). It is the potential for this state to keep growing that is the risk of the OOM.

Having separate automations means that any state is freed from RAM between runs.

1 Like

I was referring to the OP’s use keeping an automation running.

I just looked at my wait_template usage and they (mostly) use parallel to verify a state. In one case my front door doesn’t alway lock – so I use parallel to wait with a few second timeout to see if the door reports being locked and send a notification otherwise.

I tend to use timers for most things I want to do in the future after some trigger. But that doesn’t work where the state could change again before the timer fires.

1 Like

Correct. After thinking about it, I remember exactly why I did it this way: state.

What if I want to change the color temperature of all lights in the house based on the color coming from outside (cloud coverage)? Then I need to know if the lights are already on and in the “daytime color change” mode before doing that.

Rather than adding the same “did light color number picker helper entity change?” to every lighting automation (28 of 'em), I can add it to the “are the lights on daytime mode” script. Then it only triggers for lights turned on and in that mode.

This is important because otherwise, I’d have to add 28 helpers to maintain a global state for which mode the lights are in (adaptive, worklamp-bright, scene, nighttime, off, etc). With the script looping, it keeps track of that simply by calling the right script. Less things to maintain, less things that can go wrong, fewer helper entities, etc.


I realize I’d gotten off topic explaining my specific solution. State management is why you want looping scripts. You can avoid adding new helpers this way.

Is Home Assistant prone to memory leaks from scripts?

I guess I would think to trigger on the cloud cover change, then loop over the lights that I care about and if currently on adjust the color.

Or build that test into your global all light automation as just another trigger.

There’s probably more likely reasons HA breaks. As @tom_l noted, it’s really a state-based trigger system so probably safer doing it that way. Probably worth considering that this approach isn’t really discussed much here.

Have you considered using packages? I really like packages for more complex tasks because you can package all the scripts automations, timers, helpers into a single file (or directory of files) and you then are not feeling like you are creating a lot of disorganized bloat in the helpers and automations UI.

1 Like

I missed a ton of messages since I originally responded on my phone. My bad! I’m responding to them now.

You are correct. If this is what you’re worried about, then it’s no big deal. I just need to update my doc to show how you can call the looping script and end the automation.

Instead of calling:

action: script.control_button_occupancy_day_night_lights

You instead call:

action: script.turn_on

And pass your script in that action. Doing so will prevent the automation from running when the script runs, but the automation also won’t fail and notify you of a failure if the script fails as well.

Sucks for debugging.

I have my automations in Restart mode (which I should add to the doc), so while the automation is technically “running” and waiting on the script to finish, the memory is all cleared up by the time it gets called again.

I agree with you, 1 automation per type of action would be fantastic!

I must be missing something because any automations in “Restart” mode need to be per room or light set. That allows you to dim or press “lights off” and quickly press “lights on” without having to wait for it to finish dimming off the lights before turning them on again. Instant gratification.

If they’re all sharing the same automation, you can’t benefit from Restart mode; therefore, I’m assuming you’re using “Parallel” mode (like I do with scripts) and stopping in-progress scripts when doing another action, correct?

I agree, but I don’t know how I’d achieve this since multi-trigger automations can be more complex than that.

I have this too in some places where it makes sense. The “toggle (input_boolean) changed” trigger, then re-run the automation based on that value changing. Sometimes, I have to move them to other automations because Restart mode doesn’t work if it receives 2 commands one right after the other.

Me too, but I have 75 automations and literally hundreds of devices :rofl:.

Please teach me how. I wrote this hoping to start a discussion, and it worked. Now I can learn something new!

Yeah, that’s what I’m thinking I’ll have to do to remove multiple automations. Big ol’ slab of YAML key-value pairs where one of them is a chunky device_id.

But then are you in Restart mode or Parallel mode? That makes a huge difference. “Restart mode”, from my experience, doesn’t work well with multiple rooms tied into one.

It’s working and not working for me. Adding buttons is a nightmare because I have to copy-paste and swap all the device_ids. It’s not something I can easily do on my phone, and what you’re proposing has the same issue.

But what you’re saying is the same as I have now, just in one automation and not 28. Here’s one of my simpler automation triggers:

The more we wanna improve Automations for scale, the less and less they’re native Home Assistant. But I believe this is how you’re supposed to use them even though Home Assistant doesn’t give you native controls to edit key-value pairs.

I can see where you might be coming from. Do you think of this like procedural code with a “main loop”, and I’m choosing to execute imperative actions in that loop? Maybe?

If that’s what you’re thinking, I disagree. This loop situation is still event-based.

Because we’re using “Wait for trigger”, the only time it loops is when a new event occurs; no other time.

It’s not looping on a timer or after every few seconds and then checking for state changes, it’s listening for state changes and executing only when they occur. It’s just like how an automation works except that the triggers are in our script.

I use templates all over the place for tasks that simply have no GUI equivalent, and I absolutely hate them.

As soon as you use a template, you’re breaking out of Home Assistant and breaking into code. Debugging Jinja2 templates in automations sucks so bad, and who wants to maintain some near-Python code when there’s a beautiful GUI of tasks you could use instead?

I like to avoid situations that require custom non-native Home Assistant actions as much as possible.

EDIT: I did some research. Am I misinterpreting Template Conditions and Template Actions for something else I should be using? Please enlighten me! :slight_smile:

You got it! It’s not different :slight_smile:, but you can use it during an action sequence. That makes a huge difference.

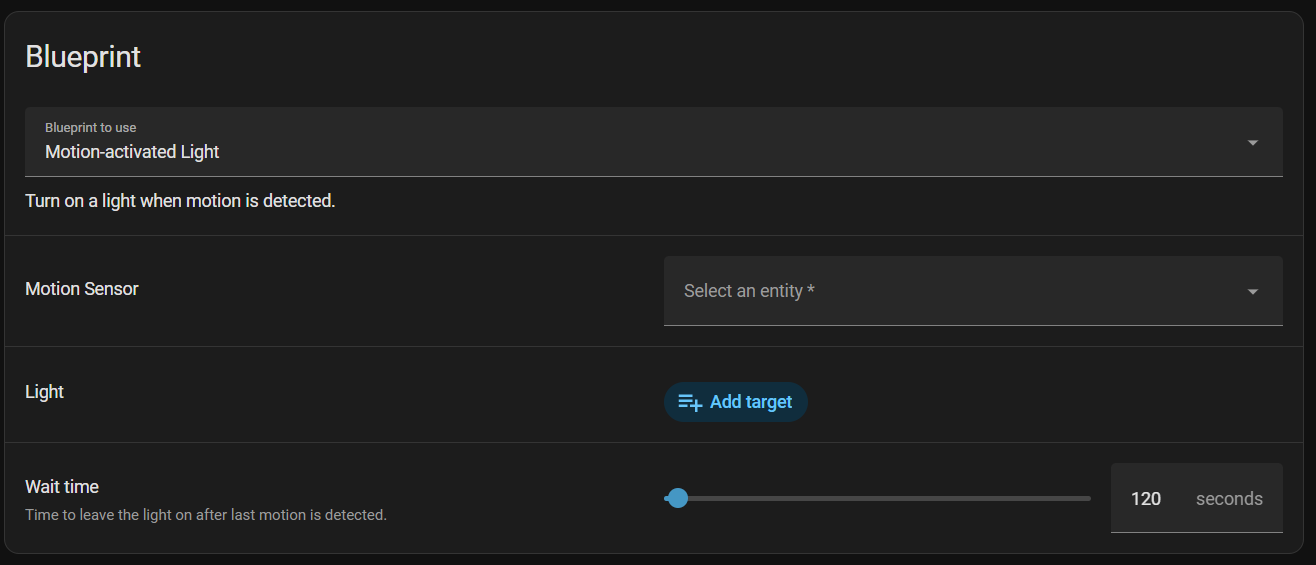
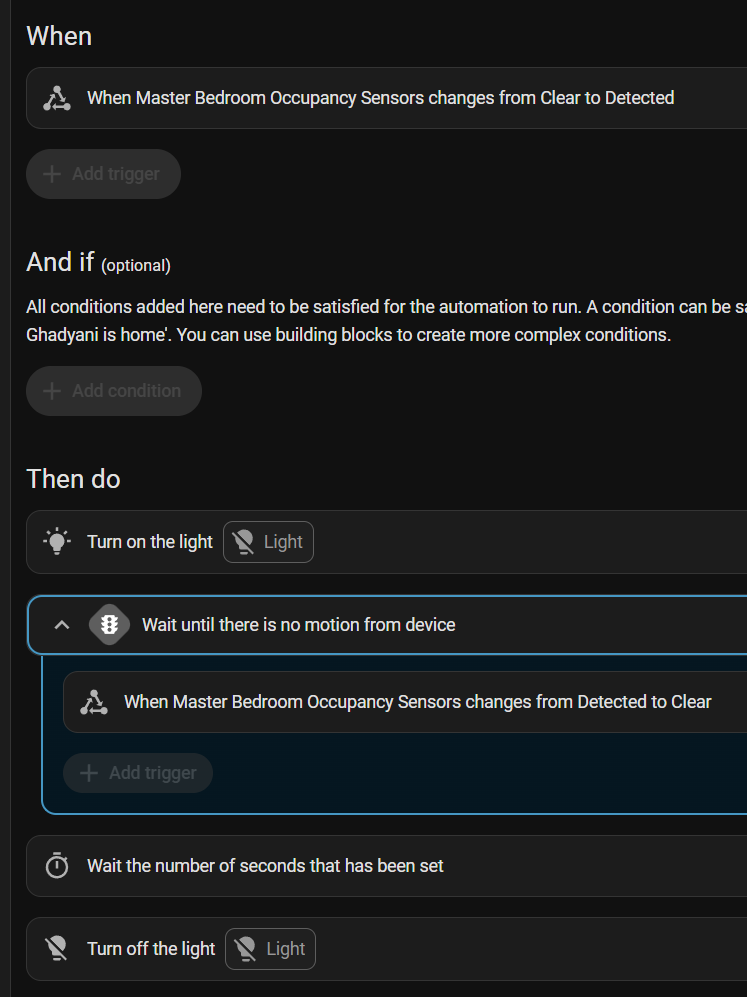
Even the default Home Assistant “Motion-activated light” Blueprint uses a long-lived “Wait for Trigger”. I found it on my sister’s newer Home Assistant install, but it’s not on mine.

I did a “Take control” of it to show you:


What I’m doing isn’t anything crazy; in fact, it looks just like what the official Home Assistant Blueprint does.

Theirs doesn’t loop because it kills the light after the trigger, but the trigger itself has no timeout and stays listening as long as the occupancy sensor entity doesn’t go to the “Clear” state.

Or are you saying the official Home Assistant Blueprint is wrong to use a long-lived trigger?

Hmm… :thinking:. So running scripts don’t start up again after restarting?

I might need another trigger for “Home Assistant start” then re-trigger the script if the lights are already on when it starts. Great idea!

Looping over lights is really into the “code” territory. I’d like to avoid that as much as possible. To me, native Home Assistant controls are king. I used to write this all custom in JavaScript myself, and I use Home Assistant to avoid as much code as possible.

I need to figure out a way to make this work with Parallel mode because Restart mode won’t work the way I expect when all the lights share an automation.

“That way” as in different triggers rather than “Wait for Triggers”? They’re the same in my opinion.

If you look above at one of my other quotes, there’s an official Home Assistant Blueprint that also uses a long-lived “Wait for Trigger”. This is provided in newer Home Assistant installs. I can’t imagine they’d do something that’d cause memory leaks in the official install.

I think this could be problematic, but only if you don’t include cancellation and deduplication.

I agree, this probably isn’t discussed much on here because of everyone’s confusion with the approach :rofl:.

I have no clue what packages are. Maybe that’s the thing I’ve been looking for the further optimize my automations all this time?

Please elaborate :smiley:!

Well… this is why you’re struggling to scale. Lean into templates and you’ll be able to scale easily. Abuse variables as configurations.

How? Do you have any examples?

Post a few of your automations that are simple but exactly the same. I’ll turn them into 1 automation.

1 Like

That blueprint is six years old and is not looping on that wait for trigger. It’s making an assumption that if the motion sensor just triggered will soon turn off, and if there’s more motion (i.e. a new trigger) it will kill off the running automation and start over. Seems more to support using triggers instead of long-running automations.

I just read your post from a year ago and I’m kind of surprised nobody commented about the long-running loop. Ignoring all the technical OOM stuff and HA restarts, that post seems like you have to jump through hoops to try and deal with the complexities of this approach.

I still haven’t seen what turning a long-running script into a triggered automation buys you.

My suggestion is like everyone else’s: use triggers for short-running automations and use templates to simplify or combine automations. And templates are an import part of your toolbox (so important that the Templating docs just got a full rewrite).

2 Likes

Well, I gave my recommendation on that post that spells out exactly what I do with my automations for the most part. I personally avoid looping at all costs.

1 Like

sweet. good work whoever did the update

2 Likes

Why?

Why does complex = more advanced? Personally I find a large number of simple automations properly named, labelled and annotated much easier to maintain. If a procedure is going to be repeated, put it in a script.

3 Likes

I’ll make a separate post for that since this particular thread is about making more advanced automations, but not my specific use case.

My automations and scripts do exactly this too! Once motion occurs (again), it kills off the old one and starts a new one. The only triggers (in my case) are things like “if the lights are already on, we need to also change them if the time is daytime or nighttime, or if the lights go off”.

Unlike mine, the official one doesn’t actually kill off the old wait and start a new one. Mine are saying “if the state changes to Detected”, the official Blueprint says “if the state goes from Clear to Detected”. It’s going to trigger even fewer times than mine.

What I’m pointing out in all this is that long-running triggers are standard fare (literally part of the standard install). Going to top-level triggers doesn’t have to be the case; and in fact, having smaller triggers like this makes a lot of sense even without timeouts.

P.S. I didn’t realize that script was 6 years old. It’s not in my Home Assistant install from 2023, but it’s in my sisters’ from 2025. It’s obviously older from that GitHub link. Makes no difference if it’s still part of the install.

I use templates, but I don’t like using them because I’m back to writing code. I can’t easily transfer that to anyone else’s house by telling them “do this and this”. They’ll need my code or it to work.

That recommendation will have me telling everyone else to avoid Home Assistant because it’s for software engineers only.

I’d like to find better solutions if possible, but yes, I’ll rely on them if I have to.

Some of the guys here are doing super advanced automations to remove the number of things they have to maintain and edit, and a lot of that comes from triggers, not actions (a separate discussion in my opinion).

How do you mass-edit automations? Do you go through the UI (like I do) or use automations.yaml?

Do you prefer the “intended” approach or some combination of what I added?