One of the reason I started using Home Assistant years ago was being able to completely automate the heating in my apartment. Just for context I live in Germany and, as in most houses, the heating is distributed through radiators that can be controlled individually through valves.
The goal that I had was to replace every one of these “dumb” valves with smart TRVs which I would be able to control and calibrate automatically through external temperature sensors.
Although this should be quite easy to do, my first experience was quite painful because things that should be straightforward (like setting up a schedule in Home Assistant) became unnecessarily complicated. That’s why I decide to write this wiki.
What we’ll do
1. Install the Hardware (Zigbee TRVs) in Home Assistant
2. Set up calibration through external temperature sensors
3. Set up heating schedule
4. Create a dashboard to control everything
5. Understand the limitations of this setup
Note that there are some tools (like Better Thermostat) that allow you to automate parts of this wiki. However, after using them for few months, I found them unreliable (constantly introducing breaking changes) and unnecessarily complicated, so I decided to do everything myself.
1. Install the Hardware
(I’m not covering the part about setting up Zigbee in your Home Assistant installation, there are many guides covering that. I will assume you have a working Zigbee installation. I’m using ZHA).
I was looking for something
- cheap
- not linked to any cloud service, completely local
- working both through zigbee and manually with controls
I ended up buying this model, which is one of the many Tuya clones

Turns out it has many quirks I discovered throughout the years, but nothing that can’t be solved through some smart scripting ![]()
Adding the device in ZHA was quite straightforward (remember to go into the “wifi” mode on the device before adding it), although many of the entities that were added had no name so I had to do some reverse engineering to understand what is what. I believe with the updated version of ZHA nowadays this is not a problem anymore.
Anyway, once you manage to add the device in Home Assistant you’ll get something like this

I’ve never used/touched the entities of the configuration section. When I installed the device for the first time they were not even there. Remember to always leave the device in the “manual” section by scrolling to the “hand” symbol on the TRV led panel.
2. Set up calibration through external temperature sensors
We know the onboard temperature sensor will not be reliable whenever the heating is on, so we need an external temperature sensor. Here you have the freedom of choosing whatever temperature sensor you want. There are some cheap zigbee models that work pretty well (but have infrequent updates). In my case I’m using a mix of temperature sensors from Ecowitt (as I already have a weather station gateway) which update quite often, and some zigbee ones. Whatever can be integrated in Home Assistant will work.
The TRVs expose a Temperature Offset (in the Controls section) which can be used to calibrate the temperature to match an external sensor. Luckily there’s already someone who thought of that and made a handy blueprint which worked well for me (and should be device agnostic): TRV Calibrator - Calibrate your valve with an external sensor (probably TRV agnostic) .
Install the blueprint and set it up for every one of your radiator valve: you should then have an automation per device. Remember: you can have multiple TRVs in the same room linked to the same external temperature sensor!
The automation works pretty well. Here are some examples for 2 rooms


Of course in case the changes are too abrupt it could take a while for the automation to adjust, however this is not really an issue.
3. Set up heating schedule
This was probably the most difficult part.
My idea was to have two temperatures: an ECO temperature (16°C) and a HEAT temperature (19-20°C depending on the room). When the schedule is ON the TRV should go into HEAT and back to ECO when the schedule is OFF. Easy, right? ![]()
The first step was to create a schedule. In order to do that you have to go to Settings → Devices & Services → Helpers → Create Helper → Schedule. Create one for every room you want to control the heating by dragging the mouse on the timetable.

Ok, now that we have a schedule we just need to create an automation to turn on the heating.
This is was not straightforward because I discovered that these TRVs have some hard limits that can’t be changed: they will only start heating when the difference in temperature between the target temperature and the measure temperature exceeds 3-5°C, which is not what we want. For this reason in my automation I always use a first target temperature of 30°C (to fully open the valve) and then set my target. As there’s no way to manually control the valve position, I think this is the best workaround.
This is one of my automation

and in YAML
Code
alias: Turn Heating Kitchen ON
description: ""
mode: single
triggers:
  - entity_id:
      - schedule.heating_kitchen
    from: "off"
    to: "on"
    trigger: state
conditions:
  - condition: template
    value_template: >-
      {{ state_attr('climate.tze200_hue3yfsn_ts0601_zonnsmartthermostat_2',
      'temperature')|float !=
      states('input_number.heat_temperature_kitchen')|float }}
    alias: Check that the target temperature is not already at heat
actions:
  - data:
      temperature: 30
      hvac_mode: heat
    target:
      entity_id: climate.tze200_hue3yfsn_ts0601_zonnsmartthermostat_2
    alias: First set temperature to 30 to open valve
    action: climate.set_temperature
  - delay:
      hours: 0
      minutes: 2
      seconds: 0
      milliseconds: 0
  - data:
      temperature: "{{ states('input_number.heat_temperature_kitchen') }}"
      hvac_mode: heat
    target:
      entity_id: climate.tze200_hue3yfsn_ts0601_zonnsmartthermostat_2
    alias: Then set the actual target temperature
    action: climate.set_temperature
There is a new entity: input_number.heat_temperature_kitchen. This is a simple input number entity that I use to dyamically control my HEAT temperature.
Of course we also need a automation to set back the ECO temperature whenever the schedule goes from ON to OFF.
Code
alias: "Turn OFF Heating in Kitchen "
description: ""
mode: single
triggers:
  - entity_id:
      - schedule.heating_kitchen
    from: "on"
    to: "off"
    trigger: state
conditions:
  - condition: state
    entity_id: automation.turn_heating_kitchen_on
    state: "on"
  - condition: template
    value_template: >-
      {{ state_attr('climate.tze200_hue3yfsn_ts0601_zonnsmartthermostat_2',
      'temperature')|float ==
      states('input_number.heat_temperature_kitchen')|float }}
    alias: Check that the target temperature is at heat
actions:
  - data:
      temperature: "{{ states('input_number.eco_temperature_kitchen') }}"
      hvac_mode: heat
    target:
      entity_id: climate.tze200_hue3yfsn_ts0601_zonnsmartthermostat_2
    action: climate.set_temperature
Also here there’s a new input number, input_number.eco_temperature_kitchen'.
You’ll need one of these automations for every room.
This simple system is already capable of maintaining the temperature in every room, as you see from this picture

The yellow temperature is the target temperature (notice the jump to 30°C at the beginning of the heat cycle), while the blue one is the actual temperature from the TRV (corrected with the offset).
4. Create a dashboard to control everything
At this point we already have something that should reliably working in an automatic way. But if we want to control it and tweak it on demand we need to have a dashboard that exposes all these controls, including every eco and heat temperatures.
This is what I was able to create; as usual the requirement was simplicity.
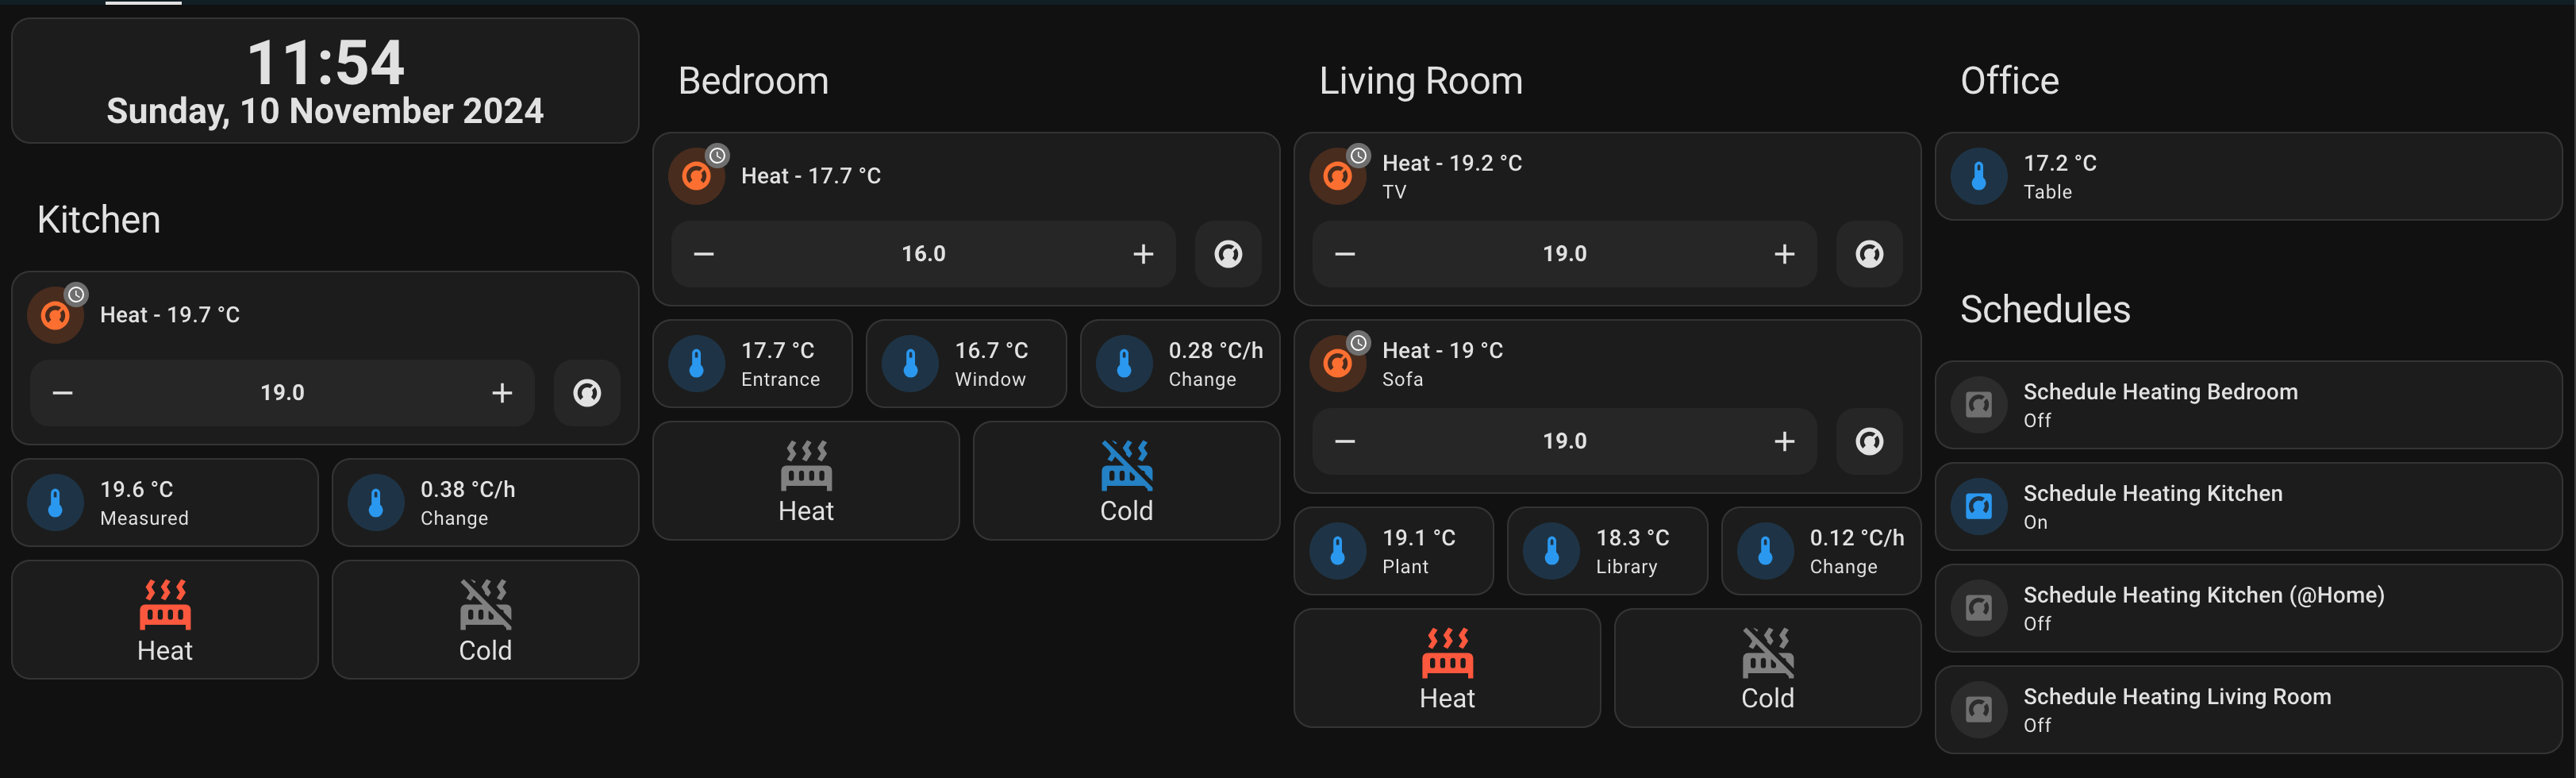
Every room has its own temperature control (for manual adjustments) with the observed temperature and temperature change (derivative sensor). The buttons Heat and Cold manually trigger the same automations we defined before, so that we don’t have to manually set a target temperature ourselves.
Notice that I have two TRVs in the Living Room connected to the same automation and sensor.
An additional card allows one to also turn on/off the heating schedules.
There’s an additional section to control the value of the heat/eco temperatures

Here is the complete YAML code (WARNING, that’s a lengthy one)
Code
theme: Backend-selected
title: Heating
path: heating
icon: mdi:heat-wave
subview: false
badges: []
cards:
  - type: custom:digital-clock
    firstLineFormat: H:mm
    secondLineFormat: cccc, dd LLLL y
  - type: vertical-stack
    title: Kitchen
    cards:
      - type: custom:mushroom-climate-card
        entity: climate.tze200_hue3yfsn_ts0601_zonnsmartthermostat_2
        fill_container: true
        hvac_modes:
          - heat
          - "off"
        collapsible_controls: false
        show_temperature_control: true
        secondary_info: none
        tap_action:
          action: more-info
        hold_action:
          action: more-info
        primary_info: state
      - type: horizontal-stack
        cards:
          - type: custom:mushroom-entity-card
            entity: sensor.temperature_2
            fill_container: false
            primary_info: state
            secondary_info: name
            name: Measured
          - type: custom:mushroom-entity-card
            entity: sensor.kitchen_temperature_change
            fill_container: false
            primary_info: state
            secondary_info: name
            name: Change
            icon: mdi:thermometer
            style: |
              :host {
                --icon-color: {% if states('sensor.kitchen_temperature_change') | float > 0 %} red {% else %} blue {% endif %};
                --text-color: {% if states('sensor.kitchen_temperature_change') | float > 0 %} red {% else %} blue {% endif %};
              }
      - type: horizontal-stack
        cards:
          - show_name: true
            show_icon: true
            styles:
              card:
                - "--mdc-ripple-color": blue
                - "--mdc-ripple-press-opacity": 0.5
            type: custom:button-card
            size: 20%
            color: gray
            tap_action:
              action: call-service
              service: automation.trigger
              service_data:
                entity_id: automation.turn_heating_kitchen_on
            name: Heat
            icon: mdi:radiator
            state:
              - operator: template
                value: |
                  [[[
                    return (states['climate.tze200_hue3yfsn_ts0601_zonnsmartthermostat_2'].attributes.temperature == states['input_number.heat_temperature_kitchen'].state)
                  ]]]
                color: rgb(255, 87, 53)
          - type: custom:button-card
            styles:
              card:
                - "--mdc-ripple-color": blue
                - "--mdc-ripple-press-opacity": 0.5
            size: 20%
            color: gray
            tap_action:
              action: call-service
              service: automation.trigger
              service_data:
                entity_id: automation.turn_off_heating_in_kitchen
            name: Cold
            icon: mdi:radiator-off
            state:
              - operator: template
                value: |
                  [[[
                    return (states['climate.tze200_hue3yfsn_ts0601_zonnsmartthermostat_2'].attributes.temperature == states['input_number.eco_temperature_kitchen'].state)
                  ]]]
                color: rgb(28, 128, 199)
  - type: vertical-stack
    title: Bedroom
    cards:
      - type: custom:mushroom-climate-card
        entity: climate.thermostat_bedroom_zonnsmartthermostat_3
        fill_container: true
        hvac_modes:
          - heat
          - "off"
        collapsible_controls: false
        show_temperature_control: true
        secondary_info: none
        tap_action:
          action: more-info
        hold_action:
          action: more-info
        primary_info: state
      - type: horizontal-stack
        cards:
          - type: custom:mushroom-entity-card
            entity: sensor.thermohygrometer_bedroom_zigbee_temperature
            fill_container: false
            primary_info: state
            secondary_info: name
            name: Entrance
          - type: custom:mushroom-entity-card
            entity: sensor.indoor_temperature
            fill_container: false
            primary_info: state
            secondary_info: name
            name: Window
          - type: custom:mushroom-entity-card
            entity: sensor.bedroom_temperature_change
            fill_container: false
            primary_info: state
            secondary_info: name
            name: Change
            icon: mdi:thermometer
            style: |
              :host {
                --icon-color: {% if states('sensor.bedroom_temperature_change') | float > 0 %} red {% else %} blue {% endif %};
                --text-color: {% if states('sensor.bedroom_temperature_change') | float > 0 %} red {% else %} blue {% endif %};
              }
      - type: horizontal-stack
        cards:
          - type: custom:button-card
            styles:
              card:
                - "--mdc-ripple-color": blue
                - "--mdc-ripple-press-opacity": 0.5
            size: 20%
            color: gray
            tap_action:
              action: call-service
              service: automation.trigger
              service_data:
                entity_id: automation.turn_on_heating_in_bedroom
            name: Heat
            icon: mdi:radiator
            state:
              - operator: template
                value: |
                  [[[
                    return (states['climate.thermostat_bedroom_zonnsmartthermostat_3'].attributes.temperature == states['input_number.heat_temperature_bedroom'].state)
                  ]]]
                color: rgb(255, 87, 53)
          - type: custom:button-card
            styles:
              card:
                - "--mdc-ripple-color": blue
                - "--mdc-ripple-press-opacity": 0.5
            size: 20%
            color: gray
            tap_action:
              action: call-service
              service: automation.trigger
              service_data:
                entity_id: automation.turn_off_heating_in_bedroom
            name: Cold
            icon: mdi:radiator-off
            state:
              - operator: template
                value: |
                  [[[
                    return (states['climate.thermostat_bedroom_zonnsmartthermostat_3'].attributes.temperature == states['input_number.eco_temperature_bedroom'].state)
                  ]]]
                color: rgb(28, 128, 199)
  - type: vertical-stack
    title: Living Room
    cards:
      - type: custom:mushroom-climate-card
        entity: climate.thermostat_heating_living_room_tv_zonnsmartthermostat_3
        fill_container: true
        hvac_modes:
          - heat
          - "off"
        collapsible_controls: false
        show_temperature_control: true
        secondary_info: name
        tap_action:
          action: more-info
        hold_action:
          action: more-info
        primary_info: state
        name: TV
      - type: custom:mushroom-climate-card
        entity: climate.thermostat_living_room_sofa_thermostat
        fill_container: true
        hvac_modes:
          - heat
          - "off"
        collapsible_controls: false
        show_temperature_control: true
        secondary_info: name
        tap_action:
          action: more-info
        hold_action:
          action: more-info
        primary_info: state
        name: Sofa
      - type: horizontal-stack
        cards:
          - type: custom:mushroom-entity-card
            entity: sensor.temperature_1
            fill_container: false
            primary_info: state
            secondary_info: name
            name: Plant
          - type: custom:mushroom-entity-card
            entity: sensor.wh45_temperature
            fill_container: false
            primary_info: state
            secondary_info: name
            name: Library
          - type: custom:mushroom-entity-card
            entity: sensor.living_room_temperature_change
            fill_container: false
            primary_info: state
            secondary_info: name
            name: Change
            icon: mdi:thermometer
            style: |
              :host {
                --icon-color: {% if states('sensor.living_room_temperature_change') | float > 0 %} red {% else %} blue {% endif %};
                --text-color: {% if states('sensor.living_room_temperature_change') | float > 0 %} red {% else %} blue {% endif %};
              }
      - type: horizontal-stack
        cards:
          - show_name: true
            show_icon: true
            styles:
              card:
                - "--mdc-ripple-color": blue
                - "--mdc-ripple-press-opacity": 0.5
            type: custom:button-card
            size: 20%
            color: gray
            tap_action:
              action: call-service
              service: automation.trigger
              data: {}
              target:
                entity_id: automation.turn_on_heating_in_living_room
            name: Heat
            icon: mdi:radiator
            state:
              - operator: template
                value: |
                  [[[
                    return (states['climate.thermostat_living_room_sofa_thermostat'].attributes.temperature == states['input_number.heat_temperature_living_room'].state || states['climate.thermostat_heating_living_room_tv_zonnsmartthermostat_3'].attributes.temperature == states['input_number.heat_temperature_living_room'].state)
                  ]]]
                color: rgb(255, 87, 53)
          - show_name: true
            show_icon: true
            type: custom:button-card
            styles:
              card:
                - "--mdc-ripple-color": blue
                - "--mdc-ripple-press-opacity": 0.5
            size: 20%
            color: gray
            tap_action:
              action: call-service
              service: automation.trigger
              data: {}
              target:
                entity_id: automation.turn_off_heating_in_living_room
            name: Cold
            icon: mdi:radiator-off
            state:
              - operator: template
                value: |
                  [[[
                    return (states['climate.thermostat_living_room_sofa_thermostat'].attributes.temperature == states['input_number.eco_temperature_living_room'].state || states['climate.thermostat_heating_living_room_tv_zonnsmartthermostat_3'].attributes.temperature == states['input_number.eco_temperature_living_room'].state)
                  ]]]
                color: rgb(28, 128, 199)
  - type: vertical-stack
    title: Office
    cards:
      - type: custom:mushroom-entity-card
        entity: sensor.tz2000_a476raq2_ts0201_temperature
        fill_container: false
        primary_info: state
        secondary_info: name
        name: Table
      - type: horizontal-stack
        cards: []
  - type: vertical-stack
    title: Schedules
    cards:
      - type: custom:mushroom-entity-card
        entity: automation.turn_on_heating_in_bedroom
        tap_action:
          action: toggle
        hold_action:
          action: more-info
        name: Schedule Heating Bedroom
      - type: custom:mushroom-entity-card
        entity: automation.turn_heating_kitchen_on
        tap_action:
          action: toggle
        hold_action:
          action: more-info
        name: Schedule Heating Kitchen
      - type: custom:mushroom-entity-card
        entity: automation.turn_on_heating_in_kitchen_home
        tap_action:
          action: toggle
        hold_action:
          action: more-info
        name: Schedule Heating Kitchen (@Home)
        icon: mdi:thermostat-box
      - type: custom:mushroom-entity-card
        entity: automation.turn_on_heating_in_living_room
        tap_action:
          action: toggle
        hold_action:
          action: more-info
        name: Schedule Heating Living Room
  - type: vertical-stack
    cards:
      - type: horizontal-stack
        title: Bedroom
        cards:
          - type: custom:numberbox-card
            border: true
            entity: input_number.eco_temperature_bedroom
            name: Eco Temp.
            icon: false
            unit: false
          - type: custom:numberbox-card
            border: true
            entity: input_number.heat_temperature_bedroom
            name: Heat Temp.
            icon: false
            unit: false
      - type: horizontal-stack
        title: Kitchen
        cards:
          - type: custom:numberbox-card
            border: true
            entity: input_number.eco_temperature_kitchen
            name: Eco Temp.
            icon: false
            unit: false
          - type: custom:numberbox-card
            border: true
            entity: input_number.heat_temperature_kitchen
            name: Heat Temp.
            icon: false
            unit: false
      - type: horizontal-stack
        title: Living Room
        cards:
          - type: custom:numberbox-card
            border: true
            entity: input_number.eco_temperature_living_room
            name: Eco Temp.
            icon: false
            unit: false
          - type: custom:numberbox-card
            border: true
            entity: input_number.heat_temperature_living_room
            name: Heat Temp.
            icon: false
            unit: false
5. Understand the limitations of this setup
Here we come to the quirks and problems of this setup.
- The offset of every TRV is limited to the interval -5, 5. Sometimes it could happen that the offset is larger (especially when the radiator is really hot). Unfortunately there’s no way of fixing this.
- The calibration automation sends a lot of messages to the TRVs to correct the offset: this could affect battery. I always turn off this automation when I’m not using the heating (e.g. in summer).
- These TRVs don’t like rechargeable batteries: always use normal ones! I usually change the batteries at the beginning of winter every year. When changing the battery usually you need to perform calibration of TRV but it should connect automatically to Home Assistant.
- There is no window detection mechanism implemented, although it is possible to do it.
- The opening/closing of the valve is still a blackbox. For this reason the target temperature may not be precisely maintained. Packages like better thermostat can take care of this, however I found the accuracy to be good enough for me.
…many more that I’ll add in the future.