I have a new unopened IBBQ-4T which uses wifi, not bluetooth. Is there a way to connect it to Home Assistant?
I have mine integrated through local Tuya integration. There are a few ways others have posted to get the device code, either through Tuya and developer account.
I am a complete neophyte with Tuya…I’ve opened a Tuya account. I think I need some sort of gateway locally (under HA? on a raspberry pi? on Proxmox?). maybe you could give me a very quick cookbook on how to approach this.
@ghstudio … actually good timing on this as I have a lamb to cook in my Caja China next weekend. I will need to fire all of it up and make sure all works and then can send you some info. Give me a few days to catch up on this.
Well, I re-enabled my integration and started it up, All looks good. So now I have to remember how I did it. Let me search out the links I found when I did it.

If I remember correctly, I followed this:
what hardware/software do I need to run at home. I have a tuya account, but haven’t used it.
It’s not clear to me what you ask. The IBBQ-4T is a wireless device that connects to your home network. Tuya is the cloud application and Localtuya is the integration that essentially “short-circuits” the connection to the cloud.
My Home Assistant install is in my house (I run Core on a Linux box). You do not need anything else than those.
The trick is to first create a Tuya developer account and link your iBBQ-4T via the Tuya app on your phone, this should then be in your developer area. From this you get the one piece of information you need, the device local key. This used with Localtuya will get the information from the IBBQ-4T into HA for you to use. You never need any of the developer nor Tuya again as long as you do not do something that would change the local key. The local key will change if you re-pair your iBBQ-4T to another IP address and if you change it … like if you have multiple gateways in your house and you pair it to a different wireless gateway.
That article I linked does have better solutions for this issue as I have a fairly large home. I have a wireless network in the area of my Caja China roasting box but that network doesn’t reach the kitchen. If I were to re-pair the device in the Kitchen to another wireless router, it would change the local key as I understand. But still, I rarely use the device and when I do, I am cooking whole animal and that is never in the kitchen so I do not have that issue.
So, all I have is:
- Home Assistant on something
- Localtuya integration
- IBBQ-4T probes
And nothing else really (with the exception that my integration is also through Alexa and messaging so when a probe hits a set temp, Alexa announces it throughout my house and I get a phone notification).
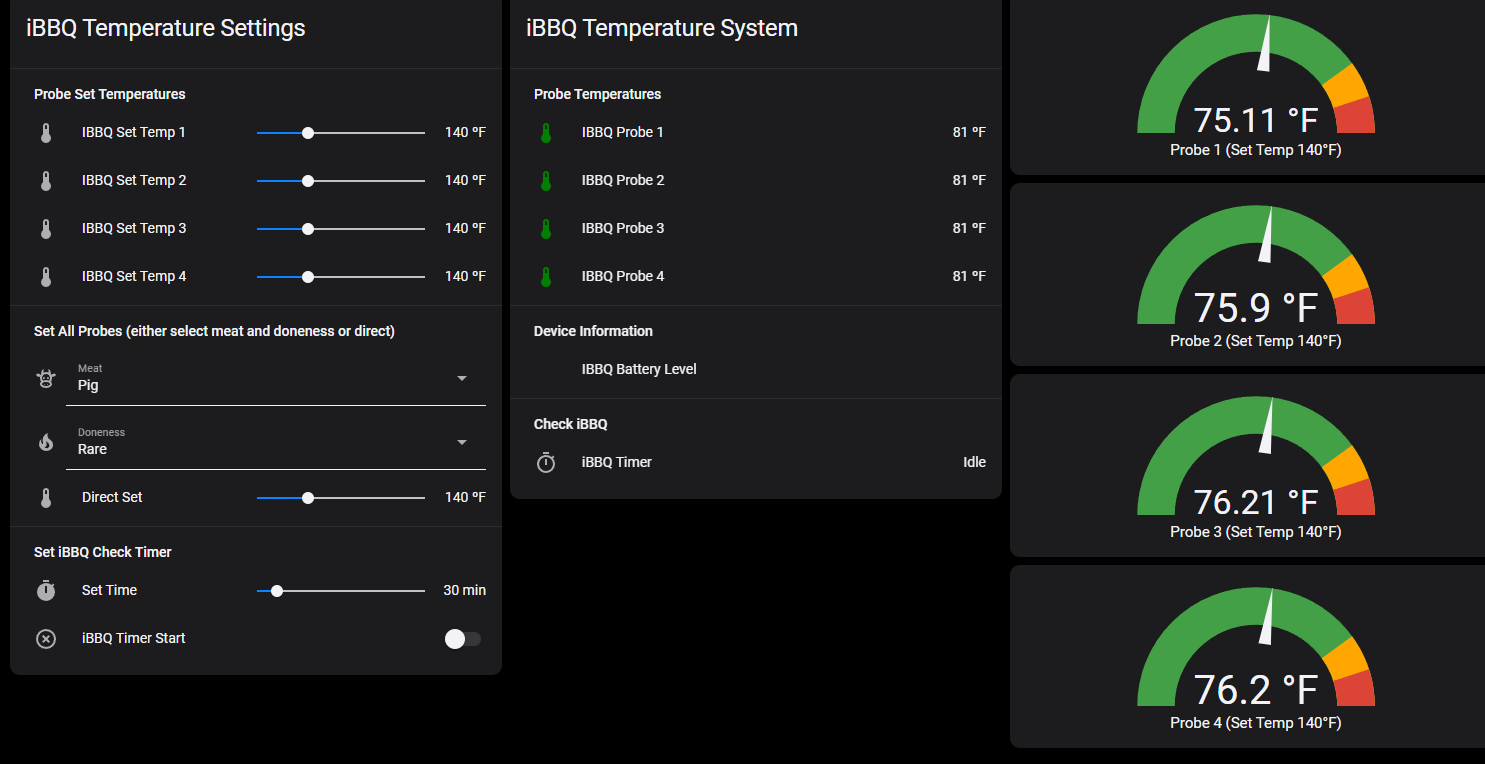
As you also see from above, I have a small JSON file with many different cuts of meat and preferred temps. I can very easily pick a meat and “doneness” and automatically set all the probes. I also have an integrated timer just to notify me to check on it or take action (like in a Caja China we might flip the Pig to skin side up after 3 hours).
I can even set the probes to four different temps if I am doing like four legs, rare, medium-rare, medium, well-done or whatever you wish to do with them (like one could be ambient temp in the box with a set temp letting you know the charcoal may be getting low).
1 Like
As a side note, If I had this to do again … I would have bought a Meater Block. And I am in fact looking at them right now and I think I will just buy it. I had an absolute need a few years back for a new multi-probe monitor and Meater was all sold out. I bought the iBBQ-4T and while I am happy with it, I HATE the wires.
Meater Block is wireless probes that bluetooth to a controller and that controller is then wireless. So much better than the ugly wires you have to run through your over door or into your grill.
Thanks…that’s exactly what I needed…and it clears up Tuya cloud vs localtuya.
I’m not a meater lover…the probes are too thick and must be inserted to a certain point. I don’'t mind multiple wires.My 4 probe cost $50 (bought on special offer)…I think it will do the trick for me 
Agreed on the Meater.
Once you get the integration going and have some results, I would be happy to send along my Lovelace GUI if that is something you want.
Hi there, I’m very new to home assistant. I’ve got around 10 smart devices in my home which I’ve managed to intergrate, including my inkbird IBBQ-4BW thanks to this thread! I’d like to start learning about lovelace configs. No prior experience coding. Are you able to share your configuration and perhaps link me to the best place to start learning?
Thanks very much!
Of course. I am traveling next few days but can post after that
I’m more of a community lurker than poster, but I wanted to say thank you to @kbrown01 and everyone else on this thread for helping me get this going. My dashboard is not as pretty, but more functional for my specific needs.

I realized the only useful data from the iBBQ-4T was the temperature of the probes (maybe power state if I decide on conditional cards). The timer and temperature settings in the inkbird app are local to the app, so all of the timer and temp logic needs to be manually built it HA. (This is obvious to me now, but I didn’t understand that at first).
I wanted more control per probe like the inkbird app, so I created a timer per probe. I also always use probe 4 to control the temp of my smoker, so that probe I wanted a low temp alarm and a high temp alarm.
I also made use of script entities for most of the logic. This was easier for me to understand than templating states in the lovelace card. For example, the timer button calls the script that grabs the slider input_number to properly set the timer.
The mini graphs are a work in progress. I just wanted a quick way to force probe 4 in the middle.
I also have zero HA automations because I use Node Red for automations. The only automations used are for sending alerts to Alexa for timer finished or temp reached for probes 1 -3, then min temp and max temp alarms for smoker temp probe 4. I even call script entities from Node Red since this is easier for me than converting yaml to json for calling services.


I’m sure there are better ways to do this with variables for the probe numbers and such, but I was proud of the accomplishment.
I can post the code if anyone is interested, but there is a lot to gather. Thanks again everyone!
1 Like
@czech12 … lots of great ideas here. I mostly use mine for a Caja China box for cooking whole animals. The only thing I have different is a quick set based on the animal, populated a var. Like:
meatmaptemp:
  tracked_entity_id:
    - input_select.meat_type
    - input_select.meat_temps
  value_template: >
     {% set tartemp = {
        "Poultry": {
            "Rare": 150,
            "Medium-Rare": 150,
            "Medium": 155,
            "Medium-Well": 160,
            "Well": 165
        },
        "Pig": {
            "Rare": 140,
            "Medium-Rare": 145,
            "Medium": 160,
            "Medium-Well": 165,
            "Well": 170
        },
        "Lamb": {
            "Rare": 140,
            "Medium-Rare": 145,
            "Medium": 160,
            "Medium-Well": 165,
            "Well": 170
        },
        "Beef": {
            "Rare": 120,
            "Medium-Rare": 130,
            "Medium": 135,
            "Medium-Well": 145,
            "Well": 155
        },
        "Venison": {
            "Rare": 120,
            "Medium-Rare": 130,
            "Medium": 135,
            "Medium-Well": 145,
            "Well": 155
        },
        "Alligator": {
            "Rare": 140,
            "Medium-Rare": 145,
            "Medium": 160,
            "Medium-Well": 165,
            "Well": 170
        }
     } %}
     {% set meattype = states.input_select.meat_types.state %}
     {% set meattemp = states.input_select.meat_temps.state %}
     {{ tartemp[meattype][meattemp] | int }}
I do like the idea of using a probe for ambient in the China box. I am going to add that with high/low to my setup! Great idea!
1 Like
Here is what I use for the graphs. It uses the the input numbers to dynamically set the max value and also the ranges for the colors. The only issue I have found is that the needle goes to “0” and then to the new temp on redraws. Can’t figure that one out but others have reported the same.
type: vertical-stack
cards:
  - type: conditional
    conditions:
      - entity: sensor.ibbq_probe_1
        state_not: unavailable
    card:
      type: custom:config-template-card
      entities:
        - input_number.ibbq_target_probe_1
        - sensor.ibbq_probe_1
      variables:
        - states['input_number.ibbq_target_probe_1'].state * 1
        - states['input_number.ibbq_target_probe_1'].state * .8
        - states['input_number.ibbq_target_probe_1'].state * .9
      card:
        type: gauge
        name: ${'Probe 1 (Set Temp ' + vars[0] + '°F)'}
        entity: sensor.ibbq_probe_1
        min: 0
        max: ${vars[0]}
        severity:
          green: 0
          yellow: ${vars[1]}
          red: ${vars[2]}
        needle: true
  - type: conditional
    conditions:
      - entity: sensor.ibbq_probe_2
        state_not: unavailable
    card:
      type: custom:config-template-card
      entities:
        - input_number.ibbq_target_probe_2
        - sensor.ibbq_probe_2
      variables:
        - states['input_number.ibbq_target_probe_2'].state * 1
        - states['input_number.ibbq_target_probe_2'].state * .8
        - states['input_number.ibbq_target_probe_2'].state * .9
      card:
        type: gauge
        name: ${'Probe 2 (Set Temp ' + vars[0] + '°F)'}
        entity: sensor.ibbq_probe_2
        min: 0
        max: ${vars[0]}
        severity:
          green: 0
          yellow: ${vars[1]}
          red: ${vars[2]}
        needle: true
  - type: conditional
    conditions:
      - entity: sensor.ibbq_probe_3
        state_not: unavailable
    card:
      type: custom:config-template-card
      entities:
        - input_number.ibbq_target_probe_3
        - sensor.ibbq_probe_3
      variables:
        - states['input_number.ibbq_target_probe_3'].state * 1
        - states['input_number.ibbq_target_probe_3'].state * .8
        - states['input_number.ibbq_target_probe_3'].state * .9
      card:
        type: gauge
        name: ${'Probe 3 (Set Temp ' + vars[0] + '°F)'}
        entity: sensor.ibbq_probe_3
        min: 0
        max: ${vars[0]}
        severity:
          green: 0
          yellow: ${vars[1]}
          red: ${vars[2]}
        needle: true
  - type: conditional
    conditions:
      - entity: sensor.ibbq_probe_4
        state_not: unavailable
    card:
      type: custom:config-template-card
      entities:
        - input_number.ibbq_target_probe_4
        - sensor.ibbq_probe_4
      variables:
        - states['input_number.ibbq_target_probe_4'].state * 1
        - states['input_number.ibbq_target_probe_4'].state * .8
        - states['input_number.ibbq_target_probe_4'].state * .9
      card:
        type: gauge
        name: ${'Probe 4 (Set Temp ' + vars[0] + '°F)'}
        entity: sensor.ibbq_probe_1
        min: 0
        max: ${vars[0]}
        severity:
          green: 0
          yellow: ${vars[1]}
          red: ${vars[2]}
        needle: true

Hey mate, definitely interested in the code, would love to use your setup!
Cheers
For those that desire, I posted (I hope all) the code on Github here: https://github.com/kbrown01/ibbq-4t
2 Likes
Thanks for this Kbrown! I was just reading your post < 12 hours about and thought, I wonder if he could post the YAML to github… and I double check the post this morning and there it is!