I’m fairly new to the home assistant community but I am active in the general (mostly german) smart home community for a long time.
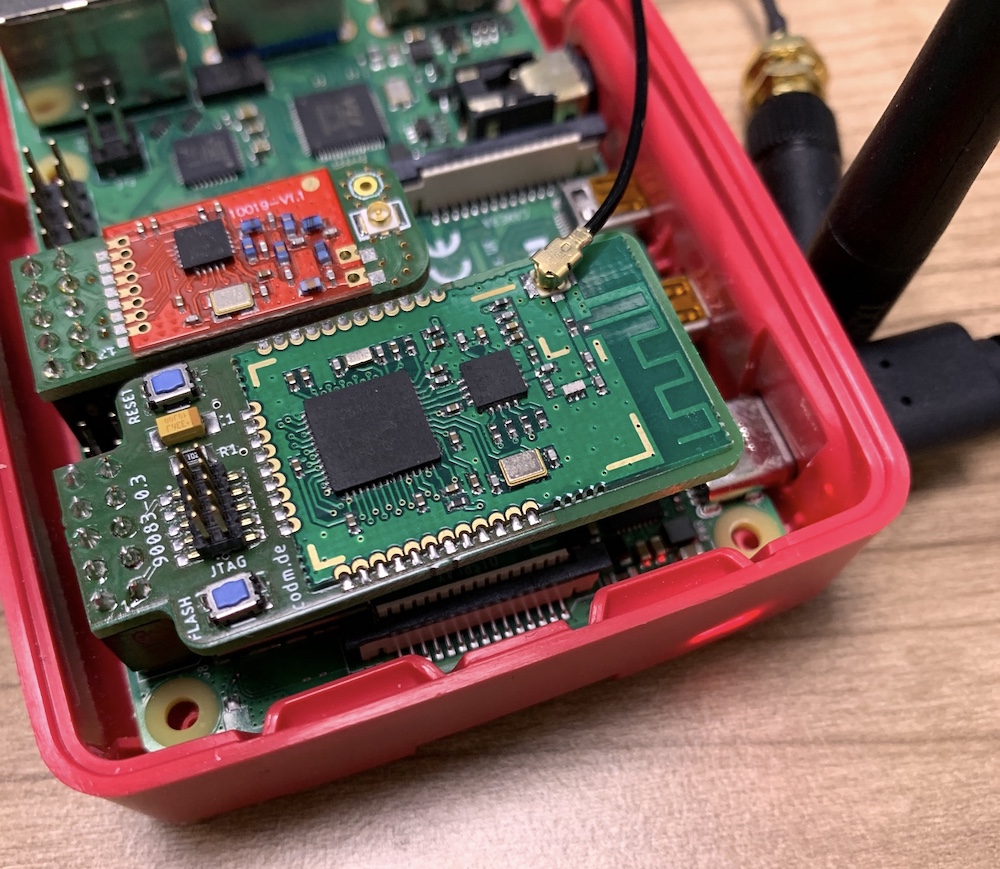
Just wanted to let you know, that I’ve built a CC2538 Module for the GPIO of the Raspberry Pi (CC-BY-SA) which should be usable with home assistant as it’s “simply” a CC2538 without the USB-Part and available on /dev/ttyAMA0.
I liked the idea of having an external Antenna for (e.g.) electric cabinet mounted Pi’s and having it attached directly to the “inside” of the case.
It can be flashed via the serial interface directly on the Pi as the Z-Stack 3.0.x MODKAM UART Firmware with SBL (Serial Bootloader) is used. There’s also a Cortex-M0-JTAG present on the 2x5 header.
If you are interestend in the development of the module, have a look over to the GitHub issues from zigbee2mqtt: https://github.com/Koenkk/zigbee2mqtt/issues/1568#issuecomment-670571253
Beside the common CC2538 module not much is needed so one can built it for themselfes - intermediate to good soldering skills required. We also sell these ready built and preflashed at our webshop in Europe: https://shop.codm.de/automation/zigbee/29/zigbee-cc2538-raspberry-pi-modul
(Please let me know if the link is ok, as I’m affiliated with cod.m)
I am also new, but serious, and bought this pre-flashed. Now I received a German explanation on how to set it up in raspbian/linux, talking about UART, etc.
2 problems; I am not German and my German is rusty at best. Also, Home Assistant does not work as typical linux. I am afraid to just click it onto my raspberry pi since I am reading this 3.3v / 5v thing and don’t want to damage it.
Could you please tell me in English is Home Assistant is set up already so that I can click it onto it and boot my Pi without any other configuration, or do I need to do some things first?
we are working on a english translation of the instructions we supply with the module. I have a first draft an can send it, if you wish. Hit me up on [email protected].
Otherwise the module is documented in english here: https://github.com/codm/cc2538-raspberry-pi-module
Also, you could just download the german pdf from the shop page and use google-translate to translate the document.
The module is especially made for the Raspberry Pi GPIO which supplies 3.3V directly. See https://pinout.xyz.
For configuring the modules should be exactly like the any CC253x UART module: https://www.home-assistant.io/integrations/zha/
Any USB-Device in that context is just a serial device connected to USB. I don’t know the HA environment completely but auto should do as the device and type ti_cc. Baudrate should be 115200.
Also see https://github.com/zigpy/zigpy-cc for the configuration hints.
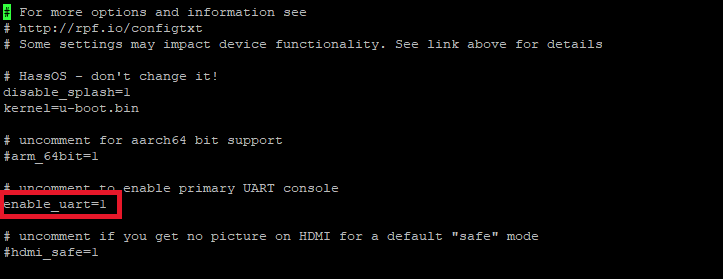
That is my problem too. If you get a pi with raspbian installed then you have normal SSH access and it indeed has a /boot/config.txt file. Now I installed home assistant operating system version from the image as is described on this website. That limits the SSH access. The Terminal addon can be installed but the folder structure is different.
I find the way to edit the config.txt.
I simply put the SD card in my laptop and in the root directory I found the config.txt. I added the lines and restarted HA.
(#dtoverlay=pi3-disable-bt
#enable_uart=1)
In zigbee2mqtt config I modified the the port to ttyAMA0, but after the restart of the integration didn’t restart, so I downgraded.
Your way might be a lot easier than mine. I wrote a guide (kinda alpha version); you can find it here
Did you add the lines with the # in front of it? That actually disables the lines (it makes them into comments).
The enable_uart=1 line is already there. You just need to remove the #.
I added the other line all the way to the bottom (under [all]). That means it will be applied in all situations.
I myself have a Raspberry Pi 4. I looked it up and did not att the pi3- part. So it is dtoverlay=disable-bt
Then as you can see for me all worked kinda like out of the box. Follow my guide. I hope it works.
Currently I have detected one sensor (it recognised it after I went really close to connect it). I can’t read any information though. It might be the antenna. I do not have an external antenna (I am missing the u.P1 to SMA female cable. I ordered one, but it could take a month before it is in. I read you can turn a resistor 90 degrees so the local antenna is used, but I will be looking for a video before I am trying to turn something on the item without breaking something off
[update]
I believe you need to remove it and resolder it… Ehm. Way above my skills grade. So I am gonna see where I can get a cable a bit faster.
@pmayer maybe you can use the guide to your advantage?
I also try to use the official intergation, but I didn’t achieve to work it.
When you setup the integration, did you see s/n number? I don’t have so perhaps it meens that the module is not working at all.
Ok It is a bit different than what I did. It of course is hard to exactly know what is wrong but what I can tell you is that the line enable_uart=1 was already in the file. You just need to uncomment it (remove the #), not add it. (see the screenshot that starts at the start of the config.txt file)
Also try to set dtoverlay=disable-pt (don’t use the pi3-).
I did not use zigbee2mqtt. ZHA (Zigbee Home Automation) which I added as an integration via the UI. I did not use any configuration. I did get that /dev/ttyAMA0 too and selected that, but not in this application.
I could solve the issue. The problem was with config line “dtoverlay=pi3-disable-bt”. I did like you wrote in your description without “pi3” and it works.
To summarize the easiest way:
take out the SD card form Pi and place it in the PC
in the root folder edit config.txt
a. uncomment line #enable_uart=1 (remove #)
b. add the line dtoverlay=disable-bt
put back SD card in Pi
restart HA
configure integration Zigbee or addon Zigbe2mqtt
-Enjoy
After reboot three thermometers didn’t paried I will check if it is a battery issue or not. (I don’ think so)
All others devices work fine. (2 more thermometers, 5 pushbutton, 2 door switches)
Great to hear you got it working @Andras_Vass! I have a 3 meter long cable with antenna I bought together with an other thing hooked up to it. It al works great.
For me everything works fine after multiple reboots though I only have 2 sensors attached right now. One sensor did lose connection after a while though, but I think it has to do with the range. Normal Wifi (same 2.4 GHz) doesn’t reach well in that part of my house.So I am hoping if I add an Ikea Tradfri lightbulb halfway through it will work. If not (tradfri might work on a different network than the rest) I will need to get an extender and add that. … Thing is that Ikea is closed now
systemctl disable hciuart and remove console=serial0,115200 console=ttyAMA0,115200 in /boot/cmdline.txt
But it still prints ls: cannot access’/dev/serial/by-id’: No such file or directory.