Custom animated weather card for Lovelace

UPDATE (1/9): @Bram_Kragten has updated the card to use lit (to improve performance). It is also significantly easy to get started with. Please follow the link here for instructions.

UPDATE (7/3): Thanks to @ciotlosm for all his inputs to get the card fixed. We now have a significantly better version of the custom animated card that provides the same output, but is less “hacky”. To configure the card:

  1. Place the weather-card.js and weather-card.css files in www\custom_ui\.
  2. Save, the amcharts icon under www\icons\weather_icons\animated
  3. Add the following to your ui-lovelace.yaml.
resources:
  - url: /local/custom_ui/weather-card.js
    type: js

title: Home Assistant
views:
  - icon: mdi:weather-cloudy
    id: weather
    title: Weather
    garage_door_tilt_sensor_alarm_level: Weather
    cards:
      - type: "custom:weather-card"
        entity_weather: weather.yweather
        entity_sun: sun.sun

Any inputs are more than welcome.

Old instructions (can be ignored)
The custom weather card in this thread is perfect for my needs, but, unfortunately does not work with Lovelace. I modified the same to make it work with Lovelace (0.73.0b0) - all credits go to the authors of the original code.
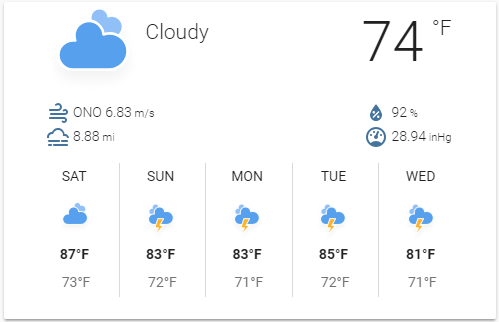
image

To implement the card:

  1. Add the custom-weather-animated.html file to www\custom_ui\custom-weather-animated.html.
  2. Save, the amcharts icon under www\icons\weather_icons\animated
  3. Import the files in frontend using:
    frontend:
      extra_html_url:
        - /local/custom_ui/custom-weather-animated.html
      extra_html_url_es5:
        - /local/custom_ui/custom-weather-animated.html
    
  4. Add an input_boolean entity that we will use. I added input_boolean.weather.
  5. Customize the input_boolean entity that you created in the last step to add the weather details. Note, that you will need Yahoo weather configured and use the Yahoo weather entity, which in my case is weather.yweather.
    customize:
      input_boolean.weather:
        config:
          weather: weather.yweather
          sun: sun.sun
    
  6. Add the animated card to Lovelace:
     cards:
       - type: 'custom:custom-weather-animated'
         entity: input_boolean.weather
    

Restart HA and make sure to clear the browser cache (CTRL+SHIFT+R) and you should see the card. Check the logs if things don’t go as expected.

I am not a Polymer/UI expert and I am sure things can be improved. I am creating this thread so that we can improve upon things and keep it updated as Lovelace matures.

40 Likes

That is exactly why I put it out there so that we can remove the unnecessary hacks…suggestions welcome.

3 Likes

Curious, what makes this a “shitty hack”?

1 Like

So helpful aren’t you?

5 Likes

Thanks for sharing, @arsaboo! I may try that soon!

So instead of making shitty remarks instead show us how it should be done

8 Likes

@eddi89 Folks have reported your comment as inappropriate. It would be great if you can provide constructive feedback rather than lashing out like that. That specific comment is not good for anything. I truly appreciate your valuable contributions and understanding!

5 Likes

I may be wrong but I think people may be taking @eddi89’s comment the wrong way.

I took it as meaning the point of Lovelace was to reinvent the front end and remove the need for tacking on the likes of custom UI etc and their somewhat unfriendly, hacky, approach to get the personalised cards users want… Otherwise what’s the point?

Not for a minute criticising custom UI as I depend on it myself to achieve the desired results with the current front end.

Like I said, I may have misunderstood though.

One of the goals of Lovelace is to make custom UI easier to support. In the old UI, custom UI would rely on configuration stored in the state machine. This was difficult to maintain and also made it difficult to configure an entity to look different if you wanted to include it in 2 places.

One of the goals of Lovelace was to better support custom UI. We realized that we needed extensive configuration options and so both built-in and custom cards can leverage our new powerful system. See also the documentation for custom cards.

At the end of the day, custom UI (and custom panels) is a great way to experiment and share your work. We prefer if people will work on a custom card, see the different use cases and then we can see if we want to make this part of the built-in Lovelace cards.

6 Likes

I’ve actually been working on doing something similar for my setup. I could never get the card to work correctly using the previously posted way. I used the examples of creating your own card, and this does not require adding an additional file to the frontend section of configuration.yaml. This is my first post, so I have no idea how to do any formatting.

With that said, I modified ui-lovelace.yaml to include a resource which is my weather-card-example.js file. It’s a type JS. I then added a type “custom:weather-card-example” with two entities, weather.yweather and sun.sun. I then copied the ContentCardExample from the documentation, changed the name, and modified the code it to use values from the two entities I was using.

The results are the same, so I don’t know which method is better. But like I said, I could never get the card to work using an input_boolean, and I’ve got everything working now using a custom card in lovelace.

2 Likes

Nice to see someone is reading our docs! Next step is to replace all the hardcoded units (which are partly incorrect btw) and localizations. you can check the weather-card code in the frontend-repo for this

It will be great if you can post your config and the relevant instructions. I’m sure we can figure out a hybrid approach and use the weather card information as @eddi89 suggested to develop the right approach.

Apologies if the formatting is bad. All of the code below is ripped off from either the documentation or SneakyPieBrown on the reddit post. I’m working through some CSS challenges, and I don’t have the forecast data implemented yet. It won’t be difficult to add it, I just haven’t had time to sit and code it yet. And my javascript skills are very basic, so it’s likely there’s a better way to code all this. But it does work for me. Also, my measurements are done for the US, so you may need to make changes to work for your location. And it’s a good idea to clear the cache, as usual. With all the disclaimers out of the way…

On my ui-lovelace.yaml file:

resources:
  - url: /local/custom_ui/weather-card.js
    type: js

views:
  - tab_icon: mdi:home-assistant
    name: Home
    cards:
      - type: "custom:weather-card"
        entities: 
          - weather.yweather
          - sun.sun

On my weather-card.js file:

class weatherCard extends HTMLElement {
  set hass(hass) {
    if (!this.content) {
      const card = document.createElement('ha-card');
      card.header = 'Weather Forecast';
      const link = document.createElement('link');
      link.type = 'text/css';
      link.rel = 'stylesheet';
      link.href = '/local/css/homeassistant.css';
      card.appendChild(link);
      this.content = document.createElement('div');
      this.content.className = 'card';
      card.appendChild(this.content);
      this.appendChild(card);
      console.log('b',this);
    }

    var currentCondition;
    var humidity;
    var i;
    var iconToUse;
    var pressure;
    var sunLocation;
    var temperature;
    var visibility;
    var windBearing;
    var windSpeed;
    
  var dayWeatherIcons = {
    'clear-night': 'day',
    'cloudy': 'cloudy',
    'fog': 'cloudy',
    'hail': 'rainy-7',
    'lightning': 'thunder',
    'lightning-rainy': 'thunder',
    'partlycloudy': 'cloudy-day-3',
    'pouring': 'rainy-6',
    'rainy': 'rainy-5',
    'snowy': 'snowy-6',
    'snowy-rainy': 'rainy-7',
    'sunny': 'day',
    'windy': 'cloudy',
    'windy-variant': 'cloudy-day-3',
    'exceptional': '!!',
  };

  var nightWeatherIcons = {
    'clear-night': 'night',
    'cloudy': 'cloudy',
    'fog': 'cloudy',
    'hail': 'rainy-7',
    'lightning': 'thunder',
    'lightning-rainy': 'thunder',
    'partlycloudy': 'cloudy-night-3',
    'pouring': 'rainy-6',
    'rainy': 'rainy-5',
    'snowy': 'snowy-6',
    'snowy-rainy': 'rainy-7',
    'sunny': 'night',
    'windy': 'cloudy',
    'windy-variant': 'cloudy-night-3',
    'exceptional': '!!',
  };
    
  var windDirections = [
    'N', 
    'NNE', 
    'NE', 
    'ENE', 
    'E', 
    'ESE',
    'SE', 
    'SSE',
    'S', 
    'SSW', 
    'SW', 
    'WSW', 
    'W', 
    'WNW', 
    'NW', 
    'NNW', 
    'N'
  ];    
    //console.log('a',hass);
    for (i=0; i < this.config.entities.length; i++) {
        if (hass.states[this.config.entities[i]]._domain == "sun") {
            sunLocation = hass.states[this.config.entities[i]].state;
        } else if (hass.states[this.config.entities[i]]._domain == "weather") {
            currentCondition = hass.states[this.config.entities[i]].state;             
            humidity = hass.states[this.config.entities[i]].attributes.humidity; 
            pressure = hass.states[this.config.entities[i]].attributes.pressure; 
            temperature = Math.round(hass.states[this.config.entities[i]].attributes.temperature); 
            visibility = hass.states[this.config.entities[i]].attributes.visibility; 
            windBearing = windDirections[(parseInt((hass.states[this.config.entities[i]].attributes.wind_bearing + 11.25) / 22.5))]; 
            windSpeed = hass.states[this.config.entities[i]].attributes.wind_speed; 
        }
    }
    
    if (sunLocation == 'above_horizon') {
      iconToUse = dayWeatherIcons[currentCondition];  
    } if (sunLocation == 'below_horizon') {
      iconToUse = nightWeatherIcons[currentCondition];  
    }
    
    if (iconToUse) {
        //this.content = document.createElement('span');
      this.content.innerHTML = `
      <span class="icon bigger" style="background: none, url(/local/weather_icons/animated/` + iconToUse + `.svg) no-repeat; background-size: contain;">` + currentCondition + `</span>
      <span class="temp">` + temperature + `</span><span class="temp_unit">°F</span>
      <br>
      <span>
        <ul class="variations right">
            <li><span class="iron-icon"><iron-icon icon="mdi:water-percent"></iron-icon></span>` + humidity + `<span class="unit"> %</span></li>
            <li><span class="iron-icon"><iron-icon icon="mdi:gauge"></iron-icon></span>` + pressure + `<span class="unit"> hPa</span></li>
        </ul>
        <ul class="variations">
            <li><span class="iron-icon"><iron-icon icon="mdi:weather-windy"></iron-icon></span>` + windBearing + ` ` + windSpeed + `<span class="unit"> mi/h</span></li>
            <li><span class="iron-icon"><iron-icon icon="mdi:weather-fog"></iron-icon></span>` + visibility + `<span class="unit"> mi</span></li>
        </ul>
      </span>
        `;
    }
  }

  // The height of your card. Home Assistant uses this to automatically
  // distribute all cards over the available columns.
  getCardSize() {
    return 3;
  }  
}

customElements.define('weather-card', weatherCard);
1 Like

Thanks for the definitive explanation, there does seem to be a lot of confusion out there …and people who don’t understand the term “experimental” :slight_smile:

@beatle SO, I formatted your post. But, it won’t work in 0.73.0b0 (something to do with setconfig)

image

Here’s the weather-card.js (just changed the icon path). I think we are on the right path.

I will look at the localization options in the weather card.

I am guessing we also need the css file /local/css/homeassistant.css that you referenced in the .js file.

I agree. It’s like he is talking about the ducttape not the hacker.

We are making progress here and it is all good. I am sure we will achieve the desired end soon…there are some very smart people around :slight_smile:

After the last update the component needs a setConfig method.

Yeah…I tried it at a few places, but could not figure out (mostly because I don’t have it working even in 0.72). Let me know if you have any thoughts about how/where to include that function.