I moved into a new house a couple of years ago, built around 20 years ago it was a stretch of the budget and I knew I would have to save for a while before I could start making big changes. It wasn’t long before (immediately after the first power bill) I realised the 20 year old air conditioner would also be a financial burden, and its temperature control was poor, it would barely keep us cool the first half of the night and by 3am we would get frostbite on our toes. The AC is a 6.5kw Daikin system, a heat pump outside and a unit in the roof with 3 zones, there is a controller upstairs and another in the kitchen area.

For a while we played with settings and found a happy medium of comfort vs cost to run, a setting of 26 degrees. I always wanted to be able to automate the system, so when the solar is producing power we can run the unit full tilt and get the house cool for the evening, and then start winding it down to save power as the night went on. But I couldn’t find anything for a 20 year old system, and all the new
systems are tied to the cloud and well above my limited budget (plus Dutch blood doesn’t help). Searching the controller part number + Wi-Fi I found some people adding a Wi-Fi relay to the power button, but that’s not enough, I wanted a professional integration. what I did notice was the labels P1/P2 inside the controller, that lead me to
I followed the project for a while, it wasn’t exactly what I was after, they were working on the Daikin Altherma heat pumps and there was no info about the type of VRV AC unit I had. I saw he had just developed a new device so I reached out to him about a month ago to see if I could get my hands on one. I managed to buy his last board and with a warning “this is a prototype and will require loads of reverse engineering” he send it to the opposite side of the world. It took 3 weeks to arrive, and in the meantime I read everything on his GitHub and setup an ESP32 with a couple of bme280 temp/humidity/pressure sensors so I could cross reference readings to reverse engineer the data. I searched every Daikin manual I could get my hands on for any tidbit of info

Within 10 minutes of the device arriving I had hooked it up and connected to my Wi-Fi, its powered directly off the P1P2 bus, so it was just a matter of jumping the 2 wires from the controller to the device - note how small it is! It creates the usual AP where you can connect to enter your Wi-Fi details. Once connected to the Wi-Fi the device has a telnet interface, it was just a matter of opening a command prompt and typing “telnet 192.168.0.151” and with a simple command “b 192.168.0.100 1833 mqttuser mqttpassword” it started throwing numbers at my mqtt server in home assistant.
Franticly I started pressing buttons on the controller, but couldn’t figure out how to read it as the data was changing so quickly. I turned to node-RED and set up a simple flow, using a “mqtt_in” node subscribing to the topic “P1P2/R/#” and connecting that to a “write to file” node. this gave me more insight, but I found it difficult to decode without knowing what I was doing at the time, so I put a simple
“function” node between to add a timestamp
var d = new Date();
var t = d.getTime();
var payload = {"time":t,"payload":msg.payload}
msg.payload = payload
return msg;
Armed with this I started with some simple tests, turn the power on, change modes, and change the temperature setpoint. here is quite literally less than 2 seconds of data from the bus, from the great
documentation on Arnold’s GitHub I quickly figured out that the first byte 00 was from the main controller, the second byte F0 was to the Aux controller and the third byte 38 is the type of message. in the second line its the other way, 40 means reply, F0 means from the Aux controller and 38 is still the type.
{"time":1661920109585,"payload":"R T  0.026:
00F038000060001C00110018005101002A00C0E6"}
{"time":1661920109632,"payload":"R T  0.026:
40F03800601C00110018005101000000C00019"}
{"time":1661920109669,"payload":"R T  0.026: 800018000000000000008A"}
{"time":1661920109816,"payload":"R T  0.121: 0000110000030F0011C80000004A"}
{"time":1661920109869,"payload":"R T  0.048: 4000110000000000157B005C"}
{"time":1661920109877,"payload":"R P
00000E00000F72007A120000000000000000000000000093"}
{"time":1661920109878,"payload":"R P
40000E00000C02000000000000000017700003000003E9A2"}
{"time":1661920109900,"payload":"R T  0.026: 0008200461"}
{"time":1661920110062,"payload":"R T  0.131:
00F038000060001C00110018005101002A00C0E6"}
{"time":1661920110113,"payload":"R T  0.026:
40F03801601C00110018005101000000C00099"}
{"time":1661920110283,"payload":"R T  0.028:
0000100160001C00110002000000000080400100000000F8"}
{"time":1661920110286,"payload":"R P
00000F1D03050B080000003209C400000300010003090097"}
{"time":1661920110287,"payload":"R P
40000F01015358007B0000010200000000002009F1000072"}
{"time":1661920110287,"payload":"R T  0.067:
400010010060001C0011003A000000000080000001000000"}
{"time":1661920110288,"payload":"R P
00000D0000000000000000000000000000000000000000C4"}
{"time":1661920110370,"payload":"R P
40000D0D0A950001191F000000000000000000000000002D"}
{"time":1661920110371,"payload":"R T  0.026:
00F038010060001C00110018005101002A00C03F"}
{"time":1661920110371,"payload":"R T  0.026:
40F03801601C00110018005101000000C00099"}
{"time":1661920110402,"payload":"R T  0.026:
8000100160001C001100020000000000800000000000005F"}
{"time":1661920110541,"payload":"R T  0.136: 0009200430"}
{"time":1661920110696,"payload":"R T  0.122:
00F038010060001C00110018005101002A00C03F"}
{"time":1661920110735,"payload":"R T  0.026:
40F03801601C00110018005101000000C00099"}
{"time":1661920110790,"payload":"R T  0.027:
0000100160001C00110002000000000080400100000000F8"}
{"time":1661920110884,"payload":"R T  0.066:
400010010060001C0011003A000000000005000001000057"}
{"time":1661920110900,"payload":"R P
00000D0000000000000000000000000000000000000000C4"}
{"time":1661920110901,"payload":"R P
40000D0D0A950001192C000000000000000000000000006C"}
{"time":1661920110932,"payload":"R T  0.026:
00F038010060001C00110018005101002A00C03F"}
{"time":1661920110985,"payload":"R T  0.026:
40F03801601C00110018005101000000C00099"}
{"time":1661920111007,"payload":"R T  0.026: 000A2004C3"}
{"time":1661920111168,"payload":"R T  0.119:
00F038010060001C00110018005101002A00C03F"}
{"time":1661920111199,"payload":"R T  0.026:
40F03801601C00110018005101000000C00099"}
{"time":1661920111254,"payload":"R T  0.027:
0000100160001C0011000200000000000540010000000030"}
{"time":1661920111347,"payload":"R T  0.065:
400010010060001C0011003A000000000005000001000057"}
{"time":1661920111356,"payload":"R P
00000D0000000000000000000000000000000000000000C4"}
{"time":1661920111357,"payload":"R P
40000D0D0A9500011936000000000000000000000000007C"}
{"time":1661920111394,"payload":"R T  0.026:
00F038010060001C00110018005101002A00C03F"}
{"time":1661920111443,"payload":"R T  0.026:
40F03801601C00110018005101000000C00099"}
{"time":1661920111472,"payload":"R T  0.026: 00001F31"}
{"time":1661920111519,"payload":"R T  0.031: 4000FFE3"}
Using my phone to record a video while I pushed buttons meant I could accurately associate the time to the changes in the data it didn’t take long to come up with some tables, I didn’t manage to figure every byte, but I got the main things at least.
00 F0 38 message from master to slave
byte 3 00=off, 01=on, 03=turn on, 02=turn off
byte 4 00
byte 5 60=fan, 67=dry, 63 auto, 62=cool, 61=heat
byte 6 00=fan only, 01=heat, 02=cool
byte 7 19 current master set temp cooling in hex 25c (16-32c range- 10
to 20 hex)
byte 8 00 when slave equal, 80 when changed
byte 9 11=fan low, 51, fan high, D1=change to high, 91=change to
low  (cooling and fan mode)
byte 10 00
byte 11 20 current master set temp heating in hex 25c
byte 12 00 when slave equal, 80 when changed
byte 13 11=fan low, 51, fan high, D1=change to high, 91=change to
low (heat mode)
byte 14 01
byte 15 00
byte 16 2A
byte 17 00 goes to 01 next message after reply with 01 in byte 11,
sent out twice
byte 18 C0

40 F0 38 reply slave to master
byte 3 00=off, 01=on
byte 4 60=fan, 67=dry, 63 auto, 62=cool, 61=heat
byte 5 19 current master set temp cooling in hex 25c
byte 6 00
byte 7 11=fan low, 51, fan high (cooling and fan mode)
byte 8 00
byte 9 20 current set temp heating in hex
byte 10 00
byte 11 11=fan low, 51, fan high (heat mode)
byte 12 01
byte 13 00
byte 14 00 clear error codes. Goes to 01 for 1 message
byte 15 00
byte 16 c0
byte 17 00
I quickly realised I was missing temperature values, so I borrowed the wife’s hairdryer and started warming things up. it didn’t take long to figure out the temperatures, Arnold and others had figured out the Daikin method of encoding so I knew what to look for and how to convert it.
00 00 11 Master to heatpump status
byte 3 00
byte 4 00
byte 5 03
byte 6 0F
byte 7 00
byte 8 14 F8.8 temperature master
byte 9 C6 F8.8 temperature master
byte 10 00
byte 11 00
byte 12 00

40 00 11 Reply heatpump status
byte 3 00
byte 4 00
byte 5 00
byte 6 00
byte 7 00
byte 8 17 F8.8 temperature inside air intake
byte 9 F1 F8.8 temperature inside air intake
byte 10 00
byte 11 00
byte 12 00
I fed all this information back to Arnold, expecting him to take a while to figure out how to control it, within a day he had sent me a new firmware image with the code required to try controlling the AC.
Initially it worked great, I could power on and change modes but I ran into issues with fan speed and temperature control, looking into the code I realised a simple bug with the way the main controller flags to the aux controller and the way the aux should respond. Another few hours later I had a new build firmware ready to load. over the next few days we logged data and noted a few read errors which as a safety feature of the device inhibit controlling the AC. Arnold has been working hard changing the “scope mode” of the device which measures the timing of the falling edge and validates the read
data and the data written to the bus. these have now been resolved and the latest firmware seems to be rock solid. There was also some other little bug fixes, rate limiting some of the MQTT data, right down to the nitty gritty, like changing the degree symbol to the standard one home assistant uses so temperatures from the device can be graphed against others.
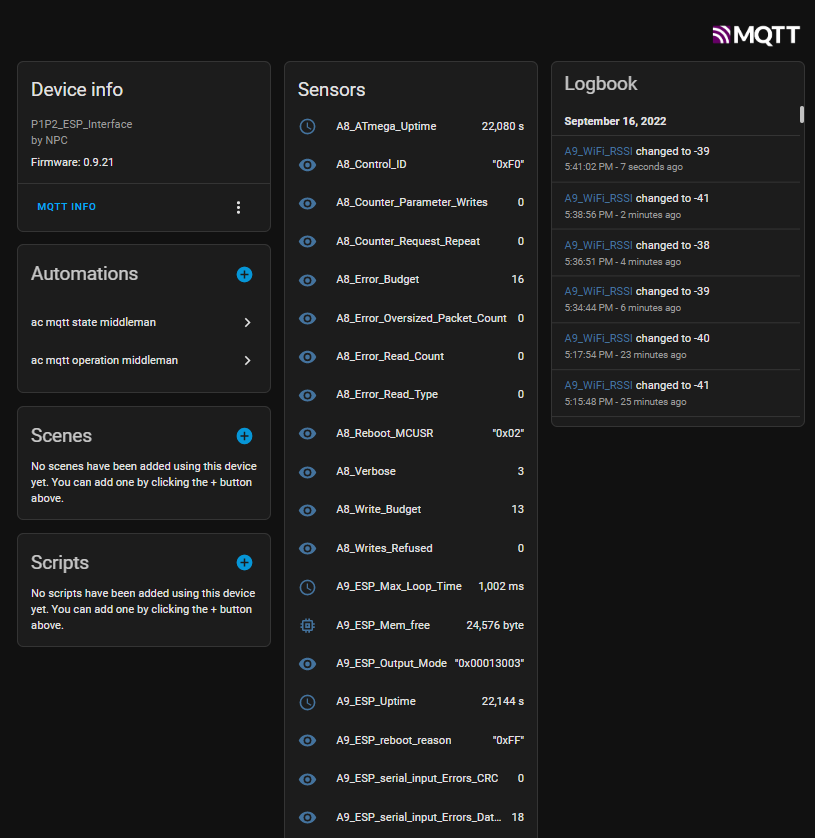
The device itself transmits via MQTT, and has auto discovery setup for home assistant. here are some of the relevant data points…


During the analysis of the data and the temperatures being passed around I noticed that the Aux controller temperature is never used, only the master controller… this was unexpected! and explains why the temperature control was so poor in the first place, at night to save energy we would set the zones to just the bedrooms, not the kitchen and living areas - so they would remain warm while we froze at 3am!. Just knowing this 1 piece of information will save us a load of energy, while we cant change the temperature reported by the master controller, we can adjust the setpoint knowing the temperature of the master, and the temperature of the bedrooms.
Here is some graphed data, the AC Intake and Output temperatures are from the ESP32 I set up with BME280’s in the intake/output ducts, all the other data is from the P1P2 device. also note the compressor status changing as it cycles on and off.

The next step was getting a user interface to control the AC, telnet was OK for me but ranks very low on the wife acceptance factor! Arnold is busy putting together some new firmware called P1P2MQTT which will simplify the process dramatically in setting this up, but I’m impatient, so I went and made a couple of automations to control the unit now. At the moment the device is setup for HA MQTT discovery, however the data needed a bit of work to make it nicely work with the MQTT-HVAC integration. I’ve setup 2 automations, one for feeding states into the HVAC integration, and another to control the device. setting up the MQTT HVAC also means that I can expose it to Google home and voice control the AC from anywhere in the world, and create automations and reminders based on other inputs, like Solar production
alias: ac mqtt state middleman
description: ""
trigger:
  - platform: mqtt
    topic: P1P2/P/125/S/2/Target_Operating_Mode
  - platform: mqtt
    topic: P1P2/P/125/S/2/Actual_Operating_Mode
  - platform: mqtt
    topic: P1P2/P/125/S/2/Fan_Speed_Cooling
  - platform: mqtt
    topic: P1P2/P/125/S/2/Fan_Speed_Heating
  - platform: mqtt
    topic: P1P2/P/125/T/2/Target_Temperature_Cooling
  - platform: mqtt
    topic: P1P2/P/125/T/2/Target_Temperature_Heating
  - platform: state
    entity_id:
      - automation.ac_mqtt_middleman
    attribute: last_triggered
condition: []
action:
  - delay:
      hours: 0
      minutes: 0
      seconds: 1
      milliseconds: 0
  - service: mqtt.publish
    data:
      topic: AC/State/Mode
      payload_template: >
        {% set values = { '97':'heat', '98':'cool', '99':'auto', '103':'dry',
        '96':'fan_only'} %}   {% if states('sensor.s2_power_off_on') == '1' %}
        {{ values[states('sensor.s2_target_operating_mode')] if
        states('sensor.s2_target_operating_mode') in values.keys() else
        'unknown' }}  {% else %}  off  {% endif %}
  - service: mqtt.publish
    data:
      topic: AC/State/Action
      payload_template: >
        {% set values = { '0':'fan', '1':'heating', '2':'cooling'} %}  {% if
        states('sensor.s2_power_off_on') == '1' %} {{
        values[states('sensor.s2_actual_operating_mode')] if
        states('sensor.s2_actual_operating_mode') in values.keys() else
        'unknown' }} {% else %} off {% endif %}
  - service: mqtt.publish
    data:
      topic: AC/State/Fan
      payload_template: >
        {% set values = { '17':'low', '81':'high'} %}  {% if
        states('sensor.s2_actual_operating_mode') == '1' %}
        {{values[states('sensor.s2_fan_speed_heating')] if
        states('sensor.s2_fan_speed_heating') in values.keys() else 'off' }} {%
        else %} {{values[states('sensor.s2_fan_speed_cooling')] if
        states('sensor.s2_fan_speed_cooling') in values.keys() else 'off' }} {%
        endif %}
  - service: mqtt.publish
    data:
      topic: AC/State/Temp
      payload_template: >
        {% if states('sensor.s2_actual_operating_mode') == '1' %}
        {{states('sensor.t2_target_temperature_heating') }} {% else %}
        {{states('sensor.t2_target_temperature_cooling') }} {% endif %}
mode: queued
max: 10
description: ""
trigger:
  - platform: mqtt
    topic: AC/Command/Mode
    id: command_mode
  - platform: mqtt
    topic: AC/Command/Fan
    id: command_fan
  - platform: mqtt
    topic: AC/Command/Temp
    id: command_temp
condition: []
action:
  - choose:
      - conditions:
          - condition: trigger
            id: command_mode
        sequence:
          - service: mqtt.publish
            data:
              topic: P1P2/W
              payload_template: >
                {% if (trigger.payload != 'off') and
                (states('sensor.s2_power_off_on') == '0') %} F 38 0 1 {% endif
                %}
          - delay:
              hours: 0
              minutes: 0
              seconds: 5
              milliseconds: 0
          - service: mqtt.publish
            data:
              topic: P1P2/W
              payload_template: >
                {% set values = { 'heat':'F 38 1 61', 'cool':'F 38 1
                62','auto':'F 38 1 63', 'dry':'F 38 1 67', 'fan_only':'F 38 1
                60','off':'F 38 0 0'} %} {{ values[trigger.payload] if
                trigger.payload in values.keys() else '' }}
          - delay:
              hours: 0
              minutes: 0
              seconds: 5
              milliseconds: 0
      - conditions:
          - condition: trigger
            id: command_fan
          - condition: state
            entity_id: sensor.s2_actual_operating_mode
            state: "1"
        sequence:
          - service: mqtt.publish
            data:
              topic: P1P2/W
              payload_template: >
                {% set values = { 'high':'F 38 8 51', 'low':'F 38 8 11' } %}  {{
                values[trigger.payload] if trigger.payload in values.keys() else
                '' }}
          - delay:
              hours: 0
              minutes: 0
              seconds: 5
              milliseconds: 0
      - conditions:
          - condition: trigger
            id: command_fan
        sequence:
          - service: mqtt.publish
            data:
              topic: P1P2/W
              payload_template: >
                {% if states('sensor.s2_actual_operating_mode') == '1' %} {% set
                values = { 'high':'F 38 8 51', 'low':'F 38 8 11' } %}     {%
                else %} {% set values = { 'high':'F 38 4 51', 'low':'F 38 4 11'
                } %}  {% endif %} {{ values[trigger.payload] if trigger.payload
                in values.keys() else '' }}
          - delay:
              hours: 0
              minutes: 0
              seconds: 5
              milliseconds: 0
      - conditions:
          - condition: trigger
            id: command_temp
        sequence:
          - service: mqtt.publish
            data:
              topic: P1P2/W
              payload_template: >
                {% if states('sensor.s2_actual_operating_mode') == '1' %} {{"f
                38 6 " + ("%0x" | format(trigger.payload | int ) | string )
                }}     {% else %} {{"f 38 2 " + ("%0x" | format(trigger.payload
                | int ) | string ) }}  {% endif %}
          - delay:
              hours: 0
              minutes: 0
              seconds: 5
              milliseconds: 0
mode: queued
max: 10
And adding the entity to HA (under MQTT: in config.yaml)
climate:
  - name: aircon
    modes:
      - "off"
      - "auto"
      - "heat"
      - "dry"
      - "fan_only"
      - "cool"
    fan_modes:
      - "high"
      - "low"
    power_command_topic: "AC/Command/Power"
    power_state_topic: "AC/State/Power"
    mode_command_topic: "AC/Command/Mode"
    mode_state_topic: "AC/State/Mode"
    temperature_command_topic: "AC/Command/Temp"
    temperature_state_topic: "AC/State/Temp"
    fan_mode_command_topic: "AC/Command/Fan"
    fan_mode_state_topic: "AC/State/Fan"
    precision: 1.0
    min_temp: 16
    max_temp: 32
    current_temperature_topic: "P1P2/P/125/T/0/Temperature_main_controller"
and a pretty card to show it all off, and dramatically improve the WAF!

type: custom:simple-thermostat
entity: climate.aircon
step_size: 1
sensors:
  - entity: sensor.office_temperature
    name: Upstairs temp
    decimals: 0
  - entity: sensor.t0_temperature_main_controller
    name: Downstairs Temp
    decimals: 0
  - entity: sensor.doubleview_temp_max_0
    name: Forecast Max
  - entity: sensor.a8_write_budget
    name: Changes left
header:
  name: Airconditioner
control:
  hvac:
    'off':
      name: 'Off'
      icon: mdi:power
    fan_only:
      name: Fan
      icon: mdi:fan
  fan:
    high:
      name: High
      icon: mdi:fan-speed-3
    low:
      name: Low
      icon: mdi:fan-speed-1
I cant take credit for much of this, Arnold and others have been working on this project for a long time and the documentation and reverse engineering information is incredible. The forums here have helped me create a cheap smart home where things are local and exactly the way I want them. Hopefully this post will get the project some light, and with a few more devices in the wild they may learn more about the protocol and allow even more control or gathering of more information. Arnold expects to have more devices ready in October and likely another batch in January. He is also actively working on a rewrite of the software, which should simplify things and hopefully in the future cover a lot more models of Altherma heat pumps and VRV Air Conditioners.
Just want to say a big thanks to Arnold and his support in getting this working on such and old and unusual system, his support during the setup was incredible! with no less than 100 email between us over the last 2 weeks.
My next project will be replacing the zone controller pictured next to the original controller with a ESP based relay module, and a current sensor to upgrade the normally binary zones to positional dampers so I can better control airflow to individual rooms, and even use presence sensors to switch off rooms when unoccupied.


