Now sometimes I am seeing some strange begaviour with one radiator at 100% and the other at 0% and sometimes the radiator load is -8000 which obviously gives a negative average. I cases where a radiator does not calcualte a load I am not sure what the default value in the script should be
Internal “opened window” sensor is working just fine, no needs additional one.
Regarding external sensor there is no way to use it directly. Only with additional script help (in HA) and even then TRV uses average temp between 2 sensors. It’s not very obvious and useful as for me.
I already read this issue, but would be fine for me.
Till yesterday I was using Danfoss Link system with 5 thermostats. It was showing 21C but for sure in the room it was colder. If I can average the TRV temperature and external sensor, it would be more comfortable - I hope
Going back to the Danfoss Link the open window sensor was not working at all. In many cases, my wife opened window in the kitchen, and the radiator was fully open and extremely hot. When we closed the window in few minutes we got 24-25C in the room.
So now I’d like to have more comfort and less heat consumption. Now I’m waiting for devices to fully start the HA environment.
I had ordered ConBee II zigbee module and Xiaomi Aquara sensors
Your statement regarding external room sensor is not true. With firmware 1.18 there is a new attribute called “Radiator covered” which basically turns off usage of internal temperature sensor.
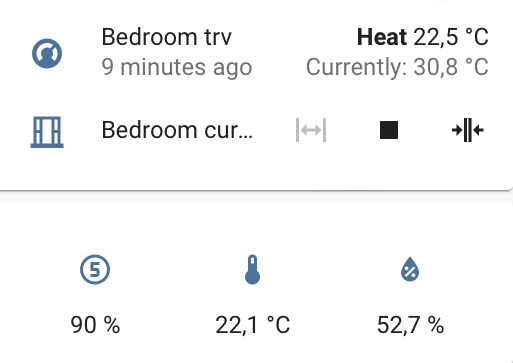
Look at my current bedroom trv. It is detecting temeprature over 30C with setpoint at 22,5 but valve is still opened at 90% because room temperature is still too low.
fair point. This is zha topic and you’re taling z2m and I’m talking deconz But still, 1.18 trv works with external temp sensor much better than before. Cheers!
I did a thermostat card to control my rooms with multiple radiators while still seeing the individual performance. External temperature is what is displayed as the thermostat measured temp. Let me know if you are interested and I can share the code.
“Currently” is the reading of the external temp sensor
The loading icon is the projected load of that TRV, and the average is what I send to both TRV every 30mn as part of the group, so on that page I have the information that should be present (Sent) to each TRV, I guess you could also display the average load and temp coming from the TRV themselves.
I did a pretty simple appdaemon app that controls Ally TRVs through zha, including the load balancing. Code is on github along with the config. There’s also a small module that periodically syncs an external temperature sensor to the TRVs.
I ran into an issue where the load_estimate was negative, but the zha quirk for Danfoss thinks it’s an unsigned int. To fix that I created a small custom quirk (which I put in /config/custom_quirks/__init__.py and then set zha/custom_quirks_path in configuration.yaml):
from zhaquirks.danfoss import DanfossThermostatCluster
import zigpy.types as t


DanfossThermostatCluster.manufacturer_attributes[0x4040] = ("load_radiator_room_mean", t.int16_t)
Now, I don’t know if all of this actually has the intended effect, but at least it seems to be doing the right thing
Recently got an ally and got it integrated in z2m and running in covered mode with external temp sensor. This ally is on the kitchen radiator and the thing is, the radiator is really poorly placed. it is basically behind the counters with a open port over it.
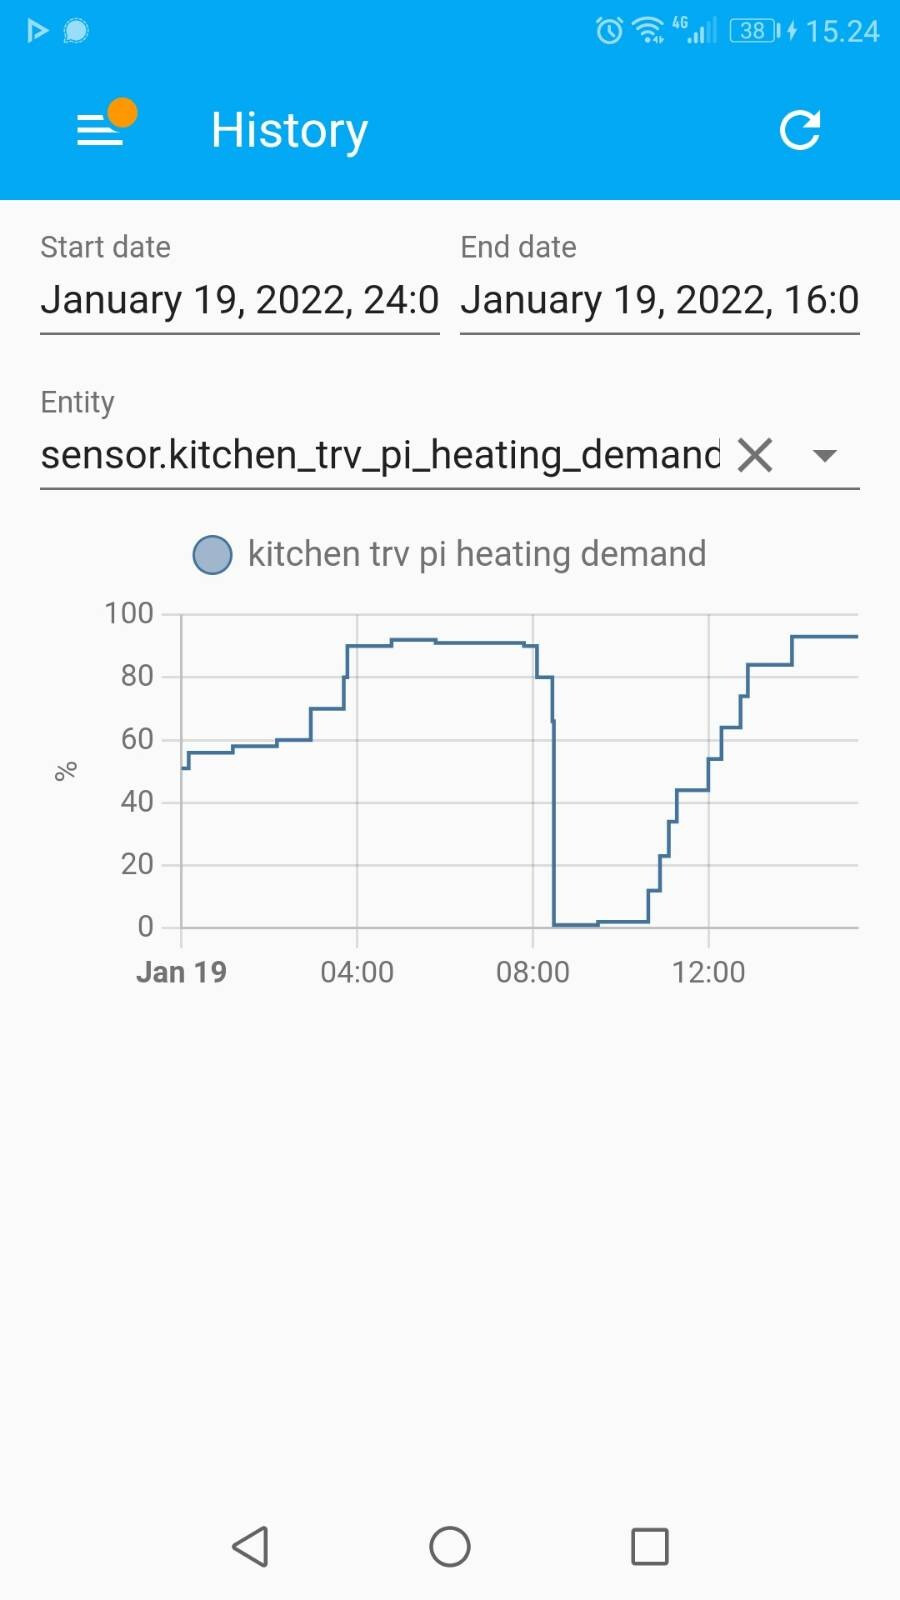
When the room load is more or less constant the ally is able to track the temperature setpoint pretty but it over/undershoots quite a lot and you can also see on the valve opening (picture)
what are you guys experience with the Adaptation run control, as I understand it, the ally will try to “learn” the room and thereby better know how to control the temperature
I’ve seen in other comments that in ZHA people have enabled Adaptation run control by sending commands to the zigbee cluster ID, is there an equivalent way to do this in z2m and do you guys believe it will help ?
I was able to figure out myself how to get Danfoss Ally valve state by reading the PIHeatingDemand attribute periodically. I have updated the firmware of my Allys to version 1.18, haven’t tested this on earlier firmware versions. Here’s how I did it, hopefully someone else might find this useful:
So as first step I created an automation that reads the PIHeatingDemand of my Danfoss Ally TRVs to sensors. Below is an example that creates a sensor called sensor.office_radiator_thermostat_valve_raw and writes PIHeatingDemand to it every 5 minutes
id: read_thermostat_values_to_sensors
alias: Read additional thermostat values and store them to sensors
trigger:
 - platform: time_pattern
   minutes: /5
condition: []
action:
 # Office radiator valve state
 - service: zha_toolkit.execute
   data:
     command: attr_read
     ieee: paste_your_trv_ieee_here
     endpoint: 1
     cluster: 0x0201
     attribute: 0x0008
     state_id: sensor.office_radiator_thermostat_valve_raw
     allow_create: True
Then I created a template sensor that follows the raw value and has a proper measurement unit and an icon set (I tried first customization for the raw sensor, but that didn’t work for some reason):
This is jut one example how to create sensors from Ally TRV attributes. You can easily follow pretty much any attribute just by changing the cluster and attribute values of zha_toolkit.execute service call.
I think there is no need to create a separate sensor if no value conversion or default value is needed.
The sensor state can be updated directly from the zha_toolkit.
Also note that instead of the IEEE address you can provide the entity name, and if there’s only one cluster of type 0x0201 in the device you can even omit the endpoint (but when setting it, zha_toolkit does not have to spend time and energy on finding these values).

 But still, 1.18 trv works with external temp sensor much better than before. Cheers!