Interesting, I didn’t know that Zigbee cluster attributes are available as state attributes of the Ally thermostat entity. How often do the attributes update? If the update interval is acceptable this looks like a very elegant way to get the valve state 
The fastest seems to be about every 7-10min.
And you could configure that using zha-toolkit/conf_report !
+1 If possible I would also ask for instructions on how to do it.
Thank you in advance.
Hi all, first post in this community.
I’ve recently bought these TRVs and installed Home Assistant, still learning home assistant concepts etc. This thread (and a few others) has great amount of info to learn from regarding these TRVs, appreciate the discussions here.
I noticed there is a relatively recent “Programming Guide” document (June 08, 2022) on the official Danfoss support site. Not sure if it was unavailable before, or if it is just a new version, but it has a wealth of information about this product and actually explains some of the odd features that have been discussed here. I’ll outline the main points here, but I encourage everyone to go to the official support site and read it themselves: Danfoss Ally™ support | Danfoss
External Temperature Sensor
There were some guesses in this thread of how the behavior of this TRV is when using an external sensor, specifically in (default) uncovered mode. The guide explains that the eTRV actually still uses it’s internal temperature sensor for operation, but the reported external room temperature is used to set a temperature offset between the internally measured and actual room temperature, and is not measuring by an average between them. This explains why the initial guidelines in this mode were to report this value once every few hours, but not more often than 30 minutes - the offset should not change so often, and should be relatively constant with normal operation. I would imagine this would also save battery life due to less frequent communication. Additionally, it explains that the max offset is ±4 degrees, which also explains why some failed to see big differences in operation, even after putting the external sensor outside.
For covered mode it acts as was already discussed here - the internal measurement is ignored, and that is also why this mode requires more frequent communication.
Alternatively, it seems one could just set a raw offset value.
Load Balancing
They explain how the room load balancing is supposed to work:
The gateway calculates an average of the load for all the
radiators in the room and distributes it to all the eTRVs in the
room via the attribute 0x4040 ”Load Radiator Room Mean”
every 15 minutes.
The Gateway must discard all the values below -500 (too
low) down to -8000 (invalid/inactive) and values older than
90 minutes. The average must then be calculated with the
values from the other eTRVs in the room.
Sending the -8000 value will actually deactivate the feature
Another interesting thing I noticed - there is a manufacturer specific command which can be used to set the heating temperature with different behaviors. The standard approach of just setting the setpoint (which I assume is what happens by default) will, as I understand, gradually change the behavior. However, there is also a “user interaction” setpoint change, which is equivalent to the user physically turning the TRV knob, and will do an aggressive adjustment to arrive at the requested temperature as soon as possible.
During a User Interaction (setpoint change by turning the dial or setpoint change via ”SetpointCommand + UI=1”)
the motor jumps to a much different position regardless of limitations for battery saving and energy
efficiency.
NOTE: The aggressive command (type 1) must not be used all the time for schedule changes!!! If done, it
could reduce comfort, energy efficiency and battery lifetime!
It seems the main intended use case is to pick up when the dial was turned on one TRV, and then this command can be sent to other TRVs in the room, to force them also to do an “aggressive” adjustment, or use it when a user changes the temperature in dashboard.
The document also has nice pictures and operation/communication examples, and also describes other features like display orientation, installation orientation, eTRV internal schedules etc.
I’m still just starting out with Home Assistant, so many home-assistant / zigbee details are a bit over my head for now, but so far most or all of these features seem relatively straightforward to implement.
4 Likes
Interesting stuff! Thank you for the deep dive!
I tried my hand at creating an automation blueprint for updating the external temperature for this TRV. This automation is meant to respect the Danfoss recommended intervals (at least every X, but not more often than Y), though these values have to be configured manually.
It uses the external sensor state change as the primary trigger, and additionally uses a timer to refresh the temperature after the required period, even if the temperature sensor did not change during this time. You have to manually create a timer for each TRV and set the timer interval accordingly - for uncovered mode it should be “at least every 3 hours” (I use 2h30m), and for covered it should be “at least every 30 minutes” because the covered mode will switch off if no reading is received for 35 minutes. I think it is safe to use max values for each timer as it is only a fallback. You should create a new timer for each TRV as it will be reset on each automation activation, so reusing one timer might cause some of the TRVs to go without a reading for a longer time (though technically I think it should be OK to reuse timer if you also use the same source temperature sensor, but I’d still create unique ones to be sure)
For the “Minimum update interval” input you should again use corresponding value depending on if the TRV is in covered or uncovered mode. By Danfoss documentation it should be 30 min for uncovered and 5min for covered.
Here is the blueprint you can put in your /config/blueprints/automation/ or a subdirectory within.
blueprint:
  domain: automation
  name: Ally Temp Update
  description: Update Danfoss Ally TRV external temperature with min/max refresh rate
  input:
    ally_device:
      name: Ally TRV Device
      description: Temperature reading will be sent to this device
      selector:
        device:
          manufacturer: Danfoss
          entity:
            domain: climate
    min_update_minutes:
      name: Minimum update interval
      description: >
        Updates will not be sent if time from last update is less than minimum interval.
        Normally 30min for uncovered, 5min for covered.
      selector:
        number:
          max: 360
          min: 1
          unit_of_measurement: minutes
          mode: box
    temp_sensor_id:
      name: Temperature Sensor
      description: External sensor from which the temperature will be read. Expects data format 12.3
      selector:
        entity:
          domain: sensor
          device_class: temperature
    max_update_timer_id:
      name: Timer entity
      description: >
        Timer that will be (re)started on update.
        Set this timer to slowest interval you want the device to update at.
        Normally 3h for uncovered, 30m for covered.
        Use separate timer for each automation.
      selector:
        entity:
          domain: timer

variables:
  device: !input ally_device
  ieee: "{{(device_attr(device, 'identifiers')|list)[0][1]}}"
  min_update_minutes: !input min_update_minutes
  temp_sensor_id: !input temp_sensor_id
trigger:
- platform: state
  entity_id:
  - !input temp_sensor_id
- platform: event
  event_type: timer.finished
  event_data:
    entity_id: !input max_update_timer_id
condition:
- condition: template
  value_template: >
    {{ as_timestamp(now()) - as_timestamp(state_attr(this.entity_id,'last_triggered'),0)|int
    > (60 * min_update_minutes) }}
action:
- service: zha.set_zigbee_cluster_attribute
  data:
    ieee: '{{ ieee }}'
    endpoint_id: 1
    cluster_id: 513
    cluster_type: in
    attribute: 16405
    value: '{{ (states(temp_sensor_id) | float * 100) | round(0)}}'
- service: timer.start
  target:
    entity_id: !input max_update_timer_id
mode: single
I only tested it briefly so there could be some bugs, but I think it works. Do let me know if someone else tries this if it works for you or not.
edit: had to add default timestamp value, otherwise would fail to run the first time
Hey, nice work, thank you!
Did just install the blueprint and it did not throw an error. Seems like its working, but I don’t know how to test if it really works.
My Card says the thermostat is heating although the temperature is way higher than heating trigger?

Also the temperature the card shows is not the temperature of the external sensor
Which is about 22,7 °C.
As I understood, the external sensor temperature is used to control the heating of the thermostat.
Do you have a hint, where exactly I can see, if this is the case?
Kind regards,
Michael
Yes, the default card will always show the temperature reading from the TRV itself. You can check if the attribute was sent to the TRV by going to the device in settings, and selecting “Manage Clusters” on the device info 3-dot menu. There you should select the correct cluster and attribute (see below) and click “get zigbee attribute”:

The value should be your last sent external sensor reading (i.e. 2270). Worth remembering that the behavior depends on whether your TRV is in “uncovered” (default) mode, or “covered” mode. In uncovered, it calculates an offset from the external reading, but still actually uses the internal sensor. The offset is calculated automatically and limited to ±4 degrees. Whereas in covered mode the internal sensor is ignored, so the external measurement updates are required more often.
At least that’s what Danfoss documentation says.
Judging by other people experiences in this and other threads, it can take a few days for the TRV to “learn” the heating response of the radiator, but it tends to behave well after that. I’m not sure about the state “heating” - we are still not in heating season, so I am just testing my TRVs without actual heating operation, but I also have noticed them being in “heating” mode even if the temperature is higher than the setpoint. I’m not sure how reliable that indicator is.
You can also check the attribute “pi_heating_demand” of the TRV climate entity, which should correspond with the actual open/closed level of the valve. If the measured temperature is higher than setpoint, it should slowly lower.
One last thing to note - I think by default, setting the setpoint through HA or from TRV handle, will initiate the setpoint change command with “user action” command, which will make the TRV to update the setpoint very aggressively, and it can overshoot the target temp. Also something to keep in mind, if you did recently change the setpoint.
Hi Napalm,
all clear and everthing you mentioned is as it should be.
The value is indeed the same as the external temperature sensor, also the mode is uncovered, so the value for heating should be calculated with the offset. I am really curious how this works as soon as heating season begins. If it is not I might switch to covered mode.
pi_heating_demand is currently always on 1 which i assume means 1% opened. Which also then leads to the question if this might be the “anti freezing” heating.
But I have no clue why this started yesterday.
One last thing to note - I think by default, setting the setpoint through HA or from TRV handle, will initiate the setpoint change command with “user action” command, which will make the TRV to update the setpoint very aggressively, and it can overshoot the target temp. Also something to keep in mind, if you did recently change the setpoint.
Do you mean it then might take some time to learn again which the correct target temp?
Regards,
Michael
For me all TRVs are currently on pi_heating_demand 0. Heating season has not begun here either, but I did see different values as well before when I was playing around.
Once heating season starts, I think it is worth manually initating the adaptation run by sending 1 to attribute 0x404C. But I think I will put it in mounting mode and back again before doing that, as documentation states it will not run if valve characteristics is already found (no idea if automatic run already did anything while heating was off).
No, it should not impact learning. What I meant was that the “aggressive” manual control might overshoot when actual heating is being done - for example, your room temperature and setpoint is at 18, you feel cold so you turn the dial or set from HA target temp to 22. The TRV reacts immediately and tries to get to 22 as fast as possible, bypassing the gradual “learned” response, but since there is a delay until the room heats, it might easily overshoot to, for example, 25, and take time to cool down again. But I don’t think it impacts learning itself, so it should still end up following the external temp sensor, as long as that value is sent to it regularly.
But since I see now you are also not in heating season yet, I don’t think that is the case.
Hi everybody,
As many I’m preparing for winter and so checking that everything works fine.
I’m wondering about a functionality that I have not been using last year : Heat Available (attribute 0x4030). The documentation says " by default the heat is considered on if the gateway does not send any info about that".
The thing is that my boiler is not always on and I start to think that this could mess with PID
So, my question is : am I wrong not using it since the beginning? Is anybody using it to declare that the boiler is on ?
Thanks for your answers!
When the valve is “1%” open, there generally is no water flow. Depending on the valve water flow could easily start only at 30% and more.
No K can be read as Kelvin, and I think it stems from the fact that a valve needs to have a 2K range regulation according to EN215 standard.
Thanks for sharing.
I modified the script to avoid the external timer.
The technique is to add an internal delay and the restart mode.
So either the delay expires and the temperature is sent again, or a temperature is received and then the automation restarts.
I also added a temperature offset.
And I converted it to zha-toolkit, which is not necessary, but then I can add it as an example there.
Maybe the automation should not send the temperature after 150 minutes or more, because that is more a failsafe. By sending an old temperature, the TRV might suppose it is too cold, while in reality it is too hot.
So I’ll likely remove the long delay.
You may update the original blueprint if you like to avoid relying on zha-toolkit.
I have been pondering about this and might add an automation to turn HEAT to off when the boiler is off as well.
Any suggestions if I should go with Radiator Covered or Uncovered mode? My radiators are NOT covered, but I understood if setting the TRV to Radiator Covered, it will rely only on the external remote temp sensor. Or do you guys have a better experience with the built-in “learning” algorithm, which relies on both sensors?
Here is about two weeks worth of uncovered remote temperature setting - and I think there is an issue since Nov 15 at about 13:00 because the temperature then suddenly drops.
The remote temperature is in magenta/purple - it’s temperature is offset by 0.5°C to the real temperature so I send it corrected by 0.5°C to the valve.
Orange is the setpoint and blue is the temperature measured by the valve.
The peak on Nov 11 is when the valve was removed for a short while to see if another radiator was mounted correctly - so that is body heat. Also at that time, the “boiler” wass off.
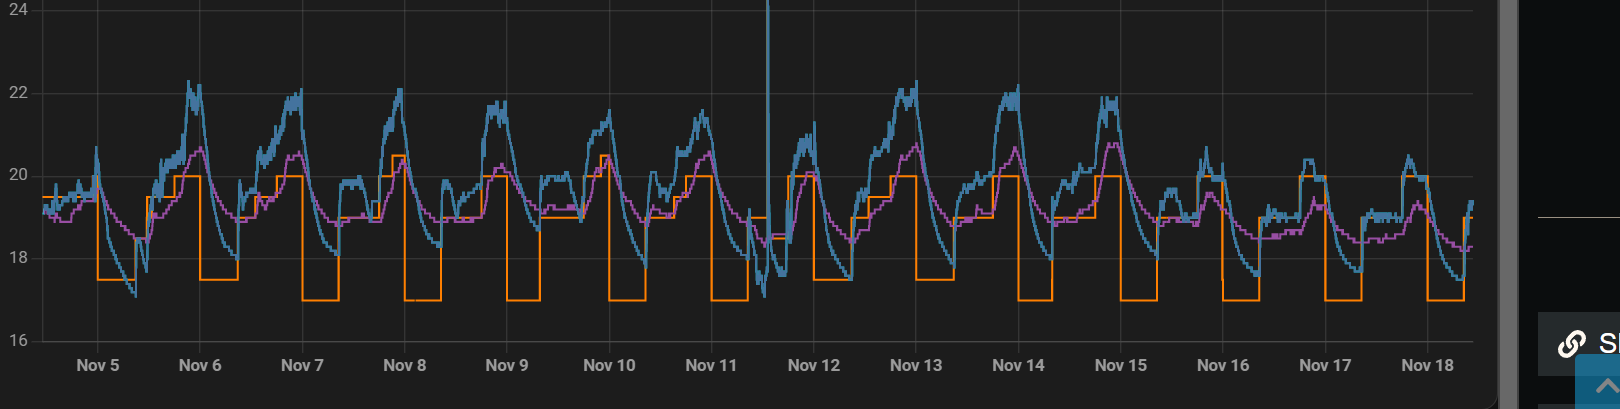
These last 3 days, when the remote temperature repoting is apparently dysfunctionnal.
I find it very hard to claim that with the remove temperature sensor it does a very good job, but when regulating the local temperature it is pretty much perfect.
Edit: the remote temperature update was not working because I cleaned up my automations and I deleted the working ones - recreating the automating from the blueprint makes it work again.
I’ll probably be turning my boiler on or of depending on whether or not at least one TRV is requesting heat.
I updated the remote temperature automation so that when the 30 minutes have passed, the temperature sensor value is incremented with 0.001 °C.
That way, when the sensor value is reported again, HA will see that as a change, and therefore trigger the automation.
The increase by 0.001°C does not trigger the automation itself as it is running at that time and it is in the “single” mode.
‘zha_toolkit.ha_set_state’ was just added to zha_toolkit, so that makes zha_toolkit a requirement with this method.
EDIT: I checked my logs and a temperature is sent to the TRV about every 30 minutes (no earlier than 30 minutes and generally less than 33 minutes).