Goal was to have a wall-mounted touchscreen display without battery/charging topics, that would start in a kiosk-like mode.

Shopping list:
-
Raspberry pi starter kit like this one (I used the 4GB version to also allow running youtube videos smoothly since the display is mounted in the kitchen area): Raspberry Pi 5 8GB Starter-Kit | 128GB microSD | Offizielles 27W Netzteil | Offizielles Gehäuse mit Lüfter | 4K Micro HDMI Kabel 1m | Alu-Kühlkörper: Amazon.de: Computer & Zubehör
-
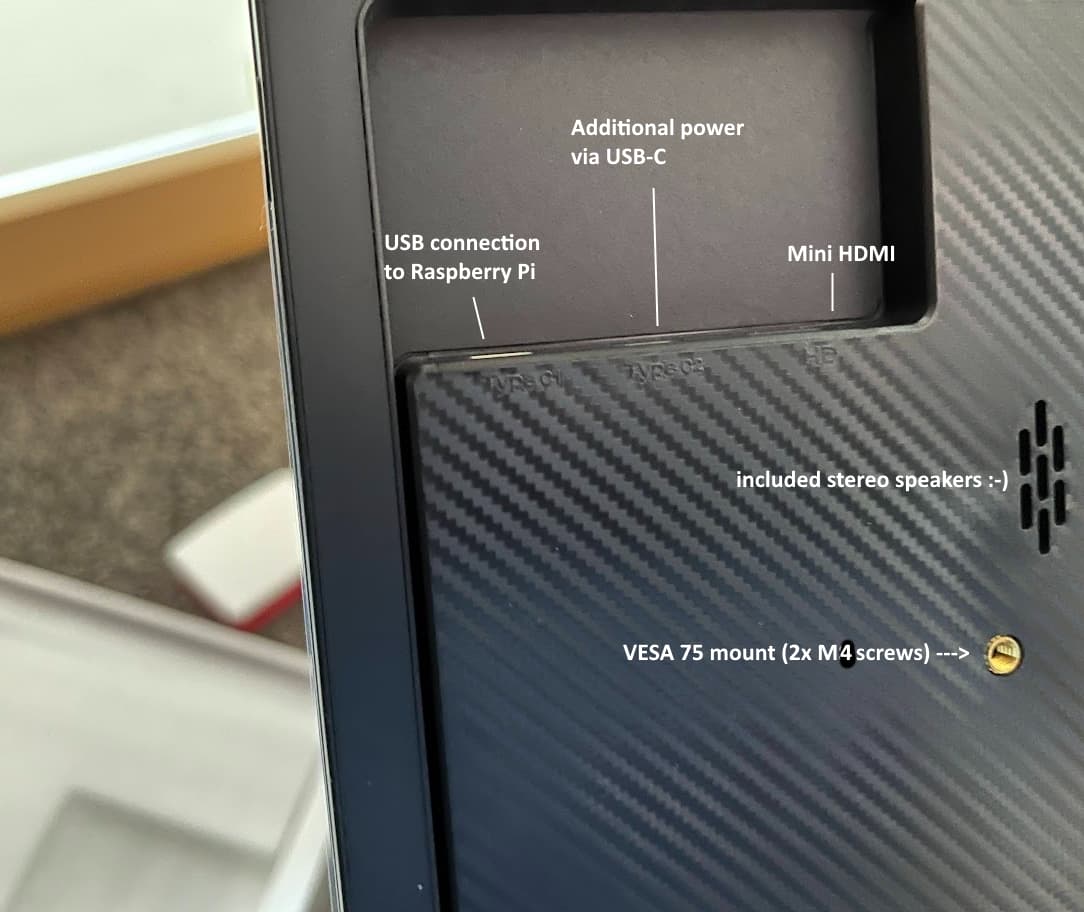
Wall mount: https://www.bauhaus.at/tv-wandhalterungen/schwaiger-tv-wandhalterung-fixed-1/p/25631519 (the included screws did not fit the VESA 75 mounts on the display, so I used two short M4 screws)
-
Mini HDMI to HDMI adapter (to allow connecting the HDMI/Micro HDMI cable from raspberry): https://www.bauhaus.at/hdmi-kabel/hdmi-adapter/p/26082794?search_p=true&adb_search=hdmi%20mini
-
To provide a simple way to operate the raspberry pi throughout the setup process, I also connected a USB keyboard/touchpad like this one: Rii i8 Mini Tastatur Wireless, Smart TV Tastatur, Kabellos Tastatur mit Touchpad, Mini Keyboard für Smart TV Fernbedienung/PC/PAD/Xbox 360/ PS3/Google Android TV Box/HTPC/IPTV: Amazon.de: Computer & Zubehör
Wiring of touchscreen:
setup:
-
put raspberry pi OS (debian bookworm 64-bit) on SD card with raspberry pi imager (enable SSH access and wifi connection in image configuration)
-
installed the matchbox on-screen keyboard and enabled it as additional application via right click on the top left menu (terminal icon)
-
for the matchbox keyboard to display properly, I had to switch the window manager from wayland to X11 via „sudo raspi-config“ in the terminal (or via ssh)
-
setup a dashboard called „kalender“ in home assistant, copied the URL
-
test run of chromium browser via ssh/terminal command:
Trying to run the chromium command directly, gave me a „Display …“ error, so I tried to place a command first that gives control over the screen (run in terminal/ssh as @raspberrypi:~ $:)
export DISPLAY=:0.0
chromium-browser --noerrdialogs --disable-infobars --kiosk http://192.168.0.110:8123/dashboard-example/kalender
these two commands after each other should start up your dashboard URL smoothly.
Furthermore, I disabled startup error messages in chromium (source by https://web.archive.org/web/20210225045501/https://desertbot.io/blog/raspberry-pi-touchscreen-kiosk-setup) :
Remove exit errors from the config files that could trigger a warning (run these in the terminal/ssh):
sed -i ‘s/“exited_cleanly”:false/“exited_cleanly”:true/’ ~/.config/chromium/‘Local State’
sed -i ‘s/“exited_cleanly”:false/“exited_cleanly”:true/; s/“exit_type”:“[^”]+"/“exit_type”:“Normal”/’ ~/.config/chromium/Default/Preferences
To enable autorun of the startup commands, I created a .desktop file in /etc/xdg/autostart with the nano editor:
sudo nano /etc/xdg/autostart/chromium_autorun.desktop
in nano, I pasted the prepared commands (this is the full file content):
[Desktop Entry]

Type=Application

Name=chromium_autorun

Comment=Autostart chromium

NoDisplay=false

Exec=export DISPLAY=:0.0

Exec=chromium-browser --noerrdialogs --disable-infobars --kiosk http://192.168.0.110:8123/dashboard-example/kalender
Save the file in nano with CTRL+o, then
Exit nano by CTRL+x
sudo reboot
to reboot into your nice start-up
Next up on the project: Setting up presence detection to cut off power to the screen after a few minutes with no presence. Only cutting off the power for the display did not work, since the screen still tries to draw sufficient power from the raspi. So I am getting a wifi-connected USB plug to also cut power via the display – raspberry USB connection.
For the time being, I left screen blanking on in the raspi configuration.