I love the sound of mechanical doorbells, especially Westminster chimes. Sure, modern electronic chime products replicate the sound, but there is something nostalgic about mechanical chimes that I find pleasing. A few years ago I selected the Craftmade C3-PW [1] for my home but this article describes my journey to upgrade my smart home to include a video doorbell in a way that works with the Westminster chime.
My enjoyment of mechanical doorbells has created some challenges when integrating modern video door bells. Not all video doorbells can work with electro-mechanical chimes. Those that do, specify the simple chimes with a single solenoid to ring the bell (ding dong). The Westminster chime unit includes a more complex internal mechanical and electrical arrangement that is not supported by video doorbells.
I selected the Amcrest AD410 as my video doorbell. This product was mentioned fairly often during my research and folks seem to like it, so I gave it a try. I put some of my research in the reference links below. It works adequately and for now I’m not motivated replace it. I may change my mind later!
The first installation solution I thought about was to separate the operation of the video doorbell from the chime units and integrate them with a Home Assistant automation. This approach uses something like a Shelly Uni [3] to operate the doorbell and use Home Assistant to monitor the video doorbell button press. This method is attractive because everything is available for purchase and integration is a software solution in home assistant. There is an integration already for the AD410 and for the Shelly Uni. Plus Home Assistant can disable the bell on command or on a schedule if desired4.
But I decided against this approach because the trigger timing can be slow and sometimes unreliable in HA. Plus some of my z-wave automations take a few seconds to execute on occasion. Plus if Home Assistant is down for any reason, the doorbell does not work.
The maxim I try to work by with home automation projects: things should still work manually if the automation system fails completely. In this case I’m interested only in recording the door cameras locally and the doorbell buttons must operate and announce a visitor as long as power is available.
The method I finally went with uses a couple of relays to interface the the video doorbell and the mechanical chimes. The AD410 and its chime kit drives a relay coil and the relay contacts replace the manual door button to operate the chime. The circuit schematic is shown in figure 1 below.
A single 30VA transformer powers both chimes and AD410s, one for the front door and another for the side entry.
One pole of each DPDT relay operates the bell on the main floor, the second pole operates the remote chime located on the terrace level.

Figure 1
The relay solution has introduced some complexity because I decided to layout a circuit board to meet some additional needs:
- 16VAC relays are not common and expensive. While 12VDC relays are cheap and plentiful
- Separate the upstairs and downstairs chime units using a double pole relay
- Add a terminal block to eliminate wire nuts and tidy up the installation.
The schematic for the relay module is shown in figure 2 below.

Figure 2
The value of C1 is selected to control AC ripple to the relay coil. R1 further reduces the DC voltage so that the relay sees 12VDC at its coil. The dry contacts support high current and the AC voltages to drive the bell circuits. The configuration jumpers JP1 and JP2 are not populated (the red X) and can select either the normally open or normally closed contacts for output to terminal block J1. I use the normally open contacts.

This assembly is sized so that two relay modules and two Amcrest chime units can fit inside the C3-PW chime. KiCad schematic and pcb layout of the relay module are available on github [15].
Assembly includes attachment of the relay modules, the Amcrest chime modules and wiring all internal connections to the C3-PW. This allows the entire assembly to be bench checked before final installation. The only connections to be made while standing on a ladder are to the house wiring from the doorbells, the downstairs bell and to AC power for the transformers.
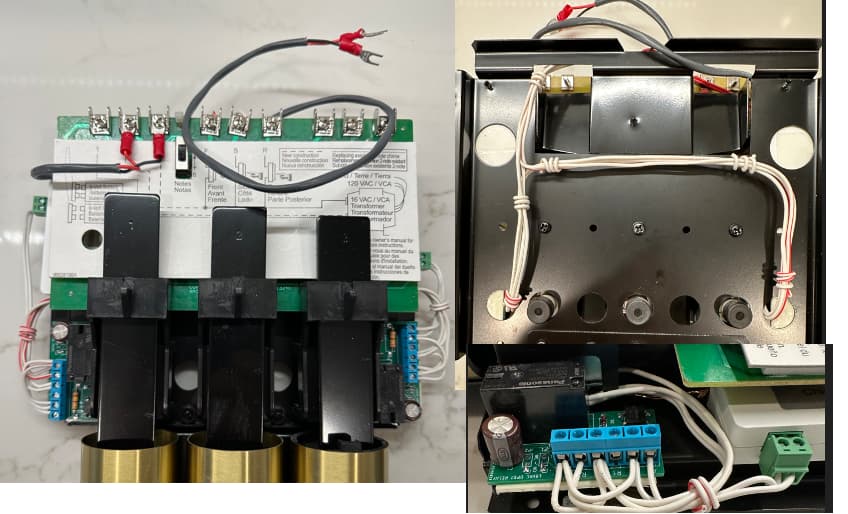
The figure below shows the completed assembly before final installation to the house wiring.
The AM410 is delivered with an internal setting that disables the external mechanical chime. I had to change this default to make the doorbell ring. See reference 6 for the method to change this setting using the API. This setting can be adjusted in the mobile app too.
Also, the blue ring light around the button flashes when it looses its cloud connection. There appears to be a watchdog for the flashing light behavior. If a selected API register is not written periodically, the button flashes. The article in reference 14 describes the register and a binary reset sensor in Home Assistant that will periodically “pet the dog” to stop the annoying button flash sequence without cloud access.
This solution was certainly a bit more involved than I would like. It needed a custom circuit assembly. For me, home automation is a hobby and I like to make things work the way I think they should.
I always try to make automation solutions in a way that does not require any special training for those that are expected to live with it and should not require a mobile app or additional interfaces to operate. Anything that is too complex is unused or a demand to change it is quickly given. Also, it should work more or less the same as the un-automated solution, but smarter!
In the case of the doorbell, the door buttons are replaced with a video camera. The button works the same and rings the bell inside to announce a visitor at the door. It is smarter because now I record the video from the door camera for the day I hopefully never need it.
Presently, the Amcrest app and cloud service are used only for initial setup of the cameras. The AD410s operate on a vlan and I remove internet access for them after they are initialized. BlueIris can record directly from the cameras.
This paper describes the basic installation of the video doorbells and some simple automations to keep it working.
Next projects include:
• Virtual peep hole to show who is at the door on a remote device
• Video intercom to talk to whoever is at the door.
These next activities will include more interesting support from Home Assistant.
Stay tuned for my next installment of this project.
References
- Westminster Chimes Chime in Pewter - C3-PW
- DIY Smart Doorbell for just $2, no soldering required » Frenck.dev
- Shelly Uni
- Doorbell button > Shelly Uni config
- Wiring up multiple doorbells to a single button
- https://www.reddit.com/r/amcrest/comments/rl1hm1/ad410_doorbell_doesnt_ring/
- Doorbell Recommendations - #15 by Mark53
- https://www.reddit.com/r/homeassistant/comments/pz7hsb/integration_of_amcrest_ad410_thats_way_easier/
- DoorBird - Home Assistant
- Fully Offline Video Doorbell for Home Assistant - Amcrest AD110
- https://www.reddit.com/r/homeassistant/comments/u09h26/hacompatible_video_doorbells/
- https://www.reddit.com/r/homeassistant/comments/ijd1c0/video_doorbell_setting_up_home_assistant_guide/
- Deep Dive into the EZVIZ DB1 Doorbell with Home Assistant | Sean Blanchfield
- Amcrest Doorbell AD110 API/Local Only
- GitHub - tuxhobo/dpdt-relay-module: Simple relay module uses inexpensive 12V DC relays to control a 16VAC load.