@aceindy The option that was offered is too complicated, you need something simpler. You need something like this. This is a very similar option for this project. I need to extract 9 bytes with changeable bits and show them in the sensor as numbers.
I tried to do it like his, but I ran into a problem. After filling in the code after successful compilation on ESP, an error occurs:
WARNING Can’t connect to ESPHome API for esp32-smart-coffee-philips.local: Error connecting to (‘192.168.1.52’, 6053): [Errno 111] Connect call failed (‘192.168.1.52’, 6053)
and the web interface becomes unavailable. If I comment out the user sensor, the web interface becomes available. I don’t understand how the user sensor blocks the web interface?

Here’s what I did that causes the API to be blocked and after that esp is not available either through the Home Assistant or through the web interface, but I can upload the firmware via ESPHome
esphome:
  name: ${node_name}
  friendly_name: esp32-smart-coffee-philips
  comment: ESP32 Smart Coffee Philips
  includes:
    - /config/esphome/components/smart_coffee_philips_5400/philips5400_sensor.h

sensor:
- platform: custom
  lambda: |-
    auto coffeedrinkcount = new DrinkCountSensor(id(uart_mainboard));
    App.register_component(coffeedrinkcount);
    return {
      coffeedrinkcount->counter_espress,
      coffeedrinkcount->counter_espresso,
      coffeedrinkcount->counter_coffee,
      coffeedrinkcount->counter_coffee_milk,
      coffeedrinkcount->counter_america
      };

  sensors:
    - name: "Espress"
      id: "counter_espress"
    - name: "Espresso"
      id: "counter_espresso"
    - name: "Coffee"
      id: "counter_coffee"
    - name: "Coffee Milk"
      id: "counter_coffee_milk"
    - name: "America"
      id: "counter_america"
The code in the philips 5400_sensor.h component itself
#include "esphome.h"

class DrinkCountSensor : public PollingComponent, public Sensor, public UARTDevice {
  public:
    DrinkCountSensor(UARTComponent *parent) : PollingComponent(600), UARTDevice(parent) {}

  Sensor *counter_espress = new Sensor();
  Sensor *counter_espresso = new Sensor();
  Sensor *counter_coffee = new Sensor();
  Sensor *counter_coffee_milk = new Sensor();
  Sensor *counter_america = new Sensor();

  void setup() override {}

  std::vector<int> bytes;

  void update() override {
    if (bytes[0] == 0xAA && bytes[3] == 0xFF && bytes[11] == 0x55) {
      uint8_t counter_byte = static_cast<uint8_t>(bytes[9]);
      const uint8_t BIT_COUNTER_ESPRESS = 0xD1;
      const uint8_t BIT_COUNTER_ESPRESSO = 0x18;
      const uint8_t BIT_COUNTER_COFFEE = 0xA5;
      const uint8_t BIT_COUNTER_COFFEE_MILK = 0x23;
      const uint8_t BIT_COUNTER_AMERICA = 0x66;

      counter_espress->publish_state(static_cast<bool>(counter_byte & BIT_COUNTER_ESPRESS));
      counter_espresso->publish_state(static_cast<bool>(counter_byte & BIT_COUNTER_ESPRESSO));
      counter_coffee->publish_state(static_cast<bool>(counter_byte & BIT_COUNTER_COFFEE));
      counter_coffee_milk->publish_state(static_cast<bool>(counter_byte & BIT_COUNTER_COFFEE_MILK));
      counter_america->publish_state(static_cast<bool>(counter_byte & BIT_COUNTER_AMERICA));

      bytes.clear();
    }
  }
};


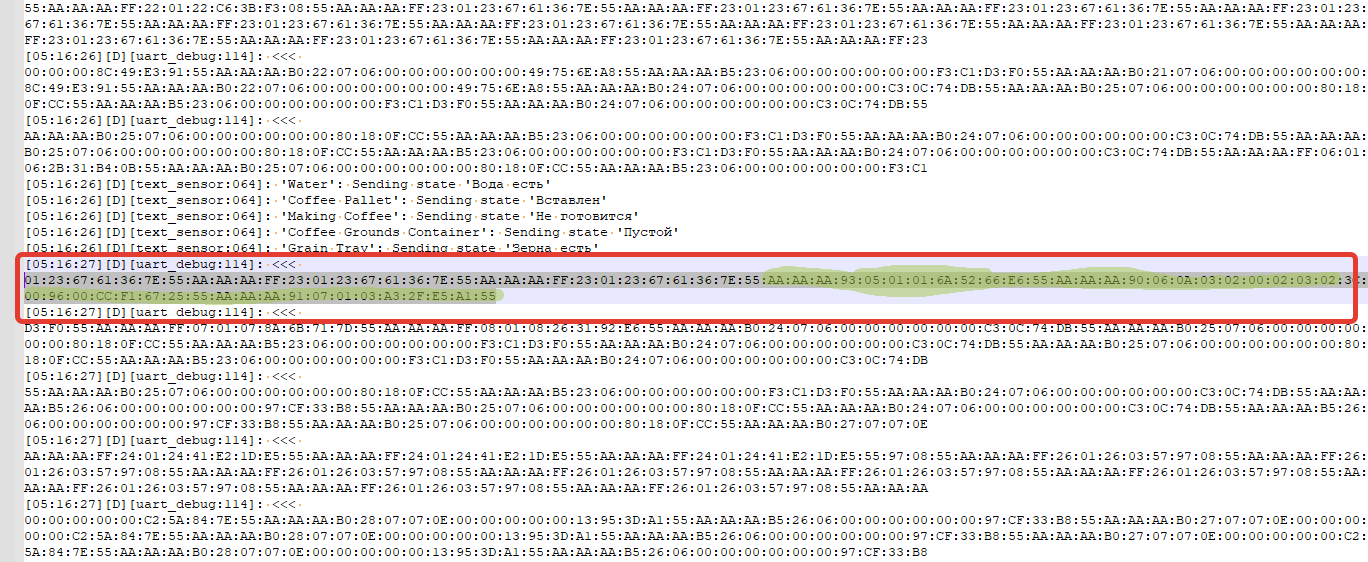
 , I found how to operate a coffee machine. To make coffee, we look in the logs for the address and functions that are listed below, this is the command to start making coffee. Start recording in the log, select the parameters we need (strength, amount of water, number of cups) to make coffee and run, then we find the command in the logs. Why is that? Because then we run what we set in the settings, so you can create a lot of different scripts with different parameters.