On Windows 10 using Hyper-V with hassos_ova-3.12.vhdx.gz !!
Prerequisites:
- A PC capable of running Hyper-V on Windows 64bit, a monitor, an mouse and a keyboard.
- A local installation of Windows 10 Pro / Windows 10 for Workstations / or above with Administrator Access.
- Local Access to the internet, preferably an Ethernet connection to speedup download times but WiFi will work just fine.
- 8Gb of hard-disk space for the files and tools we need to download. 2-3Gb to install the Hyper-V feature; 5-6Gb for the base VHDX file we need to download. (This space can be reclaimed after we have your new HASSIO installation up and running inside Hyper-V)
- An additional 16Gb or 32Gb or 64Gb of hard-disk space for the expanded VHDX. (This is really a mater of preference, however I advise you go big and avoid the need to do this again in the future.)
- 10 minutes to follow these instructions.
Step 1. Installing Hyper-V
Turn on your Computer. After Windows loads to the desktop, left click the start icon in the bottom left of your screen. At the start menu type “Add Features” "

 . In the list scroll down and place a check in the box marked Hyper-V. Click “Ok”. After the feature is added, windows will need to restart.
After you have the feature installed and you have rebooted windows and a back to the desktop proceed to Step 2.
Step 2. Create the folders for the files we are about to download
Create the folders where you want to keep the VHDX file. In my case I chose D:\VHDX\VDISKs\HASS-Original\ Open “File Explorer”


(Just pick a place you will remember, preferably on a fast disk. I recommend putting it in a folder you don’t mind safely keeping as a backup location for your unused VHDX files)
(In my case I chose to use a 2nd NVME disk for this; as I only want my Main OS on my primary boot disk.(NVME 1) keep in mind this can be any disk you don’t need to utilize an NVME, or sata SSD for this. Even a typical hard drive will be faster then the typical sd card installation on a rpi3b.)
Create the fold structure you want. Right click the blank space on the root of the disk you picked, hover over “New” and in the fly-out menu that appears to the right, select “Folder”.

Name the folder VHDX and hit enter. Open the VHDX folder and Right click the blank space, hover over “New” and in the fly-out menu that appears to the right, select “Folder”.
Name the folder VDISKs and hit enter. Open the VDISKs folder and Right click the blank space, hover over “New” and in the fly-out menu that appears to the right, select “Folder”.
Name the folder HASS-Original. Close or Minimize File Explorer.
Step 3. Download "hassos_ova-3.12.vhdx.gz"
Open a browser and Download the VHDX. file linked here from the official https://www.home-assistant.io/hassio/installation/ website. Download the file to the folder we just created in step 2. If your not given the option to pick where to download the file to then just proceed to download the file to your default downloads folder.
Step 4. Locate and Extract the “.gz” file
Extract the file with your choice of software (winrar/7zip/others) I used 7zip for this purpose, But you can use what ever you like. If you already have a program you installed earlier for this then that’s great. If not, then using your browser download the program you intend to use to extract the “.gz” file with. Install it and fallow the setup prompts. Once its installed Open the program. Using the Program Navigate to where ever you downloaded the “.gz” file earlier. In my case its “D:\VHDX\VDISKs\HASS-Original” but if you downloaded the file to the default downloads folder now is your opportunity to move the “.vhdx” file while its being extracted from the “.gx” file. Make sure to extract the file to the folder you created earlier but in your case up one folder to the “D:\VHDX\VDISKs” folder . This helps you to avoid moving the .vhdx file later. (Remember; Each time you move a file you increase the possibility for the file to become corrupted.)
Step 5. Open Hyper-V Manager
Left click the start menu icon in the bottom left of your screen and type “Hyper-V” now hover over “Hyper-V Manager” and right click. in the Menu that opens select “Run as administrator”.


Step 6. Expand the .vhdx
With Hyper-V Manager open, on the right “Actions” menu find where it says “Edit Disk…” and left click “Edit Disk…”.


With the “Edit Virtual Hard Disk Wizard” open, click “Next >” to get passed the “Before You Begin” Page. Now from the “Local Disk” Page, Browse to the location of the .vhdx file we extracted in “Step 4.” Select the .vhdx file and click “Open” to close the browse menu.
Back on the “Wizard” click “Next >” to go to the “Choose Action” page. Select “Expand” and Click “Next >” to go to the “Configure Disk” page. In the box Provided type your desired size in Gigabytes for the disk you want to end up with.

(Note the file we Downloaded earlier is an expanding .vhdx file. This procedure will not yet actually increase the file size of this file on disk.)
Now with your desired size typed into the provided box click “Next >” to go to the “Summary” page. IF all looks well and is how you desire the file size to be on the “Summary” page then click “Finish”.

Close or Minimize the Hyper-V Manager window.
Step 7. Open Disk Management and attach the .vhdx
Hover your Mouse over the Windows Start icon in the bottom left corner of your screen and RIGHT click. Now in the Pop-Out Menu move up to where it says “Disk Management” and left click.

Now with the “Disk Management” Window open, On the Top Menu, Hover over Where it says “Action”. Select “Attach Vdisk”. Click “Browse” to Browse to the .vhdx file we just Expanded in “Step 6.” (D:\VHDX\VDISKs\hassos_ova-2.12.vhdx) Select it and Click “Open”.

!!!Make sure to SELECT the “Read-only”!!! check box on the bottom left of the window. After you make sure it is ticked (This Part is not exactly mandatory, But I don’t want Windows trying to alter the contents of this Linux Disk in Anyway. So that’s what I did.) then Click “OK”.
Now with the VDISK attached as Read-only scroll down to the bottom of the bottom window. you should see your vdisk file attached and highlighted on the left in blue. The Diagram portion on the right side of the window should now show a bunch of different partitions in the disk we just attaced. The last box on the right should be the blank un-partitioned space we just added, it should be black and should show you how much free space we now have in the disk.
Once we copy this disks contents to the new VHDX file we will create for our Virtual Machine and boot it for the first time, HASSOS will automatically expand the data partitions to use the extra space we created. (This Will Only Happen on the first Boot)
Step 8. Create a New VDISK
Now with the “(D:\VHDX\VDISKs\hassos_ova-2.12.vhdx)” disk attached, go back to “Hyper-V Manager”. Left click the start menu icon in the bottom left of your screen and type “Hyper-V” now hover over “Hyper-V Manager” and right click. in the Menu that opens select “Run as administrator”.
Now with “Hyper-V Manager” opened, on the right “Actions” menu find where it says “New” and left click “NEW” In the Menu that Opens click “Hard Disk…”.
In the “New Virtual Hard Disk Wizard” Click “Next >” to go to the “Choose Disk Format” Page. Now make sure that “VHDX” is selected and click “Next >” to go to the “Choose Disk Type” Page.

On the “Choose Disk Type” Page make sure “Dynamically expanding” is selected and Click “Next >” to go to the “Specify Name and Location” Page.

On the “Specify Name and Location” Page in the top box provided Type a Name for your New Expanding VHDX disk that we will use to boot HASSIO. (I named mine “hassio64.vhdx” the “64” part represents the size in gigabytes that I expanded the vdisk to, this is just make this easier to identify this disk later if you end up making additional copies with different sizes). Now in the second provided box type the location where you want to store this disk or click browse to select the location we created earlier in Step 2.
Once you have selected the location to create and store your new expanding .vhdx file click “Next >” to go to the “Configure disk” Page.
Now on the “Configure disk” Page Select the second option down, “Copy the contents of a specified physical disk:”. in the provided menu select the disk we attached earlier in “Step 7.”. You should be able to tell which disk it is based on its size. The correct disk should also be the last disk in the list and should have the highest number in the list. In my case it was disk 17 ie… (\.\PHYSICALDRIVE17 64 GB). After you have selected the correct disk click “Next >” to go to the “Summary” Page.
Now on the “Summary” Page if all of your desired setting look good and are the way you want them then click “Finish”.
Step 9. Detach the .vhdx disk that we expanded and then copied in the 2 previous steps.
go to the taskbar and maximize “Disk Management” if you disk not close it previously. Or re open “Disk Management” the same way we did earlier if you did closed it by; Hovering your mouse over the Windows Start icon in the bottom left corner of your screen and RIGHT clicking.
Now with the “Disk Management” Window opened, scroll down to the disk we attached earlier. (this will most likely be the last one in the list on the bottom, it should have the same bluish highlighed color to denote that it is a mounted virtual disk. the disk should also be listed as “Read-only”, and should be the same size as the disk we expanded earlier) after you are sure you have the right disk, right click on the left side of the window where it shows the disk number. Once you have right clicked the correct disk select “Detach Disk” from the fly-out menu that appeared.
This opens a window where you could browse to a disk to detach, but you should be able to just click “OK” and proceed with detaching the disk.
 Now Close the “Disk Management” Window and go Back to Hyper-V Manager.
Step 10. Create a New Virtual Machine using the disk we just created in “Step 8”.
Now with the “Disk Management” Window closed, Go Back to “Hyper-V Manager” on the task bar. If you closed in previously open it again by, Left clicking the Windows Start menu icon in the bottom left of your screen and typing “Hyper-V” again. Now hover over “Hyper-V Manager” and right click. In the Menu that opens beside “Hyper-V Manager”, select “Run as administrator”.
Now with “Hyper-V Manager” opened, on the right “Actions” menu find where it says “New” and left click “New”. In the Menu that Opens, click “Virtual Machine…”.

In the “New Virtual Machine Wizard” Window that opens click “Next >” to go to the “Specify Name and Location” Page.
Now on the “Specify Name and Location” Page, type a name for your new Virtual Machine.
I chose “HASSIO”. You can choose to name your virtual machine anything you like.

( If you desire, you can leave the Default directory for Virtual Machine files alone, by not ticking the check box to “Store the virtual machine in a different location”.)
My suggestion is to make sure the check box below that is selected. Put a check in the box marked “Store the virtual machine in a different location”. Now with the check box ticked, in the second provided Text box, you can either; type the location for the virtual machine files to be created; or choose browse to browse to a location. My suggestion is to use the folder “VHDX” on the root of D:\ that we created earlier and to create a folder in that folder named “VMs” like this (D:\VHDX\VMs). The wizard will not create the folder for you so you can just click browse and then browse to the “VHDX” folder and the right click in the blank space to create the new folder and name it “VMs” select it and click “Choose folder” or you can click the button near the top of the window labeled “New Folder” and then name it VMs, then select the folder and click “Choose Folder”. 
(By doing it my way. It will be easier to move,rename,delete, or even just to see how much space, our new virtual machines and all associated file are taking up.)
When your finished naming and choosing the location for the VM we are creating, click “Next >” to go to the “Specify Generation” Page.
Now on the “Specify Generation” Page, Select “Generation 2” and click “Next >” to go to the “Assign Memory” Page.

Now on the “Assign Memory” Page, in the provided text box type in your desired amount of Ram you want assigned to your virtual machine in megabytes. (1024MB is = to 1GB) My Type in 4096 if you want to assign 4GB of memory to you VM at startup. ( Anything will do here. But remember that the vm will not be able to utilize more then 4GB of ram anyways do to the x32/x64bit limitation) I suggest you choose to assign 4096MB and select the check box for “Use Dynamic Memory for this virtual machine” you will be able to adjust this dynamic range later after the vm is created.
Once you have assigned your desired amount of memory click “Next >” to go to the “Configure Network” Page.
Now on the “Configure Network” Page, if this is not your first VM then you will likely have an option to select what ever virtual switches you have previously created. If this is your first VM then you will likely not have created a virtual switch yet. If this is your case just leave the default of not connected and proceed to the next step. (you will be able to assign a switch later after the VM is created.)
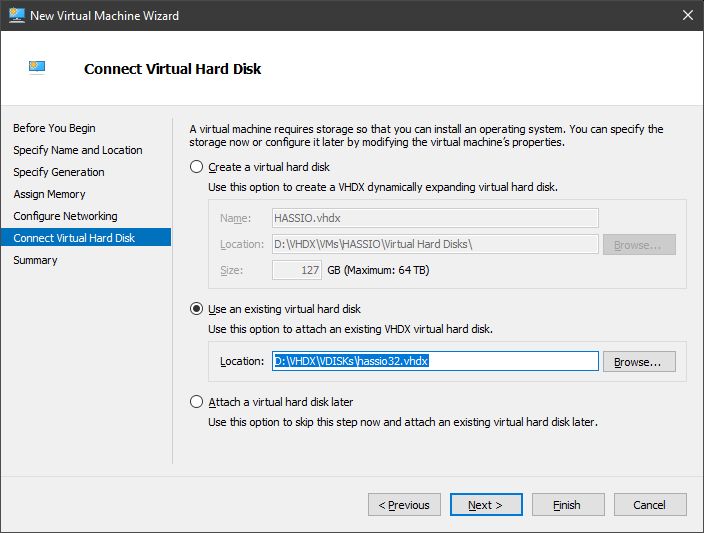
Click “Next >” to go to the “Connect Virtual Hard Disk” Page.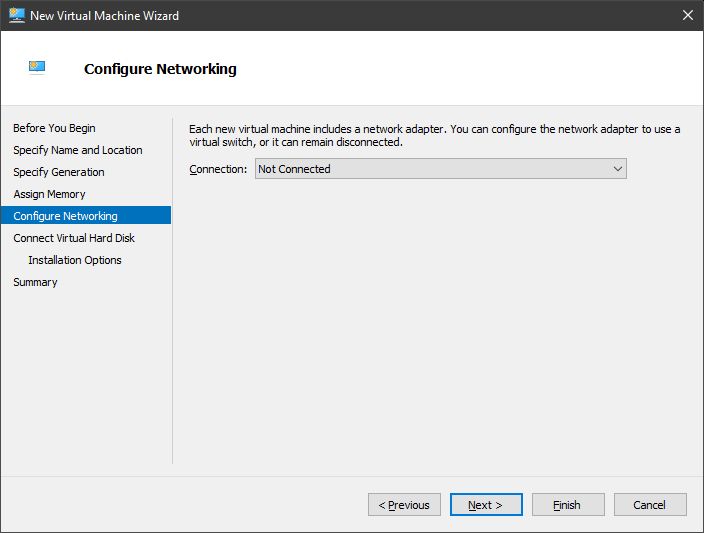
Now on the “Connect Virtual Hard Disk” Page, click the second option to “Use and existing virtual hard disk” in the provided text box type the path to the .vhdx we created in “Step 8.” or
click the “Browse” button to browse to the location where we create the .vhdx file earlier in “Step 8.” (ie… “D:\VHDX\VDISKs\hassio64.vhdx”)
Now on the “Summary” Page, if all looks good and the setting for the new VM are as you like then click the “Finish” button to create the New Virtual Machine.
Step 11. Create a Virtual Switch
For the purpose of this guide we will be giving your new VM an external network connection. The other types of virtual switches and there intended uses will be beyond the scope of this guide and can be further researched here.
It should be understood that in order to create the new virtual network switch your system will temporarily be disconnected from the network. This is done do to the nature of how the operating system will be assigning the physical adapter to the virtual adapter and then sharing the network connection of the virtual adapter we will create.
Now with “Hyper-V Manager” opened, on the right “Actions” menu find where it says “Virtual Switch Manager” and left click it.

Now with the “Virtual Switch Manager” open, In the menu box on the right click “External” to give you our VM a connection to the internet. Below that click the “Create Virtual Switch” Button. On this page give your Switch a name I suggest you name it the name of your extrenal addapter + ExternalVswitch ( ie… “i210v_extrenal_v_switch”) but you can do as you like. After you’ve named the new switch give it a brief description in the “notes” section. Below that in the drop down menu beside the selection of “External” you will see a list of your physical network adapters. Chose carefully as your network layout and desired use case will no doubt be unique.
In general if you have only one network adapter and you do want to give the new virtual machine we just created in “Step 10” connection to the real network outside of your physical host (Windows 10 machine) then you will need to select you physical adapter as well as the check box below it marked “Allow management operating system to share this network adapter”.
 Once you have decided how you want your virtual switch configured click “Ok” to proceed with the creation of the virtual switch.
After a brief loss of network connection you should be back on line and the adapter you you just named should now be providing you with a network connection. You can now close the “Virtual Switch Manager” and go back to the “Hyper-V Manager” user interface.
Step 12. Adjust our Setting for the new VM before first Boot.
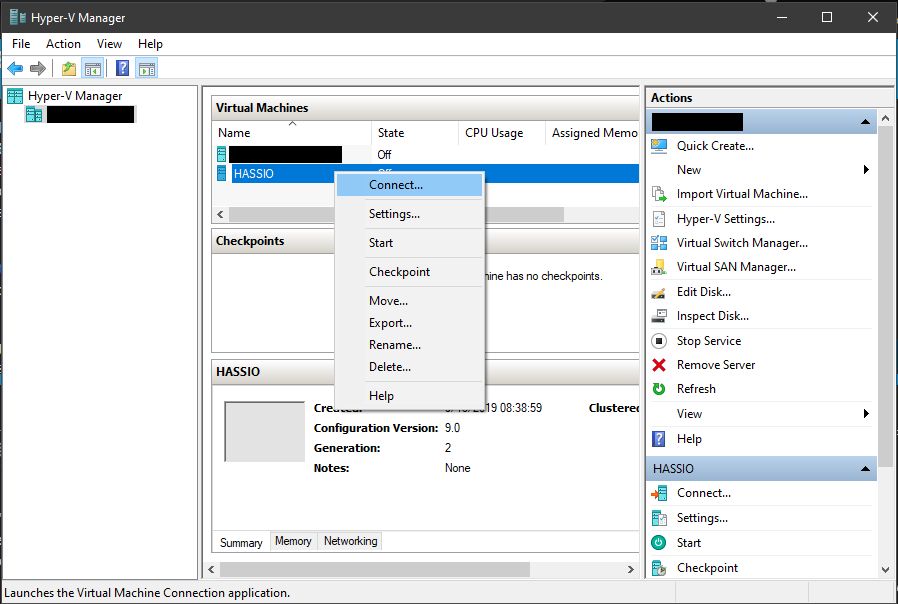
Now on with the “Hyper-V Manager” user interface open in front of you. Right click the new Virtual Machine we created in “Step 10.”. mine is called “HASSIO”. In the “Virtual Machine Settings” window that opened when we right clicked our new VM.

On left menu box click the second option down “Firmware”. on the firmware options tab on the right side menu select the option for the “Hard Drive” with the name of the virtual hard disk we created earlier (hassio64.vhdx) displayed beside it. after it is selected click “Move Up” to ensure it is in the first boot option. Ensure that Network Adapter is not the first option in the list. The “Hard Disk” option should be shown on the top of the list.
Next back on the left side navigation menu in the settings window click the third option “Security”. After the “Security” tab is displayed on the right, make sure that the check box for “Secure Boot” is NOT selected.
Next back on the left side navigation menu in the settings window click the forth option in the list “Memory”. After the “Memory” tab is displayed on the right, set your desired amount of memory to be assigned at boot. (optionally you can fallow my example and ensure that the check box for “Enable Dynamic Memory” IS checked.) If you will be Enabling Dynamic Memory then assign a reasonable range from 512MB - 8192MB. After you have made your selection go back to the left side navigation menu in the settings window.
Next back on the left side navigation menu in the settings window click on the fifth option “Proccessor” and make sure you have the number of physical CPU core that you want to use selected.
(I am about to state my opinion regarding the processing power of the “Raspberry Pi 3 B” vs “Modern PC CPUs”. You may have a different view on this subject, this is my advise you may do with it as you like.)
The rpi3b has significantly less compute power when compared to modern CPUs even though it dose enjoy having 4 cpu cores these cores are less capable then a single core on an modern PC CPU.
For my VM I used only one CPU core. My CPU (the i9-9900k) has 8 cores and 16 threads. However, I see no reason to assign more than one CPU core to this VM. But please do no feel that you are limited to only one this is merely my suggestion. You may find That a different number on a different cpu may work better for you. (AMD vs INTEL)
Section 6 and 7. “SCSI Controller” under “Hard Drive”
Make sure “Virtual hard disk:” is selected and is pointing to the .vhdx we created earlier. (“D:\VHDX\VDISKs\hassio64.vhdx”)
Finally Section 8. Make sure that in the “Network Adapter” Tab on the right side menu you have the external virtual switch we created earlier selected.
NOW with ALL the settings we just went over, configured and ready. Click “OK” to save the settings for the VM.
Now right click again on the VM we created and select “Connect”. (We want to see the details and as they load, We will not be able to directly login to HASSIO via the VM connection but this will help to determine what our issues might be if any.)
In the VM connection window. Click the “green Start” icon on the top menu.
The VM will Begin to load and will expand to use the size we provided earlier. It will be given an IP address and all of these things we will be able to glean, if only for a few seconds as they fly by on the screen in front of us. But if we pay attention we should be able to see them as they are happening.
Keep in mind the speed of your disk you chose to put the .vhdx file on. the type and speed of your memory (ie… ddr2, ddr3, ddr4, / 1600mhz, 2400mhz, 3200mhz) and the speed (1.2Ghz-5.0Ghz) and number of cpu cores (1-16) you assigned to the VM. Give your VM at least 2 minutes to finish booting the first time. You should be able to tell when its up and ready by looking at the VM connection. if there is no more info coming across the screen and you see “link become ready” then its likely finished booting.
Open a browser and navigate to “http://hassio.local:8123/” to claim your installation for the first time. You should be greeted by the OnBoarding screen. Where you will be asked to create a user account, username, and password. I tend to prefer Chrome for this but you might like something else.
“If you are running an older Windows or have stricter network configuration, you might need to access Home Assistant at http://hassio:8123.”
I suggest you first install and configure the Samba and SSH Add-ons. Then take a snapshot using the hassio interface and using samba store this in a safe location so you have a default config to fall back to if you ever need to.
At this point you should be able to to fallow the setup instructions. For more assistance I suggest you read the docs at https://www.home-assistant.io/docs/

 I am not seeing the HAASIO option for add ons on my side bar… Is there something I am missing O_o