Looks like I managed to work my issue out. By adding a name: field after the source camera, i am able to create two disparate entities using the same camera which outputs two different named images.
Can you help me?
I have same error with deepstack-ui for face recognition only(with object i browse file good)

I run deepstack on synology and also add folder in synology follow instruction but when enter command with root it is not success
{“success”:false,“error”:“userid not specified”,“duration”:0}
deepstack log.

Please help!
Try to watch the video, maybe it will help you understand your mistake

Dear Divan,
Thank very much for your video. I watch more time and follow step by step but same error with face recognition.

Maybe I don’t understand in Russian. I descript my sequence follow your video as below
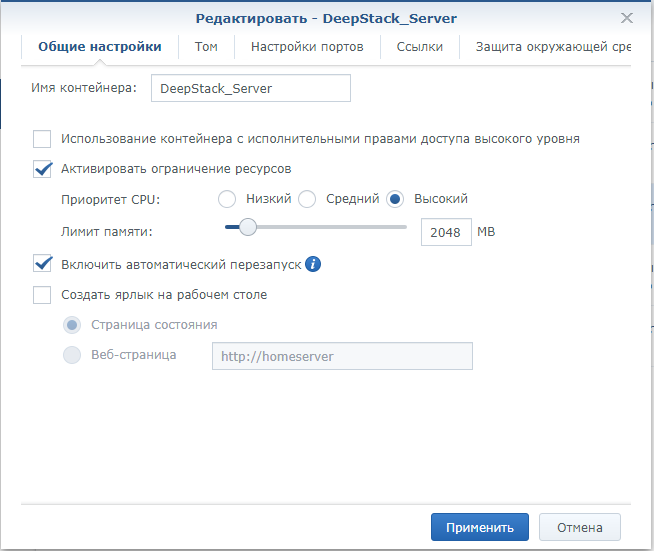
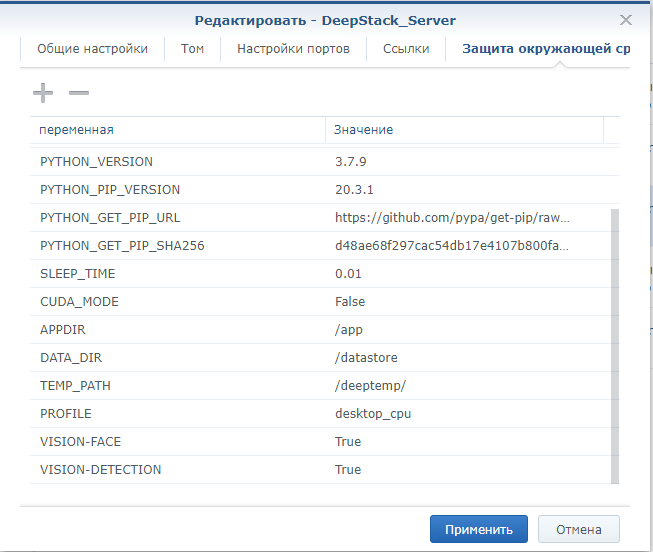
1- Install deepstack on synology with port 5500 and environment VISION-FACE & VISION-DETECTION = True

I receive log

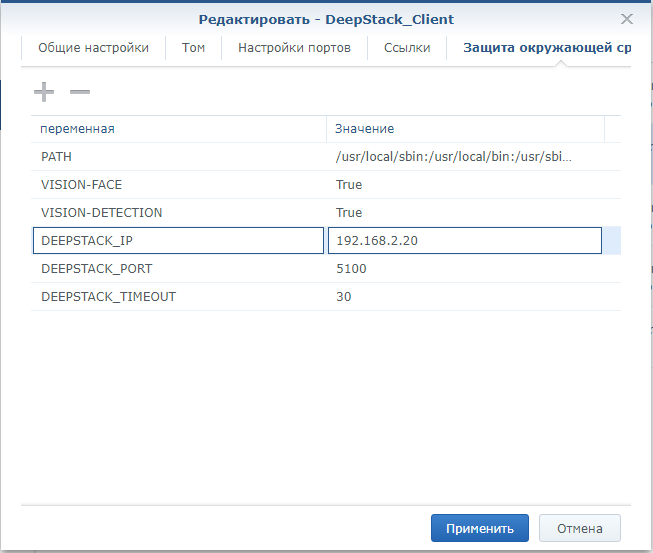
2- install deepstack-ui with port 8501 and add environment DEEPSTACK_PORT = 5500 and DEEPSTACK_IP = 192.168.2.20 (IP of nas)

3- install deepstack-trainner with port 5550 and add DEEPSTACK_HOST_ADDRESS = http://192.168.2.20:5500

4- after get error with face recognition I add folder with one photo and enter command
(I disabled all container) I don’t know mistake where, Could you show me how to fix! thank again
1 Like
- Try deleting everything and installing it again
- Check your settings with my settings


Use these images
deepquestai_deepstack
robmarkcole_deepstack-ui
1 Like
I have made amendments to the integration. Now we not only determine the name, but also checks the confidence. Without confidence, it often determines incorrectly. For example, the camera recognized the face of user 1 and the confidence of the recognized face is not indicated, then deepstack can report that it is user 2, and this is already an error. Therefore, I added the condition if the username and confidence are above 70, then this is true, if if the username and confidence are below 70, then this is false.
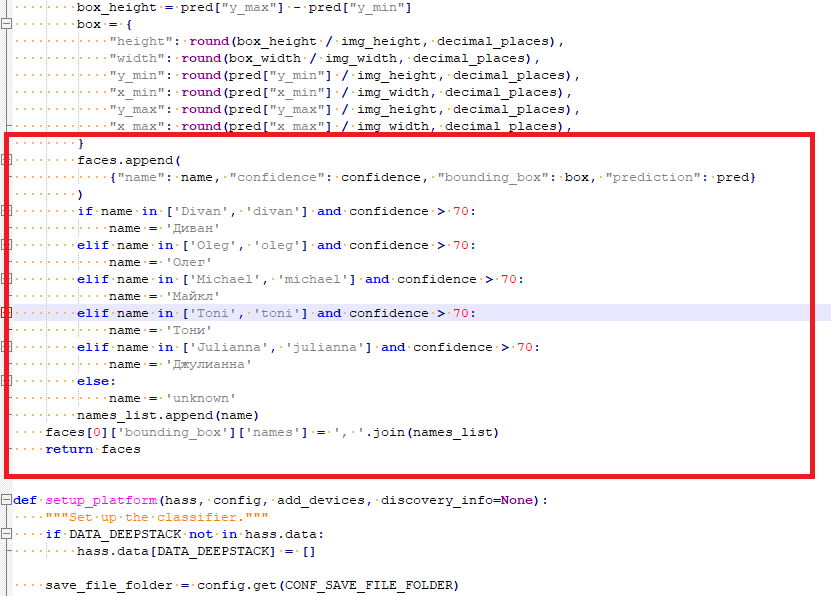
        faces.append(
            {"name": name, "confidence": confidence, "bounding_box": box, "prediction": pred}
        )
        if name in ['Divan', 'divan'] and confidence > 70:
            name = 'Диван'
        elif name in ['Oleg', 'oleg'] and confidence > 70:
            name = 'Олег'
        elif name in ['Michael', 'michael'] and confidence > 70:
            name = 'Майкл'
        elif name in ['Toni', 'toni'] and confidence > 70:
            name = 'Тони'
        elif name in ['Julianna', 'julianna'] and confidence > 70:
            name = 'Джулианна'
        else:
            name = 'unknown'
        names_list.append(name)
    faces[0]['bounding_box']['names'] = ', '.join(names_list)
    return faces
An example of if the confidence is below 70. The system will not report the user name and will show unknown


Ниже перевод текст на русском языке
Развернуть
Я внес в интеграцию поправки. Теперь не только определяем имя, но и сверяет уверенность. Без уверенности определяет часто ошибочно. Например камера распознала лицо пользователя 1 и уверенность распознанного лица не указывается, то deepstack может сообщить, что это пользователь 2, а это уже ошибка. Поэтому я добавил условие если имя пользователя и уверенность выше 70, то это верно, если если имя пользователя и уверенность ниже 70, то это ложно.
Вставьте этот код в файлик image_processing.py
        faces.append(
            {"name": name, "confidence": confidence, "bounding_box": box, "prediction": pred}
        )
        if name in ['Divan', 'divan'] and confidence > 70:
            name = 'Диван'
        elif name in ['Oleg', 'oleg'] and confidence > 70:
            name = 'Олег'
        elif name in ['Michael', 'michael'] and confidence > 70:
            name = 'Майкл'
        elif name in ['Toni', 'toni'] and confidence > 70:
            name = 'Тони'
        elif name in ['Julianna', 'julianna'] and confidence > 70:
            name = 'Джулианна'
        else:
            name = 'unknown'
        names_list.append(name)
    faces[0]['bounding_box']['names'] = ', '.join(names_list)
    return faces
Пример того, если уверенность ниже 70. Система не сообщит имя пользователя и покажет неизвестно
Пример того, если уверенность выше 70. Система сообщит правильное имя пользователя
Hello, I had the same problem, I found the solution on Deepstack forum here.
It’s because the DETECTION endpoint is not activated. Run deepstack container with environmental variable “-e VISION-DETECTION=True”.
Yeah, this. Tried to train Deepstack with all kinds of images - high res, cam shots, selfies - and it’s just a mess. Thinks the gf is me and I am her like 80% of the time. Gets confused by people wearing glasses. It’s practically unusable.
Is there some kind of best practice on what sort of images should be uploaded for training? I’ve read that people have had better luck with Compareface, may have to give it a go…
I need your help. Thanks to one person who gave me an amazing option and who encouraged me to redo everything. This option is good because I will not need to go into the code of the deep stack_force integration itself, but I can do it using the Home Assistant.
As a result, I did this. I have created a sensor that outputs the names of recognized faces and I can also change the face recognition parameters via input_number. deepstack_confidence_face

sensor:
  - platform: template
    sensors:
      persons_names:
        friendly_name: 'Names of identified persons'
        icon_template: mdi:face-recognition
        value_template: >
          {% set detect_face = state_attr('image_processing.detect_face_eufy_camera','faces') | selectattr('faces','!=','name')| map(attribute='name') | join(', ') %}
          {% set confidence_face = state_attr('image_processing.detect_face_eufy_camera','faces') | selectattr('faces','!=','confidence')| map(attribute='confidence') | join(', ') %}
          {% set set_confidence = states('input_number.deepstack_confidence_face')%}
          {% if detect_face and confidence_face >= set_confidence %}
          {{ state_attr('image_processing.detect_face_eufy_camera','faces') | selectattr('faces','!=','name')| map(attribute='name') | join(', ') }}
          {% else %}
          unknown
          {% endif %}
If desired, you can create an automation that will send pictures in telegram. In fact, you can implement many more automation options. For example, a husband and wife in the house. The husband came to the kitchen, the camera recognized the husband and turned on the coffee maker for him, and the wife came and turned on the kettle for her, or turned on the TV in the husband’s room, and the laptop or climate control for the wife. If the camera sees only the husband, then the climate will adjust to the husband, and if the wife saw the camera, then to the wife, and if they are together, then the climate is by agreement for two, etc. There are a lot of options.
alias: 'Process Data from Facial Recognition'
description: ''
trigger:
  - platform: state
    entity_id: image_processing.detect_face_eufy_camera
condition: []
action:
  - service: telegram_bot.send_photo
    data:
      file: /config/www/deepstack/snapshots/detect_face_eufy_camera_latest.jpg
      caption: >
        {% if is_state('image_processing.detect_face_eufy_camera', 'unknown') %}
        {% else %}
        *Someone's in the hallway:* {% set detect_face =
        state_attr('image_processing.detect_face_eufy_camera','faces') |
        selectattr('faces','!=','name')| map(attribute='name') | join(', ') %}
        {% set confidence_face =
        state_attr('image_processing.detect_face_eufy_camera','faces') |
        selectattr('faces','!=','confidence')| map(attribute='confidence') |
        join(', ') %} {% set set_confidence =
        states('input_number.deepstack_confidence_face')%} {% if detect_face and
        confidence_face >= set_confidence %} {{
        state_attr('image_processing.detect_face_eufy_camera','faces') |
        selectattr('faces','!=','name')| map(attribute='name') | join(', ') }}
        {% else %} unknown {% endif %}{% endif %}
      target: 11111111
      disable_notification: false
  - service: telegram_bot.send_photo
mode: single
I’m trying to implement the translation of names into Russian in the Home Assistant and so that it outputs a list. So that it was instead of Igor, Oleg, Masha = Igor, Oleg, Masha and changed depending on which person was identified. I was able to configure only for single names, i.e. only one name is translated
Let me clarify, with the edits in the integration in the python file, this works, but it can’t be made to work in Home Assistant
        faces.append(
            {"name": name, "confidence": confidence, "bounding_box": box, "prediction": pred}
        )
        if name in ['Divan', 'divan'] and confidence > 70:
            name = 'Диван'
        elif name in ['Oleg', 'oleg'] and confidence > 70:
            name = 'Олег'
        elif name in ['Michael', 'michael'] and confidence > 70:
            name = 'Майкл'
        elif name in ['Toni', 'toni'] and confidence > 70:
            name = 'Тони'
        elif name in ['Julianna', 'julianna'] and confidence > 70:
            name = 'Джулианна'
        else:
            name = 'unknown'
        names_list.append(name)
    faces[0]['bounding_box']['names'] = ', '.join(names_list)
    return faces
Here is my version, which works only if one name is recognized, and it does not work with several names
{% set names = state_attr('image_processing.detect_face_eufy_camera','faces') | selectattr('faces','!=','name')| map(attribute='name') | list | join(', ') %}
{% set total_faces = state_attr('image_processing.detect_face_eufy_camera','total_faces') %}
{% set confidence_face = state_attr('image_processing.detect_face_eufy_camera','faces') | selectattr('faces','!=','confidence')| map(attribute='confidence') | join(', ') %}
{% if names in ["Igor" , "igor"]  and confidence_face > '60' %}
  {% set names_list = "Игорь" %}
{% elif names in ['Oleg', 'oleg'] and confidence_face > '60' %}
  {% set names_list = "Олег" %}
{% elif names in ['Masha','masha'] and confidence_face > '60' %}
  {% set names_list = "Маша" %}
{% elif names in ['Marina','marina'] and confidence_face > '60' %}
  {% set names_list = "Марина" %}
{% elif names in ['unknown'] %}
  Неизвестное лицо
{% endif %}
{{ names_list }}
Текст на русском (Text in Russian)
Нуждаюсь в вашей помощи. Благодаря одному человеку, который подкинул мне потрясающий вариант и который побудил меня переделать все. Этот вариант хорош тем, что мне не нужно будет лезть в код самой интеграции deepstack_face, а можно сделать средствами Home Assistant.
В итоге сделал так. Создал сенсор, который выводит имена опознанных лиц и также я могу менять уверенность распознавания лица через input_number.deepstack_confidence_face
sensor:
  - platform: template
    sensors:
      persons_names:
        friendly_name: 'Names of identified persons'
        icon_template: mdi:face-recognition
        value_template: >
          {% set detect_face = state_attr('image_processing.detect_face_eufy_camera','faces') | selectattr('faces','!=','name')| map(attribute='name') | join(', ') %}
          {% set confidence_face = state_attr('image_processing.detect_face_eufy_camera','faces') | selectattr('faces','!=','confidence')| map(attribute='confidence') | join(', ') %}
          {% set set_confidence = states('input_number.deepstack_confidence_face')%}
          {% if detect_face and confidence_face >= set_confidence %}
          {{ state_attr('image_processing.detect_face_eufy_camera','faces') | selectattr('faces','!=','name')| map(attribute='name') | join(', ') }}
          {% else %}
          unknown
          {% endif %}
При желании можно создать автоматизацию, которая будет слать снимки в телеграм. На самом деле можно реализовать гораздо больше вариантов автоматизации. Например муж и жена в доме. Муж пришел на кухню, камера распознала мужа и включила ему кофеварку, а пришла жена и включила ей чайник или в комнате мужу включила телевизор, а жене ноутбук или настройка климата. Если камера видит только мужа, то климат будет подстраиваться под мужа, а если камера увидела жена, то под жену, а если они вдвоем, то климат по договоренности для двоих и т.д. Вариантов куча.
alias: 'Process Data from Facial Recognition'
description: ''
trigger:
  - platform: state
    entity_id: image_processing.detect_face_eufy_camera
condition: []
action:
  - service: telegram_bot.send_photo
    data:
      file: /config/www/deepstack/snapshots/detect_face_eufy_camera_latest.jpg
      caption: >
        {% if is_state('image_processing.detect_face_eufy_camera', 'unknown') %}
        {% else %}
        *Someone's in the hallway:* {% set detect_face =
        state_attr('image_processing.detect_face_eufy_camera','faces') |
        selectattr('faces','!=','name')| map(attribute='name') | join(', ') %}
        {% set confidence_face =
        state_attr('image_processing.detect_face_eufy_camera','faces') |
        selectattr('faces','!=','confidence')| map(attribute='confidence') |
        join(', ') %} {% set set_confidence =
        states('input_number.deepstack_confidence_face')%} {% if detect_face and
        confidence_face >= set_confidence %} {{
        state_attr('image_processing.detect_face_eufy_camera','faces') |
        selectattr('faces','!=','name')| map(attribute='name') | join(', ') }}
        {% else %} unknown {% endif %}{% endif %}
      target: 11111111
      disable_notification: false
  - service: telegram_bot.send_photo
mode: single
Я пытаюсь в Home Assistant реализовать перевод имен на русский и чтобы это выводило списком. Чтобы было вместо Igor, Oleg, Masha = Игорь, Олег, Маша и менялось в зависимости от того какое лицо было опознано. Я смог настроить только для одиночных имен, т.е переводится только одно имя
Уточню, с правками в интеграции в файлике python это работает, но в Home Assistant не получается заставить работать
        faces.append(
            {"name": name, "confidence": confidence, "bounding_box": box, "prediction": pred}
        )
        if name in ['Divan', 'divan'] and confidence > 70:
            name = 'Диван'
        elif name in ['Oleg', 'oleg'] and confidence > 70:
            name = 'Олег'
        elif name in ['Michael', 'michael'] and confidence > 70:
            name = 'Майкл'
        elif name in ['Toni', 'toni'] and confidence > 70:
            name = 'Тони'
        elif name in ['Julianna', 'julianna'] and confidence > 70:
            name = 'Джулианна'
        else:
            name = 'unknown'
        names_list.append(name)
    faces[0]['bounding_box']['names'] = ', '.join(names_list)
    return faces
Вот мой вариант, который работает только если опознано одно имя, а с несколькими именами это не работает
{% set names = state_attr('image_processing.detect_face_eufy_camera','faces') | selectattr('faces','!=','name')| map(attribute='name') | list | join(', ') %}
{% set total_faces = state_attr('image_processing.detect_face_eufy_camera','total_faces') %}
{% set confidence_face = state_attr('image_processing.detect_face_eufy_camera','faces') | selectattr('faces','!=','confidence')| map(attribute='confidence') | join(', ') %}
{% if names in ["Igor" , "igor"]  and confidence_face > '60' %}
  {% set names_list = "Игорь" %}
{% elif names in ['Oleg', 'oleg'] and confidence_face > '60' %}
  {% set names_list = "Олег" %}
{% elif names in ['Masha','masha'] and confidence_face > '60' %}
  {% set names_list = "Маша" %}
{% elif names in ['Marina','marina'] and confidence_face > '60' %}
  {% set names_list = "Марина" %}
{% elif names in ['unknown'] %}
  Неизвестное лицо
{% endif %}
{{ names_list }}
1 Like
The issue is resolved. He was lying right on the surface. A wonderful deepstack client from tomer/deepstack-trainer. Russian Russian names I was able to specify there and the recognized names in Russian began to be displayed in the sensor
I have improved the sensor that displays names and attributes

sensor:
  - platform: template
    sensors:
      persons_names:
        friendly_name: 'Names of identified persons'
        icon_template: mdi:face-recognition
        value_template: >
          {% set detect_face = state_attr('image_processing.detect_face_eufy_camera','faces') | selectattr('faces','!=','name')| map(attribute='name') | join(', ') %}
          {% set confidence_face = state_attr('image_processing.detect_face_eufy_camera','faces') | selectattr('faces','!=','confidence')| map(attribute='confidence') | join(', ') %}
          {% set set_confidence = states('input_number.deepstack_confidence_face')%}
          {% if detect_face and confidence_face >= set_confidence %}
          {{ state_attr('image_processing.detect_face_eufy_camera','faces') | selectattr('faces','!=','name')| map(attribute='name') | join(', ') }}
          {% else %}
          unknown
          {% endif %}
        attribute_templates:
          faces: "{{ state_attr('image_processing.detect_face_eufy_camera','faces') }}"
          total_faces: "{{ state_attr('image_processing.detect_face_eufy_camera','total_faces') }}"
          total_matched_faces: "{{ state_attr('image_processing.detect_face_eufy_camera','total_matched_faces') }}"
          matched_faces: "{{ state_attr('image_processing.detect_face_eufy_camera','matched_faces') }}"
          last_detection: "{{ state_attr('image_processing.detect_face_eufy_camera','last_detection') }}"
          friendly_name: "{{ state_attr('image_processing.detect_face_eufy_camera','friendly_name') }}"
          device_class: "{{ state_attr('image_processing.detect_face_eufy_camera','device_class') }}"
Script for sending photos in a telegram
service: notify.notify
data:
  message: ''
  data:
    photo:
      file: /config/www/deepstack/snapshots/detect_face_eufy_camera_latest.jpg
      caption: 'Someone's in the hallway 📷: *{{ states.sensor.persons_names.state }}*'
Текст на русском (Text in Russian)
Вопрос решен. Он лежал прямо на поверхности. Замечательный клиент deepstack от t0mer/deepstack-trainer. Я смог там указать имена на русском языке и в сенсоре стали отображаться опознанные имена на русском
Доработал сенсор который выводит имена и атрибуты
sensor:
  - platform: template
    sensors:
      persons_names:
        friendly_name: 'Имена идентифицированных лиц'
        icon_template: mdi:face-recognition
        value_template: >
          {% set detect_face = state_attr('image_processing.detect_face_eufy_camera','faces') | selectattr('faces','!=','name')| map(attribute='name') | join(', ') %}
          {% set confidence_face = state_attr('image_processing.detect_face_eufy_camera','faces') | selectattr('faces','!=','confidence')| map(attribute='confidence') | join(', ') %}
          {% set set_confidence = states('input_number.deepstack_confidence_face')%}
          {% if detect_face and confidence_face >= set_confidence %}
          {{ state_attr('image_processing.detect_face_eufy_camera','faces') | selectattr('faces','!=','name')| map(attribute='name') | join(', ') }}
          {% else %}
          unknown
          {% endif %}
        attribute_templates:
          faces: "{{ state_attr('image_processing.detect_face_eufy_camera','faces') }}"
          total_faces: "{{ state_attr('image_processing.detect_face_eufy_camera','total_faces') }}"
          total_matched_faces: "{{ state_attr('image_processing.detect_face_eufy_camera','total_matched_faces') }}"
          matched_faces: "{{ state_attr('image_processing.detect_face_eufy_camera','matched_faces') }}"
          last_detection: "{{ state_attr('image_processing.detect_face_eufy_camera','last_detection') }}"
          friendly_name: "{{ state_attr('image_processing.detect_face_eufy_camera','friendly_name') }}"
          device_class: "{{ state_attr('image_processing.detect_face_eufy_camera','device_class') }}"
Скрипт для отправки фото в телеграм
service: notify.notify
data:
  message: ''
  data:
    photo:
      file: /config/www/deepstack/snapshots/detect_face_eufy_camera_latest.jpg
      caption: 'Кто-то в коридоре 📷: *{{ states.sensor.persons_names.state }}*'
3 Likes
wow, @DivanX10 , you made such a contribution to this topic, I greatly appreciate it!
My problem is that it was such a long time ago when I tried to pull this together, and since I’m far from a coder, simply an enthusiast, I’d really appreaciate if you could create a short write up from the very beginning, how to properly pull this thing together. Only if you don’t mind. Nevertheless, I’ll try to redo it from scratch based on your input, but if you can make my journey just slightly easier, that’d be fantastic. No rush, no pressure, only if you feel like, I think others would also benefit from it. But kudos for all your previous contribution, it’s already a big help to noobs like me 
@DivanX10 , if you allow me, I have one more question quickly about the trainer, more specifically about training images. I tried before with image training with many methods, and I’ve came to the realisation that the key to successfully teaching a person’s images is to upload MANY pictures in one batch, otherwise only the LAST image uploaded (sent to deepstack) will be the latest and ONLY reference image.
Did you notice that is it the same with this trainer, as well, or you can slowly upload images one by one over a period of time as it accumulates more images of a given person?
thx in advance!
I use packages.
Reading the article Convenient configuration (configuration) Home Assistant.
This is written in configuration.yaml as follows
homeassistant:
  packages: !include_dir_named includes/packages # We place any configurations in the folder packages
How to make a sensor with attributes?
We read about creating a sensor with attributes here
You can create a sensor and control not only the content of the state, but also what is contained in the attributes. Here is an example:
input_text:
  t_state:
  t_attribute:

sensor:
  - platform: template
    sensors:
      my:
        value_template: "{{ states('input_text.t_state') }}"
        attribute_templates:
          a: "{{ states('input_text.t_attribute') }}"
In the packages folder, we create a file with any name, I called face_identify_deepstack_sensor.yaml
In the face_identify_deepstack_sensor.yaml file, we insert the code, where image_processing.detect_face_eufy_camera is the name of my camera (the deepstack config is below) and I also use the auxiliary element number input_number. deepstack_confidence_face. It allows you to adjust the confidence of facial recognition through lovelace. Instead of image_processing. detect_face_beauty_camera, you need to specify the name of your camera
sensor:
  - platform: template
    sensors:
      persons_names:
        friendly_name: 'Names of identified persons'
        icon_template: mdi:face-recognition
        value_template: >
          {% set detect_face = state_attr('image_processing.detect_face_eufy_camera','faces') | selectattr('faces','!=','name')| map(attribute='name') | join(', ') %}
          {% set confidence_face = state_attr('image_processing.detect_face_eufy_camera','faces') | selectattr('faces','!=','confidence')| map(attribute='confidence') | join(', ') %}
          {% set set_confidence = states('input_number.deepstack_confidence_face')%}
          {% if detect_face and confidence_face >= set_confidence %}
          {{ state_attr('image_processing.detect_face_eufy_camera','faces') | selectattr('faces','!=','name')| map(attribute='name') | join(', ') }}
          {% else %}
          unknown
          {% endif %}
        attribute_templates:
          faces: "{{ state_attr('image_processing.detect_face_eufy_camera','faces') }}"
          total_faces: "{{ state_attr('image_processing.detect_face_eufy_camera','total_faces') }}"
          total_matched_faces: "{{ state_attr('image_processing.detect_face_eufy_camera','total_matched_faces') }}"
          matched_faces: "{{ state_attr('image_processing.detect_face_eufy_camera','matched_faces') }}"
          last_detection: "{{ state_attr('image_processing.detect_face_eufy_camera','last_detection') }}"
          friendly_name: "{{ state_attr('image_processing.detect_face_eufy_camera','friendly_name') }}"
          device_class: "{{ state_attr('image_processing.detect_face_eufy_camera','device_class') }}"
Creating an auxiliary element number input_number.deepstack_confidence_face. If you do it through the GUI

If you do it via yaml. To the input_number.yaml file
deepstack_confidence_face:
  name: "Deepstack: Face Recognition Confidence"
  min: 40
  max: 100
  step: 1
  mode: slider
  icon: mdi:face-recognition
These are the settings we use to work with deepstack
image_processing:
  - platform: deepstack_face
    ip_address: 192.168.1.47
    port: 5100
    timeout: 10000
    detect_only: False
    save_file_folder: /config/www/deepstack/snapshots/
    save_timestamped_file: False
    save_faces: False
    save_faces_folder: /config/www/deepstack/faces/
    show_boxes: False
    source:
# Connecting the camera Eufy Indoor Cam 2K Pan & Tilt
      - entity_id: camera.eufy_camera_hall
        name: detect_face_eufy_camera  #( this is the name of my camera. As we call it here, it will be called, so I have it called image_processing.detect_face_ugon_camera)
Explanation of options
detect_only: Configuring detect_only = True results in faster processing than recognition mode, but any trained faces will not be listed in the matched_faces attribute
save_timestamped_file: Whether to save a photo with the last date of the snapshot to the folder-true\false
save_faces: Whether to save faces to a folder - true\false
show_boxes: Enable/disable the selection of the face with a red frame - true\false
Deepstack Training Recommendation
For deepstack face recognition to work correctly, I use photos from different angles, this will allow me to recognize a person’s faces more correctly. If you upload photos that look straight, then there will often be erroneous recognition when viewing from an angle. It is also necessary to use confidence, the higher the confidence, the more correct it will be to identify the person. The best option for face recognition is a confidence of at least 70. So I created

Текст на русском (Text in Russian)
Я использую packages.
Читаем статью Удобная настройка (конфигурация) Home Assistant.
Прописывается это в configuration.yaml следующим образом
homeassistant:
  packages: !include_dir_named includes/packages # Размещаем любые конфигурации в папке packages
Как сделать сенсор c атрибутами?
Про создание сенсора с атрибутами читаем блог Ивана Бессарабова
Создание template сенсора с атрибутами
Можно создать сенсор и управлять не только содержимым стейта, но и тем что содержится в атрибутах. Вот пример:
input_text:
  t_state:
  t_attribute:

sensor:
  - platform: template
    sensors:
      my:
        value_template: "{{ states('input_text.t_state') }}"
        attribute_templates:
          a: "{{ states('input_text.t_attribute') }}"
В папке packages создаем файлик с любым именем, я назвал face_identify_deepstack_sensor.yaml
В файлик face_identify_deepstack_sensor.yaml вставляем код, где image_processing.detect_face_eufy_camera это имя моей камеры (конфиг deepstack ниже) и еще я использую вспомогательный элемент число input_number.deepstack_confidence_face. Оно позволяет регулировать уверенность распознавания лица через lovelace. Вам вместо image_processing.detect_face_eufy_camera нужно указывать имя своей камеры
sensor:
  - platform: template
    sensors:
      persons_names:
        friendly_name: 'Имена идентифицированных лиц'
        icon_template: mdi:face-recognition
        value_template: >
          {% set detect_face = state_attr('image_processing.detect_face_eufy_camera','faces') | selectattr('faces','!=','name')| map(attribute='name') | join(', ') %}
          {% set confidence_face = state_attr('image_processing.detect_face_eufy_camera','faces') | selectattr('faces','!=','confidence')| map(attribute='confidence') | join(', ') %}
          {% set set_confidence = states('input_number.deepstack_confidence_face')%}
          {% if detect_face and confidence_face >= set_confidence %}
          {{ state_attr('image_processing.detect_face_eufy_camera','faces') | selectattr('faces','!=','name')| map(attribute='name') | join(', ') }}
          {% else %}
          unknown
          {% endif %}
        attribute_templates:
          faces: "{{ state_attr('image_processing.detect_face_eufy_camera','faces') }}"
          total_faces: "{{ state_attr('image_processing.detect_face_eufy_camera','total_faces') }}"
          total_matched_faces: "{{ state_attr('image_processing.detect_face_eufy_camera','total_matched_faces') }}"
          matched_faces: "{{ state_attr('image_processing.detect_face_eufy_camera','matched_faces') }}"
          last_detection: "{{ state_attr('image_processing.detect_face_eufy_camera','last_detection') }}"
          friendly_name: "{{ state_attr('image_processing.detect_face_eufy_camera','friendly_name') }}"
          device_class: "{{ state_attr('image_processing.detect_face_eufy_camera','device_class') }}"
Создаем вспомогательный элемент число input_number.deepstack_confidence_face. Если делать через GUI
Если делать через через yaml. В файлик input_number.yaml
deepstack_confidence_face:
  name: "Deepstack: Уверенность распознавания лица"
  min: 40
  max: 100
  step: 1
  mode: slider
  icon: mdi:face-recognition
Вот эти настройки мы используем для работы deepstack
image_processing:
  - platform: deepstack_face
    ip_address: 192.168.1.47
    port: 5100
    timeout: 10000
    detect_only: False
    save_file_folder: /config/www/deepstack/snapshots/
    save_timestamped_file: False
    save_faces: False
    save_faces_folder: /config/www/deepstack/faces/
    show_boxes: False
    source:
# Подключаем камеру Eufy Indoor Cam 2K Pan & Tilt
      - entity_id: camera.eufy_camera_hall
        name: detect_face_eufy_camera  #( это имя нашей камеры, как мы тут именуем, так и будет называться, поэтому у меня оно именуется image_processing.detect_face_eufy_camera)
Пояснение по опциям
detect_only: Настройка detect_only = True приводит к более быстрой обработке, чем режим распознавания, но любые обученные лица не будут перечислены в атрибуте matched_faces
save_timestamped_file: Сохранять ли в папку фото с последней датой снимка - да\нет
save_faces: Сохранять ли лица в папку - да\нет
show_boxes: Включить\выключить выделение лица красной рамочкой - да\нет
Рекомендация по обучению deepstack
Для правильной работы распознавания лиц deepstack я использую фото с разными углами, это позволит более правильно распознавать лица человека. Если загружать фото которые смотрят прямо, то при угловом обзоре часто будет ошибочное распознавание. Также обязательно нужно использовать уверенность, чем выше уверенность, тем правильнее будет опознавать лицо. Самый оптимальный вариант для распознавания лица, это уверенность не ниже 70. Поэтому я создал
4 Likes
Good day all.
I’m trying to get deepstack object and face and UI running with home assistant.
When installing it on ubuntu in docker it works fine and it detects and recognises faces.
As soon as I close the SSH connection or restart the host, deepstack object and face containers stop running and I can’t start them anymore.Deepstack UI keeps working.
Error message in pertained when trying to start:
“Failure - starting container with non-empty request body was deprecated since API v1.22 and removed in v1.24.
Any ideas what the reason could be?
wow, just wow.
Thank you in the name of the community!!
Source: docker - клиент новее сервера (версия API клиента: 1.24, версия API сервера: 1.21) - Question-It.com
Docker runs on a client / server model, each release of the Docker Engine has a specific version of the API.
The combination of the release version and the Docker API version looks like this:
https://docs.docker.com/engine/api/v1.26/#section/Versioning
According to the table above, Docker API v1.24 is used in Docker Engine 1.12.x, and Docker API v1.21 is used in Docker Engine 1.9. x.The server requires an API version equal to or later than the client.
You have the following three options.
- Upgrade the server part to Docker Engine 1.12. x or higher.
- Downgrade the client part to Engine 1.9. x or lower.
- Downgrade the API version used at runtime by exporting ’ DOCKER_API_VERSION=1.21` to a client-side environment variable.
Текст на русском (Text in Russian )
Источник: docker - клиент новее сервера (версия API клиента: 1.24, версия API сервера: 1.21) - Question-It.com
Docker работает на модели клиент / сервер, каждый выпуск Docker Engine имеет определенную версию API.
Комбинация версии выпуска и версии API Docker выглядит следующим образом:
Docker Engine API v1.26 Reference
Согласно приведенной выше таблице, Docker API v1.24 используется в Docker Engine 1.12.x, а Docker API v1.21 используется в Docker Engine 1.9.x. Серверу требуется версия API, равная или более поздняя, чем у клиента.
У вас есть следующие три варианта.
- Обновите серверную часть до Docker Engine 1.12.x или выше.
- Понизьте клиентскую часть до Engine 1.9.x или ниже.
- Понизьте версию API, используемую во время выполнения, экспортировав
DOCKER_API_VERSION=1.21в переменную среды на стороне клиента.
@DivanX10 , do you happen to know the answer to this question? Or what is your experience with the trainer you recommended, which btw looks very promising!
I tried before with image training with many methods, and I’ve came to the realisation that the key to successfully teaching a person’s images is to upload MANY pictures in one batch, otherwise only the LAST image uploaded (sent to deepstack) will be the latest and ONLY reference image. Did you notice that is it the same with this trainer as well, or you can slowly upload images one by one over a period of time as it accumulates more images of a given person?
I uploaded several photos at once and in parts at different times. I didn’t notice any difference in the recognition operation. It also does not depend on the client here. It depends more on the angle of the photos and the clarity of the image from the camera. If the camera takes a clear picture, without blurring and without squares, then the recognition confidence is higher than 70%, if the picture is not very good, then recognition is 50-65% and can often be wrong. It also correctly recognizes if you look at the camera without moving and it works even if you look at the camera from an angle. For integration, I use Agent DVR, where pictures are taken in real time, aka WEBRTC, and the pictures are not quite perfect, but good, which gives + for correct recognition. I also use filters to exclude false identification, without filters, it is often mistakenly identified.
What filters do I use?
- I set the confidence at 70%
- In automation, I use the condition, if the entrance door is closed, then ignore it, if it is identified as unknown, if the entrance door is open and people come in, then I allow you to send unknown
Текст на русском (Text in Russian)
Я загружал и сразу несколько фоток и частями в разное время. Разницу в работе распознавания я не заметил. От клиента тут тоже не зависит. Тут больше зависит от ракурса фоток и четкости снимка от камеры. Если камера делает четкий снимок, без размытии и без квадратиков, то уверенность распознавания выше 70%, если снимок не очень получился, то распознание составляет 50-65% и часто может ошибаться. Также правильно распознает, если смотреть на камеру не подвижно и это работает, даже если смотреть на камеру под углом. Для интеграции я использую Agent DVR, там снимки делаются в реальном времени, он же WEBRTC и снимки получаются не совсем идеальными, но хорошими, что дает + для правильного распознавания. Также я использую фильтры для исключения ложных опознавании, без фильтров часто опознается ошибочно.
Какие фильтры я использую?
- Выставляю уверенность в 70%
- В автоматизации использую условие, если входная дверь закрыта, то игнорить, если опознано как unknown, если входная дверь открыта и заходят люди, то разрешаю присылать unknown
2 Likes
Thanks for this info, I’ll try to solve it!
It’s a good starting point for me 
Dear @DivanX10
really would not like to waste your time, but if you can, plase help me. I think I get where you’re going with this adjustable confidence treshold thingy, but unfortunately I have a slightly simpler method, and since I’m terrible with value templating, I can hardly extract the needed information from your help. If you can assist me a little bit on how to properly syntax my value template for my use case, I would praise your name.
My approach in a nutshell:
- I run Blue Iris NVR with deepstack integrated
- based on AI confirmed person detection I trigger a virtual “person is moving before the gate” sensor in HA
- when this virtual sensor gets triggered, I run an automation which calls the deepstack integration in HA to run a face recognition, save a snapshot of the result, and send a notification to my ios companion app
- the automation is condition splitted, based on the deepstack integration’s sensor states. And currently I desperately miss the filtering possibility on confidence level, this is what I need to solve!
My goal with the notifications:
- if it is a known, recognized person, above a certain confidence level, then include the name in the notifiiciations, later I’d like to trigger other automations based on the person (for instance open garden gate to someone I trust), don’t know yet how to solve it yet
- if it is an unknown person, then send a critical alert to my phone (so it passes through possible muted state of my phone) saying unknown person is standing before the gate.
- I just put a default branch as well if all conditions fail somehow, but the AI confirmed alert from blue iris still triggers my “motion sensor”, then it just simply sends a camera stream to my phone so I can check what the heck is going on.
Here’s my automation in it’s current form, and I desperately need to take into account the confidence level of the recognition, because many times faces are recognized as MY face, and the deepstack sensor name state attribute GETS my name in it, just with a very low confidence level. So even if a known person’s name is received, but BELOW the needed confidence (let’s say 70), then the UNKNOWN PERSON branch should be running ot the automation. I hope I explained it clearly
alias: Face recognition notification test
description: ''
trigger:
  - platform: state
    entity_id: binary_sensor.street_person_motiondetection
    to: 'on'
condition: []
action:
  - service: image_processing.scan
    data: {}
    target:
      entity_id: image_processing.face_counter
  - delay: '00:00:01'
  - event: image_processing.detect_face
    event_data:
      entity_id: image_processing.face_counter
  - delay: '00:00:01'
  - choose:
      - conditions:
          - condition: template
            value_template: >-
              {{ 'Zsolt' in
              state_attr('image_processing.face_counter','faces').0.name }}
        sequence:
          - service: notify.mobile_app_zsolt_iphone_12_pro
            data:
              message: 'Confidence of recognition: ' # here I would need to extraxt confidence level from sensor state with a value template
              title: Zsolt is at the front gate!
              data:
                attachment:
                  url: >-
                    https://XXXXXXXXXXXXXX/local/deepstackrecog/face_counter_latest.jpg
                  content-type: jpeg
                  hide-thumbnail: false
      - conditions:
          - condition: template
            value_template: >-
              {{ 'unknown' in
              state_attr('image_processing.face_counter','faces').0.name }}
        sequence:
          - service: notify.mobile_app_zsolt_iphone_12_pro
            data:
              title: Unknown person at the gate!
              message: DepStack AI couldn't recognize the person standing in front of the gate.
              data:
                attachment:
                  url: https://XXXXXXXXXXXXXX/local/deepstackrecog/face_counter_latest.jpg
                  content-type: jpeg
                  hide-thumbnail: false
    default:
      - service: notify.mobile_app_zsolt_iphone_12_pro
        data:
          message: Someone's at the front gate!
          title: There's movement in front of the gate
          data:
            push:
              category: camera
            entity_id: camera.blueiris_street
mode: single
oh, and btw, the instructional links you provided prooved to be a big rabbit hole to me, now I’m hunting after a good energy meter to be able to measure my house’s consumption against the power output of my solar panels 