Flashing Latest Sonoff T1 - Tasmota

I have just bought 3 new Sonoff T1’s (wall light switches), I cranked up drzz’s tutorial to do SonOTA flashing with Tasmota, but after SonOTA failed to start step3 some investigating found out that later firmware 2.7.1 doesn’t support OTA anymore as it is insecure which has left me on witch hunt for hardwire flashing, with not much luck as to how to go about it!

The articles I have come across are all for the older gen1 version of the T1 but alot has been updated on the new T1’s since then (worth noting that the Touch is the first model with the black backplate, T1 is the revamped version) and no one seems to have written much about it.

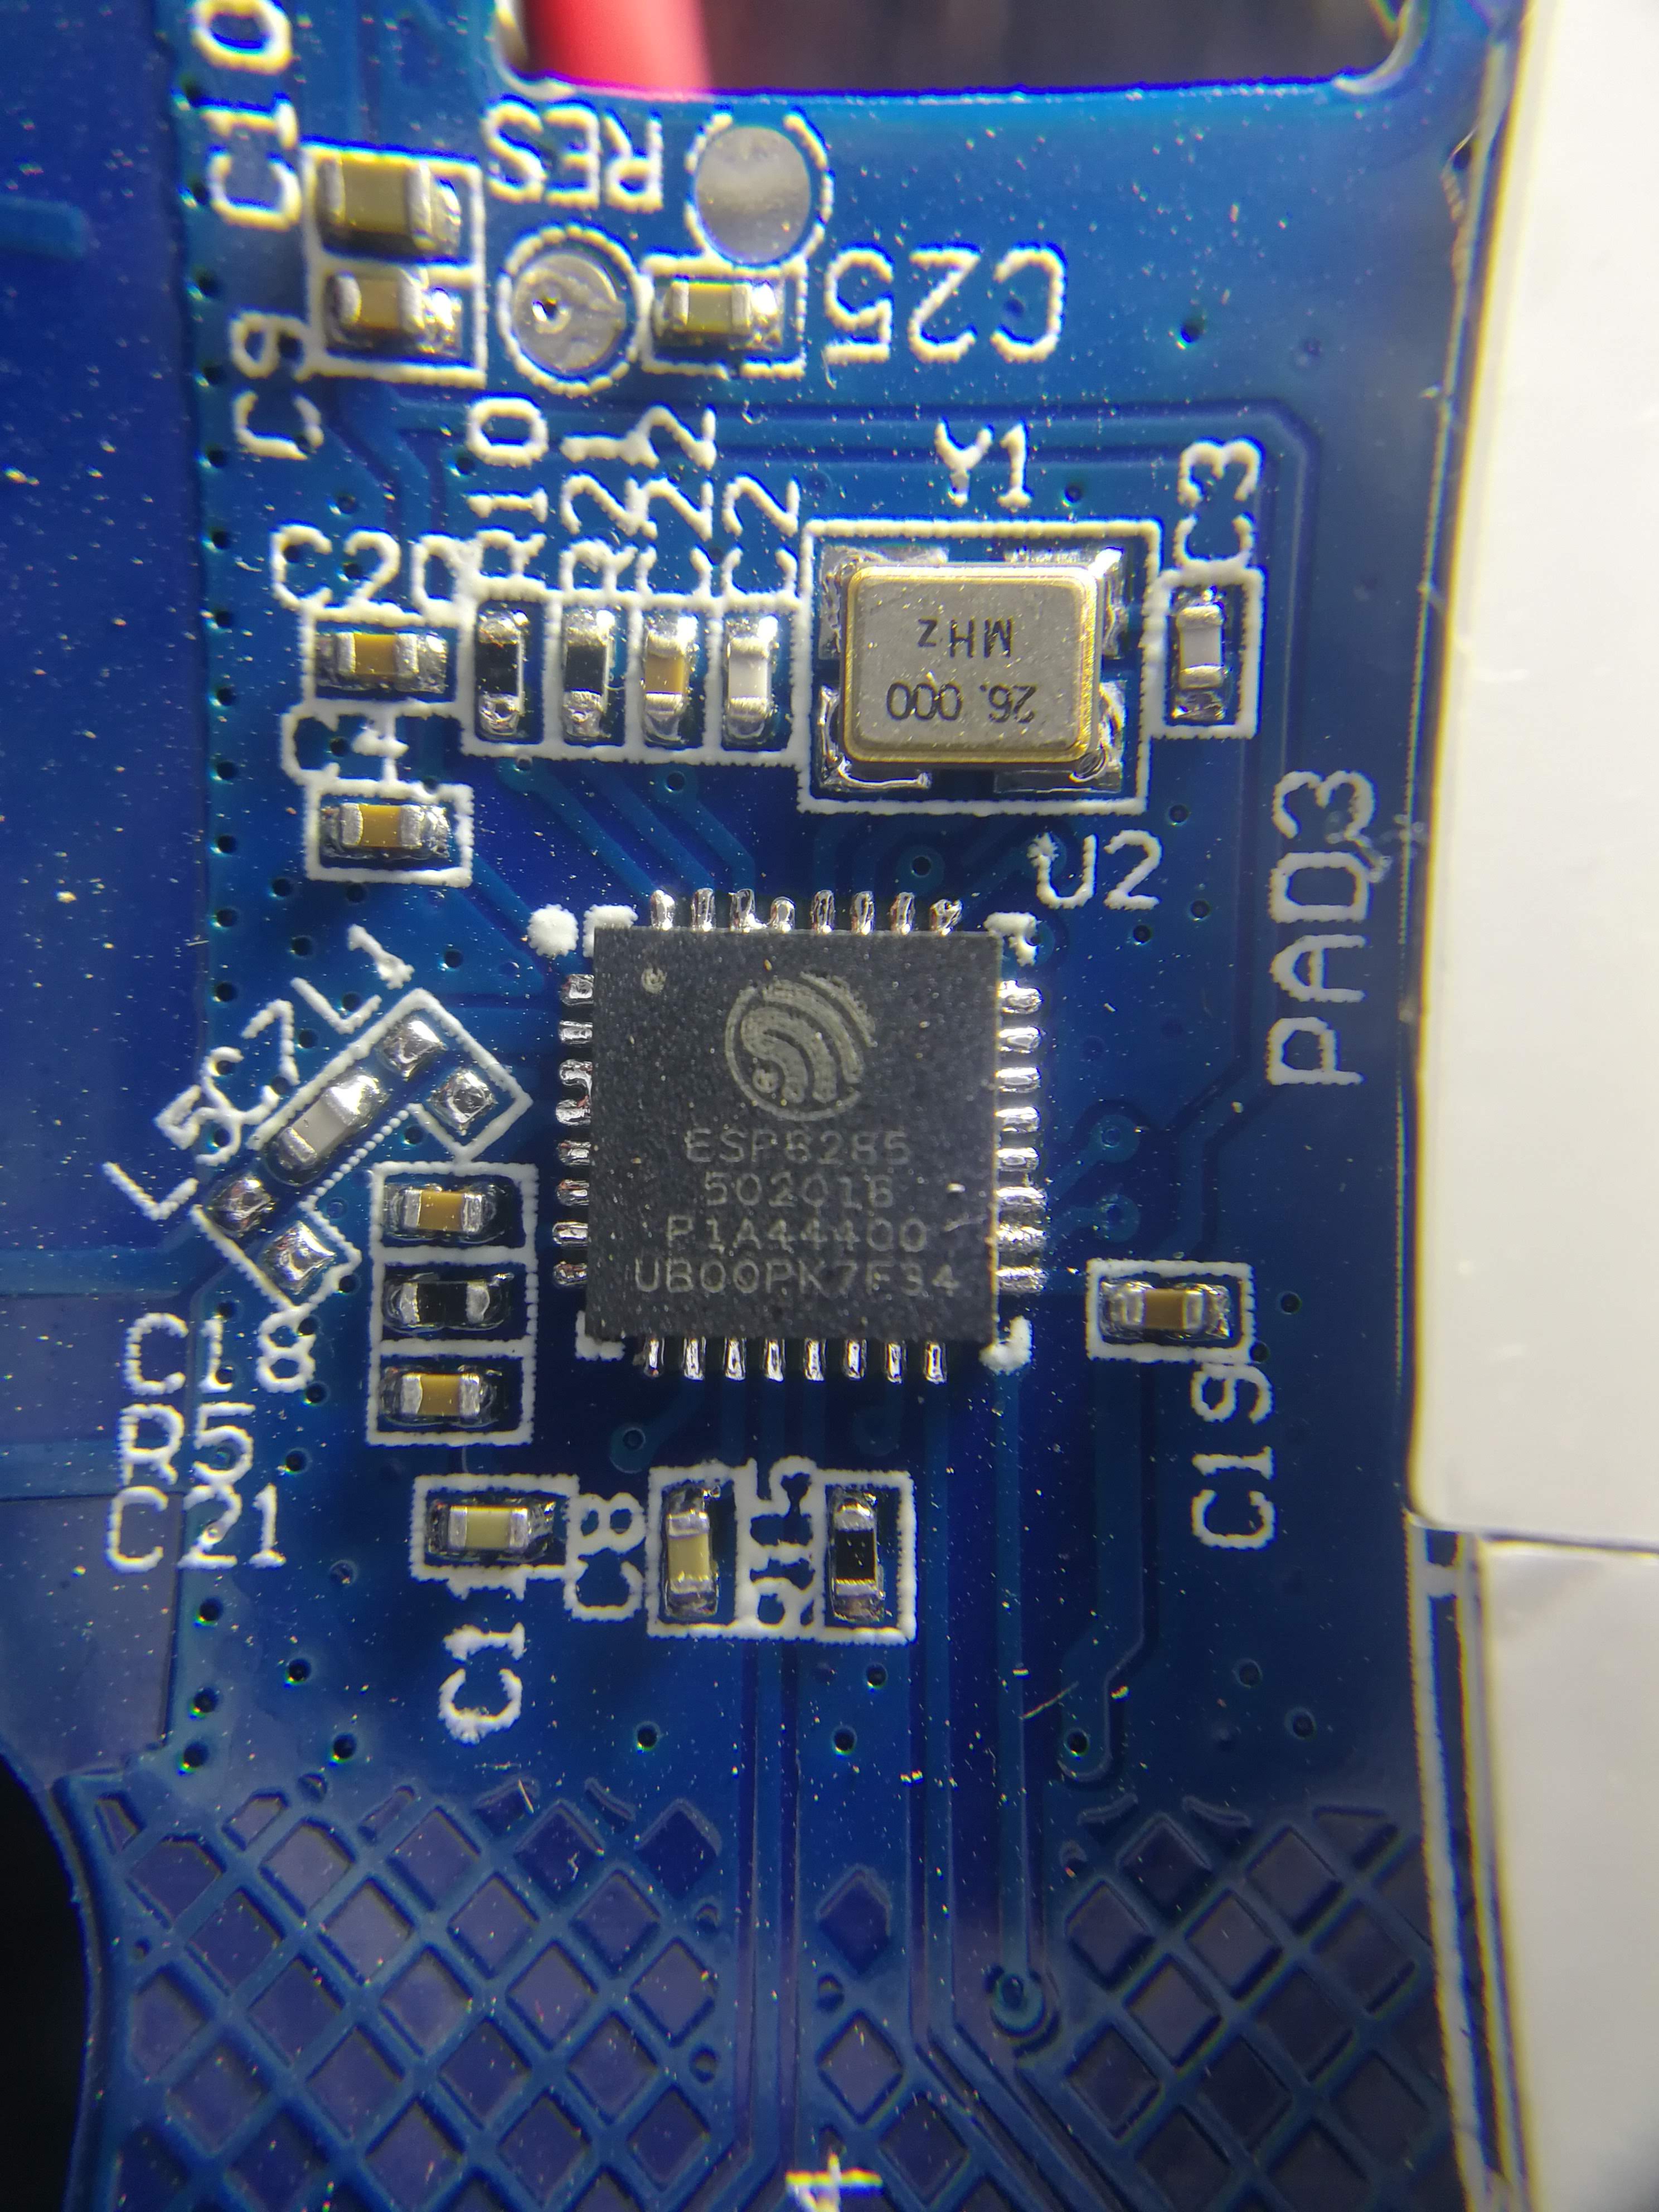
This article on github is the only one I have seen my circuit board and says OTA can be done easily (article must have been written before firmware updates or they just assuming it worked with this model)

I have soldered wire to 3.3v, gnd, tx and rx and was using ESP Easy Flasher, I know on Sonoff basics I had to hold the on/off button and disconnect/reconnect 3.3v whilst hold it down to enter flash mode. As there is no article for the new T1 I though I would try to just hit the flash button and push 6.2.1 tasmota, but then I stopped myself coz these switches aren’t cheap and I don’t want to brick.

Any help would be much appreciated.

ps here is article for flashing older version

You need to short GPIO0 and GND to enter flash mode like in https://github.com/arendst/Sonoff-Tasmota/wiki/Sonoff-Touch

1 Like

Following the article you linked, I just checked and I have ESP8285 chip.

It looks like there is track running from GPIO0 to a solder point on the back labelled ‘switch’ but when I did continuity test they aren’t joined.

I run out of time today to try the GPIO0 grounding. Will try tomorrow and post back results.

I touched GND on GPIO0 and on the 3 CH EU version I am using the middle channel touch pad changed from blue to illuminated white (there was no relay noise, just colour change) I am guessing that might be an indication that it is in flashing mode?

I went ahead an ran ESP Easy Flasher with sonoff 6.2.1.bin but it failed. Which I am gathering from the logs it couldn’t connect.

######2019-03-28######
#######0.02.003#######
######FLASH INFO######
BIN file: sonoff 6.2.1.bin
COM port: (COM4) USB Serial Port
Baud rate: 115200
######POST FLASH######
No post flash information entered...
######FLASH LOG######
[esptool.exe -vv -cd nodemcu -cb 115200 -cp COM4 -ca 0x00000 -cf "\<hidden>\Hassio\ESPEasy_mega-20181101\bin\sonoff 6.2.1.bin"]
[28/03/2019 12:08:00 PM] esptool v0.4.12 - (c) 2014 Ch. Klippel <[email protected]>
[28/03/2019 12:08:00 PM] 	setting board to nodemcu
[28/03/2019 12:08:00 PM] 	setting baudrate from 115200 to 115200
[28/03/2019 12:08:00 PM] 	setting port from  to COM4
[28/03/2019 12:08:00 PM] 	setting address from 0x00000000 to 0x00000000
[28/03/2019 12:08:00 PM] 	espcomm_upload_file
[28/03/2019 12:08:00 PM] 	espcomm_upload_mem
[28/03/2019 12:08:00 PM] 	setting serial port timeouts to 1000 ms
[28/03/2019 12:08:00 PM] opening bootloader
[28/03/2019 12:08:00 PM] resetting board
[28/03/2019 12:08:00 PM] trying to connect
[28/03/2019 12:08:00 PM] 	flush start
[28/03/2019 12:08:00 PM] 	setting serial port timeouts to 1 ms
[28/03/2019 12:08:00 PM] 	setting serial port timeouts to 1000 ms
[28/03/2019 12:08:00 PM] 	flush complete
[28/03/2019 12:08:00 PM] 	espcomm_send_command: sending command header
[28/03/2019 12:08:00 PM] 	espcomm_send_command: sending command payload
[28/03/2019 12:08:00 PM] 	read 0, requested 1
[28/03/2019 12:08:00 PM] warning: espcomm_sync failed
[28/03/2019 12:08:00 PM] error: espcomm_open failed
[28/03/2019 12:08:00 PM] error: espcomm_upload_mem failed
[2019-03-28 12:08:00] STOPPED due to 2 errors! (try reset on the unit, then start a new flash attempt)

I have blown a few more hours today, still no luck in getting into flash mode.

  1. Used putty to see if T1 was in flashing mode.
  2. Found out need to hold GPIO0 to ground for somewhere between 2 and 7 seconds (no one was definitive) after power cycling the T1.
  3. As it was hard to keep a steady hand holding a paper clip to the tiny GPIO0 leg on the ESP8285 chip and power up the FTDI with the other, I put the paper clip in my helping hands alligator claw and with rested the paperclip in place on GPIO0 and then I controlled the connect and disconnect to ground from end of the ground wire that I have bridged the FTDI ground wire side.
  4. I also found out that me grounding out ‘sometimes’ (it happens randomly) changes the colour of the middle switch light (as in picture in last reply above) which when I looked on the eWeLink app it is actually switching the switch on so it’s got nothing to do with flashing just a mere toggling of the switch.
  5. After all my efforts today I found some new information but none of it helped me.
    Putty%20config
    Settings in Putty (Serial and my FTDI is on COM4)

putty%20window
No communication happening here, I tried pressing enter twice as well, nothing happened)

I decided that units had no markings anywhere of Sonoff only the word KingArt on the ABS moulding so it must be knockoff and being in my 30 day ebay returns limit I opened case with seller to return the switches.

For some reason after I opened the return I thought I would google KingArt and look for other people who had been talking about the counterfeits and straight away seen someone had written a flashing article for this exact unit which says to use the ground switch solder point on the back not the pin leg on the ESP chip.

Sure enough his article worked at treat.

Tips:

  1. He says to ground for 1 to 2 seconds after booting it took 3 attempts before the unit would flash.
  2. I didn’t know the unit was in flash mode, I just fired up ESP Easy Flasher.exe with my bin file selected (6.2.1) and hit the flash button which failed on the first two goes at booting the KingArt unit and grounding the Switch but on the 3rd time Easier flasher took awhile and then said success.
  3. I couldn’t be bothered looking for what text I needed for Termite so I just gave the KingArt unit 240V which it then showed Sonoff AP in Wifi list and then navigated to it in my browser 192.168.4.1 put in my Wifi details in Tasmota and I was away.
  4. Once into the Tasmota Configuration I set the Module Type under the Configure Module to 30 Sonoff T1 3CH
  5. In Home Assistant in the configuration.yaml or switch.yaml or light.yaml you’ll need to register each channel by using Power1, Power2 and Power3 which you can see in action it the console view in Tasmota here is my code which I folked my lights out of the configuration.yaml and store them in light.yaml

Here’s some photos of the King Art version of the Sonoff T1 (look alike)

1 Like

It is a KingArt switch and therefore it is not a Sonoff T1 switch It is not a “fake” since the switch looks nothing like a T1 switch now it is trying to look like one. I don’t understand what would even give you an idea its a Sonoff T1 apart from a fradulent ebay listing

Inexperience, the listing, and some googling on flashing T1 not much comes up.

This article came up scrolling 4/5 way down page looks like same board as mine and he said he bought directly from sonoff and successfully flashed.

I’ll report the sellers listings as misleading before it starts every other seller jumping on the band wagon.

Hi,
I have the same switch, I have flashed it with Tasmota. It connects to wifi I can control it through the console I can see the state change in the console when I press the button, it all looks good.
However I cannot control it through hassio. I can see it is connected to my mqtt broker but HA will not acknowledge it at all.
I have it setup as a normal switch in the config file. I wonder if this is the issue. I will post the code for the switch asap.

I am at something of a loss any advice would be greatfuly received.

Yes post your config.yaml or light.yaml where you have entered it in and paste your tasmota settings too.

Rebooting Home Assistant (configurator > menu > Restart HASS) should be enough with mqtt additions, but just to make sure reboot the hypervisor(hassOS) as well Hass.io > System > Host System > Reboot.

this is what i have in the config.yaml

switch:
platform: mqtt
name: “Sonoff Switch 01”
command_topic: “cmnd/sonoffsl1/power”
state_topic: “stat/sonoffsl1/POWER”
qos: 1
payload_on: “ON”
payload_off: “OFF”
retain: true

Still not enough info to diagnose.

When you paste your code yaml is ‘strict’ with spacing one wrong space and it will stop your code dead in it’s tracks.

So when you paste your code always paste it so we can see your code as it is which includes the spacing.

To do this you must put back comma’s (referred to as back ticks) on the line above and below your code paste which on US-ENG keyboards can be found to the left the number 1 key. The symbol looks like this `

There is a difference between a 1 button and 2+ button switch with MQTT command_topic do you have single or multi switch.

Here is my 1 channel switch which is in it’s a file I created called switch.yaml just to keep the config file cleaner so I didn’t need to define group like you eg switch.

  - platform: mqtt
    name: "Scenic Light"
    state_topic: "stat/scenicls/POWER"
    command_topic: "cmnd/scenicls/POWER"
    availability_topic: "tele/scenicls/LWT"
    qos: 1
    payload_on: "ON"
    payload_off: "OFF"
    payload_available: "Online"
    payload_not_available: "Offline"
    retain: false

Please include screenshot of your tasmota MQTT settings page too.

Did you have another switches working like a sonoff or is this your first one? (if this first one we may need to go wider on setup, if one working then we are just tweaking).

Ok fair point,

switch:
    platform: mqtt
    name: "Sonoffsl1"
    command_topic: "cmnd/sonoffsl1/power"
    state_topic: "stat/sonoffsl1/POWER"
    qos: 1
    payload_on: "ON"
    payload_off: "OFF"
    retain: true    

It is a single switch.
I have sonoff basics running Tasmota which works with no issue.

  1. Change lowercase power to upcase POWER on command_topic:
  2. Restart HASS and test
  3. If fails. Post screenshot MQTT settings in tasmota GUI + restart switch and then copy and paste console code once it finishes loading.

Apart from the physical flashing there is not difference between Sonoff and Kingart once tastmota is on so look at them the same with the code eg copy and paste working code and tweak minor differences.

I have just opened a paypal case (ebay 30days run out) on the seller for ‘significantly as not described’ as they used Sonoff in the title. Initially I was upset but then after I flashed them and they were working life took over and they disappeared from thought mostly. I bought 3 of them and 1 has just failed after 2 months all I did was power off the mains and it is no longer contactable via flashing or wifi. I decided to send them all back despite having to go through soldering again (ugghh) as it has always been in the back of my mind about what shortcuts they took on the electronics/electrics as it is not a big brand which comes with thoughts of fire risk, a unit dying in the first 2 months was the flare in the sky to take action, still not heard back from paypal or the seller.

I have made these changes to the switch.

  switch:
        platform: mqtt
        name: "mqtt test"
        state_topic: "stat/sonoffls1/POWER"
        command_topic: "cmnd/sonoffls1/POWER"
        availability_topic: "tele/sonoffls1/LWT"
        qos: 1
        payload_on: "ON"
        payload_off: "OFF"
        payload_available: "Online"
        payload_not_available: "Offline"
        retain: false

My mqtt settings are,

mqtt

00:00:00 CFG: Loaded from flash at FB, Count 138
00:00:00 Project sonoffls1 Sonoff Version 6.5.0.9(sonoff)-2_5_0
00:00:00 WIF: Connecting to AP1 BTHub6-CFR5 in mode 11N as sonoffsl1-3999...
00:00:06 WIF: Connected
00:00:06 HTP: Web server active on sonoffsl1-3999 with IP address 192.168.1.122
15:13:08 MQT: Attempting connection...
15:13:09 MQT: Connected
15:13:09 MQT: tele/sonoffsl1/LWT = Online (retained)
15:13:09 MQT: cmnd/sonoffsl1/POWER = 
15:13:09 MQT: tele/sonoffsl1/INFO1 = {"Module":"Sonoff T1 1CH","Version":"6.5.0.9(sonoff)","FallbackTopic":"cmnd/DVES_BEEF9F_fb/","GroupTopic":"sonoffs"}
15:13:09 MQT: tele/sonoffsl1/INFO2 = {"WebServerMode":"Admin","Hostname":"sonoffsl1-3999","IPAddress":"192.168.1.122"}
15:13:09 MQT: tele/sonoffsl1/INFO3 = {"RestartReason":"External System"}
15:13:09 MQT: stat/sonoffsl1/RESULT = {"POWER":"ON"}
15:13:09 MQT: stat/sonoffsl1/POWER = ON
15:13:09 MQT: stat/sonoffsl1/RESULT = {"POWER":"ON"}
15:13:09 MQT: stat/sonoffsl1/POWER = ON
15:13:17 MQT: tele/sonoffsl1/STATE = {"Time":"2019-05-27T15:13:17","Uptime":"0T00:00:17","Vcc":3.231,"SleepMode":"Dynamic","Sleep":50,"LoadAvg":23,"POWER":"ON","Wifi":{"AP":1,"SSId":"BTHub6-CFR5","BSSId":"24:20:C7:69:81:F2","Channel":11,"RSSI":100,"LinkCount":1,"Downtime":"0T00:00:06"}}

Your code spacing is different from your previous code lots more spacing has been added, Generally rule of thumb is each proceeding line is 2 spaces from the above line where it is a subordinate of the above line eg you are defining characteristics of what your defined above but as you can see from the switches we are just setting a parameter rather than moving to the next parameter than stepping down into it rules or filters of a parameter which would cause us to create a new line and then space twice to let YAML know it is a sub definition.

So switch: is the group and should be far most left(no spaces) then each switch will start 2 spaces and then - to define it you then add your code keeping it all inline after you have finished adding a switch you start a new line with the - and then then next switch eg copy and paste. Spacing is crucial to YAML you have to get spaces correct… NEVER use TAB as it creates different code.

Try this. And you other sonoffs should follow similar code so the - is defining each device

switch:
  - platform: mqtt
    name: "Our room"
    state_topic: "stat/sonoffls1/POWER"
    command_topic: "cmnd/sonoffls1/POWER"
    availability_topic: "tele/sonoffls1/LWT"
    qos: 1
    payload_on: "ON"
    payload_off: "OFF"
    payload_available: "Online"
    payload_not_available: "Offline"
    retain: false
  - platform: mqtt
    name: "Kids room"
    state_topic: "stat/sonoffls2/POWER"
    command_topic: "cmnd/sonoffls2/POWER"
    availability_topic: "tele/sonoffls2/LWT"
    qos: 1
    payload_on: "ON"
    payload_off: "OFF"
    payload_available: "Online"
    payload_not_available: "Offline"
    retain: false

Ok I have copied and pasted you code. Restarted HA but still the same issue

Is is showing up in your entity list?

If so can you open it up and toggle it

Hi sorry for the late reply. I’ve being working.

yes it shows in the entity list but it shows as unavailable.

entity