Floorplan UI with Color synced lights

Hi all! New to this community, I decided to attempt something that was bugging me with 3D floorplans - My hue bulbs have color, and the floorplans I saw didn’t seem to do this dynamically. So here it is! My apporach to a floorplan focused minimal UI. This is a work in progress, I hope to add alot more custom gestures etc soon.

Check out a video of the whole UI: https://youtu.be/KcfZc1MXP_A


Features

  • Dynamic 3D Floorplan: Hue and Brightness mapped individual lights with custom popup controller.
  • Less cluttered interface displaying more information on a long press, inspired by Mattias Persson.
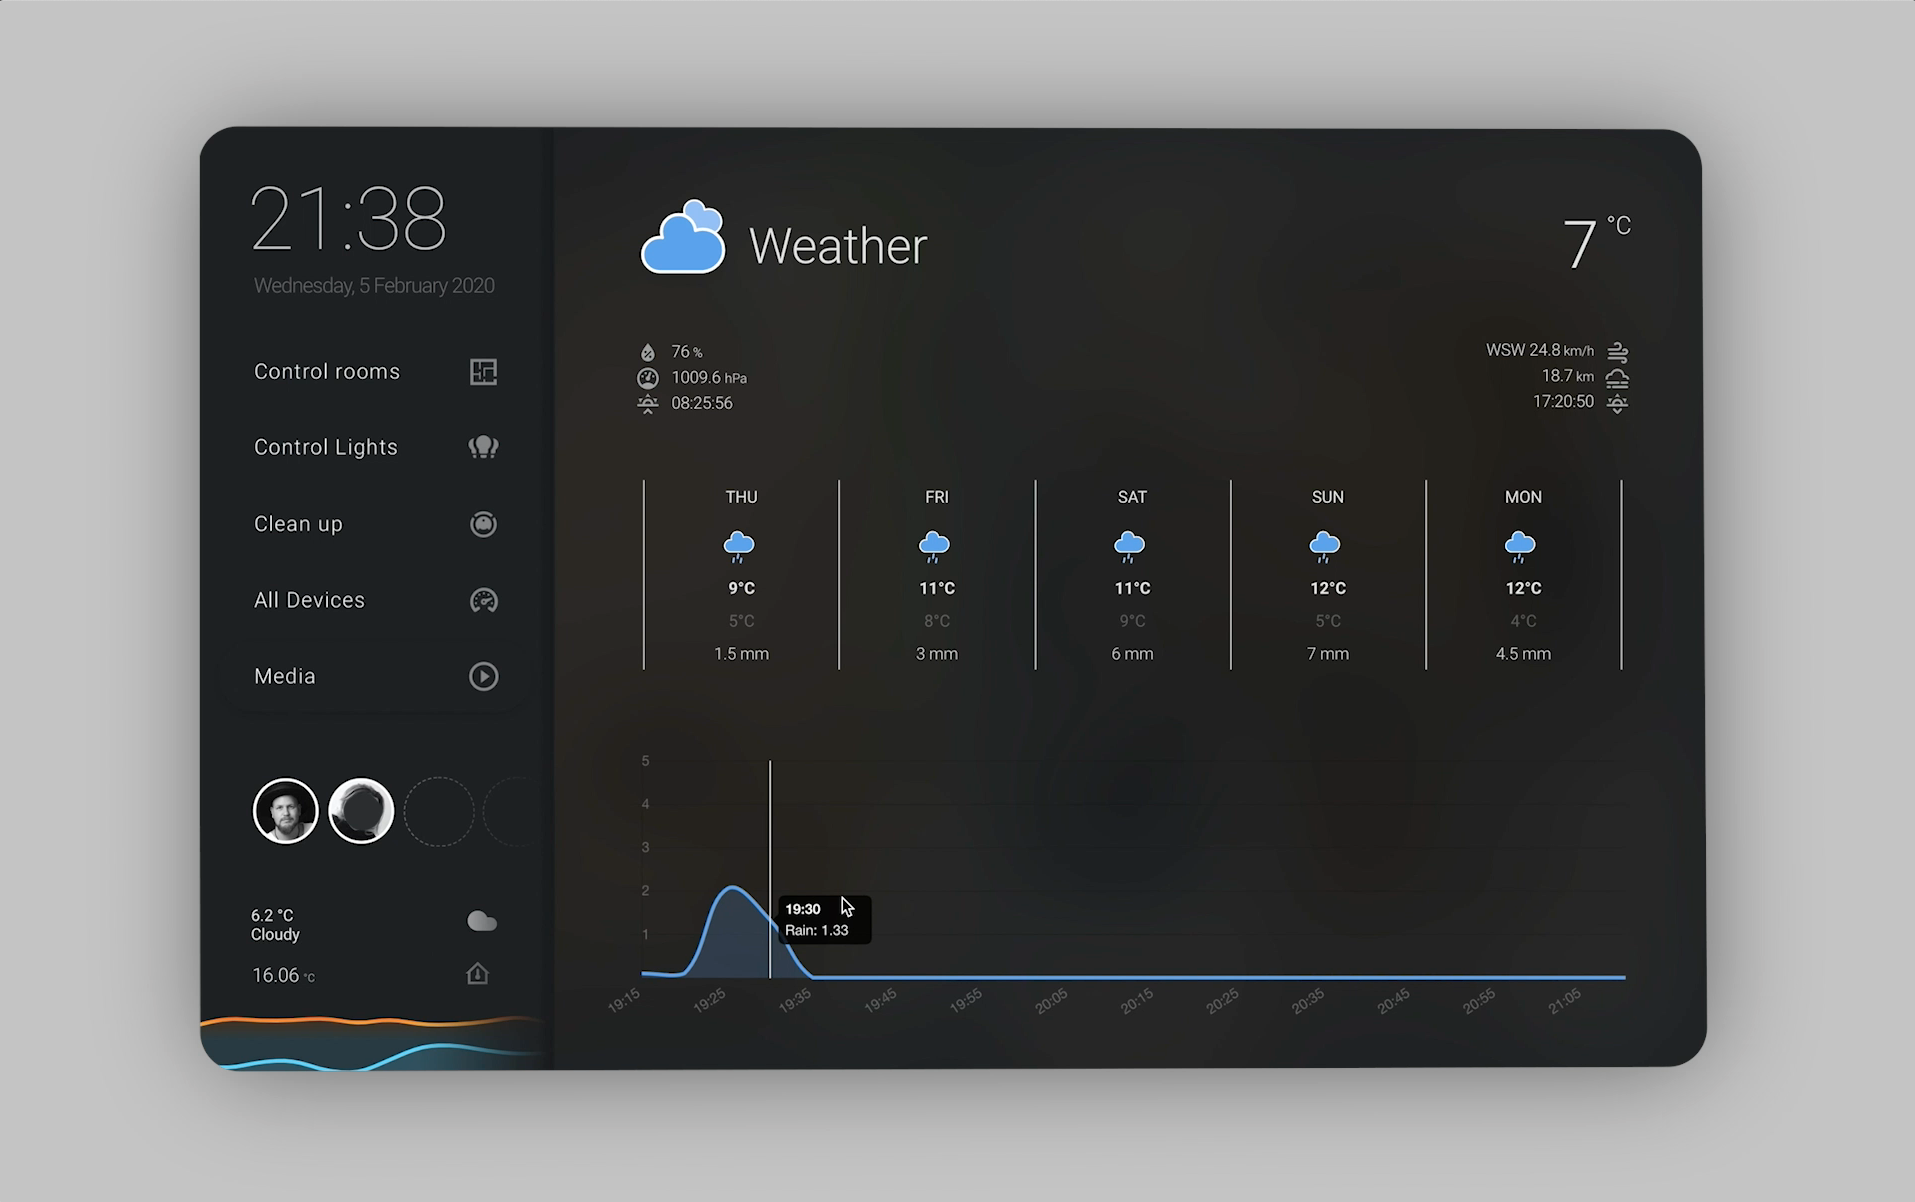
  • Custom rain card to display predicted rain in the next 2 hours - seperate repo here
  • Custom Xiaomi View for rapid room based zone cleanup

Approach & Picture-Elements Styling

This approach is heavily based on the Picture Elements Card for each view, and does not work in a traditional “Card” based way. Most cards include a heavy amount of styling and positioning. Some of this styling overrides the custom cards to use View Width so that their fonts, widths and heights scale according to the width of the display, so that I can use my interface on any resolution.

I first designed my whole UI in Pixelmator so that I could export the button images and Xiaomi floorplan overlay images.

The image transparent.png is used on state_image picture-elements to hide elements if not needed, though this was used before I realised I could conditionally display elements :slight_smile: - will update this soon to clean it up.

The sidebar

Note, the sidebar is repeated across every view in the lovelace.yaml file and includes buttons for the views.

  • Control Rooms: Tap a room to turn on or off all lights, hold tap to show custom controls.
  • Control Lights: Tap a light icon to turn on or off individual lights, hold tap to show custom controls.
  • Cleanup: Direct control of Xiaomi Mi robot and preset zones for room based cleanup
  • All Devices: Show all devices in a familiar homekit UI, why not?
  • Media: Button shows currently playing media, if playing, view shows relevant views for Plex or Spotify.
  • Weather: Shows weather forecast and predicted rain from Buienradar.

Hardware in my Home

  • Xgimi H1 PROJECTOR
  • Sound system (controlled by an IR Blaster)
  • Philips Hue Bulbs
  • Osram Garden Poles (used for roof, outdoors)
  • Xiaomi Mi Robot
  • Philips motion sensors

Individual hue & brightness lights

Map entities to css with config-template-card:
This approach relies on config-template-card. The picture elements card is wrapped inside the config-template-card. All entites used are listed on the config card so that they can be passed to the templates used in CSS. To understand why, check: https://github.com/iantrich/config-template-card

Render Individual Lights:
To have multiple lights overlayed on top of each other, the solution is actually pretty simple. You render an image for each individual light and use the CSS property filter mix-blend-mode: lighten. This will make sure only the “light” part of the image is shown, and will blend together any amount of images on top.

Hue and Opacity
To map one of your light images to the actual live RGB color of the bulb, you can use the following CSS template style which will adjust the hue rotation to the hue of the bulb (in this case, light.table):

style:
  filter: '${ "hue-rotate(" + (states[''light.table''].attributes.hs_color ? states[''light.table''].attributes.hs_color[0] : 0) + "deg)"}'

OR, include saturation (I found it buggy):

style:
  filter: '${ "hue-rotate(" + (states[''light.table''].attributes.hs_color ? states[''light.table''].attributes.hs_color[0] : 0) + "deg) saturate(" + (states[''light.table''].attributes.hs_color ? states[''light.table''].attributes.hs_color[1] : 100)+ "%)"}'

To map opacity to the entity’s brightness, use this css template:

style:
  opacity: '${ states[''light.table''].attributes.brightness / 255 }'

Cleanup

This is a custom screen made up of picture-elements that interact with the xiaomi robot vacuum component. An input text is used to determine the vacuums current state (cleaning, returning home etc) and that is used to conditionally change the picture-elements.

Weather

I built a custom card to display projected rain in the next 2 hours, using Buien Radar (Netherlands service).
For more on this card, check out this repo

Full Config:

Other Resources:

Heavily inspied by Mattias Persson

For a great article on making a 3D floorplan, check this out

145 Likes

Did you spend a lot of time designing the actual floorplan images? Really interested in this kind of set up but not sure if it should be my prio 1 or 100 :smiley:

1 Like

Once you have your floor plan set up in something like sweet home 3D, its just a matter of turning each light on, render image, turn another light on, render an image etc. This takes time, but for the computer, not you ;).

Once you have an image for each light, then you can basically just put one image ontop of the other:
– Light 1 --------
– Light 2 --------
– Base Image –

To make all of the images blend together you modify it with this simple CSS style:

mix-blend-mode: lighten;

The longest part in all of this is really just making your home in a 3D program like sweethome 3D, which can be as simple or complicated as you want it to be. Sweethome 3D makes this pretty damn simple. Its like the Sims :slight_smile:

5 Likes

Love this design. I’ve been messing arround with it. Love it so far, but still need to do a lot to fit all my needs. Thanks for the config! Very much appreciated.

1 Like

Hi. Love your UI design!

I have extremely limited experience with programming (like maybe 1 year of C++ way back in high school and a bit of html modifications) so I’ve been slowly breaking down your code, seeing what they are linked to and modifying it to suit my house.

One thing I can’t figure out is the code in your ui-lovelace.yaml file under individual light overlays where you call up the entities “light.living_room_lights”, “light.stairs_lights” and so on which has the hold actions call-service and brings out the browser_mod.popup. I know that it creates the pop up for the brightness/color template, but I can’t figure out what it controls exactly (I can’t find what it’s referencing from or if it is to be referenced from something else as I can’t find any other mentions of these specific names anywhere else)

Another thing that I’m unsure of is the Plex not playing, show Spotify condition. I don’t plan on using Plex so I’ll always have Spotify showing. What exactly can I do to this code to do that?

  • conditions:
    - entity: media_player.plex_projector
    state: unavailable
    elements:
    - client_id: 90cfab5d45f2436a9399c99d5fe23443
    style:
    left: 81%
    top: 50%
    width: 27%
    type: ‘custom:spotify-card’
    type: conditional

I may be in over my head starting with this, but the it seems like its worth the effort.

Many thanks!

2 Likes

Question. How can I hide my motion sensor icon in my lovelace? I want to just show the motion icon only when something is detected.

1 Like

This is insanely nice. I need to try to copy this and got it set up. This is exactly what I want.
Did you design this for a certain tablet or touch monitor?

1 Like

Wrap the icon element inside a conditional card! Check this out:

I designed it for 2560x1600 or 1280x800, however, you could easily adjust all of this for 1920x1080 with the UI source files I just included in the repo. (Right now the source is pixelmator).

Side note: because I used VW for all styles and font sizes, it should dynamically scale it’s width to any resolution - only the height need be adjusted for another ratio.

1 Like

Hey jerms! Awesome that you are giving this a shot! It’s a great way to learn some basic scripting.

Apologies for not documenting super well, there’s a lot of duplicate stuff going on here.

If you are referring to the elements in the “room control” view, basically those are transparent overlays that act as the buttons so when you tap on a room you don’t tap the whole home. Because all the light images overlap each other, I had to create separate “buttons” to actually control them.

The second thing is a card wrapped in a conditional card, ‘card-inception’ if you will. Interstellar pun intended.

If you remove this part:


conditions:
- entity: media_player.plex_projector
state: unavailable
elements:

and the “type:conditional” line, then reverse indent what’s left (back a tab) it should work just as a card that always shows:


- client_id: 90cfab5d45f2436a9399c99d5fe23443
  style:
    left: 81%
    top: 50%
    width: 27%
  type: ‘custom:spotify-card’

I will update all my images to explain this “invisible” layer.

Hope this helps!

2 Likes

@lukevink thank you so much for your time today.

He helped me troubleshoot an issue I’ve had. the picture-elements card has a main background image. that image, determines the whole box. so if the image is a square, so will your UI be.

My entire UI was based on a square, had a large scroll bar and images were way out of position. All working well now.

Thank you again for your valuable time, Luke!

1 Like

Great! Did you do all combinations of all lights on/off, or do you only need to have one on and one off image for each light?

1 Like

Another great question, how does this look on mobile phone? Is it useable and do you have a screenshot? (BTW it looks great :smiley: )

Hi Juice,

No, it’s not really usable on a mobile phone. When I turn it sideways, maybe a bit…

I am using this on the 21” Touchscreen monitor i have mounted to my wall, and on mobile I use custom header add-on to hide this section and show another layout which is mobile friendly. So when I go to Ha with mobile, i see a different dashboard automatically than when I browse to it from my computer. :slight_smile:

Gotta love the layout, still work in progress on my side. In between my busy schedule (2 kids and a pregant wife) i need to find some time to finish this. Usually at night when everyone elses asleep, and I make little progress because I usually fall asleep behind the computer myself. Doh! :joy::joy:

@lukevink i have this weird thing though. The time does not refresh. So, basically. When I load the page the current time shows. When I wait a few minutes, the time remains te same as when I loaded the page.

When I press an action card to turn lights on or off, etc. The time also refreshes and shows the actual current time lol. So was thinking, maybe I should have some auto refresh of the page built in. Every 20 sec a new refresh. But it’s a little weird and should just work. Maybe you or anyone else has some brilliant idea’s I could test :sweat_smile:

2 Likes

Hey so the images you can have one base image of the whole house with no lights on, then an image of the whole house with one light on, then another light etc.

You don’t really need separate rooms you can just overlap everything. (Because of the blend mode)

1 Like

Alot of performance learnings on this one! Going to update the config soon with some performance tweaks and other adjustments.

1 Like

Thats really odd! going to look into this. Mine seems to work and update just fine.

another odd one, not only time but also the buttons I’ve added (the lock ones).

Yesterday I entered, and after 2 minutes the lock icon was showing that the door was still open. So i went to check, nope door is closed. I checked the sensor state, it showed closed. The dashboard showed open.

When I pressed any random light on the dashboard, the entire dashboard seems to refresh. Time updates, the lock icon went from open to close. Really weird.

I hope we can solve this in a timely manner. WAF is dropping lol, and need to be going to migrate back to old dashboard if this is not solved. Darn.

@lukevink good news. I’ve managed to “fix” it. At the end of the config there is an entity list. I only had the light bulbs there and those worked fine on auto updating. So I’ve added all sensors and binary sensors to that list too, which forces HA to check and update the entity when the state changes. So everything is fixed. Time, date, locks everything update on the fly.

I’ve got this all working perfectly except for the dynamic style attributes. They seem to not be taking for some reason. Can’t tell what I’m doing wrong here.

opacity: ${states['light.office'].attributes['brightness']}

If I try the same attribute using a ninja template I get a good value. Using the above, no opacity attribute is set at all. If I hard code 25%, it works.