HA NeoPool MQTT: integration of Tasmota NeoPool (for Sugar Valley, Hayward/Aquarite, Bayrol devices)

HA-NeoPool-MQTT

GitHub Repository
BuyMeCoffee
Community Forum

Home Assistant MQTT integration for Tasmota NeoPool module (ESP32 and ESP8266 devices).

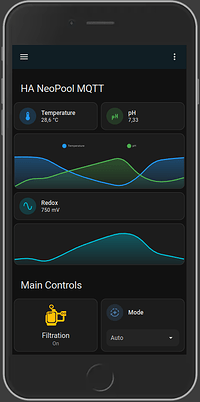
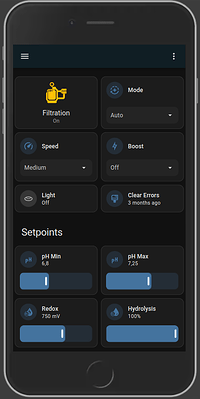
Notebook/PC Layout ha_neopool_mqtt_lovelace.yaml:

Reponsive Layout ha_neopool_mqtt_lovelace_responsive.yaml:

Since the native Tasmota integration only supports standard entities to HA (switches, selects, numbers, etc.), I opened a discussion on Tasmota’s repo with NeoPool dev, and decided for now to integrate all possible entities using purely HA’s MQTT integration entities.

All NeoPool entities are created by the provided package ha_neopool_mqtt_package.yaml via the native MQTT entities of HA (Note: It does not created a new device, it creates entities only).

This integration needs at minimum Tasmota v13.3.0 with compiled NeoPool driver.
Since the NeoPool driver is not contained in Tasmota precompiled binaries, you need to compile your own build or use one of the precompiled binary from the firmware folder. If you initial flash your ESP with one of the precompiled binaries, you can skip the points “Custom pre-configured Tasmota build” and “Configuration steps 1.” below.

For flashing ESP32/ESP8266 I highly recommend using ESP_Flasher by @Jason2866, in v2.0.1 he kindly implemented by my request support for ESP32 high-speed baud rates (1.5Mb/s) for very quick and reliable flashing and he also added support for factory images.

Custom pre-configured Tasmota build

NOTE for beginners: If you have no idea about how to custom compile Tasmota, you can use the precompiled files in the firmware folder.

When you custom compile your version, make sure to choose the dev branch and verify after flashing that version is at least v13.2.0.2. I will update notes to specify the stable min. version once known. When you custom compile your build, you’ll need to use the user_config_override.h provided in the compiler folder of this repository; this will automatically enable NeoPool and also configure all settings automatically without requiring to manually follow the manual steps of next section.

The only thing you’ll have to check is if the activated template is correct, you do this from Tasmota console executing command Module:

13:41:13.489 CMD: Module
13:41:13.491 RSL: RESULT = {"Module":{"0":"NeoPool Atom Lite + Tail485"}}

If the result is not the one you see above, you need to issue the command Module 0 to activate the preconfigured template:

13:43:35.087 CMD: module 0
13:43:35.090 RSL: RESULT = {"Module":{"0":"NeoPool Atom Lite + Tail485"}}

In case you don’t use the provided user_config_override.h file, you’ll need to follow the Manual Configuration Steps section below.

Configuration steps

  1. Tasmota
    From Tasmota console, run these commands to optimize the device configuration:

    This sets Retain flag for telemetry topic so that HA entities are immediately available

    SensorRetain 1
    

    This ensures that Tasmota %topic% is set to SmartPool so you don’t have to change all the topics in the package file
    It also sets device name, friendly name and mqtt client name (for easier identification in the broker)

    Backlog Topic SmartPool; DeviceName SmartPool; FriendlyName SmartPool; MqttClient SmartPool;
    

    Define a rule to keep the Sugar Valley device clock in sync with Tasmota’s device clock and also sets NeoPool SENSOR topic to update every 60s for often changed (measurements) values
    This also disables the device from being discovered by HA so it won’t create unnecessary and duplicate entities for NeoPool

    Rule1 ON Time#Initialized DO NPTime 0 ENDON ON Time#Set DO NPTime 0 ENDON ON System#Boot DO Backlog Discover 0; NPTeleperiod 60; ENDON
    

    Configure user template for GPIO definition based on device type
    Atom Lite + Tail485 (GPIO26: NeoPool TX / GPIO32: NeoPool RX)

    Template {"NAME":"NeoPool Atom Lite + Tail485","GPIO":[0,0,0,0,0,0,0,0,0,0,0,0,0,0,0,1,0,1,1,1,0,0,6976,0,0,0,0,0,7008,1,0,0,0,0,0,0],"FLAG":0,"BASE":1}
    

    AtomS3 Lite + Atomic RS485 Base (GPIO19: NeoPool TX - GPIO22: NeoPool RX)

    Template {"NAME":"NeoPool AtomS3 Lite + Atomic RS485 Base","GPIO":[0,0,0,0,0,0,0,0,0,0,0,0,0,0,0,6976,0,0,7008,0,0,0,0,0,0,0,0,0,0,0,0,0,0,0,0,0],"FLAG":0,"BASE":1}
    

    Other ESP32/ESP8266 devices (GPIO3: NeoPool TX - GPIO1: NeoPool RX):

    Template {"NAME":"NeoPool ESP32/ESP8266","GPIO":[1,6528,1,6496,1,1,0,0,1,1,1,1,1,1],"FLAG":0,"BASE":18}
    

    Activate Rule1 and User GPIO Template

    Backlog Rule1 4;Rule1 1; Module 0;
    
  2. Home Assistant
    Add the Home Assistant MQTT integration properly configured and working.

  3. Home Assistant
    Add ha_neopool_mqtt_package.yaml as Home Assistant package. Check HA docs on how to configure HA for package usage.
    This integration will not create a device, only entities. To check if the ha_neopool_mqtt_package.yaml is working, go to HA “Settings”, “Devices & services”, “Entities” and search for the entities “neopool_mqtt”.

  4. Home Assistant
    Add the HACS (Home Assistant Community Store), if not already done.

  5. Home Assistant
    The user interface uses the following cards, which are available via HACS and which you must first install:

  6. Home Assistant
    Add one of the two provided lovelace UI ha_neopool_mqtt_lovelace*.yaml.
    The lovelace UI yaml files here are extracted from the raw lovelace file. To use it edit the raw lovelace config within your HA Dashboard and paste the contents of one of the yaml file below the top word views:. Select one of the two possible lovelace files:

    • ha_neopool_mqtt_lovelace.yaml for pc/notebook display resolutions
    • ha_neopool_mqtt_lovelace_responsive.yaml using standard HA cards without resolution limitations
      install lovelace

Changelog

  • May 27, 2024:
    • Change pH tank level default device class as ‘problem’
    • Change hydrolysis low production device class as ‘problem’
    • Update lovelace responsive UI:
      • Add hydrolysis water flow sensor
      • Move ph water flow alarm to pH info
  • May 19, 2024:
    • Created new Water Flow binary sensor based on hydrolysis_fl1 binary sensor
    • Updated lovelace UI to accomodate Water Flow sensor

Credits

Big thanks to @fdebrus for inspiring me and @curzon01 for the great support.

Issues/Discussion

Please open an issue in this repo if you’re sure there’s a bug. For discussions/general requests, please refer to this thread in HA community.

Coffee

If you like this integration, I’ll gladly accept some quality coffee, but please don’t feel obliged. :slight_smile:

BuyMeCoffee


5 Likes

I’d also like to share my hw setup, that I highly recommend to interface the water treatment devices:

It’s an M5Stack Atom Lite connected to its Tail485 addon (on the bottom).

I chose this because the Atom Lite is a very good ESP32 device, I use it for other projects to, and in this case the real benefit is the Tail485 addon that integrates a 9-24V DC/DC voltage regulator, that outputs the 5V needed to power the Atom Lite. This means that no external power supply is needed when connected to an RS485 interface that also offers a power pin, like the Aquarite+ with its 12v pin. So basically you have a very small device (it’s like two coins), that you can connect and power inside the Aquarite+ directly.

The cost is $15 total: Search Results | m5stack-store

For the tasmota configuration, please follow the official Neopool instructions for the Atom+Tail485 setup.

1 Like

Hi Alex,
I’ve try to install the firmware bin file from ESP_Flasher, but after the download apperas this error (non stop)


First time with Atom, next ESP32 same thinks

Does the flasher recognize the device? When it starts you should see something like this:

Using 'COM3' as serial port.
Connecting....
Detecting chip type... Unsupported detection protocol, switching and trying again...
Connecting....
Detecting chip type... ESP32
Connecting.....

Chip Info:
 - Chip Family: ESP32
 - Chip Model: ESP32-PICO-D4 (revision v1.0)
 - Number of Cores: 2
 - Max CPU Frequency: 240MHz
 - Has Bluetooth: YES
 - Has Embedded Flash: YES
 - Has Factory-Calibrated ADC: YES
 - MAC Address: E8:9F:6D:09:63:C0
Uploading stub...
Running stub...
Stub running...
Changing baud rate to 1500000
Changed.
 - Flash Size: 4MB
Detected factory firmware Image, flashing without changes
Erasing flash (this may take a while)...
Chip erase completed successfully in 9.6s
Flash will be erased from 0x00000000 to 0x00335fff...
Compressed 3363248 bytes to 2113624...

Make sure to select the correct com port and show me the log since the beginning. You can copy&paste the text without doing screenshots.

Alex, this is what ESP Flasher recognize.

After that start to download to 100%

than happen the “invalid header” non stop…

Sorry for the screenshot… I haven’t read all your reply!

That’s not the Atom Lite. It should be recognised like this: Chip Model: ESP32-PICO-D4 (revision v1.0)

Show me a pic of the device so we can see what you ordered. :slight_smile:

Also: try flashing the ESP32 generic image, not the Atom Lite. It should work.

this is what I’ve buy from this link:
https://www.aliexpress.us/item/3256804991637877.html?spm=a2g0o.order_list.order_list_main.23.784b3696LzOoXH&gatewayAdapt=ita2usa4itemAdapt

I’ve try all three you posted, but same thinks

That’s not the Atom Lite. It’s the AtomS3 Lite and it requires a different firmware. I’ll link it later.

Why did you buy different devices? :slight_smile:

I would buy directly on M5Stack shop:

Atom Lite: ATOM Lite ESP32 IoT Development Kit | m5stack-store
Tail485: ATOM Tail485 - RS485 Converter for ATOM | m5stack-store

Anyway, the RS485 Base you bought is compatible also with Atom Lite.

Ok, I compiled the ESP32 S3 firmware, you will find it in the folder of the repository.

Also, since you didn’t order the Tail485 but the Atomic RS485 Base, the GPIO pins are different.

After flashing the device, once you reach Tasmota web UI, you will need to change the GPIO configuration with this:

I still don’t understand why you bought different devices…:slight_smile:

Hi Alex,

usually, when purchasing electronic products from the USA with shipping to Italy, customs duties need to be paid.
Perhaps for products of such low value, it may not be necessary, but I wanted to avoid any customs issues.

That’s simply the reason why I chose to buy the product from AliExpress.
Thank you for recompiling my device.
Tonight I will test again.

Then, at the end, with what I’ve saved, I’ll treat you to 2 coffees :slight_smile:

With such low values there’s no custom duties to be paid.

But apart that, aliexpress sells the Atom Lite…you simply confused models and bought another device.

Right, I didn’t know there were more models.
Hopefully I make that work… a further challenge!

If you can, order the Atom Lite and the Tail485, so you are in the same configuration as we are. It’s not a waste of money, since you can always use it for future projects.

I’ll try to do a quick test with what I have at home now.
If it doesn’t work, I’ll try to order the configuration you posted.

If it flashes correctly it will work. You will only have to change the GPIO configuration in Tasmota since the Tail485 is different vs the Atomic RS485.

Wow, Alex, you are a genius!
Below the firmware flashed.
Now I can see in the wifi another network called SmartPool-5488
Next step?

Using ‘COM5’ as serial port.
Connecting…
Detecting chip type… ESP32-S3
Connecting…

Chip Info:

  • Chip Family: ESP32
  • Chip Model: ESP32-S3 (revision v0.1)
  • Number of Cores: 1
  • Max CPU Frequency: 80MHz
  • Has Bluetooth: YES
  • Has Embedded Flash: NO
  • Has Factory-Calibrated ADC: NO
  • MAC Address: F4:12:FA:66:55:70
    Uploading stub…
    Running stub…
    Stub running…
    Changing baud rate to 1500000
    Changed.
  • Flash Size: 8MB
    Detected factory firmware Image, flashing without changes
    Erasing flash (this may take a while)…
    Chip erase completed successfully in 3.7s
    Flash will be erased from 0x00000000 to 0x001fbfff…
    Flash params set to 0x023f
    Compressed 2078864 bytes to 1350827…
    Writing at 0x00000000… (1 %)
    Writing at 0x000124ba… (2 %)
    Writing at 0x0001a4c1… (3 %)
    Writing at 0x0002632a… (4 %)
    Writing at 0x0002b95b… (6 %)
    Writing at 0x00031645… (7 %)
    Writing at 0x00036617… (8 %)
    Writing at 0x0003b9d8… (9 %)
    Writing at 0x000409b9… (10 %)
    Writing at 0x00045b34… (12 %)
    Writing at 0x0004a91a… (13 %)
    Writing at 0x0004f639… (14 %)
    Writing at 0x000543ce… (15 %)
    Writing at 0x00058f6f… (16 %)
    Writing at 0x0005e7b6… (18 %)
    Writing at 0x00063dae… (19 %)
    Writing at 0x00069739… (20 %)
    Writing at 0x0006e748… (21 %)
    Writing at 0x00073721… (22 %)
    Writing at 0x000787d0… (24 %)
    Writing at 0x0007d719… (25 %)
    Writing at 0x000827b4… (26 %)
    Writing at 0x0008771c… (27 %)
    Writing at 0x0008c8be… (28 %)
    Writing at 0x000918dc… (30 %)
    Writing at 0x00096998… (31 %)
    Writing at 0x0009bdf2… (32 %)
    Writing at 0x000a119f… (33 %)
    Writing at 0x000a6924… (34 %)
    Writing at 0x000ac401… (36 %)
    Writing at 0x000b169b… (37 %)
    Writing at 0x000b6e93… (38 %)
    Writing at 0x000bc7b8… (39 %)
    Writing at 0x000e4b1c… (40 %)
    Writing at 0x000ec981… (42 %)
    Writing at 0x000f590a… (43 %)
    Writing at 0x000fe0dc… (44 %)
    Writing at 0x00106728… (45 %)
    Writing at 0x0010dd5a… (46 %)
    Writing at 0x001189c4… (48 %)
    Writing at 0x0011e61e… (49 %)
    Writing at 0x00123c7c… (50 %)
    Writing at 0x00128e79… (51 %)
    Writing at 0x0012e0ff… (53 %)
    Writing at 0x001332ba… (54 %)
    Writing at 0x0013834f… (55 %)
    Writing at 0x0013d989… (56 %)
    Writing at 0x00142de6… (57 %)
    Writing at 0x00148278… (59 %)
    Writing at 0x0014e144… (60 %)
    Writing at 0x001535f8… (61 %)
    Writing at 0x00158dd8… (62 %)
    Writing at 0x0015e66f… (63 %)
    Writing at 0x0016331b… (65 %)
    Writing at 0x001682d6… (66 %)
    Writing at 0x0016d112… (67 %)
    Writing at 0x00171dea… (68 %)
    Writing at 0x00176d56… (69 %)
    Writing at 0x0017ba2e… (71 %)
    Writing at 0x00180bb7… (72 %)
    Writing at 0x0018635b… (73 %)
    Writing at 0x0018b984… (74 %)
    Writing at 0x0019131b… (75 %)
    Writing at 0x00196586… (77 %)
    Writing at 0x0019b3d6… (78 %)
    Writing at 0x001a03c0… (79 %)
    Writing at 0x001a5351… (80 %)
    Writing at 0x001aa5a4… (81 %)
    Writing at 0x001af41b… (83 %)
    Writing at 0x001b4354… (84 %)
    Writing at 0x001b921c… (85 %)
    Writing at 0x001be8e3… (86 %)
    Writing at 0x001c368d… (87 %)
    Writing at 0x001c87f8… (89 %)
    Writing at 0x001cd905… (90 %)
    Writing at 0x001d2cb0… (91 %)
    Writing at 0x001d8154… (92 %)
    Writing at 0x001ddefc… (93 %)
    Writing at 0x001e337a… (95 %)
    Writing at 0x001e86c5… (96 %)
    Writing at 0x001ed84f… (97 %)
    Writing at 0x001f32f8… (98 %)
    Writing at 0x001f8e3f… (100 %)
    Wrote 2078864 bytes (1350827 compressed) at 0x00000000 in 12.8 seconds (effective 1302.2 kbit/s)…
    Hash of data verified.

Leaving…
Hard Resetting…
Hard resetting via RTS pin…
Done! Flashing is complete!

Showing logs:
[18:36:27]ESP-ROM:esp32s3-20210327
[18:36:27]Build:Mar 27 2021
[18:36:27]rst:0xc (RTC_SW_CPU_RST),boot:0x28 (SPI_FAST_FLASH_BOOT)
[18:36:27]Saved PC:0x40375319
[18:36:27]SPIWP:0xee
[18:36:27]mode:DIO, clock div:1
[18:36:27]load:0x3fce3808,len:0x128
[18:36:27]load:0x403c9700,len:0xb90
[18:36:27]load:0x403cc700,len:0x28c8
[18:36:27]SHA-256 comparison failed:
[18:36:27]Calculated: 16c4129afd722f4ed6ac70f40d9a747e24005d354d97beebc67776b502766b21
[18:36:27]Expected: ffffffffffffffffffffffffffffffffffffffffffffffffffffffffffffffff
[18:36:27]Attempting to boot anyway…
[18:36:27]entry 0x403c98b8

Show me the entire log when it reboots…I don’t see Tasmota logging stuff…

I see Max CPU Frequency: 80Mhz, while on the Atom Lite it’s 240Mhz. S3 is really a slow device. I would order an Atom Lite if I was you. :slight_smile:

Next step: you need to add the device to the wifi network. :slight_smile:

You can use tasmota web flasher to change wifi setting, or you connect from your phone to that SmartPool-xxxx wifi network (it’s the device acting as Access Point), then open a browser and open http://192.168.4.1 (the default IP of tasmota device) and you’ll be on Tasmota UI, from there you can configure wifi settings.

well, after reboot I show this:

Using ‘COM5’ as serial port.
Unexpected error: could not open port ‘COM5’: PermissionError(13, ‘Accesso negato.’, None, 5)
[19:22:26]ESP-ROM:esp32s3-20210327
[19:22:26]Build:Mar 27 2021
[19:22:26]rst:0xc (RTC_SW_CPU_RST),boot:0x28 (SPI_FAST_FLASH_BOOT)
[19:22:26]Saved PC:0x420d0a06
[19:22:26]SPIWP:0xee
[19:22:26]mode:DIO, clock div:1
[19:22:26]load:0x3fce3808,len:0x128
[19:22:26]load:0x403c9700,len:0xb90
[19:22:26]load:0x403cc700,len:0x28c8
[19:22:26]SHA-256 comparison failed:
[19:22:26]Calculated: 16c4129afd722f4ed6ac70f40d9a747e24005d354d97beebc67776b502766b21
[19:22:26]Expected: ffffffffffffffffffffffffffffffffffffffffffffffffffffffffffffffff
[19:22:26]Attempting to boot anyway…
[19:22:26]entry 0x403c98b8

I don’t know if is correct…
Anyway I have configurate the wifi and now I try to configure the GPIO as your previous post, but I have only this in the picture:

image

One more thinks, on the information I found these… maybe can help!
(I have removed my IP and SID with xxx)

|Program Version|13.2.0.2(TasmoCompiler-esp32s3)|
|Build Date & Time|2023-11-28T21:22:02|
|Core/SDK Version|2_0_14/4.4.6.231122|
|Uptime|0T00:14:21|
|Flash Write Count|13|
|Boot Count|8|
|Restart Reason|Software reset CPU|
|||
|AP1 Information|SSId xxxxxx
RSSI 74%, -63 dBm
Mode 11n
Channel 1
BSSId 5C:A6:E6:3A:64:D0|
|||
|Hostname|SmartPool-5488|
|IPv6 Global (WiFi)|:f612:faff:fe66:5570|
|IPv6 Local (WiFi)|fe80::f612:faff:fe66:5570%st1|
|MAC Address|F4:12:FA:66:55:70|
|IP Address (WiFi)|xxx.xxx.xxx.xxx|
|Gateway|xxx.xxx.xxx.xxx|
|Subnet Mask|255.255.255.0|
|DNS Server1|xxx.xxx.xxx.xxx|
|DNS Server2|0.0.0.0|
|||
|HTTP API|Enabled|
|||
|MQTT Host||
|MQTT Port|1883|
|MQTT TLS|Disabled|
|MQTT User|DVES_USER|
|MQTT Client|SmartPool|
|MQTT Topic|SmartPool|
|MQTT Group Topic 1|cmnd/tasmotas/|
|MQTT Full Topic|cmnd/SmartPool/|
|MQTT Fallback Topic|cmnd/SmartPool_fb/|
|MQTT No Retain|Disabled|
|||
|ESP Chip Id|6706544 (ESP32-S3 v0.1)|
|Flash Chip Id|0x1740C8 (QIO)|
|Flash Size|8192 KB|
|Program Flash Size|8192 KB|
|Program Size|1134 KB|
|Free Program Space|1745 KB|
|Free Memory|245.6 KB (frag. 4%)|
|||
|Partition safeboot|832 KB (used 83%)|
|Partition app0*|2880 KB (used 39%)|
|Partition fs|4416 KB|