Help Required - Analog Dial 'Dumb' Gas Meter Monitor (for a 1991 UGI Gas Meters Ltd analog meter)

Hi Guys,

I do hope this is the correct part of the forum to post this. Mods, do feel free to move it if it is incorrect.

I’ve got to a point in this little project where I am struggling to make further progress, mainly due to my lack of knowledge of YAML, and probably being a bit thick too! :roll_eyes:

Background
I have quite an old gas meter (made in 1991 according to the date on it) installed in my house. I have tried to get an upgrade to a ‘smart’ one, but the installation people have been four times, looked at it, and have done a very quick about-turn as it is in an awkward location, in my basement and I live in a rural area that has poor mobile reception, so it is unlikely that a smart meter would work properly (I have been told)

Gas Meter Dial

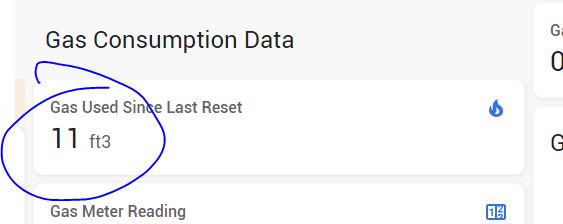
The meter is measuring in Ft3 with the dial to the right being 1 ft3 of gas consumed per revolution.

Sensor Setup
I have got an ESP32 reading the passage of the needle via a TCRT5000 IR sensor. This sensor provides both analog and digital outputs. The digital output is not used as the adjustment of it isn’t sensitive enough to record the needle traveling underneath, however, the analog output from the sensor does log a rise in voltage as the needle sweeps below it.

My Gas Appliance
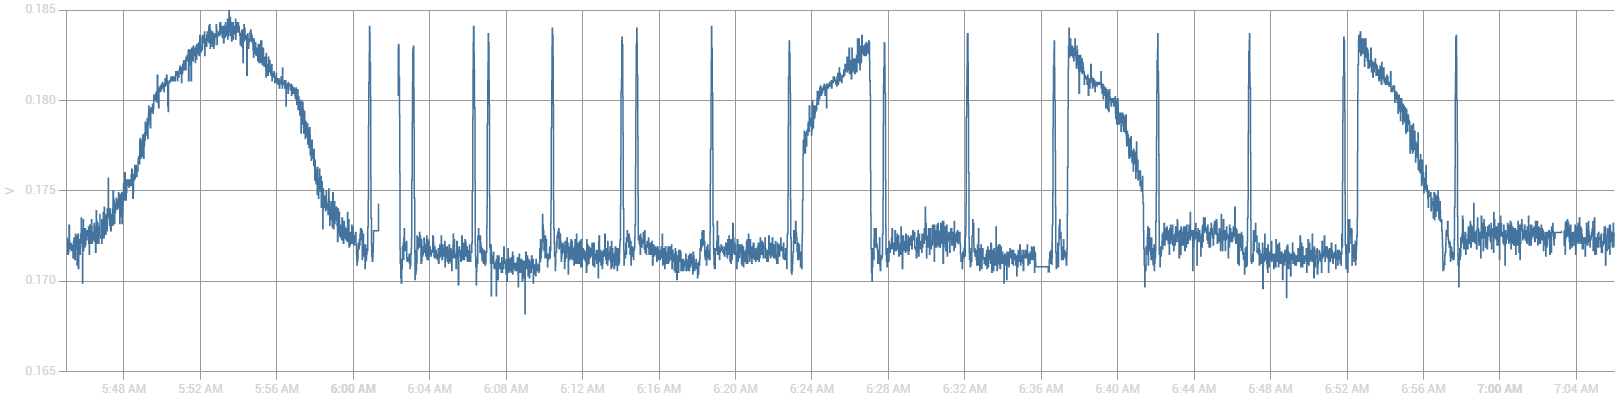
I’m running a Rayburn range off this gas meter. It is a boiler for central heating and hot water, and also a gas cooker. It uses two separate burners to achieve this. The Range cooker was installed when I built the house 30 years ago, and it uses a pilot light system instead of the more modern instantaneous piezo ignition. The pilot lights’ on it consume about 1 ft3 of gas per hour, with the needle on the meter moving at a very much slower rate than it does when the burners are lit. This can be seen here…

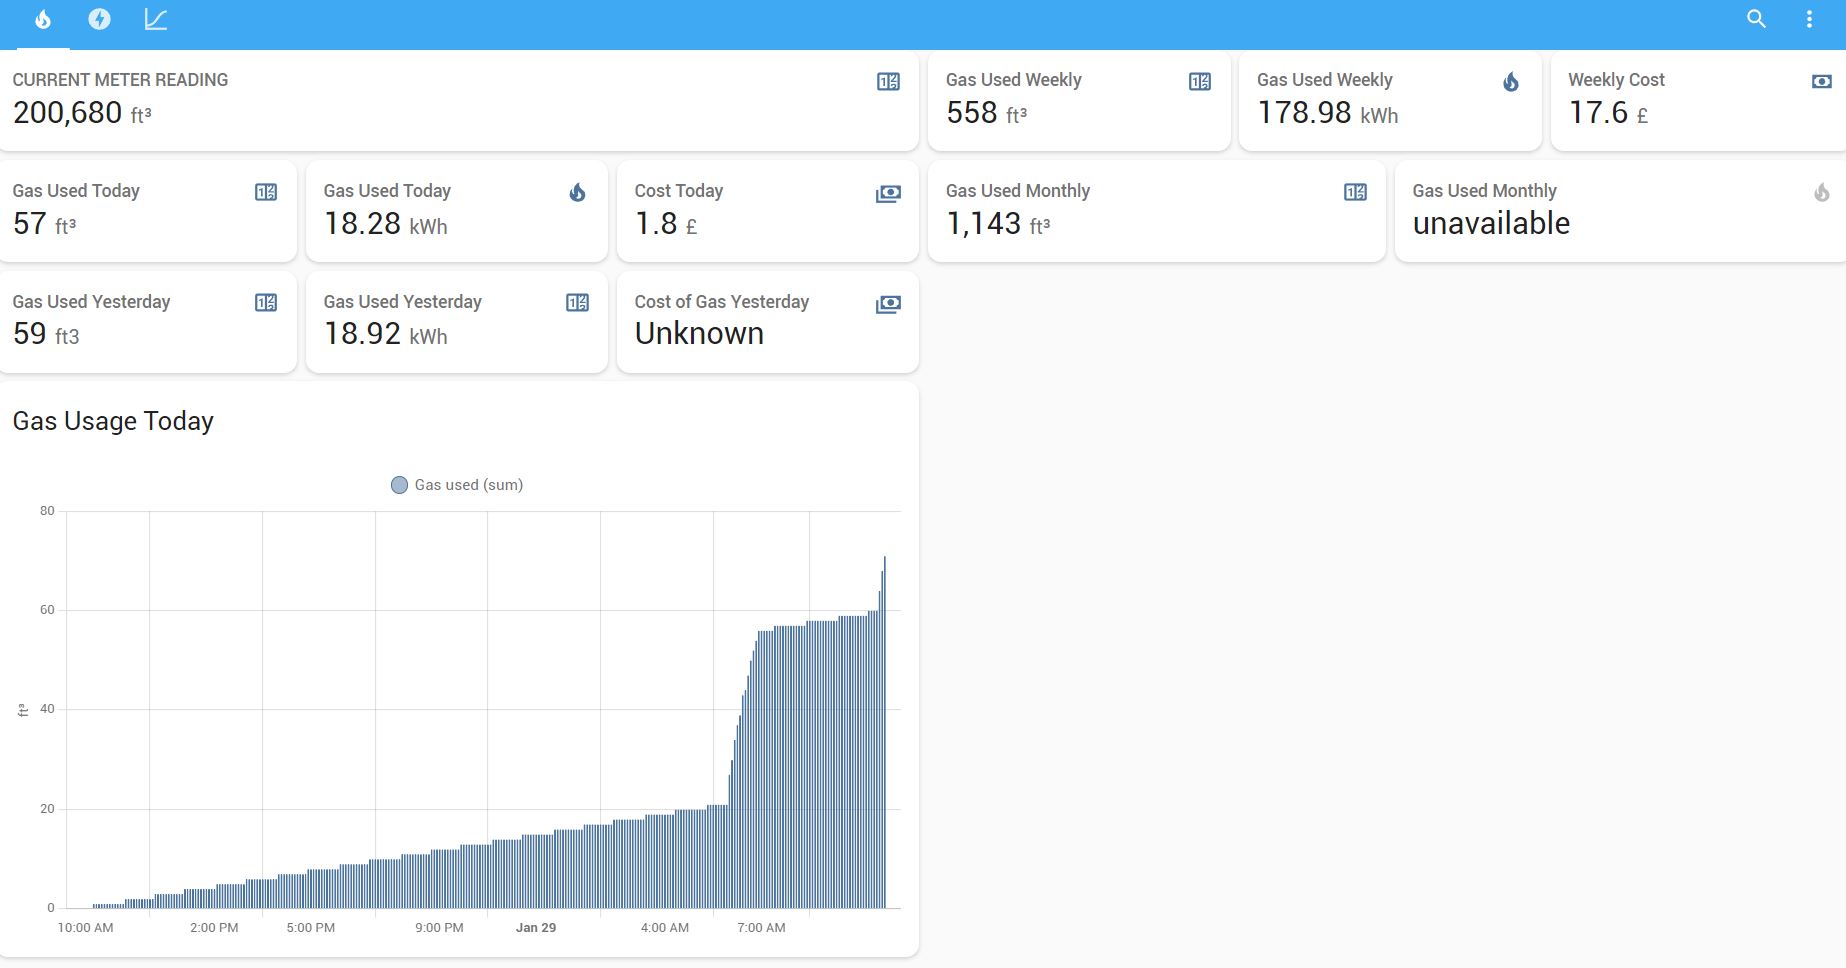
This can be contrasted with the sharp spikes when one of the burners is lit in the example below. On this the water was programmed to come on between 6 am and 7 am.

This is a similar type of appliance to the one I have in my kitchen…
Rayburn-380G

Home Assistant & ESP32 Setup
Whilst researching how to achieve this, I came across a fantastic, informative, and very helpful blog by Xavier Decuyper @Savjee on how he achieved his own analog gas meter monitoring, although his gas meter is a different style, and he ultimately used a digital output from the sensor as he adapted his code to use the digital reading.

By using some of Xavier’s YAML files from his blog I have the ESP32 working, and having tweaked the various figures, I have the IR sensor reading as can see from the images posted above. It is quite consistent too. The Energy part of HA is also working, and showing gas consumption, but unfortunately, only logs gas consumption when the ESP32 is restarted after an OTA YAML file update.

For reference, this is my YAML file…

globals:
  - id: total_pulses
    type: int
    restore_value: false
    initial_value: '0'
  
  - id: last_pulse_value
    type: int
    restore_value: false
    initial_value: '0'

# The following sensor puts the 'total_pulses' variable into Home Assistant Energy 
# Monitor and tells HA it is to ft³
sensor:
  - platform: template
    name: "Gas used"
    device_class: gas
    unit_of_measurement: "ft³"
    state_class: "total_increasing"
    icon: "mdi:fire"
    accuracy_decimals: 0
    lambda: |-
        return id(total_pulses);
# The following is to sense when a new voltage measurement is received, 
# then calculate the difference with the previous voltage. If it's larger than 
# a certain threshold, increase the pulse counter. This is to log
# when the needle has peaked when it has swept past the sensor, as the
# diff value will then be negative when the voltage falls as the needle moves
# away. The threshold is set at the 0.0035 value which is the last value I tried.
# This figure has been higher and lower and nothing seems to work
    on_value:
      then:
       - lambda: |-
           float last_reading = id(last_pulse_value);
           float current_reading = id(adc_value).state;
           float diff = last_reading - current_reading;

           if(diff > 0.0035){
             id(total_pulses) += 1;
           }

           id(last_pulse_value) = current_reading; 

# This is the reading of the voltage on the analog input pin. It takes a 
# measurement every 333ms, but only reports the average value every two seconds.
# This is to smooth the signal going to the ADC on the ESP32. The value is
# shown in HA so it is possible to confirm that  the sensor is 'seeing' the rotating needle
  - platform: adc
    id: adc_value
    pin: GPIO32
    accuracy_decimals: 4
    name: "Gas Meter Sensor Analog Value"
    update_interval: 333ms
    attenuation: 11dB 
    filters:
      - throttle_average: 2sec

# Uptime sensor 
  - platform: uptime
    name: Gas Meter Uptime

# WiFi Signal sensor
  - platform: wifi_signal
    name: Gas Meter WiFi Signal
    update_interval: 60s

# Switch to restart   
switch:
  - platform: restart
    name: gas meter monitor restart

I have tried all sorts of different values for the averaging of the signal, and for the threshold to trigger an increase in the ‘total_pulses’ value, and none of it seems to be sufficient to increase the value of the ‘total_pulses’ figure, which is reported back to HA

From checking the logs of the ESP32 device via ESPHome, the peak value for the voltage is consistent at about 0.183 > 0.185 V and as the needle passes, this reduces down to the ‘steady’ state, or background reading, which is then consistent between 0.171 > 0.175… this will then rise to the peak voltage value again as the needle passes under the sensor head… and so on. The voltage value difference is greater when the burner is lit as the needle is moving faster in relation to the sampling time.

As I stated at the beginning my knowledge of yaml is poor.

  • Is this method sufficient for triggering an increase in the total_pulses value??
  • Is there another method that can be used to register the higher sensor values, and thus trigger the total pulses counter??

Any advice or guidance would be gratefully appreciated.

Thanking you in advance for any responses received. :+1:t2:

Mike.

1 Like

Hi Mike!

I might be wrong here, but I think you can’t combine a lambda and on_value on a single sensor. I’m not 100% sure, but I believe it works like this:

  • The lambda function defines the raw state of the sensor, without any filters applied.
  • As long as the lambda function returns the same value, nothing else will be triggered.
  • When the lambda functions returns a new value, the other functions will be triggered, including your on_value function.

So it makes sense that your code only runs once when the ESP32 has finished booting. It’s the only time when the value of the lambda function changes (from nothing to an actual measurement).

To get around this, I used two sensors in my original solutions:

sensor:
 # This sensor exposes the total_pulses variable to Home Assistant and
 # converts it to m³ (1 pulse = 0.01m³ on my meter)
 - platform: template
   name: "Gas used"
   device_class: gas
   unit_of_measurement: "m³"
   state_class: "total_increasing"
   icon: "mdi:fire"
   accuracy_decimals: 2

   # 1 pulse on my meter equals 0,01 m³
   lambda: |-
       return id(total_pulses) * 0.01;

 - platform: adc
   id: adc_value
   internal: true  # No need for this in Home Assistant
   pin: GPIO32
   attenuation: 11db

   # Take a measurement every 100ms but only report the average 
   # every second. This is to overcome the noisy ADC on the ESP32.
   update_interval: 100ms
   filters:
     - throttle_average: 1sec

   # When a new voltage measurement is received, calculate the 
   # difference with the previous voltage. If it's larger than 
   # a certain treshold, increase the pulse counter.
   on_value:
     then:
       - lambda: |-
           float last_reading = id(last_pulse_value);
           float current_reading = id(adc_value).state;
           float diff = last_reading - current_reading;

           if(diff > 0.019){
             id(total_pulses) += 1;
           }

           id(last_pulse_value) = current_reading;

The template sensor is the one exposed to Home Assistant. The adc sensor is the one I used internally to count pulses.

Try putting your on_value function into the adc sensor and I believe everything should start working.

Hi Xavier,

May I first apologize for the delayed response - real life sometimes gets in the way :unamused:

Thank you for the detailed response. I have made the alterations to the YAML as you suggested, and over a few days I have tried various values on the ‘diff’ threshold figure. Unfortunately, I’m still not getting any change to the total_pulses number. :thinking:

Any further suggestions would be greatly appreciated. :+1:t2:

Cheers,

Mike.

Could you share the full YAML again?

I received a comment on my blog post of someone mentioning a similar issue. He mentioned this:

Updating the global variable (last_pulse_value) [an integer] with the local variable (current_reading) [a float] was causing the issue. It would mean that on the next loop, the called global variable would not longer be a float of 0.7, but an integer of [something else] and so the diff > x function would fail to report properly.
Anyway I changed the global variable for last_pulse_value from int to float and it works now!

Could you try that?
It’s as simple as:

globals:
  - id: total_pulses
    type: float
    restore_value: false
    initial_value: '0.0'
  
  - id: last_pulse_value
    type: float
    restore_value: false
    initial_value: '0.0'

Hi Xavier,

Thanks for the response, I’m very grateful.

The current YAML is…

globals:
  - id: total_pulses
    type: int
    restore_value: false
    initial_value: '0'
  
  - id: last_pulse_value
    type: int
    restore_value: false
    initial_value: '0'

sensor:
  - platform: template
    name: "Gas used"
    device_class: gas
    unit_of_measurement: "ft³"
    state_class: "total_increasing"
    icon: "mdi:fire"
    accuracy_decimals: 0
    lambda: |-
        return id(total_pulses);

# This is the reading of the voltage on the analog input pin  Take a measurement every 100ms but only report the average 
# every second. This is to overcome the noisy ADC on the ESP32, and to see if the sensor is 'seeing' the rotating needle
  - platform: adc
    id: adc_value
    pin: GPIO32
    accuracy_decimals: 4
    name: "Gas Meter Sensor Analog Value"
    update_interval: 100ms
    attenuation: 11dB 
    filters:
      - throttle_average: 2sec
# When a new voltage measurement is received, calculate the 
# difference with the previous voltage. If it's larger than 
# a certain threshold, increase the pulse counter.
    on_value:
      then:
       - lambda: |-
           float last_reading = id(last_pulse_value);
           float current_reading = id(adc_value).state;
           float diff = last_reading - current_reading;

           if(diff > 0.0010){
             id(total_pulses) += 1;
           }

           id(last_pulse_value) = current_reading; 

# Uptime sensor
  - platform: uptime
    name: Gas Meter Uptime

# WiFi Signal sensor
  - platform: wifi_signal
    name: Gas Meter WiFi Signal
    update_interval: 60s

# Switch to restart    
switch:
  - platform: restart
    name: gas meter monitor restart

Thanks for the YAML suggestion with the global variable, I’ll add a decimal point and re-upload, and see what happens, and report back. :grinning: :+1:t2:

Thank you for your continued assistance.

Mike.

EDIT: I’ve adjusted the global figures as noted and now the total_pulses number is incrementing… but it is doing so randomly… sometimes it will increase by 1 when the needle passes the sensor, other times it will increase by 3 as the needle passes the sensor. I’ll keep playing with the ‘diff’ variable to see if I can obtain an accurate value. I’m pleased it is now increasing though.

I thought I would post another update after running overnight.

When the burner is lit, and the dial needle moves quickly, the monitor works well. Seems quite accurate, and the total_pulses variable is incrementing as it should. :tada: :grinning:

However, when the needle is moving slowly as it does when ‘idling’ (just using the pilot light consumption) it seems to increment randomly when the needle passes below the sensor. From checking the voltage spikes, the needle on the dial rotates about once every hour whilst in this ‘idle’ state. I think what is happening during the idle state is that the ‘diff’ variable which is based on last_reading - current_reading is too small due to the slow movement of the needle. It would require a longer sampling time frame for the last_reading / current_reading values to be of great enough difference to correctly trigger the total_pulses number.

Whether this is achievable using the tools available is well beyond my knowledge. :roll_eyes:

However, I’m grateful for the help provided to date in getting me to where I am.

Mike.

1 Like

Its not clear to me how you’re monitoring the passing of the needle … Does the meter emit an IR pulse?

No, it doesn’t. The mentioned sensor is a reflective light barrier sensor. It’s changing it’s output value, when the infrared reflectiveness in front of it changes. And that’s what happens here. When the needle passes the sensor, the output differs from the time, when no needle is there.

To the general topic: I’d try to make the ESP bit as smart as possible. I’d count pulses within the ESP an let the ESP just hand over the calculated meter value. But actually I don’t know, how to do this. But I’ll have the same when problem, when I get to measure my water consumption (in some unknown future time…).

Hi @johntdyer

Apologies for the delay in responding. Just reiterating what @MadCyborg as said above.

At the beginning of the intro post, I mentioned a TCRT5000 IR Sensor. This is a cheapo IR emitter and receiver on one small board which is directly connected to an ESP32. The sensor is mounted within a small 3D-printed housing and fixed over the meter faceplate. It has two outputs, one is a digital high/low output, and the trigger threshold for this can be adjusted from a small potentiometer on the sensor circuit board, and the other output is an analog voltage output which changes according to whatever object is placed under the IR emitter/receiver - it is this analog output I am using to try and count the number of revolutions the meter needle/dial makes.

It is quite effective and does work as intended, however, my problem is the fact that the needle rotates at two different speeds. The gas consumption is correctly logged when the needle is moving at a faster speed, but when moving at a lower speed (idle, as I call, with just the pilot lights running) it proves inaccurate.

Thanks for the response @MadCyborg!

The current setup will work well if the meter needle rotates quite quickly, however, if it rotates slowly, that is where the problem lies. I think it could be solved by logging the peak analog voltage and then comparing it to current voltage readings, and if there is a falling trend in the numbers, then it can be taken that the needle has passed by the sensor and the total_pulses variable used to store gas consumption can be incremented - my lack of knowledge on how to do this in YAML is the problem :roll_eyes: There may be some other commands that could be used, but my not being very familiar with the possibilities is preventing me from progressing further.

No doubt, once it is solved, this methodology could then be applied to all meters that are analog based, which I suspect the majority of water meters are ( I live in a very, very old property, and no water meter is fitted, so it is not a problem I have to grapple with)

Cheers,

Mike.

Not what you want to read, but you shouldn’t have a meter that old. Gas meters have a certified life of either 10 or 25 years, which it exceeds on both counts. That means it could be inaccurate or dangerous.

Speak to your energy supplier again and demand the replacement. Inform them that if they fail to replace again then a formal complaint will be made on safety grounds. If they still don’t budge then speak to the regulator/ombudsman and you will find things move very quickly. You may not get a smart meter, but they should change it for something more modern as it is potentially dangerous. I did the same at a property I own and it was replaced in four hours.

Do you have a gas leak detector down there? If not then I would get one tomorrow.

It is not uncommon that such meters have a rotating magnet beneath the dial. (Although I am not sure about that in 1991).
You could try to attach a reed-switch or a maybe a halleffect sensor outside the case. They will work with your existing ESP and show way better edges than the ir sensor.

And then there is GitHub - jomjol/AI-on-the-edge-device which will read the meter by camera and interpret the numbers

I have documented my journey in integrating my gas & water meter here step by step: Geert Meersman / energy-meter · GitLab
For the water meter i use a proximity sensor, and for the gas meter I use a TCRT5000 meter.

Hi Geert,

Thanks for adding to the thread with a very useful step-by-step guide to your solution.

I checked your YAML code and it is pretty much the same as the code I am using, and it works well and is accurate. My problem is that my meter indicator dial moves at two different speeds - fast when the burner is lit, and slow when the burner is at idle. The burner is lit, and the needle is moving fast, the counter works flawlessly. The problem arises when the dial is moving slowly when the boiler is idling, this is when the rate of passage of the needle below the TCRT5000 sensor is too slow and allows multiple triggers to occur… which increases the total pulse counter when it really shouldn’t.

I like your use of the proximity sensor… I may get one and see if this will be triggered by the moving needle on my meter rotating dial. :+1:t2:

Thanks for the input,

Mike.

Hi,
well I must say that I also had some extra pulses, so I am playing a bit with the position of the proximity sensor. Now it did run 1 day without ghost pulses, let’s see how it continues :slight_smile:
With the TCRT5000 sensor I also had them, but I changed the position with 90°, as I think that when the rotary dial with mirror passes too slowly or stops, it could get some of these extra pulses. So I hope that having it now in a different set up, it will be better! Will keep you posted

UPDATE ON ORIGINAL POST

After having a bit of a play about over the Christmas holidays and thinking about the best way to get this working I changed the YAML code from that previously posted, or more accurately, changed the C++ code in the Lambda function within the YAML code

I’ve now had this running for over 48 hours and it seems to be logging the needle as it passes under the IR sensor quite accurately now, as can be seen from the screenshots below.

IR Sensor ADC Values


This screen grab shows the values being logged from the ESP32’s ADC using the analog output from the IR sensor. The red vertical sketch line is the last time the ESP32 was reset. The spikes on the graph are the needle passing below the IR sensors emitter and receiver. For clarity, the narrow spikes are when the burner is turned on (needle rotating fast) and the wider spikes are when the burner is off and just the pilot light running (needle running slowly). The darker blue numbers scribbled near the spikes are the number of rotations of the meter dial which equate to 1 ft3 of gas since the last reset (red vertical line). This screenshot shows 11 ft3 used since the last reset of the ESP32.

Actual Logged Consumption
Gas Consumption
This is a screen grab from HA itself, and the gas consumption figure correlates to the spikes shown on the previous graph, 11 ft3

YAML Code

    name: gas-meter-monitor
  
esp32:
    board: nodemcu-32s

# Enable logging
logger:

# Enable Home Assistant API
api:
  encryption:
    key: "HNNVUMR69RNNJBK9q+LCtVwenVKZpL1en2+jzl0VaHE="

ota:
  password: "a306ebc5fe5e8fb5c286227999570932"

wifi:
  ssid: !secret wifi_ssid
  password: !secret wifi_password

# Enable fallback hotspot (captive portal) in case wifi connection fails
  ap:
    ssid: "Gas-Meter-Monitor"
    password: "kCTrfHhD3FcG"

captive_portal:

globals:
  - id: total_pulses
    type: float
    restore_value: false
    initial_value: '0.0'

  - id: max_pulse_value
    type: float
    restore_value: false
    initial_value: '0.1730'
 
# This sensor exposes the 'total_pulses' variable to Home Assistant and
# tells HA it is to ft³
sensor:
  - platform: template
    name: "Gas used"
    device_class: gas
    unit_of_measurement: "ft³"
    state_class: "total_increasing"
    icon: "mdi:fire"
    accuracy_decimals: 0
    lambda: |-
        return id(total_pulses);

# This is the reading of the voltage on the analog input pin  Take a measurement every 50ms but only report the average 
# every 2 seconds. This is to overcome the noisy ADC on the ESP32, and also to see if the sensor is 'seeing' the rotating needle
  - platform: adc
    id: adc_value
    pin: GPIO32
    accuracy_decimals: 4
    name: "Gas Meter Sensor Analog Value"
    update_interval: 50ms
    attenuation: 11dB 
    filters:
      - throttle_average: 2sec

# When a new voltage measurement is received, calculate the 
# difference with the previous voltage. If it's larger than 
# a certain threshold, increase the pulse counter and also reset the maximum value 
# to the current value for the next needle rotation
    on_value:
      then:
       - lambda: |-

          float current_pulse_value = id(adc_value).state;
          float last_pulse_value = current_pulse_value;
          float diff = id(max_pulse_value) - current_pulse_value;

          if(current_pulse_value > id(max_pulse_value)){
            id(max_pulse_value) = current_pulse_value;
          }
          if(diff > 0.008){
           id(total_pulses) += 1;
           }
          if(diff > 0.008){
           id(max_pulse_value) = current_pulse_value;
           }
   

# Uptime sensor
  - platform: uptime
    name: Gas Meter Uptime

# WiFi Signal sensor
  - platform: wifi_signal
    name: Gas Meter WiFi Signal
    update_interval: 60s

# Switch to restart    
switch:
  - platform: restart
    name: gas meter monitor restart

Brief Explanation of How It Works
When there is no needle under the sensor the ESP 32 reports back a pretty steady voltage level. The ADC is quite noisy but the voltage is read every 50ms and averaged before reporting this every two seconds - smooths it out a bit.

As the needle starts to pass under the IR sensor, the voltage output on the sensor rises and reaches a maximum (in my case) of 0.183 V and after this peak starts to fall back to around 0.172 to 0.174 V - these are the peaks and troughs on the above graph.

As the needle starts to pass under the sensor, the ESP32 checks the current value of the IR sensor and compares it to the max_pulse_value of the IR sensor since the last rotation, and if it is higher, it will log that newer value as max_pulse_value. This means that we can obtain a maximum value from the IR sensor as the needle rotates under it, and we then know that the needle has passed under the sensor.

There is a variable named ‘diff’ which is the difference between the max_pulse_value and the current_pulse_value - this number is changing all the time as the needle rotates and passes under the IR sensor; it will increase and decrease in size as the needle rotates.

What we want to know is this “When has the needle definitely passed the IR sensor”. (and also when it has passed the IR Sensor, then increment the gas consumption figure by 1 ft3). This is done in the Lambda function which is C++ code, not YAML. The IF statements within the Lambda function are used to determine the difference in voltage between high and steady state, that ‘difference’ being 0.008V in my case. If this difference is exceeded, then the needle has passed the IR head as the difference between the peak sensor value and the lower ‘steady state’ value is at it’s maximum level. When this large difference occurs, the total_consumption variable is increased by 1, and max_pulse_value variable is reset to the current level, to enable the next rotation of the dial to be ascertained - and the process starts again.

I hope the above explanation is clear. If anybody wants to use this method the ‘0.008’ figure within the Lambda function will need to be changed to suit your own purposes. It would be best to set up a dashboard where you can monitor the value of the ESP32’s ADC value from the sensor, or you could sit and watch the ESPHome Log scroll past to monitor voltages/ADC values. You will need to find the maximum values and “steady-state” values of your own installation. When the dial passes under the IR Sensor this will provide the maximum value, and when the dial is away from the sensor (180 degrees opposite, it will be the lowest value). It is these ‘max’ & ‘current’ values which determine the ‘diff’ threshold in the Lambda function - and thus the success of the total_consumption variable being increased every time the needle passes the IR Sensor.

I do hope this helps somebody, and please do feel free to respond if you feel I can be of any help at all.

Thanks to all who contributed, and offered suggestions. Your input was much appreciated and valued.

Cheers,

Mike.

Just a further update.

Gas monitoring is working well, and I have created an ‘at a glance’ type dashboard. This contains cards such as ‘Daily Consumption’, ‘Weekly Consumption’, ‘Monthly Consumption’ etc.

In order to do this I first created a “Gas Meter” using the Meter preset in the Helpers section and used the sensor ‘gas_used’ (which is based on the total_pulses variable from the IR sensing head). This Helper is the gas meter, and can be added on a card to the dashboard.

Gas Meter Reading
This is from my gas meter and it reads in hundred’s of ft3 - the actual reading on the dials of my meter is 1994.90x (x= whatever fraction of ft3 the small dial is pointing to)

The problem here is the readings off this meter in the dashboard and the physical gas meter in your house will be different, as the HA Dashboard Meter will only start recording gas used from the time you create it. This is when it should be calibrated to match the existing meter reading.

If you go to Developer Tools > Services and add this yaml (below) to the box, it should replace the current gas meter value with 30208. You would click the ‘Call Service’ button to calibrate with this value you have entered. The value has to be whatever is on your gas meter reading - try and do it when the dials on the meter are static for the best accuracy.

service: utility_meter.calibrate
target:
  entity_id: sensor.gas_meter
data:
  value: '30208'

After doing the calibration is it a simple procedure to then create other Helper Meters to cover Daily, Weekly, and Monthly gas consumption. These Meters can go on separate cards on the Dashboard for ‘at a glance’ reading.

Cheers,

Mike.

Now Added a "at a glance dashboard"

The Gas Meter monitor is now seemingly to be working well and is accurately logging the dial rotations. This is feeding into the standard Energy Dashboard and calculating a cost. As noted above, I decided to create a Dashboard with all the relevant gas consumption figures on it… and here it is.

The next stage for me is to add kWh conversions to each card on the dashboard, and also a cost to each card on the dashboard… that is beyond my experience yet on HA. I will do an update when I manage to get something working though.

Cheers,

Mike.

Now added costs and kWh conversion to ‘Gas’ Dashboard

As noted in my previous post, I was looking to add a kWh figure and a cost figure to my dashboard. I have done this by creating several new ‘sensors’ in my configuration.yaml file, and also by using the Meters Helper to log the information.


‘Gas Dashboard’ as it currently stands…

The additional sensors I created are noted below:-

template:
  - sensor:
      - name: "Daily Gas Consumption kWh"
        unique_id: daily_gas_usage_kwh
        state: "{{ ((((states('sensor.gas_consumption_daily_v2')|float * 0.0283) * 1.02264) * 39.9) / 3.6)|round(2) }}"
        availability: "{{ states('sensor.gas_consumption_daily_v2')|is_number }}" 
        unit_of_measurement: "kWh"
        device_class: energy
        state_class: total

      - name: "Daily Gas Cost"
        unique_id: daily_gas_cost
        state: "{{ (((((states('sensor.gas_consumption_daily_v2')|float * 0.0283) * 1.02264) * 39.9) / 3.6) * 0.09835)|round(2) }}"
        availability: "{{ states('sensor.gas_consumption_daily_v2')|is_number }}" 
        unit_of_measurement: "£"
        device_class: monetary
        state_class: total
  
      - name: "Weekly Gas Consumption kWh"
        unique_id: weekly_gas_usage_kwh
        state: "{{ ((((states('sensor.gas_consumption_weekly_v2')|float * 0.0283) * 1.02264) * 39.9) / 3.6)|round(2) }}"
        availability: "{{ states('sensor.gas_consumption_weekly_v2')|is_number }}" 
        unit_of_measurement: "kWh"
        device_class: energy
        state_class: total

      - name: "Weekly Gas Cost"
        unique_id: weekly_gas_cost
        state: "{{ (((((states('sensor.gas_consumption_weekly_v2')|float * 0.0283) * 1.02264) * 39.9) / 3.6) * 0.09835)|round(2) }}"
        availability: "{{ states('sensor.gas_consumption_weekly_v2')|is_number }}" 
        unit_of_measurement: "£"
        device_class: monetary
        state_class: total

      - name: "Monthly Gas Consumption kWh"
        unique_id: monthly_gas_usage_kwh
        state: "{{ ((((states('sensor.gas_consumption_monthly_v2')|float * 0.0283) * 1.02264) * 39.9) / 3.6)|round(2) }}"
        availability: "{{ states('sensor.gas_consumption_monthly_v2')|is_number }}" 
        unit_of_measurement: "kWh"
        device_class: energy
        state_class: total

      - name: "Monthly Gas Cost"
        unique_id: monthly_gas_cost
        state: "{{ (((((states('sensor.gas_meter_monthly_v2')|float * 0.0283) * 1.02264) * 39.9) / 3.6) * 0.09835)|round(2) }}"
        availability: "{{ states('sensor.gas_meter_monthly_v2')|is_number }}" 
        unit_of_measurement: "£"
        device_class: monetary
        state_class: total

The new sensors take the totals from various Meter type Helpers I created i.e. ‘sensor.gas_consumption_daily_V2’, or ‘sensor.gas_consumption_weekly_V2’, and then undertake either a kWh conversion or a cost conversion on the figures created by the Helpers… and as these costs or kWh ‘sensors’ have unique names, they can be quite readily added to Entity cards in a dashboard for review.

Obviously, if my gas unit rate (we get billed in £/kWh here in the UK) changes, I will have to change the figures in the yaml code, but this isn’t difficult to do.

The next step for me is to add a “Standing Charge” cost… (here in the UK we get billed a fixed amount per day from the gas company, irrespective of how much gas we use - this is £0.2712 with my current gas supplier)… and I could add this into the daily, weekly monthly calculations in order to get a more accurate reflection of what my next bill will look like and also add the 5% VAT (tax) onto the bill too, for even greater accuracy.

I hope this helps somebody, and if anybody does have any questions do feel free to ask, and I’d be more than happy to help out where I can.

Cheers, :+1:t2:

Mike.

1 Like

This is very intriguing. I have a very crude meter (see below), so this won’t work for me.

Did you set up a normal HA integration, a HACS integration, or some other way to import the data?