Meet S.P.A.R.K.Y - The AI Retro Assistant Thingie that predates itself
I found this perfectly preserved portable TV on a ebay-like site and i knew i have to get it and give it some smarts…basically my thought process was “if something respects your privacy to much - give it a microphone and access to the internet, to bring it in the 21st century…then run Home Assistant on it”
Running Home Assistant is the easy part - as soon as i find a way to interface analog technology with modern day devices, I can just cast the local URL of my smart home UI to it. Basically, I only need to get my Magic Mirror - Home Assistant integration from a couple of years ago to this.
This seemed to be a very easy task (at the time) since every device and it’s cat has some sort of smartness nowadays, so it should only be a matter of connectivity…
The easiest way to bring some internet in this museum piece, should be just by interfacing present day technology with it’s analog counterparts - fancy language for ‘I need to slap a HDMI on it’
I also had a digital to analog convertor (HDMI to RCA) around, waiting for years for me to find a purpose for it, so this was the ideal setup; i just need to integrate it directly in the TV somehow.
Working with old technology shouldn’t even be a challenge (i said to myself, pouring the first glass of whisky at the dusk of Friday…easy weekend project, i thought in my innocence) since those things were built in the age of serviceable technology, with single-layer PCBs and public documentation and schematics that reveal the electrical diagrams to anyone that dares playing with a circuit board…
And while that is true for ‘old’ tech…for really old tech, even though schematics are public, are printed on paper - the thing that predates the internet and the means to acces it whenever you need it from the confort of your office, anywhere in the world…so no diagrams on this one
Again, since it is old, somewhat simple tech (at least you can see every individual component), it should not be that difficult to find some points on the PCB to tap some power for the new component …and RCA connections are also straightforward solder points - So I opened it up and blew off some Jurassic-worthy dust, older than my ability to formulate articulate language and i started mapping the board.
After only a couple more glasses of liquid patience (on the rocks) i managed to have a POC build that was running Netflix - on the CRT!!! Let me tell you, hearing that Netflix “ta-dum” on this vintage ass speaker felt like victory!
It is now morning…
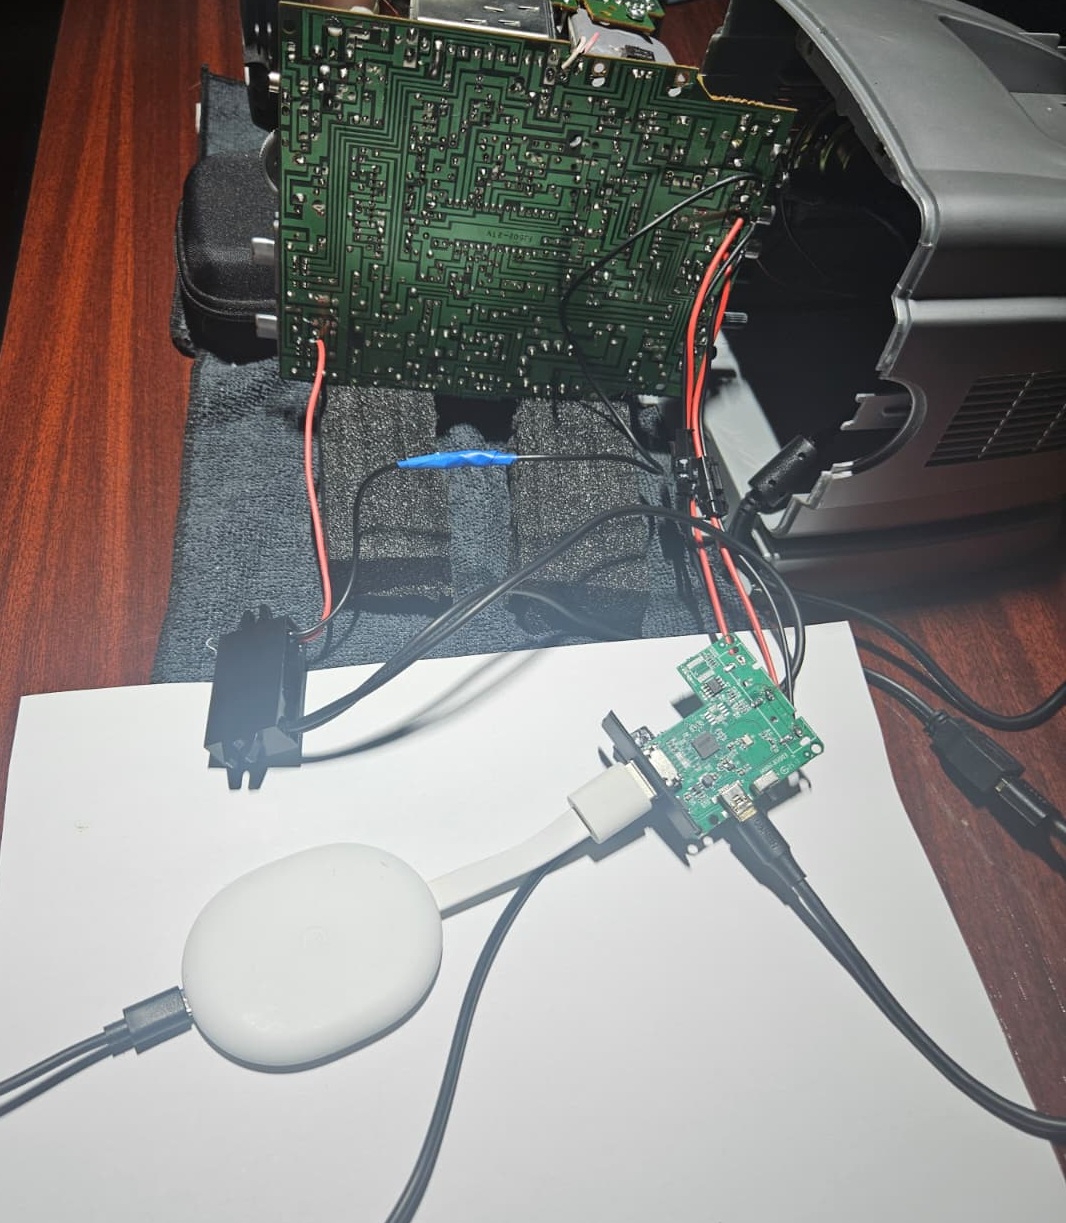
At this point i faced a new problem - the signal converter need to be powered itself, but this one runs on 5 VDC and since I declared war on any and all cables, i needed the final build to be able to run wirelessly; I can’t have wires anchoring down poor S.P.A.R.K.Y. to power up it’s new board, a smart TV stick or even a Raspberry Pi that i intended to add to it…so everything must happen internally.
The only problem is that this thing only gives me 13 VDC from anywhere on the board - so i must add a buck to it, to create a separate 5V line, to supply all the new components - internally.
I managed to find a 12V-to-5V, 15W automotive buck converter in my “recyclable stockpile” (read: junk I haven’t thrown away because I might need it someday) - and the ‘automotive’ part is crucial in this build because it is fully encapsulated in resin so it protects the rest of the sistem from shorts and it has some extra protections required in automotive industry (Over Voltage, Over Current, Over Temperature)

I also realized that the TV power supply is a 13V 1A supply, and that 1A is just not gonna cut it if i intend to connect multiple devices to SPARKY and power them from it’s own supply - so I changed the power supply as well with a 12V 7A one.
The massively 7 amps oversized supply is perfect for this - since is a cheap Chinese OEM i always like to over-spec them, to make sure they don’t overheat, plus I need enough margin to play around with devices without starving the entire system; and the 12V is also a great fit for the buck I decided to use.
Things are starting to look bright! (Maybe because it’s midday now)
All I have to do now is to put everything together and close it up…
Nope…not gonna happen…
This TV is absurdly tightly packed. I’m sure this wouldn’t be an issue with a full-size CRT, but a portable one has everything crammed so closely together that there’s almost no space left inside. The whole thing is packed tighter than a nun’s… never mind…
There just isn’t enough room to accommodate the new board, the buck converter, and the new cables, as I had initially only accounted for the signal converter board.
I had to pull everything apart and strip every piece that was literally replaceable by wires.
I stripped the RCA connectors from the convertor and wired the connection directly on the TV motherboard and added a HDMI and USB connector to the case with wires that run to the signal convertor so it will allow it to stay on top of the CRT funnel (obviously fully covered in electrical tape)
This is the new signal convertor - at the smallest possible size
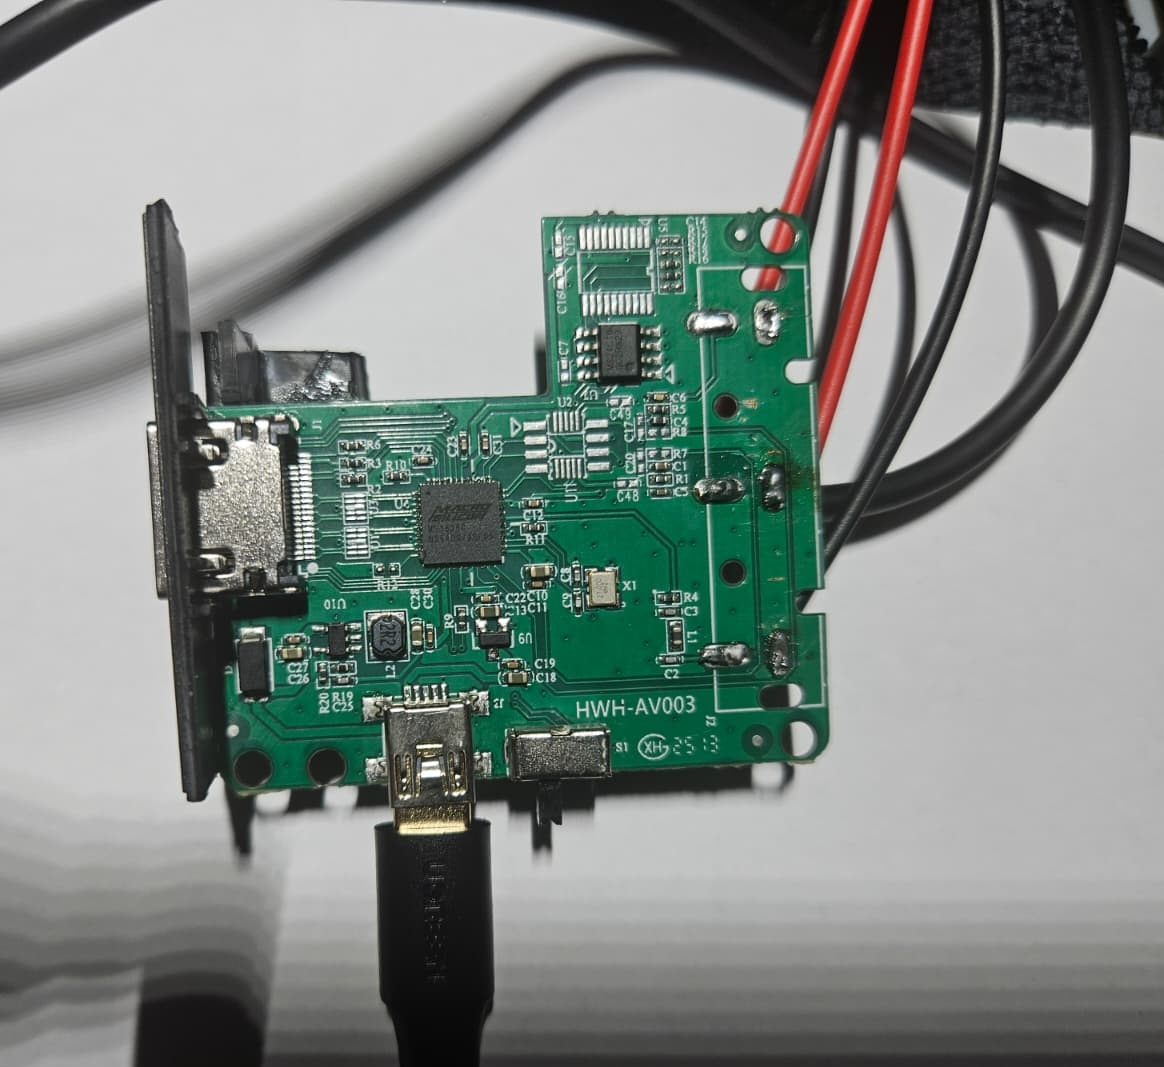
It now fits in perfectly!
The TV was so well preserved, with not a single scratch on the casing, that i felt bad about cutting holes in it so i did my best to include the new ports with no visible damage; I even kept the rear label, reinforced it and used it as a door that covers the new ports. (also added a magnet to it so it stays closed when not used…and gives it a really satisfying click)
The build is really clean and I’m very satisfied with it, but that last paragraph about closing it up and preserving the label…actually took quite some time…a lot of time…
…and it is morning…AGAIN…
Now i have red eyes, an almost empty glass (it is not called drinking in the morning if you started at dusk, 2 days ago, and never stopped) and a CRT TV with HDMI and a USB port, that runs wirelessly and can be interfaced with modern day technology - even the cat is surprised by this one;
Netflix, Home Assistant, streaming whatever or even an external monitor (because my 2 OLED screen laptop definitely needs a 5" CRT tertiary display…sure…) - the possibilities are endless!
But now, I had a revelation ! (granted, sleep depravation plus alcohol does that)
IT DESERVES A FACE!
Facial expressions on a actual face! I was thinking Fallout Securitrons!
Basically i can slap an old Chromecast on it and stream/cast anything on it or a Google TV and run any app, including Fully Kiosk Browser that i use on my HOLODECK Assistant to cast literally any content or UI element of my smart home - but it doesn’t have a face…yet…
So i started working on a ‘face’ that does procedurally generated expressions - I didn’t want to have a washed down app that just rolls through a few animations - that gets boring - i wanted a procedurally generated expression drawing engine in Canvas 2D
…that doesn’t really work yet, but is should put dynamic expressions on a face and look like thsi:
But in the age of AI, it actually seems useful, so I’ll get it done at some point.
I’m thinking of running it as a completely separate app that listens to everything around it (including itself) and generates expressions based on the output of a local, offline AI that interprets whatever it hears and sends the appropriate mood signal back to the app…hmm…that might work…
(I got this idea while writing this line, so I haven’t tried it yet)
Thank you for reading, it was a cool weekend project and hopefully, a fun read for you
[written by a human]
Main Components used:
Signal Converter: HDMI to RCA Composite Video Audio Converter 1080p
Buck Convertor: 12V to 5V 3A 15W Car Buck Converter
Power Supply: 12V 7A 84W Power Supply