See this in blog form here
While setting up my home-assistant instance, I documented the tips and tricks I found helpful.
- Getting started
- Restarting
- SSH into Home Assistant
- Setup Github
- Lights
- Outlets
- Scenes
- Alexa or Google Home
- Smartphone
- Location tracking
- Updating the db
- Node Red
Getting started
To get home assistant installed and running you should follow the guide
here
Restarting
After making changes to configuration.yaml, you need to restart the home assistant
server. To do so, go to Developer Tools > Services and select
homeassistant.restart and click Call Service
If changing groups, automations or scripts, you can just use
homeassistant.reload
Or go to Configuration -> Server Controls -> Reload [Scripts, Groups, …]
SSH into Home Assistant
Often, you’ll want to SSH into the Home Assistant server running on the Rasberry
Pi (or whatever). To do so:
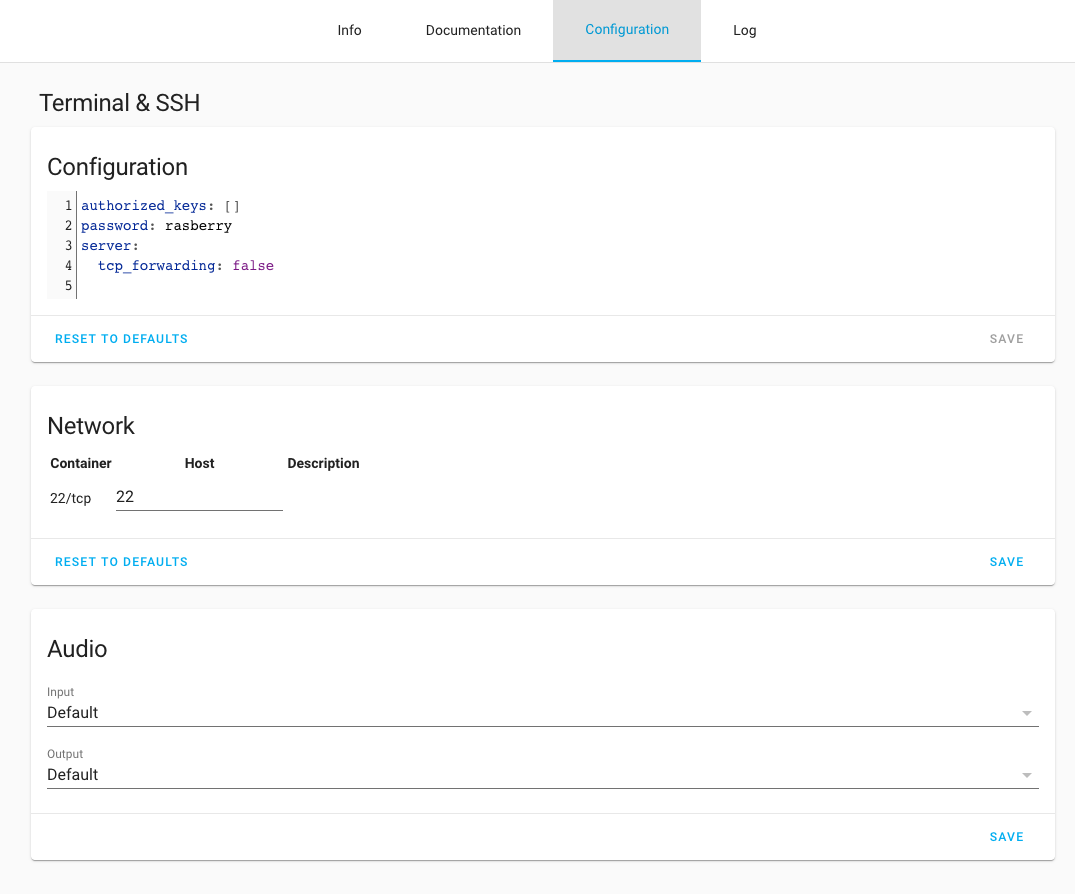
- Enable the
SSH & Web Terminal Add On. - Under the Add On’s Configuration Page set the Network Port to 22 and add a
password like so:
- restart homeassistant
- Open a terminal on your Desktop and run
ssh -v [email protected]and type
in your password from the configuration - You should now be in the root directory of home assistant server. run
pwd
and you should see/rootrunlsand you should see
addons backup config share ssl
to exit the ssh, enter exit()
Copying files over SSH
to copy from your computer to your home assistant server while on your computer
(ie not sshed into home assistant)
scp -r /path/to/source/files/* [email protected]:/config/path/to/destination
Setup Github
Once you have SSH enabled, you should create a repo in the /config folder and
push it to a
Github private
repository. This will serve as your backup.
Lights
Circadian Rhythm
This is a super cool component that will change your lights according to
circadian rhythms throughout the day. Like flux on a Mac, this will slowly make
your lights warmer and dimmer as the sun sets.
Setup
You have to add the following to the configuration.yaml
circadian_lighting:
  <options>

switch:
  - platform: circadian_lighting
    <all lights>
Make sure you turn on the Circadian Lighting Switch like so:

Adding a new light
Whenever you add a new smart light, you need to add it to the switch component
shown above.
Light Groups
Most devices are grouped using the default
groups but lights,
especially vanity lights and fan lights that ofter have multiple bulbs in a
single fixture should use the
light group feature.
Outlets
Amazon Smart Plugs
Amazon smart plugs don’t work by default with home-assistant. Here’s the
workaround.
-
setup the amazon smart plug in Alexa if you have already. Name it something
you’d never say like “Outlet Plug for Study Lamp”. -
create an input-boolean in home-assistant and name it the way you’d like to
refer to plug (for instance if you want to tell Alexa to “Turn on the Study
Lamp” you’d name the input-boolean “Study Lamp”). Note that the input-boolean
entity will not show up in the Devices page of the home assistant UI, so you
can’t assign it to an area. -
create a binary sensor that captures the state from the input-boolean like
so:binary_sensor: - platform: template sensors: study_lamp: friendly_name: "Forwarding Switch - Study Lamp" device_class: garage_door value_template: "{{ is_state('input_boolean.study_lamp', 'on') }}" icon_template: mdi:forward <if you have more than one binary_sensory it goes here> -
use the “Home Assistant Cloud” tool to
sync entitieswith Alexa. both the
input-boolean (“Study Lamp”) and binary sensor (“Forwarding Switch - Study
Lamp”) should be added to your Alexa app’s device list -
create two routines in the Alexa app - one to turn on the Amazon smart plug
(“Outlet Plug for Study Lamp”) when the binary_sensor (“Forwarding Switch -
Study Lamp”) is Open - and to turn off the Amazon smart plug when the
binary_sensor is Closed. Note sometimes it takes a couple of minutes for the
Alexa app to work with the new device. When trying to create the routines, I
received various not compatible errors. Just wait a few minutes.
Scenes
Don’t use them. Just
create scripts instead
Alexa or Google Home
Use nabu casa to
integrate with Alexa.
Sync devices with Alexa under Configuration > Home Assistant Cloud > Alexa
Note: you’ll have to delete devices in the Alexa app after you remove them from
“Synced Entities” in home assistant.
Home Assistant scenes and scripts will both show up as scenes in Alexa. If Alexa
get’s confused about what’s what you can always create an Alexa routine to help
her clarify.
Smartphone
Create a user for every person in the house for location tracking. That will
allow you to create automation such as “when everybody leaves the house, turn
off the airconditioning and lights”.
Before downloading the Home Assistant iPhone app, make sure your iPhone has a
sensible name like “Kevin’s iPhone”. Here’s how to
rename your iPhone.
You’ll want to download the
Home Assistant on
everybody’s smart phone. Have everyone login in with their own home assistant
account on their phone.
Note: to set this up for the first time, they have to do this while connected to
the same wifi as your home assistant server.
On the iPhone, you’ll have to set the Location services to Always
manually.
If you didn’t follow my instructions above, in the Home Assistant iPhone app, be
sure to give each device a sensible name, for instance “Kevin’s iPhone” or
“Rachael iPhone”. Change this under Hamburger Menu > App Configuration >
General > Device Name.
You may have to change the “iPhone” entity name in Home Assistant and restart
Home Assistant to get this to work. You’ll probably also want to update the
entity_ids as well.
Pro tip: while there, change the Open Links In from safari to your preferred
browser (Chrome)
Location tracking
You’ll want to create a person in your
config file for everyone
and assign device trackers to them. You’ll probably use the smart phone trackers
that were created when you installed the Smartphone app on the person’s phone,
although you can use others or
even multiple trackers.
person:
- name: Kevin McLaughlin id: kevin_mclaughlin device_trackers:
- device_tracker.kevins_iphone
Updating the db
By default, home assistant uses a sqllite database that’s stored in a local file
on the rasberry pi. That’s not ideal.
Fortunately pushing the data is simple matter of creating an external db
(probably postgres but any sql will do) hosted somewhere (I recommend
render) and adding/updating the
recorder component in
your configuration.yaml like so:
recorder: db_url: YOUR_EXTERNAL_STRING
Node Red
While the home assistant’s built-in automations work fine for simple
automations, eventually you’ll find that you want an automation that home
assistant’s automations can’t handle.
When that happens, you should start using Node Red.
Setting up Node Red is as simple as installing the add-on.
Watch a few youtube videos to get the hang of it.
Note: whenever you add an entity to home assistant you have to reload Node Red
like so:
Supervisor > Node Red > Restart