How to: HA base security system with Cellular backup and 24/7 3rd party monitoring

The primary purpose of this post is to provide one approach to providing Cellular backup communications to Home Assistant. While my focus was for the purpose of an alarm system it’s also appropriate for general HA access. I’ll need to review this again to make sure I didn’t leave anything out.

One side benefit to the approach provided here is you end up with a cell phone that can be used as a wall mount replacement for a security system keypad. This phone can also replaces a dedicated home line if you have one or want one. I connected the phone to a Panasonic DECT system with link2cell via bluetooth. We like having a separate number we can give out that’s not our personal number. I still need a better mounting method but this is the cell phone sitting where the alarm panel used to be affixed. The USB cable runs into the basement and connects directly to the Odroid N2+ that runs Home Assistant.

This is was my second option for a mount. It’s a shower mount available on amazon that I modified to attach permanently to the wall.

Background
I installed HA to perform two functions, home automation and home security. Our house came with a 24/7 security system already installed. It was pretty basic with sensors on 3 of 4 doors doors, a glass break sensor and one motion detector. I figured as I installed devices to support home automation that I had the makings for an excellent security system. One thing that always bothered me about our vendor supplied security system was that by simply cutting the phone line the 24/7 monitoring could be disabled. I was convinced I could build a better system than any commercial security installer. I consider the following to be the minimum requirements:

• Redundant internet access (cellular as one)
• Uninterruptible power for controller and primary sensors
• Personal monitoring
• 24/7 3rd party monitoring
• Sensors on all doors and windows (reuse existing where possible)
• Motion sensors throughout main portion of house
• Camera integration
• Detailed alerting 

I initially build out the sensor system utilizing Wyze sensors, however at the time these sensors had one major flaw. The integration that was build didn’t give any indication of battery life and if the battery when dead there was a high probability of bricking the sensor. There had been communications with Wyze about helping fix the integration but they didn’t step up to the task. Battery life was also way shorter than advertised. Needless to say they were not a good choice. After a second search I ended up selecting the Aqara brand contact and motion sensors. While some people have indicated they have connection problems with these sensors, they’ve been rock solid for me. They advertise a 2 year battery life. I haven’t been using them for that long, but based on current battery consumption I believe that’s a pretty good number. Utilizing these battery based sensors covered the uninterruptible power requirement for contact and motion sensors. In addition Aqara sell water leak detection sensors and temperature sensors providing options for non security based monitoring.

While the above could have covered all of my sensor needs I wasn’t crazy about having a visible sensor on doors. For windows they are more out of the way. Since the existing alarm system already had hidden contact sensors on the doors my desire was to integrate these. Konnected.io makes great products for integrating your existing security components. I initially utilized one of the Konnected.io products for easy integration of the door sensors. However after thinking about it for a while I figured I should be able to wire these sensors directly into the Odroid N2+ HA controller utilizing the gpio pins… I’m happy to report this works great.

For camera’s I utilized multiple brands. I set up Zone Minder to give more extensive processing that injects pictures with object detection (people and cars) into HA. At the same time using the HA camera components I can grab a picture from a camera when motion is detected. An automation grabs the picture and then email it via Yahoo, while providing an SMS notification via Twilo. It’s pretty sweet.

For uninterruptible power my desire was to minimize the devices I needed to keep running when power goes out. The sensors are covered since they operate on battery. The other essential components are the HA controller and and any devices required to provides internet access. While I could have looked to provide power to things such as the camera’s I didn’t see this as essential. Making the hardwired connection to the internet essential meant that I would need to provide power to two switches and a personal firewall that sit between the HA controller and the outside world. My HA controller sits in a different location than my internet connection equipement. This mean I would have to provide power in two locations. Utilizing cellular for internet access reduces the number of devices that need battery power and it removes the need for me to provide power in two location.

If you want to build a DIY alarm system and you’re looking to have 3rd party monitoring for times you’re not available there doesn’t seem to be many options. If you’ve found an alternative DIY option please let me know. Nate Clark at Knonnected IO build an integration for Noonlight monitoring which was announced in this post. It only works in the US. It has some limitation that have been addressed in this clone of the project. The main issue in the Konnected release was that it only alarmed with GPS coordinates, an fatal limitation if you live in a big city. The cloned version allows you to use a house address. The cloned version has a few other capability, like the ability to add a second person to the alarm notification. I’ve used the cloned project for months now and it works fine. Both versions use an authorization service run by Konnected. Nate offer the service up to the guys that run Nabucasa but they we’re supportive of taking over the service. Hopefully at some point in the future Nabucasa will take over support for the authorization service required to integrate with Noonlight or provide an alternative. Integrating with a commercially installed alarm system is also an option. With the commercial integration HA play a secondary roll and tie into a commercial alarm system for monitoring. The commercial alarm system approach doesn’t makes much sense if you’ve gone the DIY route on your smart home.

I connected my existing hardwired security system contact sensors via GPIO pins on the odroid N2+. You can find details here:

I also have this custom component that I can use to replay light history while away. It used to be available in HACS but I don’t see it anymore.

Cellular Backup
If you’ve made it this far you’ve gotten to the main purpose of this post. I was looking to utilize cellular as a backup method to accessing the internet. Most of the existing products focused on providing gateway internet access backup. I wasn’t looking to provide backup cellular for everything in my house, just the security relevant communication. I didn’t find any good post on the HA forum on how to approach utilizing cellular. Knowing the best solution for a security system would result in the HA controller having two network interfaces I put in a feature request that went no where. I’m pretty sure I was the only one that voted for the feature. So I was on my own to solve the cellular requirement.

When I stated looking at the cellular integration I looked at a Netgear gateway device. It looked promising but I never pulled the trigger on the purchase. I looked at a couple of USB dongles. There was very little information on how the USB dongles worked. The type of access provided by each device wasn’t clear. So to get started I figured I had a couple of old cell phones sitting around I’d go ahead an use them to start working things out. While utilize the cell phones I could concentrate on handling the multiple gateways connected to the HA controller. This was a good approach as it provided good information an ultimately resulted in the approach I settled on.

All of my phones are Android based and so anything stated from this point on is based on using an Android phone. Utilizing a cell phone meant I needed to utilize the USB tether feature on the phone. To make tethering the default action you have to access the developer options on the phone. This requires you to put the phone in developer mode. After which you find a “Developers options” menu under system settings. Under “Developers options” there is “Default USB configuration” and under here you can select “USB tethering”. After doing this the first thing I discovered was that even with this feature set all cell phones don’t automatically reconnect tethering. Once I had the HA controller tethered to the phone, if I power cycled the controller some phones I tested did not automatically re-enable tethering to the controller. The second thing I discovered was that enabling tethering impacted how the phone integrated with the WiFi. With two of the phones I tested enabling tethering was not allowed if the cell phone was connected to WiFi.

Lucky for me one of the phones I had was a pixel 3 XL. With the pixel device once tethering was set as the default USB connection method it always reconnected tethering after a reboot of the HA controller. The pixel also allowed tethering while connected to WiFi. So network traffic provided over the USB line to the pixel would be routed out over WiFi if the phone was connected to WiFi and over cellular if the device was not connected to wife. This was great news because it meant I could set the pixel as the default route for the HA controller and still send traffic out over my hard-line internet as long as the WiFi path was functional. If the WiFi path wasn’t functional then traffic would be routed over cellular. This is just what you want to implement cellular backup.

So what do I mean by the WiFi path being functional. In a perfect world this would mean that should the WiFi connection break anywhere in the path to the internet then the system would automatically switch over to cellular. That was too much to ask for. What it really meant was if the WiFi signal when away then the pixel would start routing traffic over the cellular signal. When the WiFi signal came back up then the pixel reconnected to the wifi and stated sending traffic back over the WiFi path, my hardwired internet connection. So if I could find a way to evaluate the internet path and turn off the WiFi signal for the HA pixel then I had an easy way to integrate cellular into the system. I tried to find a way to accomplish this with my existing WiFi router but had no luck. So I decided to create a WiFi access point utilizing a raspberry pi 3 that the pixel would use to connect to my hard-line internet connection. Using the pi meant I had full control of the access point. It meant I could put a script on the pi that monitor internet connectivity vi the hard-line path. If communications on the hard-line internet path was broken then the script could disable the pi WiFi access point. Once the hard-line internet path was functional again the script could re-enabled the pi WiFi access point. The picture below is what I ended up implementing.

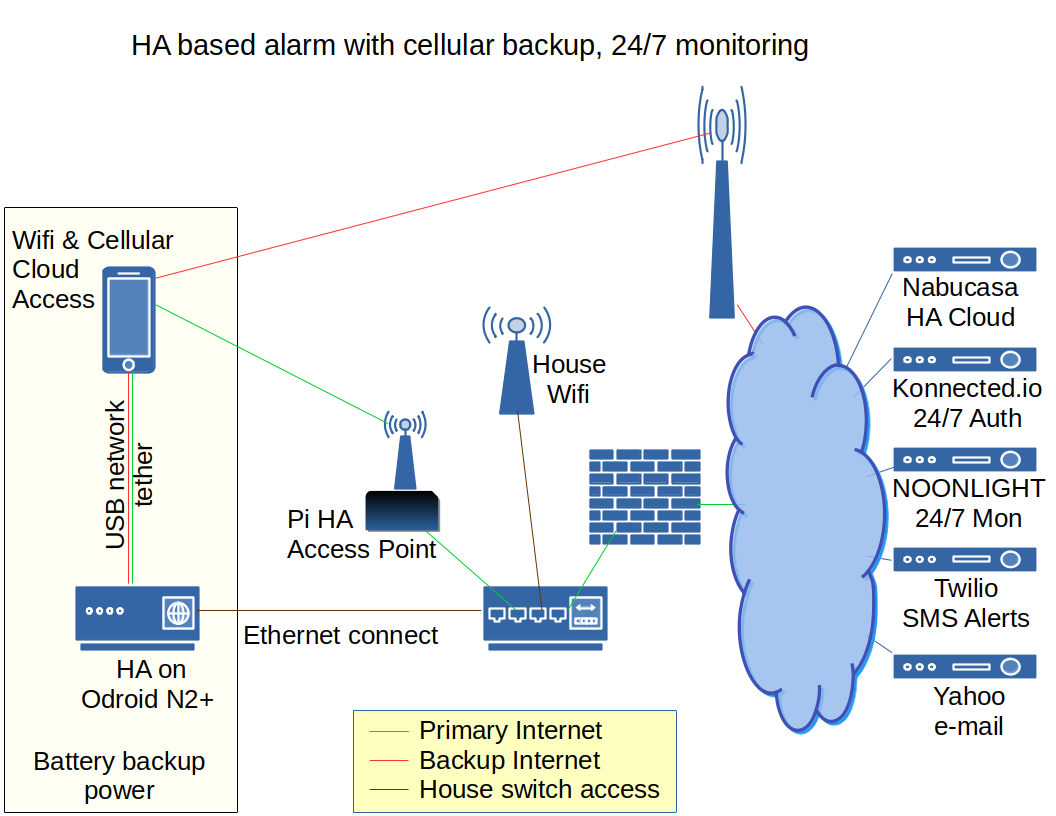
To be clear the only real reason the cell phone has to connect to my home Ethernet is because I wanted to use the phone as an interface to home assistant and I didn’t want to leave the Nabu Casa connection up if everyone was home. If I had always left Nabu Casa up, or I didn’t care about having the HA companion app on the phone then this approach works and you don’t have to build and include the wifi access point.
Cellular backup implementation
For this approach I utilized a Home Assistant Supervised install. For the base OS I utilize the latest Amrbian, which is Buster with the 5.10.x kernel. While this OS release is a major version behind the Home Assistant Operating System it still supports all of the requirements of HA, other than the operating system version. The HA install instruction for the supervised install are here:
GitHub - home-assistant/supervised-installer: Installer for a generic Linux system
I don’t know if you could accomplish the same result utilizing the Home Assistant Operating System as it’s been some time since I’ve look at HAOS. At that point in time you could not accomplish what is described here because you had no direct access to the operating system configuration.

I utilize a Pixel 3 XL to provide internet gateway access to the HA controller. The Pixel handles routing of internet bound traffic either sending the traffic over WiFi through my hard-line cable connection or out over the cellular network.

I also have a hardwired Ethernet connection from the HA controller to my home network. This Ethernet connector is used to access the WiFi enabled smart devices on my home network.

PI HA Access Point
I build an WiFi access point on a Raspberry Pi 3 strictly as a means to control the Pixel connection to my home network hard-line internet connection. It turns out that the pixel picks a random class C network CIDR block for the USB networking from the class B range of 192.168.0.0/16. My home network uses 192.168.10.0/24 which falls within this space. So to make sure the pixel didn’t select my home network address block I had to make sure the Pixel wifi interface was assign an ip address from my home network address space. To do this the WifI access point has to be a network bridge and not a network router.
These were the directions I followed: Setup Raspberry Pi as a WIFI bridge (WiFi access point) - KaliTut

The direction pick a WifI channel from the 2.4Ghz band. I wanted the network to be in the 5Gz band. The wifi integrated on the board of the PI3 is crap. I tried multiple NIC and found the best options are the Panda Wireless devices.
These are the values I used for /etc/hostapd/hostapd.conf:

# Bridge operation
bridge=br0

# The country code
country_code=US
interface=wlan0
# create 5GHz access point
hw_mode=a
channel=149
# limit the frequencies used to those allowed in the country
#ieee80211d=1
# 802.11ac support
ieee80211ac=1
# 802.11n support
ieee80211n=1
# QoS support required for full speed
wmm_enabled=1

ssid=HA
# 1=wpa, 2=wep, 3=both
auth_algs=1
wpa=2
wpa_passphrase=<REPLACE WITH YOUR PASS PHRASE>
wpa_key_mgmt=WPA-PSK
wpa_pairwise=TKIP CCMP
rsn_pairwise=CCMP

You need to fix the wap passphrase for ever you want. You can also change the broadcase id (ssid) if you like. The most important thing is I used hw_mode=a to restrict WiFi to 5Ghz band. The 2.4Ghz band is used for a lot of the smart devices including zigbee and I didn’t want to add anymore signal to that band. I also selected channel 149 as it’s outside the main 5Ghz band and thus doesn’t impact my full house Wifi. If you want to look at your WiFi space the app WiFi Analyzer is a googe google app for your phone.

The main interfaces are hard fixed in the file /etc/ network/interfaces. The instructions do not have you put an IP address on the bridge. In my example below I do assign an IP to the bridge. This is first to allow SSH access to this PI. The second is to provide a ping point for a subsequent script below that runs on the HA controller to keep track of the state of the WiFi/cellular connection. The address, netmask, gateway and dns-nameserver are appropriate values to connect to your hardwired home network. The PI is hardwired directly to you home network with the ethernet port.
My complete interfaces file follows:

auto lo
iface lo inet loopback
 
 # Ethernet
auto eth0
iface eth0 inet manual
 
 # WIRELESS INTERNET ACCESS
auto wlan0
allow-hotplug wlan0
iface wlan0 inet manual
#wireless power off
 
 # Network bridge
auto br0
iface br0 inet static
  bridge_ports eth0 wlan0 # build bridge
  bridge_fd 0 # no forwarding delay
  bridge_stp off # disable Spanning Tree Protocol 
  address 192.168.10.12
  netmask 255.255.255.0
  gateway 192.168.10.2
  dns-nameservers 192.168.10.2

Once again the address is used it in the script that runs on the HA controller to tell if the WiFi has been disabled. As such it needs to be a static IP address.

This script, name wifi-srv-network-watcher.p, is used to monitor the hard-line internet path

#! /bin/python
# Program looks to see if it can communicate with the internet, if it can't it takes
# wifi access point down, if it can access interent and wifi was previously taken
# down it brings it back up
import os
import time

internet_test_addr = "8.8.8.8" #example
full_ping_delay = 5 
ping_delay = full_ping_delay

house_internet_up = True
going_down = False

while True:
    # check to see if we can ping out internet test address
    response = os.system("ping -c 1 " + internet_test_addr + "> /dev/null")
    # good ping so internet is up
    if response == 0:
        # if internet was down then bring wifi back up
        if not house_internet_up:
            print 'Good ping ' + internet_test_addr +  ' Bringing Wifi Up'
            os.system("rfkill unblock wlan")
            house_internet_up = True
        going_down = False
        ping_delay = full_ping_delay

    # two ping fails so if internet up then take it down
    elif going_down:
        if house_internet_up:
            print 'Cant ping ' + internet_test_addr +  ' Shutting down HA WiFi'
            house_internet_up = False
            os.system("rfkill block wlan")
            ping_delay = full_ping_delay

    # first ping fail of internet test address so set to try second ping
    else:
        print "First ping failed, look for second error before taking internet down "
        going_down = True
        ping_delay = 0

    time.sleep(ping_delay)

I start this script by adding a line in /etc/rc.local before the exit 0 line. In this line FULLPATH_TO need to be replaced by the path to the script:

/FULLPATH_TO/wifi-srv-network-watcher.py >/dev/null 2>&1 &

The script needs to be executable so make it exectuable via:

chown root: /FULLPATH_TO/wifi-srv-network-watcher.py
chmod 0755  /FULLPATH_TO/wifi-srv-network-watcher.py

HA controller Setup
Prior to integrating the cellular backup I used dynamic dns and an openVPN server to gain access to my home network and HA. When on cellular there is no means to connect back to the house without using a service such as Nabu Casa. As such Nabu Casa is essential part for a fully functional cellular backed security system.

I also utilize the HA Mosquitto broker for other devices on my network. As such I utilize it here to allow notification when the pixel has switched between WiFi and Cellular. So if you haven’t already enabled the Mosquitto broker addon on your HA controller you’ll need to enable it.

As mentioned above I utilize Armbian Buster runnig on Odroid N2+ hardware. I believe the N2+ is the best platform for HA. If you’re using a raspberry pi you can accomplish the same thing, however the network configuration options might be accomplished in a differrent manner.

Network Configuration
My system has a CAT5 Ethernet wire that provides connection into my home network and out over my cable provider. I also have a usb0 wire connected directly to the pixel 3 XL. The Pixel is set to default USB to tethering mode. This provides my HA controller with outbound internet connection through the Pixel via either WiFi or Cellular, whichever the Pixel is connected to. These connections show up as two interfaces on my HA controller, eth0 (hard-line) and usb0 (tethered). On the Armbian installed OS the file /etc/network/interfaces can be used to override control of the network interfaces. This is used to set a fixed IP to the eth0 interface. The tethered usb0 interface is handled via NetworkManager as the Pixel will assign a random netblock to the USB interface. The eth0 address information should be adjusted appropriate for your home network. The contents of the /etc/network/interfaces are:

source /etc/network/interfaces.d/*

auto lo
iface lo inet loopback

auto eth0
iface eth0 inet static
	address 192.168.10.250
	netmask 255.255.255.0
        post-up route add default gw 192.168.10.2 metric 10
        pre-down route del default gw 192.168.10.2

The eth0 netblock and address should be updated to reflect your home network address space. Once you make the above changes you can reboot the system to have the values take effect.

We then need to add a script used by NetworkManager that makes sure the usb0 interface is the default route when usb0 is connected and is not the default route if usb0 isn’t connected. This allows the HA controller to work via the eth0 interface if the usb0 (pixel) interface should go off line for what ever reason. So you need to create the file /etc/NetworkManager/dispatcher.d/02-myifupdown with the following contents. The local_DNS_addr needs to be the address of whatever device provides domain name resolution on your home network (eth0):

#!/usr/bin/env bash
local_DNS_addr="192.168.10.2"
interface=$1
event=$2

if [[ $interface != "usb0" ]]
then
  exit 0
fi

if [ $event = "up" ]; then
  #echo run up steps for usb0
  ifmetric usb0 1
  gw=`route -n |grep -e "^0.0.0.0.*usb0" |tr -s " " |cut -d ' ' -f 2`
  iptables -t nat -A OUTPUT  -d $local_DNS_addr -p udp --dport 53 -j DNAT --to-destination $gw
  iptables -t nat -A POSTROUTING  -o usb0 -d $gw -p udp --dport 53 -j  MASQUERADE
  echo $gw > /var/run/NetworkManager/cur_usb_gateway

elif [ $event = "down" ]; then
  #echo run down steps for usb0
  gw=`cat /var/run/NetworkManager/cur_usb_gateway`
  iptables -t nat -D OUTPUT  -d $local_DNS_addr -p udp --dport 53 -j DNAT --to-destination $gw
  iptables -t nat -D POSTROUTING  -o usb0 -d $gw -p udp --dport 53 -j  MASQUERADE
fi

This script requires the tool ifmetric and networkd-dispatcher, so make sure they are install:

apt install ifmetric networkd-dispatcher

The file needs to be executable so run this command:

chmod 755 /etc/NetworkManager/dispatcher.d/02-myifupdown

The iptables entries in the previous script make sure that all DNS resolution is handled through the Pixel if it’s attached. I set the dns resolver IP address to my internal network’s DNS server by placing these lines in the file /etc/resolv.conf.

# fixed address by setting chattr +i
nameserver 192.168.10.2

IP address above need to change be the appropriate DNS address for your home network. To ensure the file can’t be changed by the OS network scripts I ran the command:

chattr +i /etc/resolv.conf

WiFi/Cellular monitoring script
I have a script that runs on the HA controller that monitors the state of WiFi or Cellular connectivity. The script monitors this simply by pinging the IP address assigned to the PI HA Access point above.
In my case the ip address of my wifi_bridge is 192.168.10.12. You’ll need to update wifi_bridge_addr in the script below to the IP you assigned to our bridge. The script is name wifi-network-watcher.py and placed in the directory /usr/share/hassio/homeassistant/os-support-apps.
This directory needs to be created. Then create the file wifi-network-watcher.py in this directory and add the following code. You must change the “wifi_bridge_addr =” to be the correct the static address you assigned to the wifi access point bridge bro interface up above:

#! /bin/python
import os
import socket
import time

wifi_bridge_addr = "192.168.10.12"
good_wifi_ping_delay =  1
bad_wifi_ping_delay = 15

def ha_up():
    try:
        s = socket.socket(socket.AF_INET, socket.SOCK_STREAM)
        s.connect(("localhost", 8123))
        s.close()
        return True
    except socket.error:
        return False

def send_mqtt_msg( msg ):
    # only continue if mqtt broker is up
    done = 1
    while done != 0:
        print "Sending the message"
        done = os.system( msg )
        if done != 0:
            time.sleep(5)


house_internet_up = True
going_down = False
ping_delay = good_wifi_ping_delay

while not ha_up():
    print "Waiting on HA to come up"
    time.sleep(10)
    
print "Ha up!, let's watch wifi state" 

# send initial message indicating wifi is on
send_mqtt_msg("mosquitto_pub -u MQTT_USER -P MQTT_PASSWORD -h 127.0.0.1 -t home-assistant/wifi -m "+ '{\\"state\\":\\"ON\\"}')
        
while True:

    response = os.system("ping -I usb0 -c 1 " + wifi_bridge_addr + "> /dev/null")
    if response == 0:
        if not house_internet_up:
            #print 'Good ping ' + wifi_bridge_addr +  ' Notifing HA wifi Up'
            #response = os.system("mosquitto_pub -u MQTT_USER -P MQTT_PASSWORD -h 127.0.0.1 -t home-assistant/wifi -m " + '{"state":"ON"}')
            send_mqtt_msg("mosquitto_pub -u MQTT_USER -P MQTT_PASSWORD -h 127.0.0.1 -t home-assistant/wifi -m " + '{\\"state\\":\\"ON\\"}')
            house_internet_up = True

        going_down = False
        ping_delay = good_wifi_ping_delay

    elif going_down:
        if house_internet_up:
            #print 'Cant ping ' + wifi_bridge_addr +  ' Notifing HA Wifi Down'
            house_internet_up = False
            ping_delay = bad_wifi_ping_delay
            #response = os.system("mosquitto_pub -u MQTT_USER -P MQTT_PASSWORD -h 127.0.0.1 -t home-assistant/wifi -m "+ '{"state":"OFF"}')
            send_mqtt_msg("mosquitto_pub -u MQTT_USER -P MQTT_PASSWORD -h 127.0.0.1 -t home-assistant/wifi -m " + '{\\"state\\":\\"OFF\\"}')

    else:
        #print "First ping failed, look for second error before Notifing internet down "
        going_down = True
        ping_delay = 0

    time.sleep(ping_delay)

In the script above you also need to replace MQTT_USER and MQTT_PASSWORD with the user and password you configured for your mqtt broker.

Make the file executable:

chmod 0755 /usr/share/hassio/homeassistant/os-support-apps/wifi-network-watcher.py

I start the script by adding the following line to the file /etc/rc.local just prior to the “exit 0” line

/usr/share/hassio/homeassistant/os-support-apps/wifi-network-watcher.py 2>&1 > /dev/null &

Configuring Home Assistant
The above script sends mqtt messages to HA. We want these to be implemented in HA as a binary sensor. So in your configuration.yaml file you find the binary_sensor: section and add the following. If you already have the binary_sensor line you don’t need to add it a second time.

binary_sensor:
 - platform: mqtt
    name: "wifi_status"
    state_topic: "home-assistant/wifi"
    payload_on: "ON"
    qos: 0
    device_class: connectivity
    value_template: "{{ value_json.state }}"

Adding automations to control nabucasa
I only want nabucasa enable when someone that lives in the house leaves the house or when the pixel WiFi goes down. The following integrations are used to implement this. You need to update the person.XXXX lines as appropriate for your installation. These intergations include lines to send twilo sms message. You can delete those line if you don’t use twilo. If you use twilo you’ll need to update the phone number.

- id: '1642697265420'
  alias: nabucasa enable
  description: Enable nabucasa when someone departs the house
  trigger:
  - platform: state
    entity_id:
    - person.bill
    - person.mary
    to: not_home
  condition:
  - condition: state
    entity_id: binary_sensor.wifi_status
    state: 'on'
  action:
  - service: cloud.remote_connect
  - service: notify.sendtsms
    data_template:
      title: nabucasa connect msg
      message: Remote access enabled at {{ states('sensor.date_time') }}
      target:
      - '+15554443333'
  mode: single

- id: '1642797265421'
  alias: nabucasa disable
  description: disable nabucasa when everyone is home and wifi is good
  trigger:
  - platform: state
    entity_id:
    - person.bill
    - person.mary
    to: home
  condition:
  - condition: and
    conditions:
    - condition: state
      entity_id: person.mary
      state: home
    - condition: state
      entity_id: person.bill
      state: home
    - condition: state
      entity_id: binary_sensor.wifi_status
      state: 'on'
  action:
  - service: cloud.remote_disconnect
  - service: notify.sendtsms
    data_template:
      title: nabucasa disconnect msg
      message: Remote access disabled at {{ states('sensor.date_time') }}
      target:
      - '+15554443333 '
  mode: single

- id: aa2aa306c5f54c07aea573747595d240
  alias: enable nabucasa when wifi goes down
  trigger:
  - platform: state
    entity_id: binary_sensor.wifi_status
    to: 'off'
  action:
  - service: cloud.remote_disconnect
  - delay:
      seconds: 10
  - service: cloud.remote_connect
  - service: notify.sendtsms
    data_template:
      title: Internet issue
      message: Switched to cellular path at {{ states('sensor.date_time') }}
      target:
      - '+15554443333'

- id: aa2aa306c5f54c07aea573747595d241
  alias: wifi came up while someone is away so just restart nabucasa to reconnect
  trigger:
  - platform: state
    entity_id: binary_sensor.wifi_status
    to: 'on'
  condition:
  - condition: or
    conditions:
    - condition: state
      entity_id: person.bill
      state: not_home
    - condition: state
      entity_id: person.mary
      state: not_home
  action:
  - service: cloud.remote_disconnect
  - delay:
      seconds: 10
  - service: cloud.remote_connect
  - service: notify.sendtsms
    data_template:
      title: Internet back
      message: Wifi back on but still away so reset remote {{ states('sensor.date_time')
        }}
      target:
      - '+15554443333'

- id: aa2aa446c5f54c07aea573747595d241
  alias: wifi came up while and everyone home so disable nabucasa
  trigger:
  - platform: state
    entity_id: binary_sensor.wifi_status
    to: 'on'
  condition:
  - condition: and
    conditions:
    - condition: state
      entity_id: person.bill
      state: home
    - condition: state
      entity_id: person.mary
      state: home
  action:
  - service: cloud.remote_disconnect
  - service: notify.sendtsms
    data_template:
      title: Internet back
      message: Wifi back and all home so close remote {{ states('sensor.date_time')
        }}
      target:
      - '+15554443333'

I made a few modification to the above implantation that are in this post below.

5 Likes

What an absolutely brilliant set up and even more brilliantly detailed in this post. Hats off to you.

2 Likes

Not sure at which one you looked, but I have the LB2120. It has two Ethernet ports, LAN and WAN, and acts as a cell failover. It’s permanently connected to the LTE network and as soon as the WAN internet connection becomes unavailable it seemlessly switches to LTE. Works without issues and it’s pretty configurable too.

That’s one of two that I looked at from netgear. Out of curiosity what type of cellular service did you have to get to use this? Did you just insert a SIM for phone service or did you get a data plan SIM of some type? And what options does the provide for determining the main communications path is down?

I just got a cheap SIM for phone service with plenty of data. Plugged it into my phone first, removed the PIN and then just slapped it into the modem (but I think the modem could have done that too). I think I had to manually configure the APN. Some service providers don’t want you to use their phone service plans like this, some don’t care so YMMV. I checked the legal fine print first to make sure modem only use was ok with them. I didn’t want the SIM to be deactivated without me noticing until I need it most… I can read and send SMS with the modem over the web UI and over AT commands, so that’s kinda neat.

The fallback options are pretty basic. You can define a list of IPs the modem will ping to determine connection status. You can also disable the WAN port entirely, making it a pure LTE modem. And you can configure it as either a router (with NAT, DHCP server, etc, the usual stuff) or as a pass through bridge. I did the latter, so it’s mostly transparent on the network.

I had to update the instruction above because it turned out that the Pixel would assign a random /24 CIDR block from the 192.168.0.0/16 network address range to the tethered interface. I was doing some testing to see what would happen should the Pixel reboot. Much to my surprise it picked a different random network block that just happened to be the CIDR block I use for my home network. This screwed everything up. The fix was to change the WiFi access point from a routing device to a bridge device. This way the Pixel WiFi interface is assigned an IP address from my home network. As a result it will not assign that network block to the usb tethered interface.

Amazing explanation. Thanks for sharing.
What I did was to create an AP by using a Raspberry PI + GSM module that is connected to the Raspberry directly. I didn’t need to use another mobile phone.

I looked at doing with a GSM device. I figured I still needed a wall mounted panel and while the phone is small, it functions well as a panel.

Wanted to congratulate again for the details. I tried several times to follow the instructions and replicate what you did but it seems the skills someone needs to accomplish it should be big. It will be great, if you have a detailed configuration, or a video explaining step by step for people like me with a little bit more unexpert on linux I will really appreciate it.
I am trying since Monday and with no luck. I was able to create the interfaces, bridge and even turn on the GSM board I have with 3G simcard. The hostpot appeared and I was able to connected to it, but, unluckely I could not get internet to work from the clients I got connected. I bet some routing IP’s are missing but not sure what to do next. I also tried by installing the linux openwrt but it never recognized the modem like the raspberry desktop version did from once. Not sure what I am doing wrong but I am willing to share any details I can if you can help me with it.
Thank you in advance

If you could share a drawing of your setup I can try and help. It reads like you used a raspberry pi to create a bridge between a LAN segment and the GSM network. Is this correct? Is your intent to use the 3G just as cellular backup for HA or is it for multiple clients that would be connecting? On the box you have the GSM card connected to, can you log into that box and then ping something out on the internet?

Changing data flow to only use phone usb0 purely for backup
This solution has been up an running for some time now. I’m happy to report it works well. I put mention in the post above that the wifi access point is only necessary if you have these two requirements.

* I want the phone to run the HA companion application give a wall mounted access point to HA.
* I only want the Nabu Casa connection operation when we're away from the house

If you don’t care about running the HA companion app on the phone, you don’t need to build the wifi access point. Or if you want the companion app on the phone and you’re fine with the Nabu Casa connection being up 24/7 then you don’t need the wifi access point. You could just use the system as described above with outbound internet traffic always going out over the cellular. Or you could create a script that monitors the state of your home internet and only route the traffic over the cellular when your home network can’t talk with the internet. It would a modification of what I’m describing below in this post.

With the system built as described above I hit a point where the wifi access point would drop out for no clear reason. So my system cycle between using my home internet and cellular multiple times a day. Some times it was multiple times an hour. This worked but I didn’t like it. I decided to try different usb wifi adapters in the bridge. Panda wireless controllers are supposed to be the best for working in linux. I had this PAU09 sitting around so I gave it a try. It works great and stopped the wifi from dropping out. It’s a little more expensive and is pretty big with the antennas. I’ve order this as an alternative and expect it’ll do just as well.

Because of the dropouts I also decided I didn’t really need to run all of the internet bound HA traffic through the phone all the time. I made these small changes to the above implementation to only route outbound HA traffic through the phone if my home network had issues accessing the internet.

The first change was to set the HA system so that it configured the usb0 interface with the phone but didn’t bring up the interface. This was done by modifying the usb0 interface specific file located in /etc/NetworkManager/system-connections and setting the autoconnect parameter to false. So this file looks like this for me:

[connection]
id=Wired connection 1
uuid=d021bdf5-afab-357e-b36a-7a162e7a07a9
type=ethernet
autoconnect=false
#autoconnect-priority=-999
permissions=
timestamp=1629971061

[ethernet]
#cloned-mac-address=00:1E:06:42:0C:B5
mac-address-blacklist=

[ipv4]
dns-search=
method=auto

[ipv6]
addr-gen-mode=stable-privacy
dns-search=
method=auto

The next thing was to change the scripts that monitored the status of the wifi provided by the access point. In the initial implementation the script that ran on the wifi access point and the script that runs on HA worked independently. In this new implementation the script that runs on the access point provides the script that runs on HA a notice on the state of the wifi. If the wifi is up and running periodic notifications are sent to the HA script. If the wifi is down then notification are not sent. If the HA script doesn’t receive the notification then it enabled the cellular backup interface.

The script /home/brian/network-watcher/wifi-srv-network-watcher.py that runs on the wifi access point now looks like this

#! /bin/python3
# Program looks to see if it can communicate with the internet, if it can't it takes
# wifi access point down, if it can access interent and wifi was previously taken
# down it brings it back up
import os
import subprocess
import time
import syslog
import socket
import sys
from datetime import datetime

HOST, PORT = "IP_OF_YOUR_HA_CONTROLLER", 5555
connected = False

internet_test_addr = "8.8.8.8" #use google dns YOU COULD CHANGE
full_ping_delay = 5 
ping_delay = full_ping_delay

# set so we start WiFi if the internet is up
house_internet_up = False
going_down = False

#Delay a couple seconds for things to come up
time.sleep(2)
syslog.syslog(syslog.LOG_INFO, 'Network Watcher up using target ' + internet_test_addr )

while True:
    # check to see if we can ping out internet test address
    response = os.system("ping -c 1 " + internet_test_addr + "> /dev/null")
    # good ping so internet is up
    #print "Ping Response: %d" % ( response )
    if response == 0:
        #print( 'Good response to ping' )
        # if internet was down then bring wifi back up
        if not house_internet_up:
            #print( 'Good ping ' + internet_test_addr +  ' Bringing Wifi Up')
            syslog.syslog(syslog.LOG_INFO, 'Good ping ' + internet_test_addr +  ' Bringing Wifi Up')
            #os.system("rfkill unblock wlan")
            response = os.system("systemctl start hostapd")
            if response == 0:
                house_internet_up = True
                syslog.syslog(syslog.LOG_INFO,"wifi successfully activated");
            else:
                syslog.syslog(syslog.LOG_INFO,"wifi did not activated");
        going_down = False
        ping_delay = full_ping_delay
        try:
            #print( 'Trying connection' )
            if not connected:
                   sock = socket.socket(socket.AF_INET, socket.SOCK_STREAM)
                   #print( 'Attempt new connection' )
                   # Connect to server and send data
                   sock.connect((HOST, PORT))
                   connected = True
                   #print( "Connection make") 
            now = datetime.now() # current date and time
            data = now.strftime("%m/%d/%Y %H:%M:%S")
            #sock.sendall(bytes(data + "\n", "utf-8"))
            sock.sendall(bytes(data, "utf-8"))

            #print("Sent:     {}".format(data))

        except socket.error as msg:
            syslog.syslog(syslog.LOG_INFO, "Exception communicating with HA")
            connected = False
            #sock.close();

    # two ping fails so if internet up then take it down
    elif going_down:
        if house_internet_up:
            #print('Cant ping ' + internet_test_addr +  ' Shutting down HA WiFi')
            syslog.syslog(syslog.LOG_INFO, 'Cant ping ' + internet_test_addr +  ' Shutting down HA WiFi')
            #os.system("rfkill block wlan")
            response = os.system("systemctl stop hostapd")
            if response == 0:
                syslog.syslog(syslog.LOG_INFO,"wifi turned off");
                house_internet_up = False
            else:
                syslog.syslog(syslog.LOG_INFO,"wifi did not turn off");
            ping_delay = full_ping_delay

    # first ping fail of internet test address so set to try second ping
    else:
        syslog.syslog(syslog.LOG_INFO,  "First ping failed, look for second error before taking internet down ")
        #print "First ping failed, look for second error before taking internet down "
        going_down = True
        ping_delay = 5

    time.sleep(ping_delay)

I changed the name of the companion script that runs on the HA controller from wifi-network-watcher.py to wifi-ctrl-srv.py. I placed the new script in the directory

/usr/share/hassio/homeassistant/os-support-apps/

so that the file file is included in HA backups. Since I changed the script name I had to modify the line in /etc/rc.local that starts the script to match this new name. The script contains the following:

root@HA:/etc/NetworkManager/system-connections# cat /usr/share/hassio/homeassistant/os-support-apps/wifi-ctrl-srv.py
#!/bin/python3
import os
import time
import socket
import syslog
import threading
import subprocess
#from datetime import *
from datetime import datetime

reported_date = datetime.now()

class ThreadedServer(object):
    def __init__(self, host, port):
        self.host = host
        self.port = port
        self.sock = socket.socket(socket.AF_INET, socket.SOCK_STREAM)
        self.sock.setsockopt(socket.SOL_SOCKET, socket.SO_REUSEADDR, 1)
        self.sock.bind((self.host, self.port))

    def listen(self):
        self.sock.listen(5)
        while True:
            client, address = self.sock.accept()
            client.settimeout(60)
            threading.Thread(target = self.listenToClient,args = (client,address)).start()

    def listenToClient(self, client, address):
        global reported_date
        size = 1024
        syslog.syslog(syslog.LOG_INFO,"Connection from wifi controller")
        while True:
            try:
                data = client.recv(size)
                if data:
                    # Set the response to echo back the recieved data :
                    response = data.decode("utf-8")
                    #print("Convert date to time from ",response)
                    reported_date = datetime.strptime(response, '%m/%d/%Y %H:%M:%S')
                    #client.send(data)
                else:
                    raise error('Client disconnected')
            except Exception as e:
                syslog.syslog(syslog.LOG_INFO,"Exception in client that talks with wifi contoller " + str(e))
                client.close()
                return False


def ha_up():
    try:
        s = socket.socket(socket.AF_INET, socket.SOCK_STREAM)
        s.connect(("localhost", 8123))
        s.close()
        return True
    except socket.error:
        return False

def send_mqtt_msg( msg ):
    # only continue if mqtt broker is up
    done = 1
    while done != 0:
        #print("Sending message",msg)
        done = os.system( msg )
        if done != 0:
            time.sleep(5)


def control_thread():
    global reported_date

    usb0_down = True
    wifi_down = False
    loop_delay = 5

    while not ha_up():
        syslog.syslog(syslog.LOG_INFO,"Waiting on HA to come up")
        time.sleep(10)

    syslog.syslog(syslog.LOG_INFO,"Ha up!, let's watch wifi state")

    # send initial message indicating wifi is on
    send_mqtt_msg("mosquitto_pub -u mqtt -P Hass10mqtt -h 127.0.0.1 -t home-assistant/wifi -m "+ '{\\"state\\":\\"ON\\"}')

    refreshTime=0

    while True:
        cur_date = datetime.now()
        time_diff = cur_date - reported_date
        #print( "Time difference is ",time_diff.total_seconds())

        if time_diff.total_seconds() >= 30:
            wifi_down = True
            if usb0_down:
                syslog.syslog(syslog.LOG_INFO,"need to bring up usb0 cellular backup interface")
                # Let HA know system switching from wifi to cellular 
                send_mqtt_msg("mosquitto_pub -u mqtt -P Hass10mqtt -h 127.0.0.1 -t home-assistant/wifi -m " + '{\\"state\\":\\"OFF\\"}')
                #Add command to bring usb interface up
                usb0_status = subprocess.check_output("nmcli con up 'Wired connection 1'", shell=True, text=True)
                if "successfully activated" in usb0_status:
                    usb0_down = False
                    syslog.syslog(syslog.LOG_INFO,"usb0 successfully activated");
                else:
                    syslog.syslog(syslog.LOG_INFO,"usb0 did not activated");
        else:
            wifi_down = False
            if not usb0_down:
                syslog.syslog(syslog.LOG_INFO,"need to take down usb0 cellular backup interface")
                send_mqtt_msg("mosquitto_pub -u mqtt -P Hass10mqtt -h 127.0.0.1 -t home-assistant/wifi -m " + '{\\"state\\":\\"ON\\"}')
                #Add command to take usb interface up
                usb0_status = subprocess.check_output("nmcli con down 'Wired connection 1'", shell=True, text=True)
                #print("usb0 status",usb0_status);
                if "successfully deactivated" in usb0_status:
                    usb0_down = True
                    syslog.syslog(syslog.LOG_INFO,"usb0 successfully deactivated");
                else:
                    syslog.syslog(syslog.LOG_INFO,"usb0 did not deactivated");

        refreshTime = refreshTime + loop_delay

        if refreshTime >= 60:
            refreshTime = 0
            if wifi_down:
                send_mqtt_msg("mosquitto_pub -u mqtt -P Hass10mqtt -h 127.0.0.1 -t home-assistant/wifi -m " + '{\\"state\\":\\"OFF\\"}')
            else:
                send_mqtt_msg("mosquitto_pub -u mqtt -P Hass10mqtt -h 127.0.0.1 -t home-assistant/wifi -m " + '{\\"state\\":\\"ON\\"}')

        time.sleep( loop_delay )


if __name__ == "__main__":
    #print("In main code kicking off control_thread")

    ctl_thread = threading.Thread(target=control_thread)
    ctl_thread.start()

    #print("In main code kicking off socket server")
    # start service to listen for time information
    ThreadedServer('',5555).listen()

I think this is a much cleaner implementation.

Migration to Debian Bullseye Notes:
In the script above there are two “nmcli con” lines, one for up and one for down. The name ‘Wired connection 1’ is the name of the NetworManager file in “/etc/NetworkManager/system-connections”. I recently moved over to Debian Bullseye and the file name in that directory for the USB device became “Supervisor usb0.nmconnection”. As a result I had to change the line lines in the script from ‘Wired connection 1’ to ‘Supervisor usb0’.

When moving to Debian Bullseye, even though I have eth0 defined in /etc/network/interfaces, NetworkManger was doing some management for the interface. I didn’t want this. To make sure NetworkManager would not manage the interface I created the file ‘/etc/NetworkManager/conf.d/99-unmanaged-devices.conf’ containing the line

[keyfile]
unmanaged-devices=interface-name:eth0

I recently updated from HA 2022.10.5 to 2022.11.2. This upgrade caused a few problems with the way networking worked that needed to be addressed. When trying to update HA add-on’s the update would fail with this message: “blocked from execution, no host internet connection”. Looking around I found someone mention that they had a similar issue if the command “nmcli g status” did not show full connectivity. I tried this command and it returned “limited” connectivity even though all networking worked without issue. I figured this was being driven by the fact that I didn’t have NetworkManager managing the main network interface. So I went about changing things so NetworkManager did control the main interface. These are the things I did.

The first thing was to change how the static IP address was configured for eth0, the main network device. When I started this effort I configured the static ip address for eth0 via the file /etc/network/interfaces. This was disabled by commenting out the lines that defined the static IP. So this file now looks like this:

source /etc/network/interfaces.d/*

auto lo
iface lo inet loopback

#auto eth0
#iface eth0 inet static
#       address 192.168.10.250
#       netmask 255.255.255.0
#        post-up route add default gw 192.168.10.2 metric 10
#        pre-down route del default gw 192.168.10.2

The lines starting with # are the lines I commented out. I could just as well deleted these lines.

Then I needed to commend out the line in /etc/NetworkManager/conf.d/99-unmanaged-devices.conf that told NetworkManager to not manage eth0. The file now looks like this:

 [keyfile]
#unmanaged-devices=interface-name:eth0

To have NetworkManager assign a static IP for eth0 I created the file

/etc/NetworkManager/system-connections/Supervisor eth0.nmconnection

with this information:

id=Supervisor eth0
uuid=6a27bc74-19e4-47f8-b6e8-c124e45a4a12
type=ethernet
interface-name=eth0
llmnr=2
mdns=2
permissions=
timestamp=1670000589

[ethernet]
cloned-mac-address=preserve
mac-address=00:1E:06:43:08:BD
mac-address-blacklist=

[ipv4]
address1=192.168.10.250/24,192.168.10.2
dns-priority=100
dns=192.168.10.2;
method=manual

[ipv6]
addr-gen-mode=stable-privacy
dns-priority=100
dns-search=
method=link-local

[proxy]

The interface-name, mac-address, address1 and dns lines should be adjusted for your setup.
Note: previous I had dns-search in the configuration file. By changing this to dns, which is the correct entry, then the modification made above related to resolve.conf is no longer required.

I had to update the script /etc/NetworkManager/dispatcher.d/02-myifupdown, which handles making usb0 (cellular) the default route, to look like this:

#!/usr/bin/env bash

local_DNS_addr="192.168.10.2"
interface=$1
event=$2

if [ $interface = "eth0" ];then
  if [ $event = "up" ]; then
    ifmetric eth0 10
  fi
fi

if [ $interface = "usb0" ];then
  if [ $event = "up" ]; then
    ifmetric usb0 1
    gw=`route -n |grep -e "^0.0.0.0.*usb0" |tr -s " " |cut -d ' ' -f 2`
    iptables -t nat -A OUTPUT  -d $local_DNS_addr -p udp --dport 53 -j DNAT --to-destination $gw
    iptables -t nat -A POSTROUTING  -o usb0 -d $gw -p udp --dport 53 -j  MASQUERADE
    echo $gw > /var/run/NetworkManager/cur_usb_gateway

  elif [ $event = "down" ]; then
    gw=`cat /var/run/NetworkManager/cur_usb_gateway`
    iptables -t nat -D OUTPUT  -d $local_DNS_addr -p udp --dport 53 -j DNAT --to-destination $gw
    iptables -t nat -D POSTROUTING  -o usb0 -d $gw -p udp --dport 53 -j  MASQUERADE
  fi
fi

The change just sets a metric on the default gateway for eth0, which was previously handled by lines in the /etc/network/interface file. This is part of what makes usb0 (cellular) act as the default route when the hardwired network is having connectivity issues.

The final thing I did was set up a connectivity test as per HA instructions. So I added these lines:

[connectivity]
uri=http://checkonline.home-assistant.io/online.txt
interval=600

to the end of /etc/NetworkManager/NetworkManager.conf.

I’m not sure if it is required but I also added the package network-manager-config-connectivity-debian, as I believe it handles the connectivity test that was configured when using debian.

At this point a reboot of the system moved full manage of IP interfaces over to network manager. The command “nmcli g status” now shows full for connectivity. HA now seems to be happy and I can once again update HA add-ons.

The above solution worked great with Nabu Casa to provide remote access through either my main internet connection or via the cellular backup path. The recent security issue with Nabu Casa revealed that the implementation advertises the existence of all Nabu Casa user to the internet, while providing full web access, exposing each user’s HA system to zero day attacks. I decided I needed a more secure approach for remote access.

My home firewall provides openVNP capabilities and it works fine for accessing HA while on the primary internet path. However since the cellular backup is dedicated to just supporting home security, not fully backing up my home internet, this primary VPN route isn’t full replacement.

HA includes an integration for Tailscale VPN. This seems like it could possible be a alternative solution. However since I know nothing about their implementation I was hesitant to use Tailscale. The Nabu Casa security issue already caused me to rebuild all of my home IT, I didn’t want to be back at it because of a faulty TailScale implementation. I’m not saying it has one, I just didn’t want to find out.

Since I provide home IT support for multiple family members I had already set up other locations with remote VPN access. This gives me access to a secure solution that can provide remote access through either my primary or cellular internet access. For most cases I use the VPN access provided by my house firewall. Should my house internet connection goes down for any reason, HA will switches over to using the cellular communication path and send me a text letting to let me know. To make this work I needed to establish an openVPN connection from my HA controller to one of my family members VPN controller. From my cell phone I then make a VPN connection to the family members VPN controller and then I can communicate with HA at my house through this double hop VPN route.

Making the VPN connection from my HA controller, which runs debian, not HASSIO, I simply added four lines to the script /usr/share/hassio/homeassistant/os-support-apps/wifi-ctrl-srv.py provided above. The 2 important lines start with “tun_status =”. Here is the update script

#!/bin/python3
import os
import time
import socket
import syslog
import threading
import subprocess
#from datetime import *
from datetime import datetime

reported_date = datetime.now()

class ThreadedServer(object):
    def __init__(self, host, port):
        self.host = host
        self.port = port
        self.sock = socket.socket(socket.AF_INET, socket.SOCK_STREAM)
        self.sock.setsockopt(socket.SOL_SOCKET, socket.SO_REUSEADDR, 1)
        self.sock.bind((self.host, self.port))

    def listen(self):
        self.sock.listen(5)
        while True:
            client, address = self.sock.accept()
            client.settimeout(60)
            threading.Thread(target = self.listenToClient,args = (client,address)).start()

    def listenToClient(self, client, address):
        global reported_date
        size = 1024
        syslog.syslog(syslog.LOG_INFO,"Connection from wifi controller")
        while True:
            try:
                data = client.recv(size)
                if data:
                    # Set the response to echo back the recieved data :
                    response = data.decode("utf-8")
                    #print("Convert date to time from ",response)
                    reported_date = datetime.strptime(response, '%m/%d/%Y %H:%M:%S')
                    #client.send(data)
                else:
                    raise error('Client disconnected')
            except Exception as e:
                syslog.syslog(syslog.LOG_INFO,"Exception in client that talks with wifi contoller " + str(e))
                client.close()
                return False


def ha_up():
    try:
        s = socket.socket(socket.AF_INET, socket.SOCK_STREAM)
        s.connect(("localhost", 8123))
        s.close()
        return True
    except socket.error:
        return False

def send_mqtt_msg( msg ):
    # only continue if mqtt broker is up
    done = 1
    while done != 0:
        #print("Sending message",msg)
        done = os.system( msg )
        if done != 0:
            time.sleep(5)


def control_thread():
    global reported_date

    usb0_down = True
    wifi_down = False
    loop_delay = 5

    while not ha_up():
        syslog.syslog(syslog.LOG_INFO,"Waiting on HA to come up")
        time.sleep(10)

    syslog.syslog(syslog.LOG_INFO,"Ha up!, let's watch wifi state")

    # send initial message indicating wifi is on
    send_mqtt_msg("mosquitto_pub -u mqtt -P Hass10mqtt -h 127.0.0.1 -t home-assistant/wifi -m "+ '{\\"state\\":\\"ON\\"}')

    refreshTime=0

    while True:
        cur_date = datetime.now()
        time_diff = cur_date - reported_date
        #print( "Time difference is ",time_diff.total_seconds())

        if time_diff.total_seconds() >= 30:
            wifi_down = True
            if usb0_down:
                syslog.syslog(syslog.LOG_INFO,"need to bring up usb0 cellular backup interface")
                # Let HA know system switching from wifi to cellular 
                send_mqtt_msg("mosquitto_pub -u mqtt -P Hass10mqtt -h 127.0.0.1 -t home-assistant/wifi -m " + '{\\"state\\":\\"OFF\\"}')
                #Add command to bring usb interface up
                usb0_status = subprocess.check_output("nmcli con up 'Supervisor usb0'", shell=True, text=True)
                if "successfully activated" in usb0_status:
                    usb0_down = False
                    syslog.syslog(syslog.LOG_INFO,"usb0 successfully activated");
                    # Start tunnel to give alternative access through remote VPN while on cellular
                    tun_status = subprocess.check_output("openvpn --daemon --config /etc/openvpn/client/phome.conf", shell=True, text=True)
                    syslog.syslog(syslog.LOG_INFO,"Started VPN tunnel that provides remote access");
                else:
                    syslog.syslog(syslog.LOG_INFO,"usb0 did not activated");
        else:
            wifi_down = False
            if not usb0_down:
                syslog.syslog(syslog.LOG_INFO,"need to take down usb0 cellular backup interface")
                send_mqtt_msg("mosquitto_pub -u mqtt -P Hass10mqtt -h 127.0.0.1 -t home-assistant/wifi -m " + '{\\"state\\":\\"ON\\"}')
                #Add command to take usb interface up
                usb0_status = subprocess.check_output("nmcli con down 'Supervisor usb0'", shell=True, text=True)
                #print("usb0 status",usb0_status);
                if "successfully deactivated" in usb0_status:
                    usb0_down = True
                    syslog.syslog(syslog.LOG_INFO,"usb0 successfully deactivated");
                    # stop tunnel, removing access through remote VPN
                    tun_status = subprocess.check_output("killall openvpn", shell=True, text=True)
                    syslog.syslog(syslog.LOG_INFO,"Stopped VPN tunnel that provides remote access");
                else:
                    syslog.syslog(syslog.LOG_INFO,"usb0 did not deactivated");

        refreshTime = refreshTime + loop_delay

        if refreshTime >= 60:
            refreshTime = 0
            if wifi_down:
                send_mqtt_msg("mosquitto_pub -u mqtt -P Hass10mqtt -h 127.0.0.1 -t home-assistant/wifi -m " + '{\\"state\\":\\"OFF\\"}')
            else:
                send_mqtt_msg("mosquitto_pub -u mqtt -P Hass10mqtt -h 127.0.0.1 -t home-assistant/wifi -m " + '{\\"state\\":\\"ON\\"}')

        time.sleep( loop_delay )


if __name__ == "__main__":
    #print("In main code kicking off control_thread")

    ctl_thread = threading.Thread(target=control_thread)
    ctl_thread.start()

    #print("In main code kicking off socket server")
    # start service to listen for time information
    ThreadedServer('',5555).listen()

If you don’t use SSL on your HA system you’re done. The HA companion app will work because you can program it with multiple servers, using different IP address with each sever to access you HA system. HA will have a different IP when using the VPN to the family members house, then when accessed directly over your home VPN. If you use SSL on HA, you can do the same thing using the web browser on your phone instead of the companion app to access your HA controller. If you want to use the companion app, you’ll need to address the DNS resolution so that the the domain name used in the app agrees with the domain name in the cert you provisioned on HA.

I did a distro update on the raspberry pi I use for the wifi bridge to control switching from ethernet to the backup cellular. When updating from debian buster to bullseye the service connman was introduced to control network interfaces. This service caused multiple issues, like adding an ip address to eth0 and adding a default route record for eth0 without a default gateway address. I do not know if connman is standard in raspberry pi bullseye OS or just a result of the update path I took. To fix things I had to do the following.

The NIC were no longer named eth0 and wlan0, so I had to get them back to using these names by adding net.ifnames=0 to the end of the line in /boot/cmdline.txt. This is a raspberry pi os file.

I did “systemctl disable connman” to take the service out of the picture.

Once I did this dnsmasq was also enable and causing issues because it didn’t use the dns server assigned to the bridge in the interface file. This was a simple fix with “systemctl disable dnsmasq”.

To get the bridging to work I had to also remove the two lines that configured eth0 from the /etc/network/interface file. So the only thing left were records for the br0 interface and localhost loopback.

The last strange thing that happened with this update was the the wifi interface was blocked with rkfill, so I had to run “rfkill unblock wlan” once to remove this block.

With the above changes the bridge device was now running successfully on raspberry pi version of bullseye.