Z-Wave Long Range Pros & Cons
- PRO: You only need a single controller to control mesh devices and long range devices
- CON: Any device that is included in long range mode cannot be used as a repeater in your mesh network
- PRO: Z-Wave Long Range Devices do not use repeaters
- CON: You lose the ability to use Device to Device associations
- PRO: Devices included in Long Range mode are able to adjust their current draw based on the noise floor so that they use as little as power as possible. This means that they should have better battery life.
- PRO: You can setup a Z-Wave Mesh and Z-Wave Long Range on a single controller.
- A Device can only be placed in Long Range mode during inclusion so if a device is already included into the network you will have to exclude it or factory reset it first then re-include it in Long Range Mode.
- PRO: You can have up to 4000 devices in your Z-Wave Long Range network. Z-Wave mesh network is limited to 232 devices.
Z-Wave Long Range Requirements
- You need to be using Z-Wave JS UI addon version 3.4.2 and newer OR Z-Wave JS UI 9.10.0 and newer for the standalone version OR Home Assistant Core 2025.5 and newer
- CONTROLLER HARDWARE: You need a 700 or 800 series Z-Wave Controller
- END DEVICE HARDWARE: Your end device must have a 700 or 800 series Z-Wave chip in it.
- END DEVICE SOFTWARE: Your end device must have Z-Wave Long Range firmware installed on it. If your device doesn’t support Z-Wave Long Range it can get a firmware update to support Z-Wave Long Range.
How to Tell if Your Device Supports Z-Wave Long Range
- The easiest way to tell if your device supports Z-Wave Long Range is by looking at the logo on the device and packaging. Here is what the Z-Wave Long Range Logo looks like. If you see this logo your device supports Z-Wave Long Range.

- As I stated earlier if your device has a 700 or 800 series chip in it and it doesn’t support ZWLR it can support ZWLR via a fw upgrade. For example the Zooz ZEN5X relays have 700 series chips in them and they recieved ZWLR support in FW 1.50. The new Shelly 800 series relays also do not support long range but will receive a fw update to enable it. Not all devices will get ZWLR support as that’s up to the manufacturer.
Overview on How to Setup Z-Wave LR and Add Devices in LR Mode Using Z-Wave JS UI
- Using Z-Wave JS UI Change the region of your controller to USA Long Range
- Add your DSK to the provisioning list in Z-Wave JS UI
- Change the protocol to Z-Wave Long Range
- Toggle the switch in the active section6.
- Wait and your device will be automatically included into the network within 10 minutes
How to Change the Region of your Controller in Z-Wave JS UI
- You can change the region of the controller in the node settings of the controller or in the Z-Wave JS UI settings
- Click the gear icon to navigate to the Z-Wave JS UI settings page
- Expand the Z-Wave Section
- Search for RF Region in the Default Radio Configuration section
- Select USA (Long Range) for the region
- Click Save
- You can verify that the region was changed to Long Range mode by going back to the Z-Wave JS UI Control Panel. In the Protocol Column you should see a blue and purple z-wave icon. Blue is for Z-Wave and Purple is for Z-Wave Long Range.

How to Add your DSK to the Z-Wave JS UI Provisioning List
- Z-Wave JS UI provides 4 different ways for you to add your DSK. You can scan the smart start qr code, upload a picture of the qr code, convert the qr code to a string using a bar code scanner or manually type out the DSK.
- Here is a picture of what the DSK and smart start qr code look like. The smart start qr code is outlined in blue and the DSK is outlined in red.

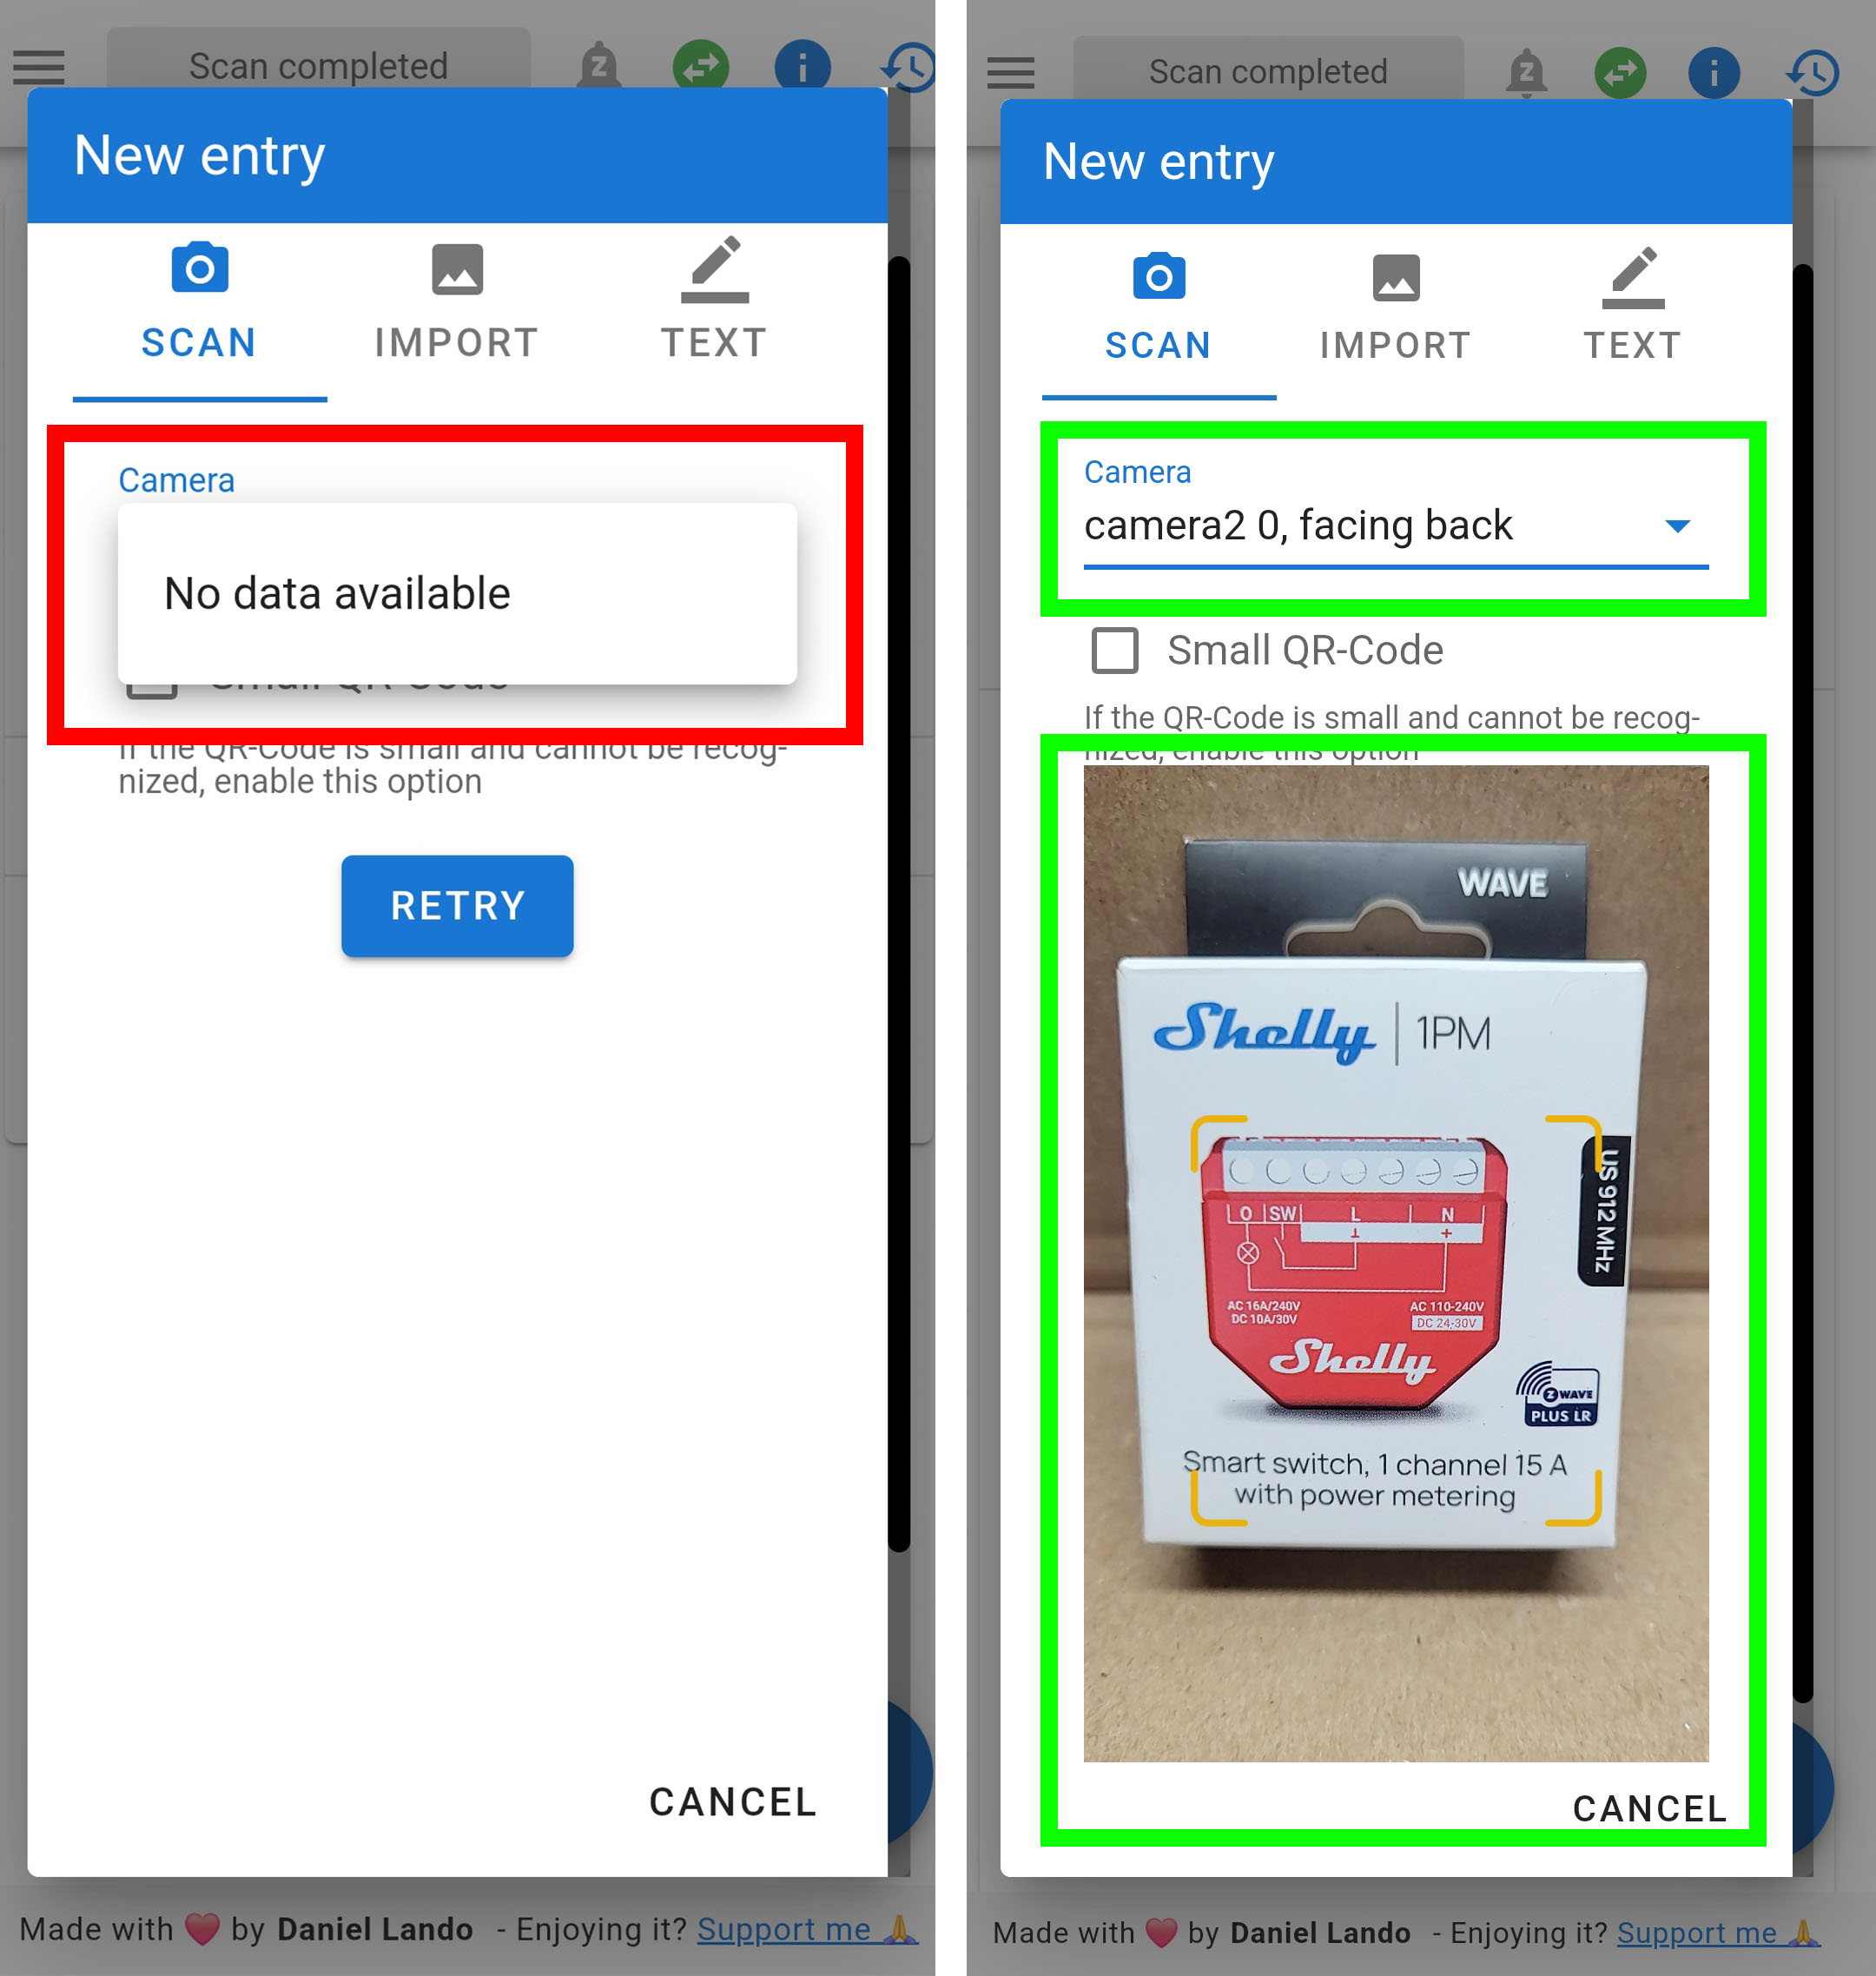
- Option 1 is to scan the qr code. This method requires you to have HTTPS setup. If you do not have HTTPS setup your browser will not allow you to use the camera to scan the qr code. The picture on the left shows HTTP and the picture on the right shows HTTPS. When HTTPS is setup you will have the option to select your camera as well as see a live view of that camera. When you do not have HTTPS you will not have the option to select a camera.
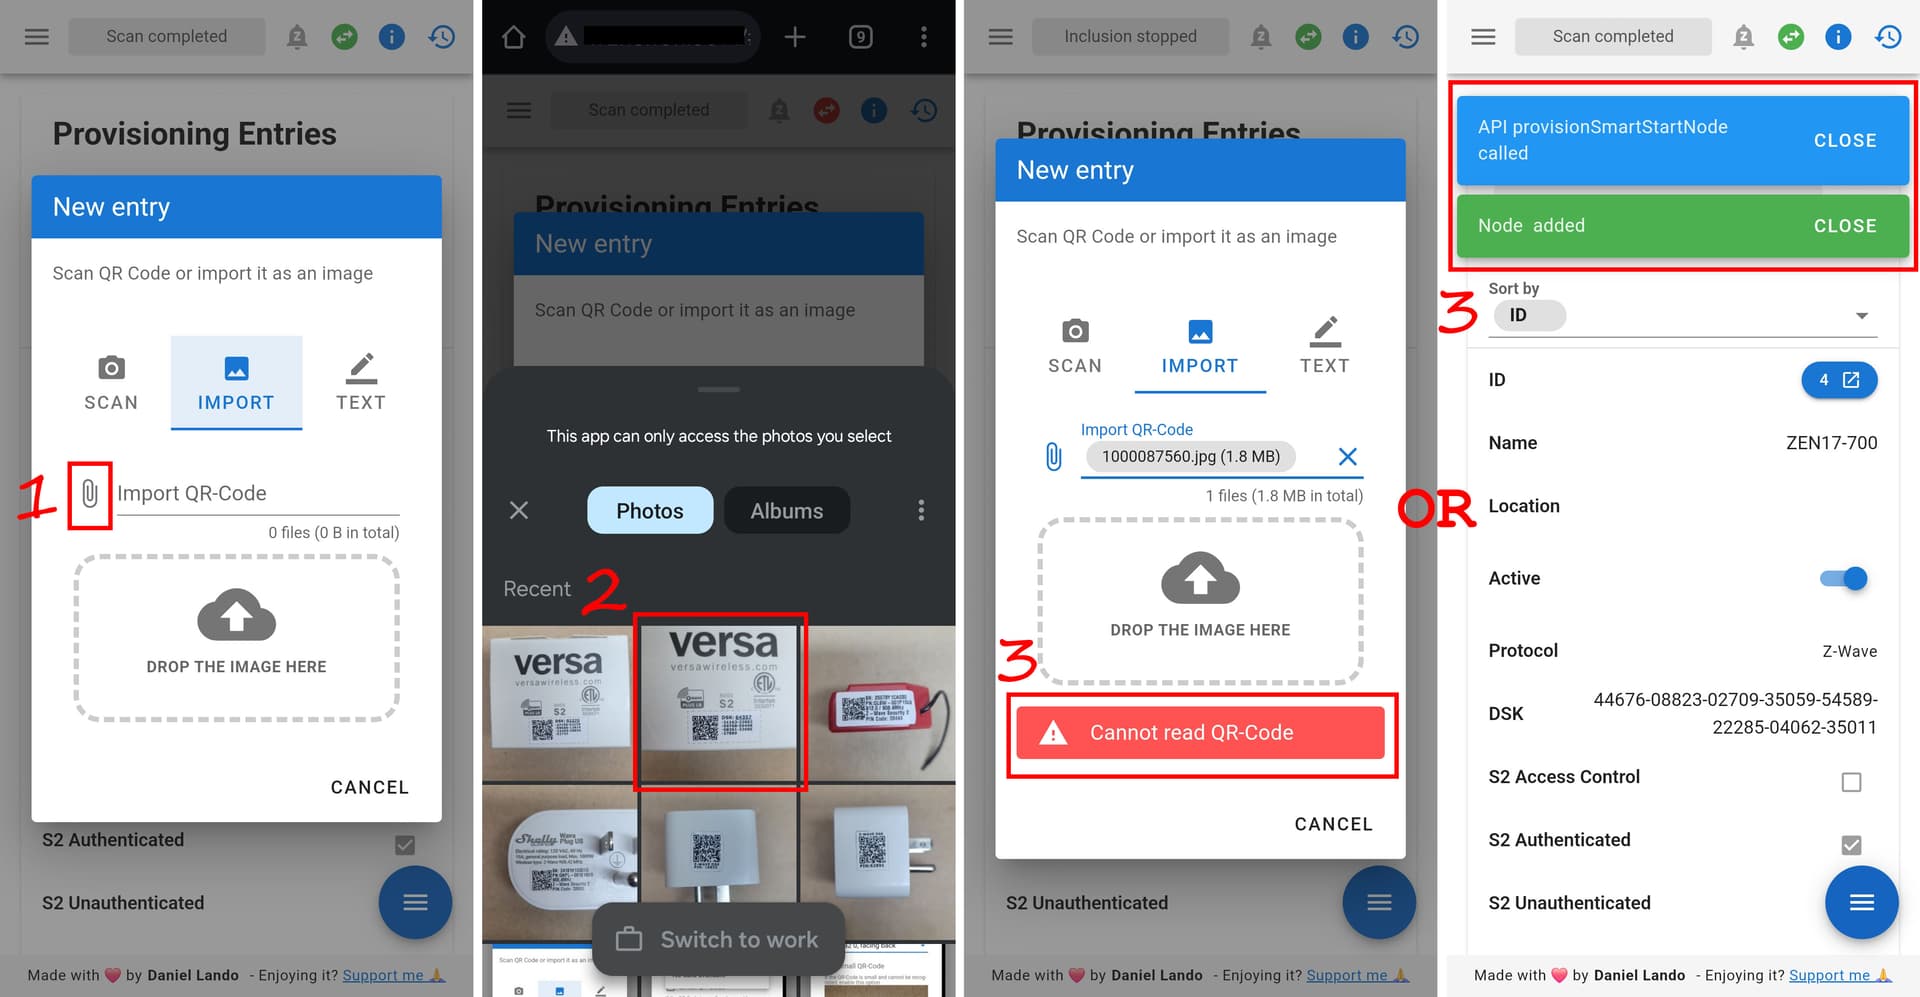
- Option 2 is to take a picture with your phones camera then upload the picture to Z-Wave JS UI. To do this click the paper clip icon to open the gallery then select your picture. Once you seleect your picture you will get a error if it failed to read the qr code or a node added Some people complain about this method not working. I found if it doesn’t work just keep trying it until it does.
- Option 3 is to scan the smart start code with any bar code scanner app. When you open the 3rd party qr code app the first thing you will see is a live view of the camera. When you scan the smart start code it should output a code that starts with 9001. You can then copy and paste that code into Z-Wave JS UI.
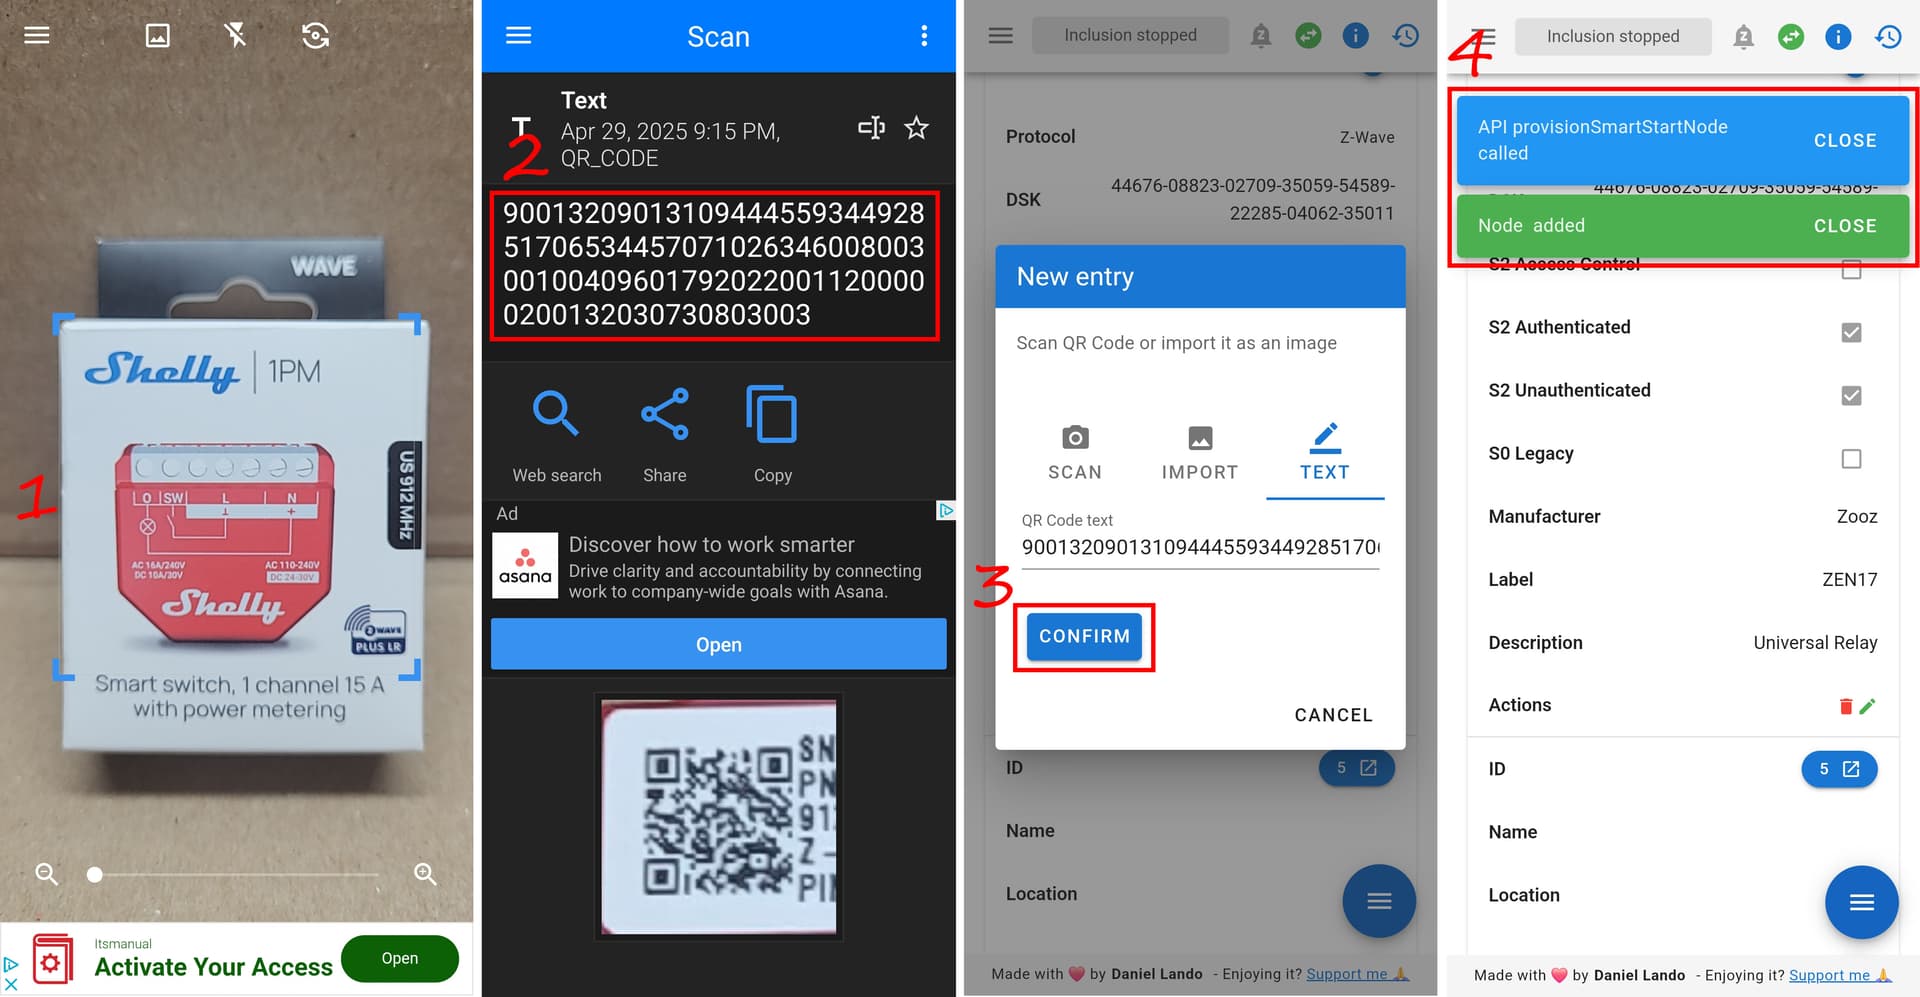
- Option 4 is to manually enter the dsk
How to Change the Protocol to Z-Wave Long Range in Z-Wave JS UI
- Once you add your DSK to the provisioning list the entry should look like this.

- Click on the word Z-Wave to change the protocol from Z-Wave to Z-Wave Long Range

- Click the toggle switch in the active column. Your device will be automatically included in Z-Wave Long Range mode within 10 minutes.

How to Add Devices in LR Mode Using Home Assistant Core 2025.5 and Smart Start
- The region will automatically be set to ZWLR if you are using Z-Wave JS so you don’t need to do it manually
- Make sure you have HTTPS setup or else you won’t be able to use the camera
- Go to Settings > Devices and Services > Click the Z-Wave Logo > Click the configure button next to your hub name > Click Add Device
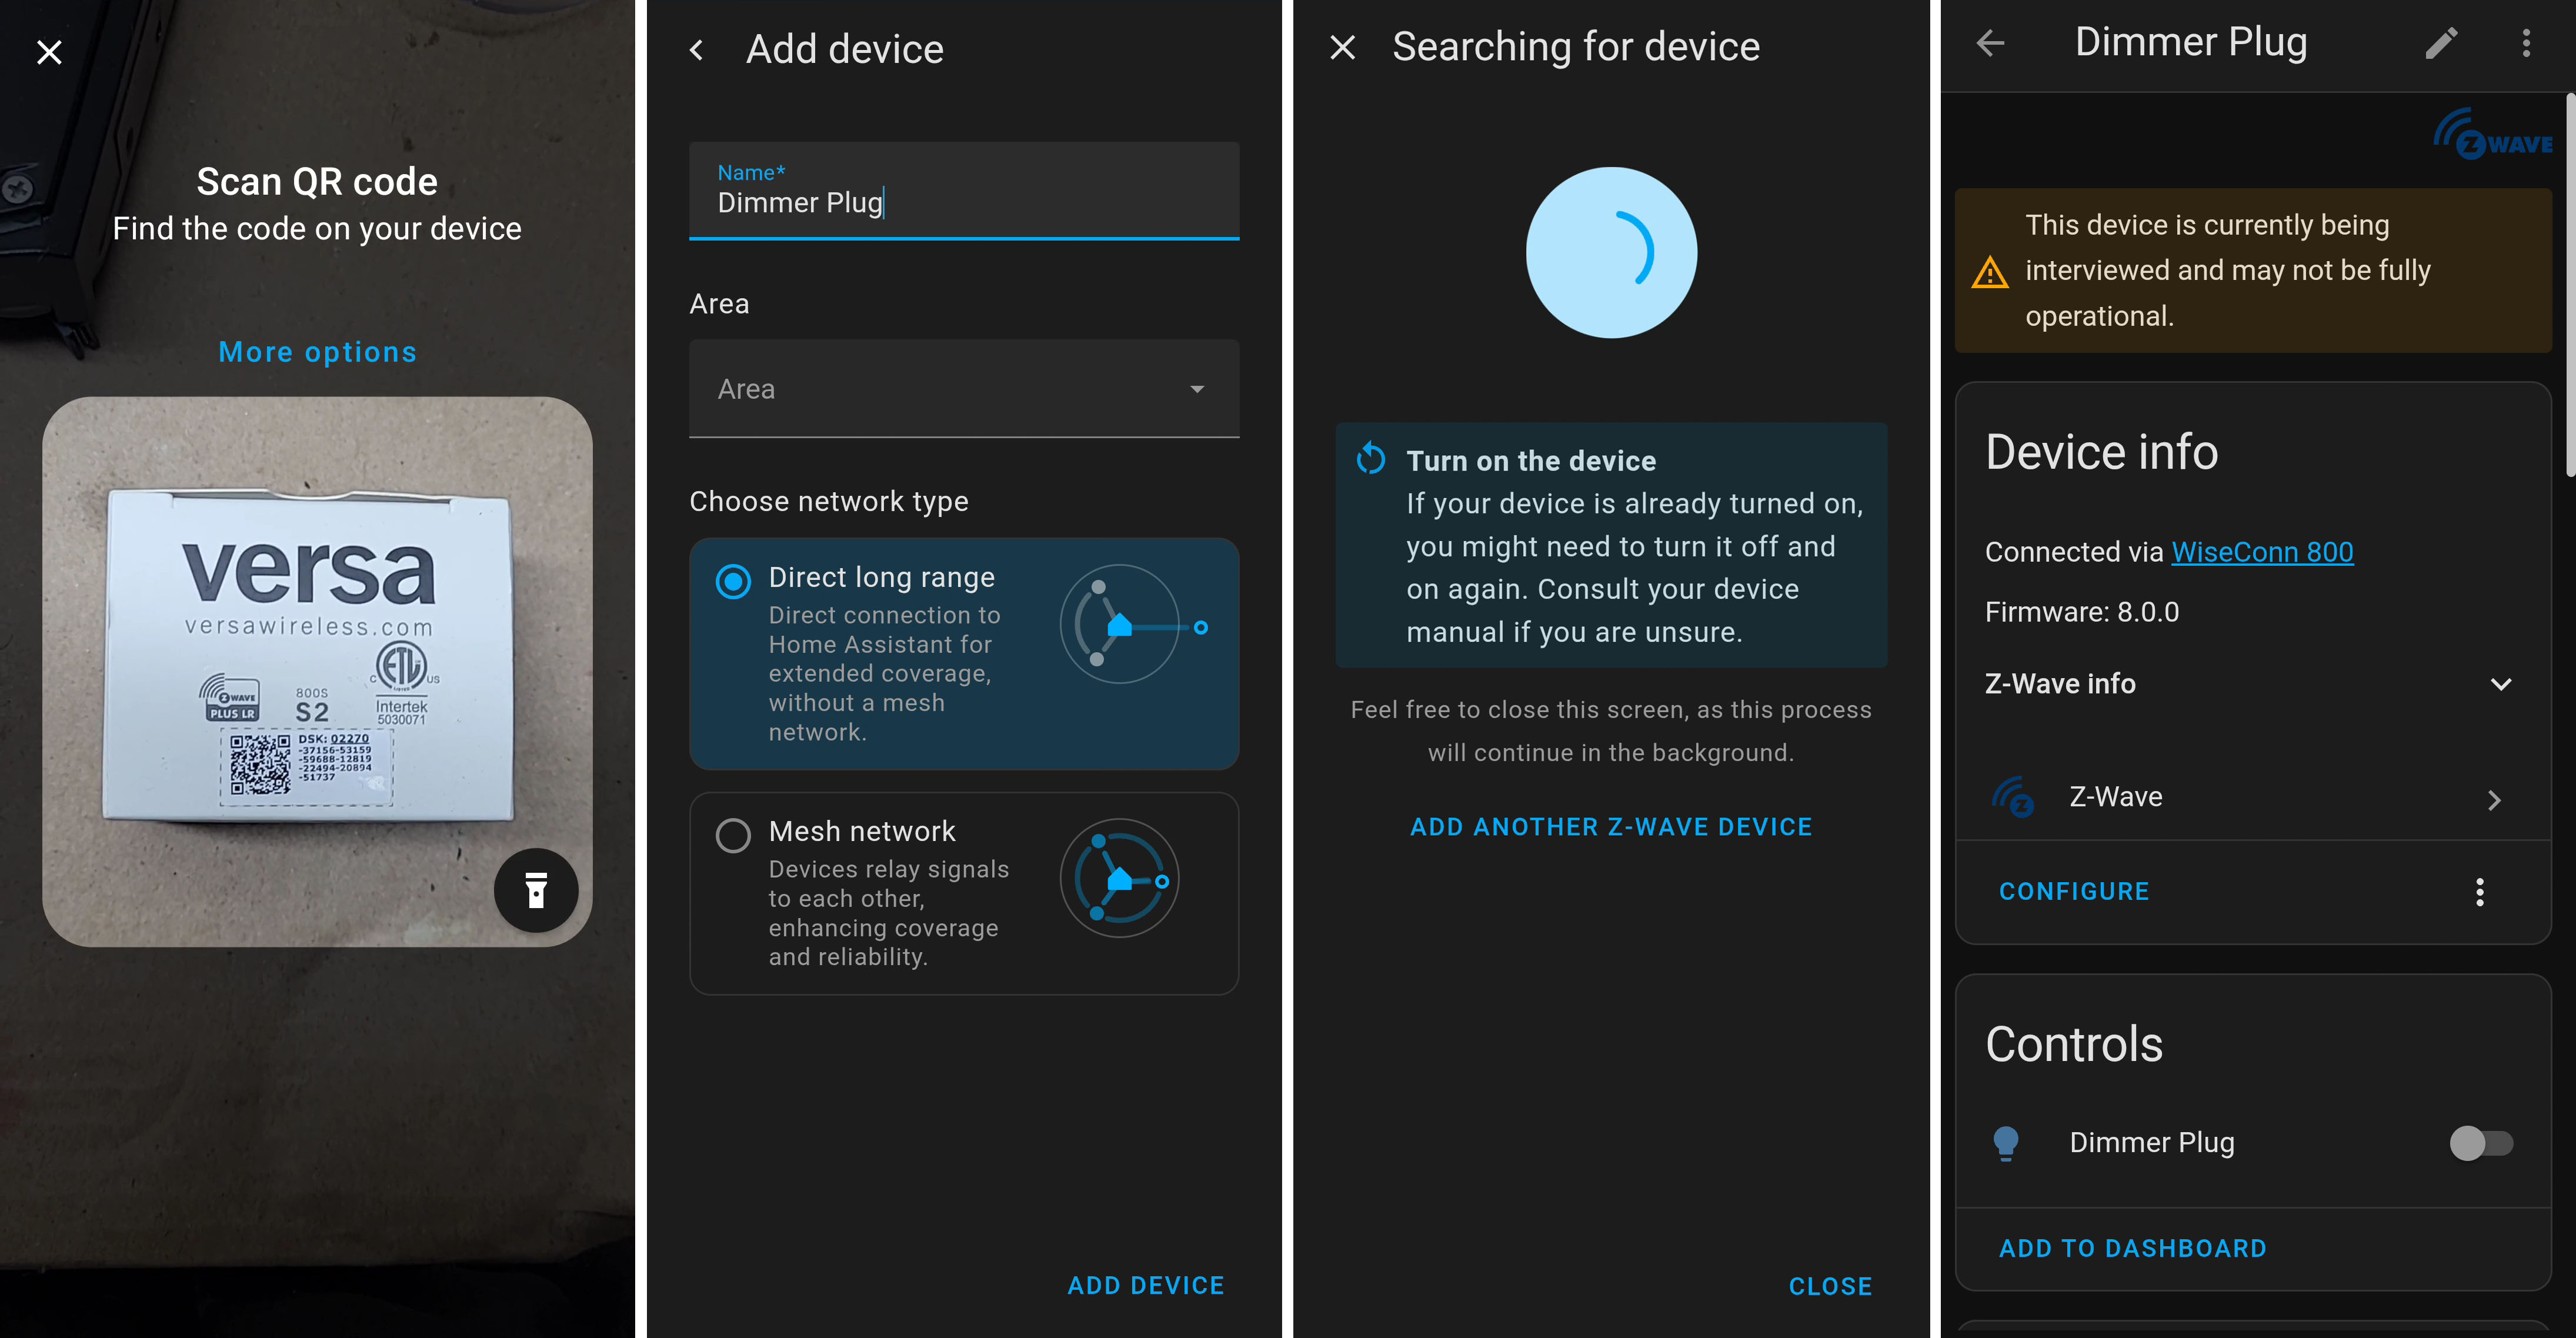
- Scan the QR Code. When the qr code is successfully scanned it will take you to the next page
- Give your device a name and make sure Direct Long Range is selected, then click add device
- Power the device on and your device will be automatically included into the network within 10 minutes
How to Manually Add Devices in LR Mode Using Home Assistant Core 2025.5
- The region will automatically be set to ZWLR if you are using Z-Wave JS so you don’t need to do it manually
- Go to Settings > Devices and Services > Click the Z-Wave Logo > Click the configure button next to your hub name > Click Add Device
- If you do not have HTTPS setup you will see a warning message and the option to enter the qr code manually
- Select the option to enter the qr code manually
- When you use a 3rd party barcode scanner app to scan the qr code it will output a long string of numbers that start with 9001. Paste this code into the box and click next
- Give your device a name, make sure direct long range is selected, then click add device
- Power the device on and it will automatically be added to the network within 10 minutes
