Integrating Nest Protect smoke alarms

Don’t forget that the first post in a community guide is a wiki - feel free to add to it or correct it.

This guide was written with reference to:

Home Assistant 2023.8.3
Supervisor 2023.08.1
Operating System 10.5
Frontend 20230802.1 - latest

December 2023: The developer has resumed work on this integration. Please check issues on GitHub before proceeding.

Background

The official Google Nest integration does not support Nest Protect smoke alarms. A custom component is available from HACS which uses an “undocumented and unofficial” API:

However, in October 2022 Google blocked this authentication method. There is an alternative, known as the “cookie method” and the developer has a beta release which supports this:

Release v0.4.0b2 · iMicknl/ha-nest-protect · GitHub

This is a step-by-step guide to setting up the integration. Most of it is taken from the developer’s instructions - I have just added screenshots. Feel free to improve it.

Limitations

  • Only Google Accounts are supported, not legacy Nest accounts

  • Cookie authentication means that you need to login to the Nest website at least once to generate a cookie. This cookie will be used to authenticate with the Nest API. The cookie will be stored in the Home Assistant configuration folder and will be used for future requests. If you log out from Nest or change your password, you will need to reauthenticate.

Tools

  • The screenshots here were taken using the Chrome browser on a Chromebook - other browsers may vary.

  • Not essential, but highly recommended… If you are doing a manual installation, the Samba Share add-on in Home Assistant makes downloading files and copying them into HA very easy. On my Chromebook, I use the CX File Explorer app.

Method

Installation via HACS

  • In HACS | Integrations search for Nest Protect
  • Click on the Download button
  • In the Download card, turn on Show beta versions
  • From the dropdown list, select v0.4.0b2
  • Click Download
  • Restart Home Assistant
  • Go to Devices & Services | Integrations and add the Nest Protect integration, which should now appear in the new integrations list

Manual Installation

  • Go to Release v0.4.0b2 · iMicknl/ha-nest-protect · GitHub and download the source code
  • Unpack the compressed file
  • Copy the folder custom_components/nest_protect to the custom_components folder in Home Assistant
  • Restart Home Assistant
  • Go to Devices & Services | Integrations and add the Nest Protect integration, which should now appear in the new integrations list

Note: since this integration has been added manually it will not appear in the HACS integrations page.

Retrieve issue_token and cookies

During configuration, you will be asked to supply an issue_token and cookies.

To get these…

  • Open a browser tab in Incognito Mode
  • Open Developer Tools (in Chrome: More Tools/Developer Tools)

  • Click on Network tab. Make sure Preserve Log is checked
  • In the Filter box, enter issueToken

  • Go to home.nest.com, and click Sign in with Google. Log into your account

Note: cookies (including third-party cookies) must be enabled in your browser or you will not be able to do this.

  • One network call (beginning with iframerpc) will appear in the Dev Tools window. Click on it
  • In the Headers tab, under General, copy the entire Request URL (beginning with https://accounts.google.com). This is your issue_token in the configuration form

  • In the Filter box, enter oauth2/iframe
  • Several network calls will appear in the Dev Tools window. Click on the last iframe call
  • In the Headers tab, under Request Headers, copy the entire cookie (include the whole string which is several lines long and has many field/value pairs). This is your cookies in the configuration form

  • Do not log out of home.nest.com, as this will invalidate your credentials. Just close the browser tab

Paste the values you have retrieved into the Configure dialogue and click submit.

For each smoke alarm you should get…

Three sensors:
image

Five configuration entities:
image

Eleven diagnostic entities:

Testing

The best way to test the connection with the cloud is to toggle one of the configuration switches - you should see the switch change in the Nest App.

In the absence of a real emergency the state of the three status sensors will not change. Manual testing (by pressing the button in the middle of the Nest Protect) does not affect them - this is testing the siren, not the smoke/CO detectors. Automations triggered by smoke/CO detection can be tested by changing the value of the sensor in Developer Tools. Notice that most of the sensors are binary, so they will appear as “off” (no problem) or “on” (problem).

You can buy aerosol sprays to carry out “real life” testing of smoke alarms without damaging them.
It is not scientific to blow cigaratte smoke round the room. :roll_eyes:

13 Likes

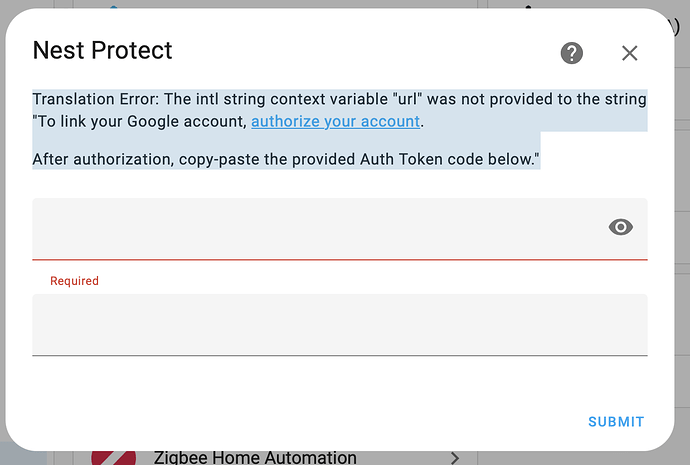
I am not getting these options for Issue_token* and cookies*, getting below screen while adding integration.

NestProtectAuthorize

I also tried clicking authorize your account but getting “Access blocked: Nest’s request is invalid…”
Any advise on how to get Access Token* ? Thank you.

1 Like

A few other people seem to have a similar issue:

Some seem to have found it useful to go back to the v0.4.0b1 version of the integration.

1 Like

Is there a way to create a template for all the sensors, creating one big main sensor that only returns “Clear” if every other sensor returns “clear”, “check” or whatever its state “should” be.

I only find that the states for the sensors is “off”. But in the lovelace cards, the states appears to be “clear”, “normal” etc.

Am I doing it completly wrong or is this a limitation?

Instead of a template, how about a group? It would be “off” for as long as all the group members were “off” and “on” if any one of them were “on”.

No, that sounds right. Nest has an IoT classification of “cloud push”, which means that Home Assistant is notified when a new state is available - and with a smoke alarm this means rarely.

The five configuration entities should all have a value corresponding to your settings. When you change your settings in HA, you will see this reflected in the Nest app and vice versa.

The three status sensors are binary, so they will always show as “off” when you look at them in developer tools. They will only be “on” if there is an actual emergency, in which case they will be updated immediately. In the UI they show as “clear” and “normal” - this is the developers trying to make the UI more friendly.

The diagnostic sensors show as “off” in developer tools and as “OK” etc. in the UI for the same reason - “on” would mean there was a problem. Some are updated once every 24 hours (you can see when this happens in the history part of the Nest app), some in the monthly automatic test, but they should rarely change.

Not sure what you mean by “limitation” - what would you expect? This is not an air quality sensor. I do understand, though, that it may be a bit of an anti-climax after all the fiddling around to get it working! :grinning_face_with_smiling_eyes:

Have you found a solution? Same issue here and unable to move forward!

I just had the same issue, installed v0.4.0b1 as suggested above, followed the instructions to get the token and cookie and it worked. Suggest you try the same!

1 Like

Great, did not know this and never used it yet. Thanks for sharing your workflow, always nice for a newbie like me. Cheers

Awesome, I’ve been looking for this ever since I replaced all smoke detectors in our house with the Nest/Google ones. We’ve had the house a year and most of the detectors were basic ones. I set this up in maybe 5 mins. Longest part was probably downloading and restarting. Now if I can find a way to get Blink cameras to work with live view then I’ll be set. I’ll probably end up wiring my own cameras in before that gets “allowed” through the API or something.

1 Like

The first dialog box has the following error text:


Clicking the “authorize your account” link just closes the dialog box.

Thanks,

Did you copy the whole token, beginning https:// ?

Works like a charm! Finally I can start adding scenario’s to improve our safety when smoke is detected. Thanks!

Does the battery level remains unknown? Or is this updated after a certain time?

Apparently - mine has not been updated. Still, they last for five years…

Hi Mchauhan!

I had the same problem. You installed the stable version. That one no longer works. In HACS click the switch that allows you to show beta versions and download v0.4.0b2. Follow all the installation procedures for Nest Protect from Integrations in HA. The window that will popup will NOT show you the Access Token or the Cookie, both fields will be empty. The first one is the Access Token and the second one is the Cookie. Follow all the steps from the guide carefully and it will work.

Good Luck!

-David

The window that will popup will NOT show you the Access Token or the Cookie, both fields will be empty. The first one is the Access Token and the second one is the Cookie. Follow all the steps from the guide carefully and it will work.

Good Luck!

-David

Hi I had the same problem. You installed the stable version. That one no longer works. In HACS click the switch that allows you to show beta versions and download v0.4.0b2. Follow all the installation procedures for Nest Protect from Integrations in HA. The window that will popup will NOT show you the Access Token or the Cookie, both fields will be empty. The first one is the Access Token and the second one is the Cookie. Follow all the steps from the guide carefully and it will work.

Good Luck!

-David

Hi David, awesome inputs, I manually added the beta version and followed it successfully added two my Nest Protect devices that I have at my home. During integration it gave one more window asking for “Google Account” or “Google Account (Field Test)” but choose the first one, did not know the second one.

Bonus, it discovered my Nest Temperature Sensor that I had in my basement and never thought it will be picked up by the integration.
A big thank you and really appreciate your guidance.
-Mukesh

Hi There,
I went through the steps but encounter an unexpected error
unexpected_error

Glad to hear it worked!

-David

I got the message that v0.4.0b2 was available. So now it works perfect! Thanks!