I don’t understand " make sure you set it by executing the node by injecting the time stamp."
I’m talking about making sure your credentials are set here :
Then to make sure it is used and set , click the inject node at the start of the flow first click on 1 then on number 2 as shown here
I don’t have the blue point on the last photo.
I assume that I only need to change the username and password fields, near the end of the code? I assume these are also the credentials used for the Nissan connect app?
What do you mean you do not have the blue point? Can you post a screen shot?
What’s the output of the debug when you press the inject on the 2 node
it should say something like this or an error

Hi kefjevl, when you say login credentials are not correct, i have used the email address and password used for logging into my Nissan connect app. Is this all I need to change in the Set flow-vars config flow (lines 12 & 13)? This is all I have changed on mine so far…
Hi dam, which credentials did you add into the Set flow page above? Was it your credentials from the Nissan connect app? Did you add anything else, or change anything else? could you send me a screenshot? Looks like you’re connected to the car now 
I used the nissanconnect app credentials.
I didn’t add anything else.
I am not completely connected to the car because a lot of information is missing
This all looks good it found the car so information can be pulled by using the subsequent other flows.
You need the same creds as you use with the Nissan Connect app.
@dam33420 is indeed successfully connected and just need to execute the other nodes in the flow by either triggering it from HA or by test in node red by pushing the consequent timestamp inject
I do not know how to do. Can you explain ?
Not sure what you do not know how to do, but to test the nodes you need to click the highlighted “buttons” below
If it is how to execute this from HA, that will involve in adding a “helper” entity in HA and use the State Node to link it to your flows
In the above example I added a button helper with Name Ariya_Update_Battery_And_Temperature
More info on helpers is here
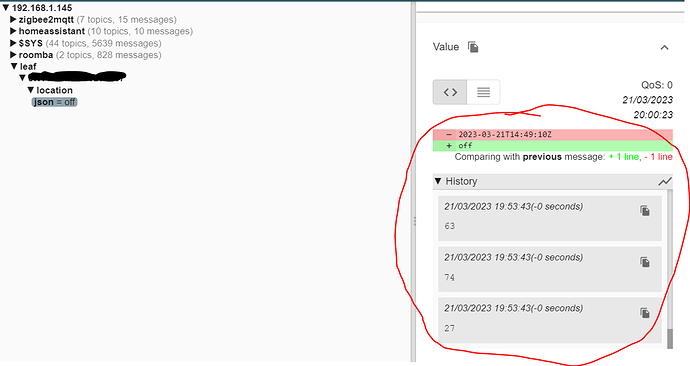
OK so I’m finally getting somewhere wit h this, there was something wrong with my password. After resetting, I’m now communicating with the car, and can see information about battery level, HVAC etc in the debug tool in Node Red, and in the MQTT explorer (although I’m not getting the information displayed as you showed in your github post). It looks like this. The numbers 74 and 27 correspond to my current battery level, and estimated remaining kms  :
:
So now I’d like to ask some help in getting these values into Home Assistant sensors. I’ve managed to create the sensors in my config, and the helpers buttons for updating. I can press the update input buttons, and I see values appear in node red debug, and in MQTT explorer, but my config sensors aren’t getting updated.
Here’s my code (with my VIN removed):
###### ARIYA BATTERY ########
    - name: Ariya_battery_last_updated
      state_topic: "leaf/VIN/batteryStatus/timestamp"
      device_class: timestamp
    - name: leaf_battery_level
      state_topic: "leaf/VIN/batteryStatus/batteryLevel"
      unit_of_measurement: "%"
      device_class: battery
    - name: Ariya_battery_Autonomy
        # Since VIN is not specified, it will represent the state from the first vehicle in the account.
      state_topic: "leaf/VIN/batteryStatus/batteryAutonomy"
      device_class: distance
      unit_of_measurement: "km"
    - name: Ariya_battery_last_updated
      state_topic: "leaf/VIN/batteryStatus/timestamp"
      device_class: timestamp
###### END ARIYA BATTERY ########

###### ARIYA Climate ########
    - name: "Ariya_cabin_temperature"
      state_topic: "leaf/VIN/hVacStatus/internalTemperature"
      device_class: temperature
      unit_of_measurement: "C"

    - name: "Ariya_cabin_temperature"
      state_topic: "leaf/VIN/hVacStatus/internalTemperature"
      device_class: temperature
      unit_of_measurement: "C"
###### END ARIYA Climate ########

###### ARIYA LOCK ########
    - name: "Ariya Sunroof state"
      state_topic: "leaf/VIN/LockStatus/sunroofStatus"
    - name: "Ariya_Lock_state"
      state_topic: "leaf/VIN/LockStatus/lockStatus"

    - name: "Ariya_Lock_state_LastUpdate"
      state_topic: "leaf/VIN/LockStatus/lastUpdateTime"
      device_class: timestamp
###### END ARIYA LOCK ########

  binary_sensor:
    - name: Ariya_plugged_Status
      state_topic: "leaf/VIN/batteryStatus/plugStatus"
      payload_on: "1"
      payload_off: "0"
    - name: Ariya_charging_Status
      state_topic: "leaf/VIN/batteryStatus/chargingStatus"
      payload_on: "1"
      payload_off: "0"
Any help would be greatly appreciated, as I’m nearly there!
Where did you create the sensors? Did you add them to the Configuration.yaml under the MQTT section?
is your MQTT broker configured in HA? Are there any errors showing in the Logs of HA?
I do not see the values in your MQTT explorer I just see location if all data is send and available on the MQTT topic it should look like this 
I added the code posted above into my configuration.yaml fine, under the mqtt section (which I already had for my WiFi hacked Roomba).
My broker is set up, as I’ve been using my WiFi hacked Roomba, and a zigbee2mqtt blind opener for some time. These can be seen in the picture below
In your mqtt node in Node Red, how exactly have you configured the topic? Could you please send some screenshots of all the changes you have made? I’ve added leaf\VIN\location\json as the topic, but this could be wrong (I’m still not that great with mqtt, or node red).
I’ve not added anything to the messages section, only the first dialog as shown above.
You should not have changed anything in the topic, this gets set in the function nodes, you need to leave the topic empty in this configuration
Thanks, that was the missing piece! All is working now, as far as I can see (although missing battery %, but likely my sensor code).
Thanks for all your help 
It also works for me except for the battery.


