Yeah, I have an ESP 12-F here I will try in place of it. Hopefully it works 
Hi everyone, I just bought a Kogan Smart Kettle, and I’m trying to get Tasmota running on it. I wouold prefer ESPHome since I’m more familiar with it, but I’ll go with Tasmota since people have already shared a template for it.
I initially just wanted to get it working in Home Assistant through the Tuya integration, using the cloud Tuya Smart app. I added the device, but then it didn’t show up as a supported device. I ran this tuyaha discovery script with my credentials: tuyaha/debug_discovery.py at 41848be7f429191bd650d34a282379cbd3c6f610 · PaulAnnekov/tuyaha · GitHub
Got devices
{   'header': {'code': 'SUCCESS', 'payloadVersion': 1},
    'payload': {'devices': [], 'scenes': []}}
So it looks like Tuya’s home assistant integration doesn’t support these smart kettles.
Next, I tried to flash it OTA using tuya-convert, but I got the dreaded “firmware is too new” error:
Your device's firmware is too new.
Tuya patched the PSK vulnerability that we use to establish a connection.
You might still be able to flash this device over serial.
I think that’s my fault since I allowed it to connect to WiFi and update to the latest firmware. I’m a bit nervous about hacking kitchen appliances with custom firmware, since it involves high temperatures and voltages, so I would have preferred to get something working the safe way (in Tuya Smart.)
I’ve previously been able to flash a TYWE3S chip over serial using a Raspberry Pi. This was for a Brilliant Smart WiFi Powerboard 20691/05 where the firmware was also too new.
So I managed to pop open the case and get access to the TYWE3S chip:
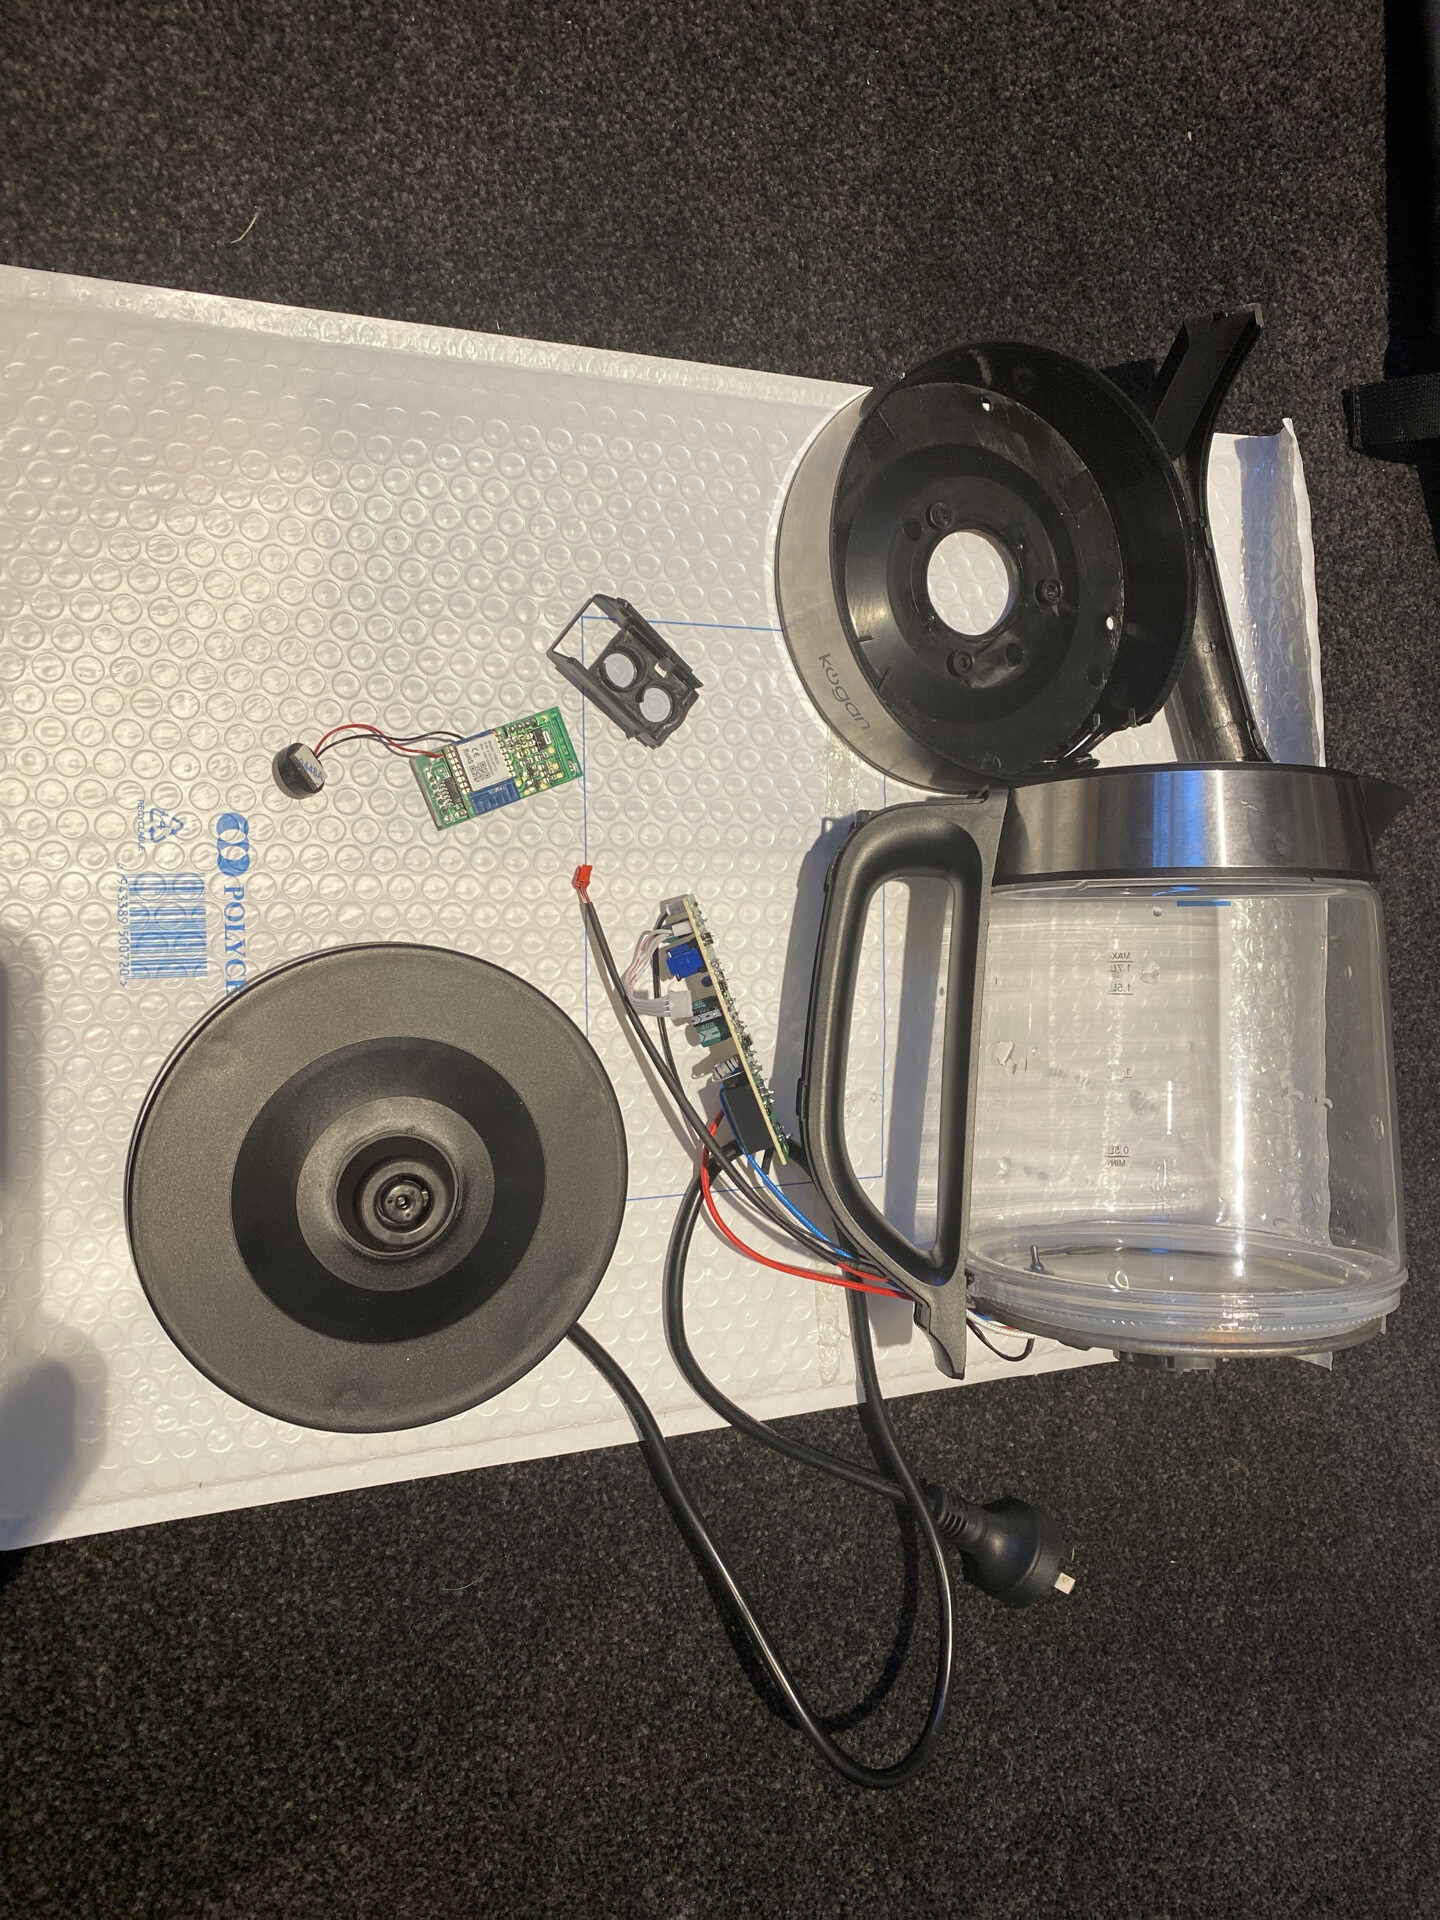
Unfortunately this time I had some problems with my soldering iron and I struggled to solder on the jumper wires. I also had some unsuccessful attempts with using blutack, tape, etc. Hopefully I haven’t damaged the chip during my attempts. But I’ve got a better soldering iron being delivered early next week, plus some flux, and things to keep the tip clean. So I’ll give it another shot.
I just have some questions about Tasmota and how this works. Does anyone know if the buttons and display will still work after I flash the custom firmware? I’m worried that these are controlled by the original firmware that was running on the ESP8266 chip. I.e. Flashing Tasmota will delete the original firmware, and then there won’t be any code that knows about the buttons and display.
What is the “TuyaMCU module”, and how do the TuyaMCU 11,1 and TuyaSend4 102,0 commands work (e.g. for the Keepwarm function)? Is there a separate microcontroller somewhere that manages the display and buttons and handles all of the boiling / Keepwarm logic? (Is this a separate “MCU” chip?)
Thanks for your help!
EDIT: I think this explains it! MCU Low-Code Development | Tuya Smart

So we can update the “Cloud Module Firmware” to Tasmota, while the custom MCU firmware stays the same and continues managing the kettle functions (including the display and buttons.)
I suppose I will just need to figure out how to “ground the nreset line” to turn off the MCU while I’m flashing the TYWE3S. Does anyone know how to do that for this kettle?
EDIT 2: I just saw this message: Kogan Smart Kettle - #40 by rabbit-aaron
That sounds like a great idea to desolder the 4 pins and separate the two boards. I will do that.
No, the buttons and everything all still work after you flash a new firmware. In fact the ESP module doesn’t drive the kettle direct: there is a separate MCU, which does all the internal logic, and controls the relay, light, temperature display, etc. This MCU then just talks to the ESP over the UART bus (a text-based serial link).
Precisely.
1 Like
Success! I was able to desolder the 4 pins to separate the MCU chip, and then soldered some leads to flash the TYWE3S chip over serial (just using Raspberry Pi GPIO.)

I also thought it would be fun to fork Tasmota and add a little /bc API endpoint (short for “brew coffee”). This responds with “418 I’m a teapot”. From 418 I'm a teapot - HTTP | MDN
The HTTP
418 I'm a teapotclient error response code indicates that the server refuses to brew coffee because it is, permanently, a teapot.
Tasmota commit on GitHub: Respond to /bc ("brew coffee") endpoint with 418 I'm a teapot · ndbroadbent/Tasmota@bbcf57f · GitHub
~/code/Tasmota $ curl -v 192.168.1.113/bc
*   Trying 192.168.1.113...
* TCP_NODELAY set
* Connected to 192.168.1.113 (192.168.1.113) port 80 (#0)
> GET /bc HTTP/1.1
> Host: 192.168.1.113
> User-Agent: curl/7.64.1
> Accept: */*
>
< HTTP/1.1 418
< Content-Type: text/plain
< Content-Length: 12
< Connection: close
<
* Closing connection 0
I'm a teapot
1 Like
I think the “Keep Warm” commands are wrong in this Tasmota template page: Kogan 1.7L Smart Glass Kettle (KASMCDSKTLA) Template for Tasmota
(Or maybe they’ve changed in the latest MCU firmware.)
I’ve been doing some debugging with the kettle buttons / display and the MQTT messages, and I can see that “00” actually corresponds with 40 degrees, and “05” means that Keep Warm is off. So here are the updated TuyaSend4 commands for my kettle (shifted up one, with “off” at the top now):
-
TuyaSend4 102,0Keepwarm 40c -
TuyaSend4 102,1Keepwarm 50c -
TuyaSend4 102,2Keepwarm 60c -
TuyaSend4 102,3Keepwarm 80c -
TuyaSend4 102,4Keepwarm 90c -
TuyaSend4 102,5Keepwarm off
Also found a “bug” in the Node-RED flow from LiquidSunset - Kogan Smart Kettle - #29 by LiquidSunset
(or at least an undesired behavior for me)

The issue is with the “Kettle turns off” event. This goes to the “Off” node, which sets the kettle mode input select to “Off”. This then triggers the action above (“Kettle mode input_select”), and this then sends the “off” command to MQTT and also turns off the keep warm function. So every time the kettle stops boiling, the keep warm function is turned off (because of the way the input_select is also being updated and triggering further events.)
I’m not too sure how to fix that. I think I could add a new sensor or variable to keep track of the “KeepWarm” state separately, and then add some extra logic after the “Kettle turns off” event so it reverts back to the correct option (instead of just Off)
Interesting. Perhaps they’ve changed the config for the firmware on the MCU since last year.
Yes, sorry! We don’t really use the keep-warm function, so it was an acceptable compromise for me. Good luck coming up with a solution. I have an idea to produce an ESPHome config for this device based on the one which @simondotau produced for the Anko kettle, but I’ll need to time that carefully as the Kogan model is our main kettle, and significant downtime would be catastrophic in this house!
1 Like
Would you mind showing the full code for this? I’m just trying to setup my kettle (the stainless steel version, not the glass one) putting together bits from this thread. (I have successfully chip-swapped the kettle with an ESP12F)
Cheers
like the photos you DID
what about doing this

just need to check the foot print (pin out see if they in same place.)
or you could PUST you luck
send it to @digiblur he mite do A video on it and mite send it back to you when done
I’ve already completed the chip swap. I pulled the WR1 out and put an ESP12F in there, flashed with Tasmota. The pin out wasn’t the same so I just used some short wires.
I just need to get teh temp setting options and the temp sensor working as the code posted above and on the Blackadder page don’t work with this model kettle (the stainless steel one rather than glass). Any tips on trying to find the correct settings would be great.
Not sure if this will help you - but I think it might.
I assume for the Temp settings you need to identify which dpId the chip is using etc?
If so, then you can do this using this really useful Tuya helper for tasmota:
There is a video showing what is does here:

These notes from Tasmota then help you create the template/ MCU settings to get what you want:
I used this about 18 months ago to map out a 21 speed fan I had flashed with Tasmota.
Attached is what it looks like when I run it on the original kogan kettle that I have (Temp is integer 5)
Hope this helps.

Thanks for linking to that helper. That sorted out which dpid I needed for the temperature sensor, however the sensor entity in HA is still showing ‘unknown’ so I don’t know what the issue is there.
Using the helper and turning on the kettle I was able to what the value for DpId 2 go up from room temp to 100 as the water boiled.

Using ‘2’ in the previously provided sensor config isn’t working for me though:
sensor:
  - platform: mqtt
    name: "Kettle Temperature"
    state_topic: "tele/tasmota_825BAE/RESULT"
    value_template: >
      {% if 2 == value_json.TuyaReceived.DpId %}
        {{ value_json.TuyaReceived.DpIdData | int(base=16) }}
      {% else %}
        {{ states('sensor.kettle_temperature') }}
      {% endif %}
    unit_of_measurement: '°C'
giving me ‘unknown’:
![]()
Any ideas?
I’ve also figured out that DpId 8 corresponds to the temperature setting that can be selected (70, 80, 90 or 100C) but not sure how to sort that out with the input_select and automation to send that temp setting request to the kettle (again, the settings for the glass kettle don’t work for this stainless one).
This is the temperature sensor I use for the original kettle:
  - platform: mqtt
    name: "Kettle temperature"
    state_topic: "tele/Kettle/RESULT"
    unique_id: "kettle_temperature"
    value_template: >
      {% if 0 <= value_json.TuyaReceived.DpType2Id5 <= 100 %}
         {{ value_json.TuyaReceived.DpType2Id5 }}
      {% else %}
        {{ states('sensor.kettle_temperature_a') }}
      {% endif %}
    unit_of_measurement: '°C'
I wonder if this would work if you change DpType2Id5 to DpType2Id2? (And changing the topic as well)
Legend! That works. Any idea on sending the temp setting to the kettle?
Glad to hear it worked.
I don’t use the ‘keep warm’ settings. But I have a copy of my old settings that do work.
Input select
  set_kettle:
    options:
      - 'Keepwarm off :102,0'
      - 'Keepwarm 40c :102,1'
      - 'Keepwarm 50c :102,2'
      - 'Keepwarm 60c :102,3'
      - 'Keepwarm 80c :102,4'
      - 'Keepwarm 90c :102,5'
Automation
- id: '4444'
  alias: Kettle - Set Temp
  description: ''
  trigger:
  - entity_id: input_select.set_kettle
    platform: state
  condition: []
  action:
  - service: mqtt.publish
    data_template:
      topic: cmnd/Kettle/TuyaSend4
      payload: '{% set dta = trigger.to_state.state %} {{dta.split('':'')[1]}}
        '
  mode: single
If you cannot tell maybe play around with 102 (try 12 or 15) and TuyaSend4 to see if you can work out which one works.
Good luck.
BTW - I have these set up for over a year and so cannot credit the original poster, or remember what I did to configure them to my own settings. Sorry for not crediting someone if I should be.
Dave
If I set the temp to keep warm on the kettle there is a corresponding RESULT in the console.
On the attached image you can see the RESULT when I set the kettle to Keep warm 60 (setting 3) and then 80 (setting 4).
You can also see that this is results in the sequence DpType4Id102":3,"102"
Which I think corresponds to the variables:
DpType4 = TuyaSend4
Id102":3 = 102,3
(and then also Id102":4 for 80c)
If you set the keep warm temp on your kettle, and then look in the Tasmota console this should give the commands you need.

I didn’t have much luck trying to capture the console messages for each button. I’m not really worried about it to be honest but I will probably try to figure it out at some point just so the config is complete.
Cheers for your help
1 Like
Hi @sparkydave,
I just opened mine up last night - found the WR1 chip - and then found this post.
I had some luck controlling the kettle via LocalTuya, and this is what i was able to determine in terms of DP mappings:
1 - Power [true/false]
2 - Temperature Sensor [0 to 100]
8 - Target Temperature [0 to 100]
13 - Keep Warm function [true/false]
14 - Keep Warm Time (Mins) - [0-360]
15 - Status
16 - Boil mode [temp_setting/boiling_quick] (i.e. temp_setting = normal mode, boiling_quick = boil, then cool to target temperature)
I’m sure i had some more detail on the other DPs… but for the life of me I can’t find my notes.
Do you have any details about how you approached the WR1 → ESP chip replacement (I.e. what wires had to be shorted)?
1 Like
Thanks for the DP mappings. Any idea what payloads need to be sent for the function controls?
For the chip swap I simply wired the ESP12F to my USB-UART:
RX-TX
TX-RX
Vcc-3.3V
GND-GND
then on the chip:
GPIO15-GND
GPIO0-GND
EN-Vcc
Once I loaded Tasmota onto the ESP I removed the GPIO-GND connection and left the EN and GPIO15 connections. I wired the TX and RX of the ESP to the same points that the WR1 had it’s TX and RX on the PCB. Since the pinout is not the same (nor the same size chip) as the WR1 I simply used short wires between the chip and PCB. It wasn’t pretty so I dind’t take any photos. I wrapped a bit of plastic around the ESP so it couldn’t short out on anything as the whole thing was reassembled.
Not 100% sure on the DP16 modes - On the original tuya chip, you sent a strin, but i’m guessing it got mapped to an enumeration. Still trying to reverse engineer it. So far have temp control + keep warm. That boil mode is the last main part of the puzzle. Also trying to figure out what DP15 and the other ones mean.
Thanks for the tips re the wiring - i had mine all ready to go, but missed the EN-VCC and the GPIO15-GND connections. After i re-read your post and fixed it it all went smoothly.
Those WR1 addon boards are just VCC, GND, TX and RX connections to the main PCB.
You can easily replace them with a NodeMCU, Wemos D1 mini or ESP-15F board without any soldering. Perhaps just some wire cutting and twisting to attach dupont cables.